
USER MANUAL
READ THIS MANUAL CAREFULLY BEFORE USING
LESEN SIE DIESE ANLEITUNG VOR DEM GEBRAUCH SORGFÄLTIG DURCH
LEA ATENTAMENTE ESTE MANUAL ANTES DE UTILIZARLO
LIRE CE MANUEL AVEC ATTENTION AVANT DE L’UTILISATION
LEGGERE ATTENTAMENTE QUESTO MANUALE PRIMA DELL’USO
LEES DEZE HANDLEIDING AANDACHTIG DOOR VOOR GEBRUIK
LEIA CUIDADOSAMENTE ESTE MANUAL ANTES DE O UTILIZAR
09240090
09240130
DISHWASHER
MODEL:


INSTRUCTION MANUAL FOR DISHWASHERS
Page 1 of 14
UK
TRANSLATION FROM THE ORIGINAL INSTRUCTIONS
CONTENTS
CHAP 1 RISKS AND IMPORTANT WARNINGS ...................................................................... 2
1.1 NORMAL OPERATING CONDITIONS ...................................................................................... 3
CHAP 2 PREFACE ................................................................................................................... 4
CHAP 3 INSTALLATION .......................................................................................................... 4
3.1 UNPACKING ...................................................................................................................... 4
3.2 POSITIONING ..................................................................................................................... 4
3.3 ELECTRICAL CONNECTION .................................................................................................. 5
3.4 WATER CIRCUIT HOOKUP ................................................................................................... 6
3.5 CONNECTION TO THE DRAIN LINE ........................................................................................ 6
3.6 RINSE AID AND DETERGENT ................................................................................................ 6
CHAP 4 USING THE MACHINE................................................................................................ 7
4.1 KEY AND SYMBOLS ............................................................................................................ 7
4.2 SWITCHING THE DISHWASHER ON ....................................................................................... 7
4.3 FILLING THE RACK ............................................................................................................. 7
4.4 CYCLE SELECTION AND START-UP ...................................................................................... 8
4.4.1 Under-counter dishwashers ............................................................................... 8
4.4.2 Hood dishwashers ............................................................................................. 8
4.5 CONTINUOUS WASHING (*OPTIONAL) .................................................................................. 8
4.6 REMOVING THE INTEGRAL FILTER ....................................................................................... 8
4.7 EMPTYING THE DISHWASHER .............................................................................................. 8
4.7.1 Appliances with no drain pump .......................................................................... 8
4.7.2 Appliances with drain cycle (*optional) ............................................................... 8
4.8 TURNING THE DISHWASHER OFF ......................................................................................... 9
4.9 RESIN REGENERATION (*OPTIONAL) .................................................................................... 9
4.10 DISPLAYING INFORMATION ................................................................................................. 9
4.11 LIST OF VIEWABLE MESSAGES ............................................................................................ 9
4.12 END OF SHIFT.................................................................................................................... 9
CHAP 5 MAINTENANCE ........................................................................................................ 10
5.1 GENERAL RULES ............................................................................................................. 10
5.2 CLEANING ....................................................................................................................... 10
5.3 CLEANING THE FILTER UNIT .............................................................................................. 10
5.4 CLEANING THE ARMS ....................................................................................................... 10
CHAP 6 SELF DIAGNOSTICS ................................................................................................ 11
CHAP 7 SETTINGS................................................................................................................. 12
7.1 NUMBER OF CYCLES TO REGENERATE RESINS ................................................................... 13
CHAP 8 SCRAPPING ............................................................................................................. 13
CHAP 9 ENVIRONMENT ........................................................................................................ 13
In legal terms, the manufacturer reserves the property of this document. It is forbidden to reproduce it or divulge it with any means
without prior written authorisation.
The manufacturer reserves the right to introduce changes in order to achieve the improvements it deems necessary without prior notice.
442489 D REV02 01-05-2019 U UK
MAXIMA - NIJVERHEIDSWEG 23 A/D - 3641 RP MIJDRECHT
THE NETHERLANDS - +31 (0) 297 253 969
WWW.MAXIMA.COM - INFO@MAXIMA.COM

INSTRUCTION MANUAL FOR DISHWASHERS
Page 2 of 14
UK
Read the instruction manual carefully before starting the machine. The
warnings contained in the manual provide important information on safety and
installation, use and maintenance. Failure to observe the instructions in the
enclosed documentation may compromise the safety of the appliance and
immediately voids the warranty.
Chap 1 RISKS AND IMPORTANT WARNINGS
This appliance is intended solely for the use for which it was designed. Any
other use is improper and therefore hazardous.
The specialised technician responsible for installing the appliance must
instruct the user on its operation and any attendant safety measures,
including practical demonstrations.
Only the manufacturer or an authorised service centre with qualified staff may
work on the machine, even in case of malfunction, using only original spare
parts.
Always disconnect or isolate the machine from its power and water supplies
before servicing, repairing or cleaning it.
The machine may NOT be used by persons untrained in its use.
The appliance may be used by children aged at least 8 years old or persons
with reduced physical, sensory or mental capacities, or with no experience or
knowledge,
provided they are supervised or after they have received training
in the safe use of the appliance.
Children must not play with the appliance.
Cleaning and maintenance by the user must not be performed by
unsupervised children.
The machine must NOT be kept powered up when not in use.
If the machine is not fitted with a plug or other device for completely
disconnecting all contacts, these disconnection devices must be incorporated
in the power supply, in compliance with the installation rules.
If the power
cable is damaged, it must be replaced by the manufacturer or an
authorised technical assistance service, or in any case by a person with
similar qualifications, to prevent all associated risks.
The screw on the appliance marked with the IEC 60417 standard
symbol
5021 represents the equipotential connection.
NEVER open the machine quickly if it has not completed its cycle.
NEVER
use the machine with the guards installed by the manufacturer
removed.
NEVER use the machine to wash objects of any form, size
or material not
guaranteed to be machine-washable or not in good condition.
NEVER
use the machine or any of its assemblies as steps or support for
persons, property or animals.
NEVER overload the open door of front-
loading machines, which is rated only
to support the basket loaded with dishes.
MAXIMA - NIJVERHEIDSWEG 23 A/D - 3641 RP MIJDRECHT
THE NETHERLANDS - +31 (0) 297 253 969
WWW.MAXIMA.COM - INFO@MAXIMA.COM

INSTRUCTION MANUAL FOR DISHWASHERS
Page 3 of 14
UK
NEVER place your bare hands in the wash solution.
NEVER overturn the machine after it has been installed.
If you notice any malfunction or fluid leak, immediately disconnect the power
supply and shut off the water supply.
Do not install the dishwasher in the vicinity of heat sources over 50°C.
NEVER
leave the dishwasher exposed to the weather (rain, direct sunlight,
etc.)
The dishwasher may not be installed outdoors without proper cover.
Never start a wash programme without the overflow in the tub, as applicable.
Never place magnetic objects in the vicinity of the machine.
Do not use the top of the machine as a table or support.
The installer is responsible for checking that the grounding system is fully
operational.
At the end of testing, the installer must issue a written declaration stating that
the machine has been installed and tested in accordance with established
legislation and good practice.
DO NOT change the position or tamper with the elements of the machine
, as
this could compromise the machine safety.
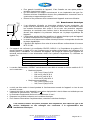
Noise pressure level according to EN ISO 4871
o LpA Max = 55db Kpa=2.5db for undercounter versions
o LpA Max = 65db Kpa=2.5db for hood versions
o LpA Max = 76db Kpa=1.5db for utensil washer versions
Max inlet water temperature: 50°C
Max inlet water pressure: 4bar (400kPa)
Appliance designed for permanent connection to the water supply
Do not clean the appliance with steam or water jets.
Max loading height
o On the ground in the versions with overflow
o Maximum height 1 m in versions with discharge pump
1.1 Normal operating conditions
Ambient temperature: 40°Cmax /4°Cmin (average 30°C)
Altitude : up to 2000 metres
Relative humidity : Max 30% at 40°C / max 90% at 20°C
MAXIMA - NIJVERHEIDSWEG 23 A/D - 3641 RP MIJDRECHT
THE NETHERLANDS - +31 (0) 297 253 969
WWW.MAXIMA.COM - INFO@MAXIMA.COM

INSTRUCTION MANUAL FOR DISHWASHERS
Page 4 of 14
UK
Chap 2 PREFACE
Warnings:
Keep
all documentation in the vicinity of the appliance; make it available to the technicians and
operators charged with operating it and
keep it in good condition in a safe place, along with
extra copies for frequent reference
The operator must read, understa
nd and familiarise himself with the contents of this
manual before working on or with the appliance.
The appliance is intended solely for professional heavy duty dishwashing applications and must
be installed, operated and serviced only by qualified person
s according to the manufacturer's
instructions.
Warranty:
The manufacturer is not liable for any damage or injury resulting from failure to observe the
instructions or improper use of the machine
Failure to observe the instructions in the enclosed docum
entation may compromise the safety of
the appliance and immediately voids the warranty
Installation and repair by unauthorised technicians and the use non-
original spare parts
immediately void the warranty.
Storage:
Transport and storage: -10°C to 55°C with peaks up to 70°C (for no longer than 24 hours)
Chap 3 INSTALLATION
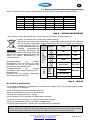
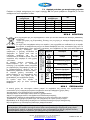
Proper installation is essential to the good operation of the appliance. Some of the data required for
installation of the appliance are given on the nameplate on its RH body panel, and a co
py is included
on the cover page of this manual.
The appliance may only be installed by qualified persons authorised to do so.
For Australia and New Zealand this machine must be installed in accordance with
AS/NZS3500.1 and PCA.
3.1 Unpacking
Check the condition of the packaging, and note any evident damage on the shipping bill. Remove the
packaging and check that the appliance is in good condition; immediately report any damage to the
reseller and the shipping agent by fax or registered l
etter with return receipt. If the damage is such as to
compromise the safety of the appliance, do not install or operate it until it has been inspected by a
qualified technician.
The packaging (plastic bags, expanded polystyrene, nails, etc. ) are hazardous and
must not be left within the reach of children or pets.
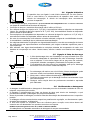
3.2 Positioning
•
Check that there are no objects or materials in the installation area which may
be damaged by the steam emitted by the applia
nce during operation, or if there
are, make sure they are properly protected.
•
Before positioning the appliance, set up the electrical power supply, water
supply and drain connections.
• For flush-mounting single panel machines, leave a space of at least 10 m
m
between the machine walls and the adjacent surfaces.
• The floor or build-in unit must be rated to support the weight of the appliance
• To ensure that it is stable, level the appliance with its four feet.
• The appliance is intended for fixed installation onl
y; any other approaches must
be agreed with and approved by the manufacturer.
MAXIMA - NIJVERHEIDSWEG 23 A/D - 3641 RP MIJDRECHT
THE NETHERLANDS - +31 (0) 297 253 969
WWW.MAXIMA.COM - INFO@MAXIMA.COM

INSTRUCTION MANUAL FOR DISHWASHERS
Page 5 of 14
UK
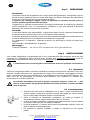
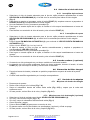
Remove the protective film from its body panels before operating the
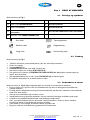
dishwasher.
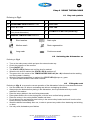
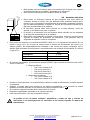
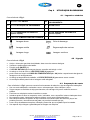
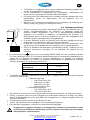
Mod.
V~
Hz
kW
A
S/N
H
2
O
kPa
°C
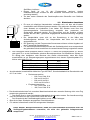
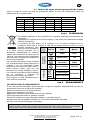
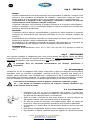
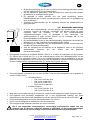
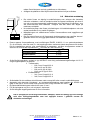
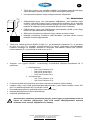
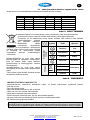
3.3 Electrical connection
The power supply must be fitted with a om
nipolar circuit breaker (master power
switch) to break all contacts including neutral, with a contact gap of at least 3
mm and thermal cutout or fuses, which must be set or rated to the power
indicated on the machine's nameplate.
The master power switch mu
st be fitted to the power line in the vicinity of the
installation and may be connected to only one machine at a time.
The mains voltage and frequency must match the nameplate ratings.
The installation must include a grounding system conforming with establ
ished
electrical safety legislation, to protect the operator and the appliance itself
This appliance conforms to EN/IEC 61000-3-11 certification if the system impedance Z
sys
is less
than or equal to Zmax in the point of interface between the user’s supply
system and the public
system. The installer or appliance user is responsible for checking that the appliance is connected
exclusively to a supply with system impedance Zsys less than or equal to Zmax
Zmax
Utensil washers
0.21 Ω
Hood
0.24 Ω
Undercounter
0.41 Ω
The power cable, which must be exclusively type H07RN-
F with current capacity at 60°C on the
cable:
Three-phase machine
o -5x2.5 mm^2 up to 20 A
o -5x4 mm^2 up to 30 A
o -5x6 mm^2 up to 38 A
o -5x10 mm^2 up to 54 A
Single-phase machines
o -3x1.5 mm^2 up to 16 A
o -3x2.5 mm^2 up to 25 A
Must not be stretched or crushed during normal operation or routine maintenance.
The appliance must also be connected to an equipotential system,
connected by a screw marked
by the symbol 5021 - IEC 60417.
The equipotential cable must have a cross section of 10 mm².
Respect the polarities indicated in the wiring diagram.
For further information, refer to the wiring diagram.
Do not use multi-sockets, adapters, cables of an inadequate cross section or type or
with extensions not conforming to established electrical installation regulations.
MAXIMA - NIJVERHEIDSWEG 23 A/D - 3641 RP MIJDRECHT
THE NETHERLANDS - +31 (0) 297 253 969
WWW.MAXIMA.COM - INFO@MAXIMA.COM

INSTRUCTION MANUAL FOR DISHWASHERS
Page 6 of 14
UK
3.4 Water circuit hookup
The appliance must be connected to its water supply with a flexible hose. A
shut off valve (cock) must be
installed between the water supply line and
the appliance's solenoid valve. The cock must be close to the appliance.
The water supply, temperature and pressure must be compatible with the ratings shown on the
technical data plate on the machine.
Make sure that the water supply flow rate is no less than 20 l/min
If the water hardness is greater than 14 °f (8 °dH), we recommend using an internal water softener.
If the water hardness is greater than 35 °f (19.5 °dH), install an external water softener upline of
the solenoid valve
For machines without water softener: if the water hardness is greater than 14 °f (8 °dH), install an
external water softener upline of the solenoid valve.
If the water has a very high residual concentration of high conductivity minera
ls, we recommend
installing a demineralisation system.
Machines intended for use with desalinated water or in any case with high sodium chloride
concentration must be ordered specifically, as they require specific construction materials
Do not supply fully
demineralised water to machines with a heat recovery unit with batteries with
copper pipes. In this case, request the version with batteries with stainless steel pipes.
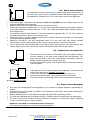
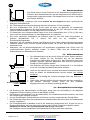
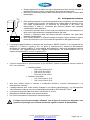
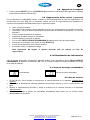
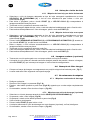
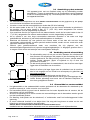
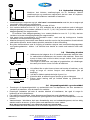
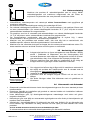
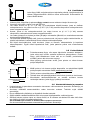
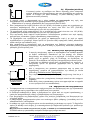
Free drain
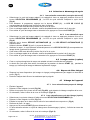
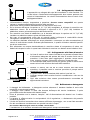
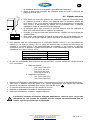
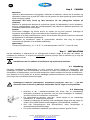
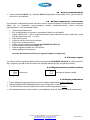
3.5 Connection to the drain line
The drain line
must consist of a free drain sump with siphon suited to
the flow capacity of the drain hose supplied with the appliance. The
hose must be able to reach the sump without stretching, restriction,
folding, crushing, pressing or forcing in any way.
The tub drains under gravity, so the drain sump must be lower than the
machine's base.
Max.
1 m
With pump (available on request)
if the drain is not lower than the base of the appliance, you can use the
version with drain pump (available on request).
In this case, the drain connection may be no higher than 1 m.
Always check that the drain works properly and is not blocked.
Any other solution must be approved by the manufacturer in advance.
3.6 Rinse aid and detergent
The rinse aid and detergent are d
ispensed by the machine's integral dispenser (depending on
model).
The dose is set by the installer in relation to the hardness of the water, and he also calibrates the
dispensers themselves.
Before calibrating them, fill the dispenser supply tubes with their respective product.
The units are calibrated with the adjuster screws, or directly with the control panel (as applicable).
The level of fluid in the container must be sufficient for priming; do not allow it to drain completely
or top it up with corrosive or impure product.
NEVER use CHLORINE or HYPOCHLORITE based detergents.
We recommend installing an automatic detergent dispenser.
MAXIMA - NIJVERHEIDSWEG 23 A/D - 3641 RP MIJDRECHT
THE NETHERLANDS - +31 (0) 297 253 969
WWW.MAXIMA.COM - INFO@MAXIMA.COM

INSTRUCTION MANUAL FOR DISHWASHERS
Page 7 of 14
UK
Chap 4 USING THE MACHINE
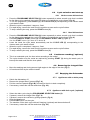
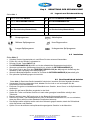
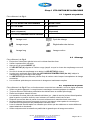
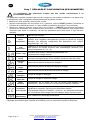
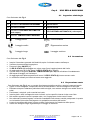
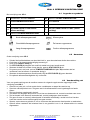
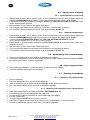
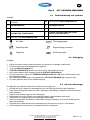
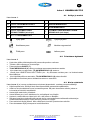
4.1
Key and symbols
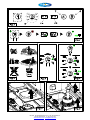
Referring to Fig.1:
1
ON/OFF LED AND BUTTON
4b
RINSE TEMPERATURE DISPLAY
2
PROGRAMME SELECTION BUTTON
5
CYCLE LED
3
START BUTTON
6
STATE LED
4
AUTOMATIC START BUTTON
( Only Hood dishwasher )
7 AUTOMATIC START LED (hood only)
4a
WASHING TEMPERATURE DISPLAY
Short washes
Drain cycle
Medium wash
Resin regeneration
Long wash Continuous wash
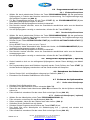
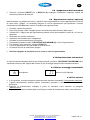
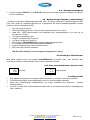
4.2 Switching the dishwasher on
Referring to Fig.2
Turn on the main power switch and open the external water tap.
Check the presence of the overflow.
Press ON/OFF (1).
The STATE LED (6) flashes red until the level is reached.
When the tub level is reached the STATE LED (6) switches off.
The green dot in the corner of the TEMPERATURE DISPLAY (4a - 4b) indicates that the washing
nor rinsing water is heating..
When the working temperature is reached, the STATE LED (6) stays on, green.
The optimal wash conditions have been reached.
4.3
Filling the rack
Referring to
Fig. 3
,
to ensure the correct operation of the dishwasher follow the rules described below:
Use a suitable rack, fill without overloading and without overlapping the dishes.
Always wipe the dishes before placing in the dishwasher; do not put dishes with dry or solid
residues in the washer.
Place the empty dishes in the rack facing downwards.
Place plates and the like in the sloping rack, with the inner surface facing upwards.
Place the cutlery in the cutlery basket, handle end down.
Do not place silver and stainless steel cutlery in the same cutlery basket as this will turn the silver
brown and may corrode the steel.
Wash the dishes immediately after use, in order to prevent any residue from hardening and sticking
on them.
Use only solid, dishwasher-proof dishes.
MAXIMA - NIJVERHEIDSWEG 23 A/D - 3641 RP MIJDRECHT
THE NETHERLANDS - +31 (0) 297 253 969
WWW.MAXIMA.COM - INFO@MAXIMA.COM

INSTRUCTION MANUAL FOR DISHWASHERS
Page 8 of 14
UK
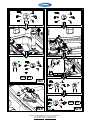
4.4
Cycle selection and start-up
4.4.1 Under-counter dishwashers
Press the PROGRAMME SELECTION (2)
button repeatedly to select a wash cycle that is suitable
for the dishes to be washed; the cycle LED lights up to indicate the cycle chosen (Fig. 4).
To run the programme, press START (3); the CYCLE LED (5)
corresponding to the chosen wash
cycle starts to flash.
When the cycle is completed, it stays on, fixed.
For rapid drying, remove the rack from the machine as soon as the cycle finishes.
To stop a wash cycle early, press the START button (3).
4.4.2 Hood dishwashers
Press the PROGRAMME SELECTION (2)
button repeatedly to select a wash cycle that is suitable
for the dishes to be washed; the cycle LED lights up to indicate the cycle chosen (Fig. 4).
Press AUTOMATIC START button (4), the AUTOMATIC START LED (7) lights up
Use the START button (3) if there is no button 4.
Lower the hood; the cycle starts automatically and the CYCLE LED (5) corresp
onding to the
chosen wash cycle starts to flash.
When the cycle is completed, it stays on, fixed.
For rapid drying, remove the rack from the machine as soon as the cycle finishes.
To stop a wash cycle early, press the START button (3).
4.5
Continuous washing (*optional)
This is an extended cycle; the time varies according to the model.
The cycle duration may be varied as required by pressing START (3)
during the wash cycle, to
interrupt the wash and start the rinse phase.
4.6 Removing the integral filter
Move the washing and rinsing arms at right angles to the edge of the door (Fig.7).
Lift each semi-filter by the relative handle.
4.7 Emptying the dishwasher
4.7.1 Appliances with no drain pump
Switch the dishwasher off.
Remove the integral filter if present (Fig.7 A).
Pull the overflow upwards (Fig.8 B), and wait for the tub to drain completely.
If necessary, extract the tub filter and clean (Fig. 8 C).
4.7.2 Appliances with drain cycle (*optional)
Select the drain cycle using the PROGRAMME SELECTION button (2).
If present, remove the integral filter (Fig.7 A).
If present, remove the overflow by pulling upwards (Fig. 9).
Close the door/hood.
Press START (3) to run the cycle.
The machine runs a drain cycle with self-cleaning (*optional) and then switches off.
If necessary, extract the tub filter and clean (Fig. 8 C).
MAXIMA - NIJVERHEIDSWEG 23 A/D - 3641 RP MIJDRECHT
THE NETHERLANDS - +31 (0) 297 253 969
WWW.MAXIMA.COM - INFO@MAXIMA.COM

INSTRUCTION MANUAL FOR DISHWASHERS
Page 9 of 14
UK
4.8 Turning the dishwasher off
Press ON/OFF (1), on the DISPLAY (4)
the central segments will light up, indicating that the
machine is powered.
4.9
Resin regeneration (*optional)
On machines with an internal softener, when the regeneration cycle led lights up red (Fig. 11
) you need
to run a regeneration cycle to restore proper function of the internal softener. Proceed as follows:
Empty and clean the dishwasher.
Remove the integral filter and open the salt container in the tub.
Pour in 250-300g of regeneration salt (1or 2mm grain size kitchen salt with no additives).
Close the container firmly.
Make sure the overflow has been removed
Close the door and switch the dishwasher on.
Press the PROGRAMME SELECTION button (2) to select the regeneration cycle.
Press the START button (3) to start a cycle.
The regeneration cycle lasts around 20 minutes.
The dishwasher will switch off when the cycle has completed.
N.B. Do not switch off the machine if a regeneration cycle is underway
4.10 Displaying information
With the machine on, hold the PROGRAMME SELECTION button (2) down for five seconds until “CC
”
appears, followed by the number of wash cycles carried out during the machine life.
4.11 List of viewable messages
Door open
Number of cycles carried out
4.12 End of shift
At the end of the day always drain the machine as described in the section Machine draining.
Disconnect the power supply by means of the main switch and close the external water cock.
Perform routine maintenance and clean the machine as described in the section Maintenance.
If possible, leave the door ajar to prevent bad odours building up inside the machine.
MAXIMA - NIJVERHEIDSWEG 23 A/D - 3641 RP MIJDRECHT
THE NETHERLANDS - +31 (0) 297 253 969
WWW.MAXIMA.COM - INFO@MAXIMA.COM

INSTRUCTION MANUAL FOR DISHWASHERS
Page 10 of 14
UK
Chap 5 MAINTENANCE
5.1
General rules
Before doing any maintenance, completely drain out all water, shut off the power
supply and close the water supply cock.
Do not use water under pressure - it can damage the electrical equipment.
Only wash the body panelling when it is cold, using only product specifically designed for steel.
If there is a risk of ice forming, drain the water from the boiler and wash pump.
5.2 Cleaning
To keep the machine in good working order, it must be maintained regularly as explained below. We
recommend periodically running a sanitising treatment with suitable non-
corrosive commercial
products.
5.3 Cleaning the filter unit
Run this procedure at the end of the day or when you see the filters are dirty:
1. Remove and clean the baskets.
2. Empty out the tub as explained in “Machine draining”.
3. Remove and carefully clean all the filters.
4. Do not use abrasive products to clean the tub.
5. Restore all removed parts when finished.
5.4 Cleaning the arms
The wash and rinse arms are easily removed in order to clean their nozzles and prevent
blockage/encrustations.
Proceed as follows ( Fig.10
):
Undo nut R and remove the arms.
Wash all parts under a jet of running water and clean the nozzles thoroughly, using a toothpick or
pointed tool if necessary.
Clean the arm rotation pins inside the machine and the wash and rinse water drainage area.
Restore the arms and check that they rotate freely.
MAXIMA - NIJVERHEIDSWEG 23 A/D - 3641 RP MIJDRECHT
THE NETHERLANDS - +31 (0) 297 253 969
WWW.MAXIMA.COM - INFO@MAXIMA.COM

INSTRUCTION MANUAL FOR DISHWASHERS
Page 11 of 14
UK
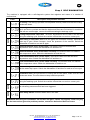
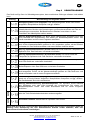
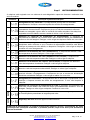
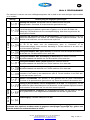
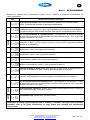
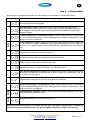
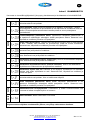
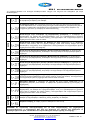
Chap 6 SELF DIAGNOSTICS
The machine is equipped with a self-
diagnosis system that registers and warns of a number of
malfunctions.
Fault
Description and possible remedies
No rinsing. The rinsing cycle was not completed correctly. Make sure that the rinsing
nozzles are clean.
No drainage. The water was not drained or drained incorrectly. Check that the drain
pipe is not bent or crushed and that the siphon and filters are not blocked. In machines
fitted with an overflow pipe, remove this before starting the drainage cycle.
Rinsing temperature reset fault. The boiler temperature did not reset in the set time
during the washing cycle. Switch the machine off and then on and run a new cycle.
SAFE
Water filling in tank fault. Make sure the pipes are connected correctly, and that the
water tap is open. Where foreseen, check the presence of the overflow. Switch the
dishwasher off and then on and fill again.
Tank thermometer fault. (Probe open) The machine does not read the tank
temperature value. Switch the dishwasher off and then on.
Tank thermometer fault. (Probe short circuited) The machine does not read the
tank temperature value. Switch the dishwasher off and then on.
Boiler thermometer fault. (Probe open) The machine does not read the boiler
temperature value. Switch the dishwasher off and then on.
Boiler thermometer fault. (Probe short circuited) The machine does not read the
boiler temperature value. Switch the dishwasher off and then on.
Boiler loading time out: boiler not filled. Impossible to carry out rinse cycle. Check
that the water tap is open. Switch the dishwasher off and then on and run a new cycle.
Insufficient rinse: the right amount of rinsing did not take place; make sure the rinse
nozzles are clean. The error does not stop machine operation.
Tank temperature reset fault: The tank temperature did not reset in the set time
during the washing cycle. Switch the machine off and then on and run a new cycle.
SAFE
Electro-mechanical safety device: the boiler or tub safety thermostats have cut in, or
the tub safety pressure switch has been triggered.
SAFE
Level safety switch: Incorrect water level in the tank.
WARNING! Switching the dishwasher off and then on again "resets" the signals, if after carrying
out the instructions given the problem persists, contact an Authorised Service Centre.
MAXIMA - NIJVERHEIDSWEG 23 A/D - 3641 RP MIJDRECHT
THE NETHERLANDS - +31 (0) 297 253 969
WWW.MAXIMA.COM - INFO@MAXIMA.COM

INSTRUCTION MANUAL FOR DISHWASHERS
Page 12 of 14
UK
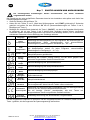
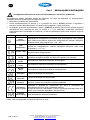
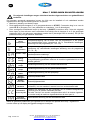
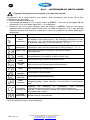
Chap 7
SETTINGS
The following settings should only be configured by a qualified technician.
The parameters listed below can be set during installation of afterwards, accessing the settings menu as
follows:
Machine in standby with door open.
Press buttons 2 and 3 together (cycle selection and START) for 5 seconds and enter the key
CH 12
(buttons 2 and 3 to change the parameter, 1 to confirm).
Then press button 1 (ON/OFF
) repeatedly to scroll through the following headings, enabling and/or
changing them using buttons 2 and 3 (the modified parameter is memorised without being
confirmed). The list of parameters may vary according to the type of dishwasher.
Language
Language selection
Boiler
Temperature
Boiler temperature settings for programmes. In the versions with
atmospheric boiler (rinse pump) there are different settings for each
programme (b1 – b2 – b3)
Tank
Temperature
Tub temperature regulation for programmes. Rinse pump versions have
different settings for each programme (t1 – t2 – t3)
Thermo - Stop
Enabling the Thermostop function, which guarantees the correct
rinse temperature.
Energy
Saving
Enabling the Energy Saving function, which guarantees
energy savings when the dishwasher is on but not in use.
Detergent
Pump
Manual operation of detergent doser
Rinse Aid
Pump
Manual operation of rinse aid doser
Manual
Rinse
Manual operation of the rinse pump
Dosage
Detergent
Detergent dosing time
Dosage
Rinse Aid
Rinse aid dosing time
Water
Hardness
Setting the supply water hardness (dishwashers with water softener): enter
the values given in the table below
Set Number
Service Cycles
Cycle counter setting and activation to enable the Service alert for an
external water softener.
The Service alert can be cancelled by holding pressed all 3
buttons with
the machine off and the door open.
Autostart
Autoenabling
Automatic enabling of automatic starting
Once all necessary parameters have been set, to exit and memorise any changes simply press and
hold button 1 for a few seconds until the on-line dashes appear.
MAXIMA - NIJVERHEIDSWEG 23 A/D - 3641 RP MIJDRECHT
THE NETHERLANDS - +31 (0) 297 253 969
WWW.MAXIMA.COM - INFO@MAXIMA.COM

INSTRUCTION MANUAL FOR DISHWASHERS
Page 13 of 14
UK
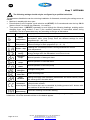
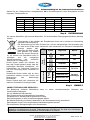
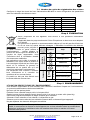
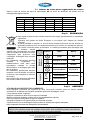
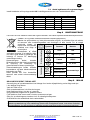
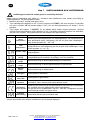
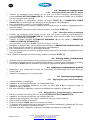
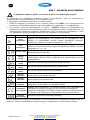
7.1 Number of cycles to regenerate resins
Set the hardness level of the water supply dH
in the settings menu following the instructions given in the
following table:
Measured
hardness
dH
Measured
hardness
dH
°fr
dGH
n°
°fr
dGH
n°
0 20
0 11
1
41 45
23 25
6
21 25
12 14
2
46 50
26 28
7
26 30
15 17
3
51 55
29 31
8
31 35
17 20
4
56 60
31 34
9
36 40
20 22
5
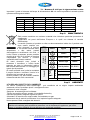
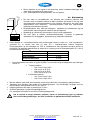
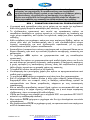
Chap 8 SCRAPPING
Our machines do not contain materials requiring special handling.
(Applicable in the EU and countries with sorted waste disposal)
The mark applied to the product or its documentation indicates that it must not be
scrapped with domestic
waste when it reaches the
end of its service life. To
prevent damage to the
environment or health risks due to
improper scrapping, keep this product
separate from other waste and recycle it
so as to promote sustainable use of
materials.
Domestic users are requested to contact
their reseller or local authority for
information on sorted waste disposal and
recycling for this type of product.
Corporate users are requested to contact
their supplier and check the terms and
conditions of the purchase contract.
The product may not be scrapped together
with other commercial waste.
Symbols Object Material
%
Recyclable
directly
Sheet Steel
80
Cardboard packaging PAP
Wooden pallet ISPM15
Plastic parts PP, PP+FV
Compounds
W
E
E
E
Motors
Assemblies
20
Electric parts
Electronic parts
Rubber parts
EPDM
Chap 9
ENVIRONMENT
RESPECT FOR THE ENVIRONMENT
Proper use of the dishwasher can improve its environmental footprint, if the following simple rules are
observed:
Only wash full baskets.
Switch the dishwasher off when not using it.
Keep the machine closed when it is in standby.
Use wash programmes suited to the amount of soiling.
Supply the machine with hot water, if gas heated.
Make sure the drains flow into a suitable sewer.
Do not exceed the recommended dose of detergent.
The manufacturer reserves the right to modify the electrical, technical and aesthetic features of this
appliance and replace any of its parts without notice, as he deems necessary to offer a reliable
product with a long service life and advanced technology.
MAXIMA - NIJVERHEIDSWEG 23 A/D - 3641 RP MIJDRECHT
THE NETHERLANDS - +31 (0) 297 253 969
WWW.MAXIMA.COM - INFO@MAXIMA.COM


BEDIENUNGSANLEITUNG FÜR GESCHIRRSPÜLMASCHINE
Seite 1 von 14
DE
ÜBERSETZUNG DER ORIGINAL-BEDIENUNGSANLEITUNG
INHALT
KAP 1 RISIKEN UND WICHTIGE WARNHINWEISE ............................................................. 2
1.1 NORMALE BETRIEBSBEDINGUNGEN .................................................................................... 3
KAP 2 EINLEITUNG ............................................................................................................... 4
KAP 3 INSTALLATION .......................................................................................................... 4
3.1 AUSPACKEN ...................................................................................................................... 4
3.2 AUFSTELLUNG ................................................................................................................... 4
3.3 ELEKTRISCHER ANSCHLUSS ............................................................................................... 5
3.4 WASSERANSCHLUSS ......................................................................................................... 6
3.5 ABFLUSSANSCHLUSS ......................................................................................................... 6
3.6 KLARSPÜLMITTEL UND REINIGER ........................................................................................ 6
KAP 4 BENUTZUNG DER SPÜLMASCHINE ........................................................................ 7
4.1 LEGENDE UND ZEICHENERKLÄRUNG ................................................................................... 7
4.2 INSCHALTEN ...................................................................................................................... 7
4.3 DEN GESCHIRRKORB BELADEN .......................................................................................... 7
4.4 PROGRAMMAUSWAHL UND -START...................................................................................... 8
4.4.1 Einbauspülmaschinen ........................................................................................ 8
4.4.2 Durchschubspülmaschinen ................................................................................ 8
4.5 UNBEGRENZTES SPÜLPROGRAMM (* OPTIONAL) .................................................................. 8
4.6 ENTNEHMEN DES BODENSIEBS ........................................................................................... 8
4.7 ENTLEEREN DER SPÜLMASCHINE ....................................................................................... 8
4.7.1 Geräte ohne Ablaufpumpe ................................................................................. 8
4.7.2 Geräte mit Ablaufpumpe (* optional) .................................................................. 8
4.8 AUSSCHALTEN DER SPÜLMASCHINE ................................................................................... 9
4.9 REGENERIERUNG DER AUSTAUSCHHARZE (* OPTIONAL) ...................................................... 9
4.10 INFORMATIONSANZEIGEN ................................................................................................... 9
4.11 ÜBERSICHT DER MÖGLICHEN ANZEIGEN .............................................................................. 9
4.12 BETRIEBSENDE ................................................................................................................. 9
KAP 5 WARTUNG ................................................................................................................ 10
5.1 ALLGEMEINE REGELN ...................................................................................................... 10
5.2 REINIGUNG ..................................................................................................................... 10
5.3 REINIGUNG DER FILTERGRUPPE ....................................................................................... 10
5.4 REINIGUNG DER SPÜLARME ............................................................................................. 10
KAP 6 SELBSTDIAGNOSE ................................................................................................. 11
KAP 7 EINSTELLUNGEN UND ANPASSUNGEN ............................................................... 12
7.1 AUFNAHMEFÄHIGKEIT DER IONENAUSTAUSCHERHARZE ...................................................... 13
KAP 8 ENTSORGUNG ......................................................................................................... 13
KAP 9 UMWELT ................................................................................................................... 13
Der Hersteller behält sich entsprechend der Gesetze die Eigentumsrechte am vorliegenden Dokument vor. Ohne vorherige schriftliche
Genehmigung sind die Vervielfältigung und Weitergabe dieses Dokuments verboten.
Der Hersteller behält sich dass Recht vor ohne Vorankündigung durch Verbesserungen, die von ihm für notwendig befunden wurden,
die vorliegende Anleitung zu ändern.
442489 D REV02 01-05-2019 U DE
MAXIMA - NIJVERHEIDSWEG 23 A/D - 3641 RP MIJDRECHT
THE NETHERLANDS - +31 (0) 297 253 969
WWW.MAXIMA.COM - INFO@MAXIMA.COM

BEDIENUNGSANLEITUNG FÜR GESCHIRRSPÜLMASCHINE
Seite 2 von 14
DE
Lesen Sie die Betriebsanleitung vor der Inbetriebnahme des Geräts
aufmerksam durch. Sie enthält wichtige Hinweise und
Sicherheitsanweisungen für Installation, Gebrauch und Wartung. Die
Nichtbeachtung der Angaben der beigefügten Unterlagen kann die Sicherheit
des Geräts beeinträchtigen und zum sofortigen Verfall der Garantie führen.
Kap 1 RISIKEN UND WICHTIGE WARNHINWEISE
Dieses Gerät ist nur für den Gebrauch vorgesehen, für den es ausdrücklich
entwickelt wurde. Jede andere Verwendung gilt als unsachgemäß und
demzufolge gefährlich.
Das Installations-
Fachpersonal ist angehalten, den Benutzer auf
angemessene Weise über die Bedienung des Geräts und eventu
ell zu
beachtende Sicherheitsmaßnahmen, auch mit praktischen Vorführungen, zu
unterrichten.
Alle Arbeiten an der Maschine, auch bei Störung bzw. Ausfall, müssen vom
Hersteller oder einem autorisierten Kundendienstzentrum bzw. von
Fachpersonal vorgenommen w
erden. Dabei dürfen ausschließlich
Originalersatzteile verwendet werden.
Vor Wartungsarbeiten, Reparaturen und Reinigung die Maschine stets vom
Stromnetz und vom Wasseranschluss trennen.
Die Maschine darf NICHT von ungeschultem Personal benutzt werden.
Die
ses Gerät darf nur dann von Kindern ab 8 Jahren und Personen mit
eingeschränkten körperlichen, sensorischen oder geistigen Fähigkeiten oder
von Personen mit mangelnder Erfahrung bzw. mangelnden Kenntnissen
verwendet werden, wenn sie beaufsichtigt werden od
er in die sichere
Bedienung des Geräts eingewiesen wurden.
Kinder nicht mit dem Gerät spielen lassen.
Die Reinigung und Pflege durch den Benutzer darf nicht von Kindern
ausgeführt werden, es sei denn, sie werden beaufsichtigt.
Bei Nichtbenutzung darf die Maschine NICHT unter Spannung bleiben.
Falls an der Maschine kein Stecker und keine andere Vorkehrung vorhanden
ist, um sie vollständig vom Stromnetz zu trennen und alle Kontakte zu
unterbrechen, müssen die erforderlichen Trennvorrichtungen
vorschriftsmäßig im Versorgungsnetz installiert werden.
Ein beschädigtes Netzkabel durch den Hersteller bzw. seinen Kundendienst
oder auf jeden Fall durch eine Fachkraft mit ähnlicher Qualifikation ersetzten
lassen, um jedes Risiko auszuschließen.
Das Symbol 5021 nach IEC-
Norm 60417 an der Schraube am Gerät
kennzeichnet den Schutzpotenzialausgleich.
Solange der Spülzyklus läuft, die Gerätetür KEINESFALLS –
auch nicht kurz
– öffnen.
Die Maschine KEINESFALLS
ohne die vom Hersteller vorgesehenen
Schutzvorrichtungen benutzen.
MAXIMA - NIJVERHEIDSWEG 23 A/D - 3641 RP MIJDRECHT
THE NETHERLANDS - +31 (0) 297 253 969
WWW.MAXIMA.COM - INFO@MAXIMA.COM

BEDIENUNGSANLEITUNG FÜR GESCHIRRSPÜLMASCHINE
Seite 3 von 14
DE
In der Maschine NIEMALS Gegenstände spülen, die nicht
spülmaschinenfest sind, aufgrund ihrer Form oder
Abmessungen nicht in der
Spülmaschine gereinigt werden dürfen oder nicht in einwandfreiem Zustand
sind.
Das Gerät oder Geräteteile NIEMALS als Leiter o
der Halt für Personen,
Sachen oder Tiere verwenden.
Die geöffnete Klappe eines Frontlader-Geschirrspülers NIEMALS
überlasten.
Die Klappe ist so ausgelegt, dass sie nur den mit Geschirr beladenen Korb
aushält.
NIEMALS die nackten Hände in die Spüllaugen tauchen.
Die Maschine nach der Installation NIEMALS kippen.
Im Fall einer Störung oder einer Leckage sofort die Stromzufuhr unterbrechen
und den Wasserzulaufhahn schließen.
Die Spülmaschine nicht in der Nähe von Wärmequellen über 50 °C aufstellen.
Die Spülmaschine NIEMALS der Witterung aussetzen (Regen, Sonne, usw.).
Die Spülmaschine darf ohne geeignete Schutzabdeckungen nicht in
Außenbereichen installiert werden.
Nie ein Spülprogramm ohne den Überlauf starten (sofern vorgesehen).
Nie magnetische Gegenstände in Maschinennähe bringen.
Die Oberseite der Maschine nicht als Ablage benutzen.
Der Installateur muss die vorschriftsmäßige Erdung überprüfen.
Nach erfolgter Prüfung muss der Installateur eine schriftliche Erklärung
ausstellen und bestätigen, dass die Installation und die
Abnahmeprüfung
ordnungsgemäß und fachgerecht nach den gesetzlichen Bestimmungen
ausgeführt wurden.
Die Position einzelner Geräteteile NICHT
verändern und keine Eingriffe
daran
vornehmen, da hierdurch die Sicherheit des Gerätes beeinträchtigt
werden könnte.
Schalldruckpegel gemäß EN ISO 4871
o LpA Max = 55 db Kpa=2,5 db für Einbaumaschinen
o LpA Max = 65 db Kpa=2,5 db für Durchschubspülmaschinen
o LpA Max = 76 db Kpa=1,5 db für Gerätespülmaschinen
Max. Temperatur des Leitungswassers: 50 °C
Max. Druck des Leitungswassers: 4 bar (400 kPa)
Gerät für den dauerhaften Anschluss an das Wasserversorgungsnetz
Das Gerät darf nicht mit Hochdruck- oder Dampfreinigern gereinigt werden.
Max. Höhe des Ablaufs
o Bodenhöhe bei Ausführungen mit Überlauf
o Max. Höhe 1 m bei Ausführungen mit Laugenpumpe
1.1 Normale Betriebsbedingungen
Umgebungstemperatur : 40°Cmax /4°Cmin ( Mittelwert 30°C)
Höhe : bis 2000 Meter
Relative Feuchte : Max 30% bei 40°C / max 90% bei 20°C
MAXIMA - NIJVERHEIDSWEG 23 A/D - 3641 RP MIJDRECHT
THE NETHERLANDS - +31 (0) 297 253 969
WWW.MAXIMA.COM - INFO@MAXIMA.COM

BEDIENUNGSANLEITUNG FÜR GESCHIRRSPÜLMASCHINE
Seite 4 von 14
DE
Kap 2 EINLEITUNG
Hinweise:
Die gesamte Dokumentation sorgfä
ltig in der Nähe des Geräts aufbewahren. Sie muss den
Technikern und Bedienern ausgehändigt
und an einem sicheren Ort sorgfältig aufbewahrt
werden; bei Bedarf Kopien anfertigen, die ein häufiges Nachschlagen erlauben
Der Bediener ist verpflichtet, die vorl
iegende Bedienungsanleitung vor jeglicher Arbeit
an der Maschine zu lesen, zu verstehen und zu lernen.
Das Gerät ist für das gewerbliche Geschirrspülen in Gemeinschaftsküchen vorgesehen, d. h.
die Installation, der Betrieb und die Wartung erfolgen durch au
sgebildetes Fachpersonal, das
sich an die Herstelleranweisungen halten muss.
Garantie:
Der Hersteller übernimmt keinerlei Haftung für Sach-
oder Personenschäden, die aus der
Nichtbeachtung der gegebenen Anweisungen oder einem unsachgemäßen Einsatz der
Maschine entstehen
Die Nichtbeachtung der in der vorliegenden Anleitung enthaltenen Anweisungen kann die
Sicherheit des Geräts beeinträchtigen und führt zum sofortigen Verfall der Garantie
Die Ausführung von Installations- und Reparaturarbeiten durch nicht
autorisiertes Personal und
die Verwendung von Nichtoriginal-Ersatzteilen führen zum sofortigen Verfall der Garantie.
Lagerung :
Transport und Lagerung : von -10°C bis 55°C mit Höchstwerten bis 70°C (max. 24 h)
Kap 3 INSTALLATION
Eine richtige Installation
ist grundlegende Voraussetzung für ein gutes Funktionieren der Maschine.
Einige notwendige Angaben für die Maschineninstallation befinden sich auf dem Typenschild
auf der
rechten Maschinenseite, eine Kopie ist auf dem Deckblatt dieser Bedienungsanleitung wiedergegeben.
Die Installation darf ausschließlich von qualifiziertem und autorisiertem Fachpersonal
vorgenommen werden.
3.1 Auspacken
Die Verpackung auf Schäden überprüfen. Eventuell bemerkte Schäden auf dem Lieferschein
vermerke
n. Nach der Entfernung der Verpackung sicherstellen, dass das Gerät sich in einwandfreiem
Zustand befindet. Wenn die Maschine beschädigt ist, sofort den Vertragshändler per Fax oder
Einschreiben mit Rückantwort und das Transportunternehmen davon unterricht
en. Wenn die Schäden
die Maschinensicherheit beeinträchtigen, die Maschine bis zum Eingriff eines Fachtechnikers nicht
installieren und/oder benutzen.
Die Verpackungsteile (Plastikbeutel, Styropor, Nägel usw. ...) von Kindern und
Haustieren fernhalten. Die Verpackungsteile können eine Gefahrenquelle darstellen.
3.2 Aufstellung
Prüfen, dass sich im Installationsbereich keine Gegenstände oder Materialien
befinden, die vom Wasserdampf, der während des Betri
ebs aus der Maschine
austreten kann, beschädigt werden können, bzw. dass diese ausreichend
geschützt sind.
Vor der Installation des Geschirrspülers die elektrischen Anlage sowie die
Wasserzulauf- und Wasserablaufanschlüsse vorbereiten.
Bei Einbau von
Maschinen mit Seitenwänden ohne Wärmedämmung
mindestens 10
mm Abstand zwischen den Gerätewänden und den
angrenzenden Oberflächen belassen.
Der Fußboden oder die
Einbauöffnung müssen für das Gesamtgewicht des
Geschirrspülers ausgelegt sein
Um die Stabilität sicherzustellen, die Maschine installieren und mit den vier
MAXIMA - NIJVERHEIDSWEG 23 A/D - 3641 RP MIJDRECHT
THE NETHERLANDS - +31 (0) 297 253 969
WWW.MAXIMA.COM - INFO@MAXIMA.COM
Sidan laddas...
Sidan laddas...
Sidan laddas...
Sidan laddas...
Sidan laddas...
Sidan laddas...
Sidan laddas...
Sidan laddas...
Sidan laddas...
Sidan laddas...
Sidan laddas...
Sidan laddas...
Sidan laddas...
Sidan laddas...
Sidan laddas...
Sidan laddas...
Sidan laddas...
Sidan laddas...
Sidan laddas...
Sidan laddas...
Sidan laddas...
Sidan laddas...
Sidan laddas...
Sidan laddas...
Sidan laddas...
Sidan laddas...
Sidan laddas...
Sidan laddas...
Sidan laddas...
Sidan laddas...
Sidan laddas...
Sidan laddas...
Sidan laddas...
Sidan laddas...
Sidan laddas...
Sidan laddas...
Sidan laddas...
Sidan laddas...
Sidan laddas...
Sidan laddas...
Sidan laddas...
Sidan laddas...
Sidan laddas...
Sidan laddas...
Sidan laddas...
Sidan laddas...
Sidan laddas...
Sidan laddas...
Sidan laddas...
Sidan laddas...
Sidan laddas...
Sidan laddas...
Sidan laddas...
Sidan laddas...
Sidan laddas...
Sidan laddas...
Sidan laddas...
Sidan laddas...
Sidan laddas...
Sidan laddas...
Sidan laddas...
Sidan laddas...
Sidan laddas...
Sidan laddas...
Sidan laddas...
Sidan laddas...
Sidan laddas...
Sidan laddas...
Sidan laddas...
Sidan laddas...
Sidan laddas...
Sidan laddas...
Sidan laddas...
Sidan laddas...
Sidan laddas...
Sidan laddas...
Sidan laddas...
Sidan laddas...
Sidan laddas...
Sidan laddas...
Sidan laddas...
Sidan laddas...
Sidan laddas...
Sidan laddas...
Sidan laddas...
Sidan laddas...
Sidan laddas...
Sidan laddas...
Sidan laddas...
Sidan laddas...
Sidan laddas...
Sidan laddas...
Sidan laddas...
Sidan laddas...
Sidan laddas...
Sidan laddas...
Sidan laddas...
Sidan laddas...
Sidan laddas...
Sidan laddas...
Sidan laddas...
Sidan laddas...
Sidan laddas...
Sidan laddas...
Sidan laddas...
Sidan laddas...
Sidan laddas...
Sidan laddas...
Sidan laddas...
Sidan laddas...
Sidan laddas...
Sidan laddas...
Sidan laddas...
Sidan laddas...
Sidan laddas...
Sidan laddas...
Sidan laddas...
Sidan laddas...
Sidan laddas...
Sidan laddas...
Sidan laddas...
Sidan laddas...
Sidan laddas...
Sidan laddas...
Sidan laddas...
Sidan laddas...
Sidan laddas...
Sidan laddas...
Sidan laddas...
Sidan laddas...
Sidan laddas...
Sidan laddas...
Sidan laddas...
Sidan laddas...
Sidan laddas...
Sidan laddas...
Sidan laddas...
-
 1
1
-
 2
2
-
 3
3
-
 4
4
-
 5
5
-
 6
6
-
 7
7
-
 8
8
-
 9
9
-
 10
10
-
 11
11
-
 12
12
-
 13
13
-
 14
14
-
 15
15
-
 16
16
-
 17
17
-
 18
18
-
 19
19
-
 20
20
-
 21
21
-
 22
22
-
 23
23
-
 24
24
-
 25
25
-
 26
26
-
 27
27
-
 28
28
-
 29
29
-
 30
30
-
 31
31
-
 32
32
-
 33
33
-
 34
34
-
 35
35
-
 36
36
-
 37
37
-
 38
38
-
 39
39
-
 40
40
-
 41
41
-
 42
42
-
 43
43
-
 44
44
-
 45
45
-
 46
46
-
 47
47
-
 48
48
-
 49
49
-
 50
50
-
 51
51
-
 52
52
-
 53
53
-
 54
54
-
 55
55
-
 56
56
-
 57
57
-
 58
58
-
 59
59
-
 60
60
-
 61
61
-
 62
62
-
 63
63
-
 64
64
-
 65
65
-
 66
66
-
 67
67
-
 68
68
-
 69
69
-
 70
70
-
 71
71
-
 72
72
-
 73
73
-
 74
74
-
 75
75
-
 76
76
-
 77
77
-
 78
78
-
 79
79
-
 80
80
-
 81
81
-
 82
82
-
 83
83
-
 84
84
-
 85
85
-
 86
86
-
 87
87
-
 88
88
-
 89
89
-
 90
90
-
 91
91
-
 92
92
-
 93
93
-
 94
94
-
 95
95
-
 96
96
-
 97
97
-
 98
98
-
 99
99
-
 100
100
-
 101
101
-
 102
102
-
 103
103
-
 104
104
-
 105
105
-
 106
106
-
 107
107
-
 108
108
-
 109
109
-
 110
110
-
 111
111
-
 112
112
-
 113
113
-
 114
114
-
 115
115
-
 116
116
-
 117
117
-
 118
118
-
 119
119
-
 120
120
-
 121
121
-
 122
122
-
 123
123
-
 124
124
-
 125
125
-
 126
126
-
 127
127
-
 128
128
-
 129
129
-
 130
130
-
 131
131
-
 132
132
-
 133
133
-
 134
134
-
 135
135
-
 136
136
-
 137
137
-
 138
138
-
 139
139
-
 140
140
-
 141
141
-
 142
142
-
 143
143
-
 144
144
-
 145
145
-
 146
146
-
 147
147
-
 148
148
-
 149
149
-
 150
150
-
 151
151
-
 152
152
-
 153
153
-
 154
154
-
 155
155
-
 156
156
-
 157
157


Maxima 09240130 Bruksanvisning
- Typ
- Bruksanvisning
- Denna manual är också lämplig för
på andra språk
- italiano: Maxima 09240130 Manuale del proprietario
- español: Maxima 09240130 El manual del propietario
- Deutsch: Maxima 09240130 Bedienungsanleitung
- português: Maxima 09240130 Manual do proprietário
- français: Maxima 09240130 Le manuel du propriétaire
- dansk: Maxima 09240130 Brugervejledning
- Nederlands: Maxima 09240130 de handleiding
Relaterade papper
Andra dokument
-
Whirlpool SDD 534 U Användarguide
-
Whirlpool HGL 44 SA Användarguide
-
Diamond DK7/2-NP Användarmanual
-
Whirlpool ADPU 3004 Bruksanvisning
-
-
-
Menuett Benkoppvaskmaskin Bruksanvisningar
-
Indesit DFP 58T93 A SK Användarguide
-
Indesit DFG 15B1 SK Användarguide
-
Primus / Lavamac FS6 User Instructions