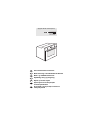
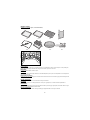
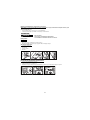
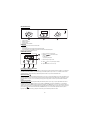
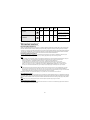
Whirlpool AKP 458/IX Användarguide
- Kategori
- Ugnar
- Typ
- Användarguide

(Apply the label from warranty here)
User and maintenance manual
Bruksanvisning och underhållsinstruktioner
Bruks- og vedlikeholdsmanual
Vejledning i brug og rengøring
Käyttö- ja huolto-ohjeet
Руководство по эксплуатации
и техобслуживанию
Інструкція з експлуатації і технічного
обслуговування
RU
UK

GB1
YOUR SAFETY AND THAT OF OTHERS IS VERY IMPORTANT
This manual and the appliance itself provide important safety warnings, to be read and observed at all times.
All safety warnings give specific details of the potential risk present and indicate how to reduce risk of injury, damage and electric shock resulting from improper
use of the appliance. Carefully observe the following instructions:
- The appliance must be disconnected from the power supply before carrying out any installation work.
- Installation and maintenance must be carried out by a qualified technician, in compliance with the manufacturer’s instructions and local safety regulations.
Do not repair or replace any part of the appliance unless specifically stated in the user manual.
- Regulations require that the appliance is earthed.
- The power cable must be long enough for connecting the appliance, once fitted in its housing, to the power supply socket.
- For installation to comply with current safety regulations, an all-pole disconnect switch with minimum contact gap of 3 mm must be utilized.
- Do not use multiple plug adapters or extension leads.
- Do not pull the power supply cable in order to unplug the appliance.
- The electrical components must not be accessible to the user after installation.
- Do not touch the appliance with any wet part of the body and do not operate it when barefoot.
- This appliance is designed solely for use as a domestic appliance for cooking food. No other type of use is permitted (e.g.: heating rooms). The Manufacturer
declines all responsibility for inappropriate use or incorrect setting of the controls.
- The appliance is not intended for use by persons (including children) with any physical, sensory or mental impairment, or without experience and knowledge
of the appliance, unless supervised or previously instructed in its use by those responsible for their safety.
- The accessible parts of the appliance may become very hot during use. Young children should be kept away from the appliance and supervised to ensure that
they do not play with it.
- During and after use, do not touch the heating elements or interior surfaces of the appliance - risk of burns. Do not allow the appliance to come into contact
with cloths or other flammable materials until all the components have cooled sufficiently.
- At the end of cooking, exercise caution when opening the appliance door, letting the hot air or steam exit gradually before accessing the oven. When the
appliance door is shut, hot air is vented from the aperture above the control panel. Do not obstruct the vent apertures.
- Use oven gloves to remove pans and accessories, taking care not to touch the heating elements.
- Do not place flammable materials in or near the appliance: a fire may break out if the appliance is inadvertently switched on.
- Do not heat or cook sealed jars or containers in the appliance. The pressure that builds up inside might cause the jar to explode, damaging the appliance.
- Do not use containers made of synthetic materials.
- Overheated oils and fats catch fire easily. Always remain vigilant when cooking foods rich in fat and oil.
- Never leave the appliance unattended during food drying.
- If alcoholic beverages are used when cooking foods (e.g. rum, cognac, wine), remember that alcohol evaporates at high temperatures. As a result, there is a risk
that vapours released by the alcohol may catch fire upon coming into contact with the electrical heating element.
Scrapping of household appliances
- This appliance is manufactured with recyclable or reusable materials. Dispose of it in accordance with local waste disposal regulations. Before scrapping, cut off
the power supply cable.
- For further information on the treatment, recovery and recycling of household electrical appliances, contact your competent local authority, the collection service
for household waste or the store where you purchased the appliance.
IMPORTANT SAFETY INSTRUCTIONS
This is the danger symbol, pertaining to safety, which alerts users to potential risks to themselves and others.
All safety warnings are preceded by the danger symbol and the following terms:
DANGER
Indicates a hazardous situation which, if not avoided, will cause serious injury.
WARNING
Indicates a hazardous situation which, if not avoided, could cause serious injury.

GB2
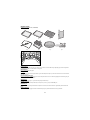
After unpacking the oven, be sure that it has not been damaged during transport and that the oven door closes properly. In the event of problems, contact the dealer
or your nearest After-sales Service. To avoid any damage, only remove the oven from its polystyrene foam base at the time of installation.
PREPARING THE HOUSING UNIT
• Kitchen units in contact with the oven must be heat resistant (min 90°C).
• Carry out all cabinet cutting work before fitting the oven in the housing and carefully remove all wood chips and sawdust.
• After installation, the bottom of the oven must no longer be accessible.
• For correct appliance operation, do not obstruct the minimum gap between the worktop and the upper edge of the oven.
ELECTRICAL CONNECTION
Be sure the power voltage specified on the appliance dataplate is the same as the mains voltage. The dataplate is on the front edge of the oven (visible when the door is open).
• Power cable replacement (type H05 RR-F 3 x 1.5 mm
2
) must be carried out by a qualified electrician. Contact an authorized service centre.
GENERAL RECOMMENDATIONS
Before use:
- Remove cardboard protection pieces, protective film and adhesive labels from accessories.
- Remove the accessories from the oven and heat it at 200° for about an hour to eliminate the smell and fumes from the insulating materials and protective grease.
During use:
- Do not place heavy objects on the door as they could damage it.
- Do not cling to the door or hang anything from the handle.
- Do not cover the inside of the oven with aluminium foil.
- Do not pour water into the inside of a hot oven; this could damage the enamel coating.
- Do not drag pots or pans across the bottom of the oven as this could damage the enamel coating.
- Be sure that the electrical cables of other appliances do not touch hot parts of the oven or become trapped in the door.
- Do not expose the oven to atmospheric agents.
Disposal of packing material
The packing material is 100% recyclable and is marked with the recycle symbol ( ). The various parts of the packing must therefore be disposed of responsibly
and in full compliance with local authority regulations governing waste disposal.
Scrapping the product
- This appliance is marked in compliance with European Directive 2002/96/EC, Waste Electrical and Electronic Equipment (WEEE).
- By ensuring this product is disposed of correctly, you will help avoid potential negative consequences for the environment and human health, which could
otherwise be caused by inappropriate waste handling of this product.
- The symbol on the product or on the accompanying documentation indicates that it should not be treated as domestic waste but must be taken to an
appropriate collection centre for the recycling of electrical and electronic equipment.
Energy saving
- Only pre-heat the oven if specified in the cooking table or your recipe.
- Use dark lacquered or enamelled baking moulds as they absorb heat far better.
- Switch the oven off 10/15 minutes before the set cooking time. Food requiring prolonged cooking will continue to cook even once the oven is switched off.
- This oven, which is intended to come into contact with foodstuffs, complies with European Regulation ( ) n. 1935/2004 and has been designed,
manufactured and sold in conformity with the safety requirements of the “Low Voltage” directive 2006/95/CE (which replaces 73/23/CEE and subsequent
amendments), the protection requirements of “EMC” 2004/108/CE.
INSTALLATION
SAFEGUARDING THE ENVIRONMENT
DECLARATION OF CONFORMITY

GB3
The oven does not work:
• Check for the presence of mains electrical power and if the oven is connected to the electrical supply.
• Turn off the oven and restart it to see if the fault persists.
The door will not open:
• Turn off the oven and restart it to see if the fault persists.
• IMPORTANT: during self-cleaning, the oven door will not open. Wait until it unlocks automatically (see paragraph “Cleaning cycle of ovens with pyrolysis function”).
The electronic programmer does not work:
• If the display shows the letter “ ” followed by a number, contact your nearest After-sales Service. Specify in this case the number that follows the letter “ ”.
Before calling the After-Sales Service:
1. See if you can solve the problem yourself with the help of the suggestions given in the “Troubleshooting guide”.
2. Switch the appliance off and back on again it to see if the fault persists.
If after the above checks the fault still occurs, get in touch with the nearest After-sales Service.
Always specify:
• a brief description of the fault;
• the type and exact model of the oven;
• the service number (number after the word Service on the rating plate), located on the right hand edge of the oven cavity (visible when the oven door is open).
The service number is also indicated on the guarantee booklet;
• your full address;
• your telephone number.
If any repairs are required, please contact an authorised After-sales Service (to guarantee that original spare parts will be used and repairs carried out correctly).
Oven exterior
IMPORTANT: do not use corrosive or abrasive detergents. If any of these products unintentionally comes into contact with the appliance, clean
immediately with a damp cloth.
• Clean the surfaces with a damp cloth. If it is very dirty, add a few drops of washing up detergent to the water. Finish off with a dry cloth.
Oven interior
IMPORTANT: do not use abrasive sponges or metallic scrapers or scourers. Over time, these can ruin enamelled surfaces and the oven door glass.
• After every use, allow the oven to cool then clean it preferably while it is still warm in order to remove built-up dirt and stains caused by food residues
(e.g. food with a high sugar content).
• Use proprietary oven detergents and follow the manufacturer’s instructions to the letter.
• Clean the door glass with a suitable liquid detergent. The oven door can be removed to facilitate cleaning (see MAINTENANCE).
• The top heating element of the grill (see MAINTENANCE) can be lowered (some models only) to clean the roof of the oven.
N.B.: during prolonged cooking of foods with a high water content (e.g. pizza, vegetables, etc.) condensation may form on the inside of the door
and around the seal. When the oven is cold, dry the inside of the door with a cloth or sponge.
Accessories:
• Soak the accessories in water with washing up detergent immediately after use, handling them with oven gloves if still hot.
• Food residues can be easily removed using a brush or sponge.
TROUBLESHOOTING GUIDE
AFTER-SALES SERVICE
CLEANING
WARNING
- Do not use steam cleaning equipment.
- Clean the oven only when it is cool.
- Disconnect power before servicing.

GB4
Cleaning the rear wall and catalytic side panels of the oven (if present):
IMPORTANT: do not use corrosive or abrasive detergents, coarse brushes, pot scourers or oven sprays which could damage the catalytic surface and
ruin its self-cleaning properties.
• Operate the oven empty with the fan-assisted function at 200°C for about one hour
• Next, leave the appliance to cool down before removing any food residue with a sponge.
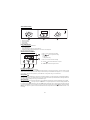
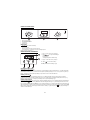
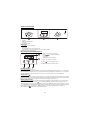
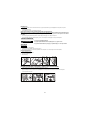
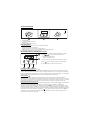
REMOVING THE DOOR
To remove the door:
1. Open the door fully.
2. Lift the catches and push them forwards as far as they will go (Fig.1).
3. Close the door as far as it will go (A), lift it up (B) and turn it (C) until it is released (D) (Fig. 2).
To refit the door:
1. Insert the hinges in their seats.
2. Open the door fully.
3. Lower the two catches.
4. Close the door.
MOVING THE TOP HEATING ELEMENT (SOME MODELS ONLY)
1. Remove the side accessory holder grilles (Fig. 3).
2. Pull the heating element out a little (Fig. 4) and lower it (Fig.5).
3. To reposition the heating element, lift it up, pulling it slightly towards you, be sure it comes to rest on the lateral supports.
MAINTENANCE
WARNING
- Use protective gloves.
- Ensure the oven is cold before carrying out the following operations.
- Disconnect power before servicing.
Fig. 1 Fig. 2
Fig. 3 Fig. 4 Fig. 5

GB5
REPLACING THE OVEN LAMP
To replace the rear lamp (if present):
1. Disconnect the oven from the power supply.
2. Unscrew the lamp cover (Fig. 6), replace the lamp (see note for lamp type) and screw the lamp cover back on (Fig. 7).
3. Reconnect the oven to the power supply.
N.B.:
- Only use 25-40W/230V type E-14, T300°C incandescent lamps.
- Lamps are available from our After-sales Service.
IMPORTANT:
- Do not use the oven until the lamp cover has been repositioned.
FOR ELECTRICAL CONNECTION, SEE THE PARAGRAPH ON INSTALLATION
1. Control panel
2. Upper heating element/grill
3. Cooling system (if present)
4. Dataplate (not to be removed)
5. Light
6. Baking ventilation system (if present)
7. Turnspit (if present)
8. Lower heating element (not visible)
9. Door
10. Position of shelves
11. Rear wall
N.B.:
- At the end of cooking, after the oven has been switched off, the cooling fan may continue to run for a while.
Fig. 6 Fig. 7
INSTRUCTIONS FOR OVEN USE
1
11
5
2
4
7
8
10
9
6
3

GB6
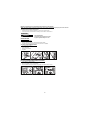
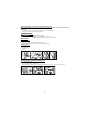
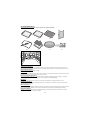
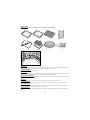
COMPATIBLE ACCESSORIES
(for the accessories supplied with oven refer to the tech fiche)
Drip-tray (Fig. 1)
For collecting fat and bits of food when placed under the wire shelf, or as a plate for cooking meat, chicken and fish, etc., with or without vegetables. Pour a little water
into the drip-tray to avoid spatters of fat and smoke.
Baking tray (Fig. 2)
For baking biscuits, cakes and pizzas.
Wire shelf (Fig. 3)
For grilling food or as a support for pots, cake tins and other cooking receptacle. It can be placed on any available level. The wire shelf can be inserted with its curvature
facing up or down.
Catalytic side panels (Fig. 4)
These panels have a special microporous enamel coating that absorbs fat spatters. It is advisable to do an automatic cleaning cycle after cooking particularly fatty food
(see CLEANING).
Turnspit (Fig. 5)
Use the turnspit as indicated on Fig. 9. Also check “Recommended use and tips” section for advice.
Grill Pan Set (Fig. 6)
The set comprises a wire shelf (6a) and an enamelled recipient (6b). This set must be placed on the wire shelf (3) and used with the Grill function.
Grease filter (Fig. 7)
Use only for particularly greasy cooking. Hook it on the rear wall of the oven compartment, opposite the fan. It can be cleaned in a dishwasher and used with the fan-
assisted function.
Sliding shelves (Fig. 8)
They allow the wire shelves and drip-trays to be pulled half out during cooking. Suitable for all the accessories, they can be cleaned in a dishwasher.
Fig. 1 Fig. 2 Fig. 3 Fig. 4
Fig. 5 Fig. 6 Fig. 7 Fig. 8
Fig. 9
6a
6b

GB7
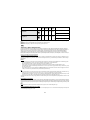
CONTROL PANEL DESCRIPTION
1. Function selector knob
2. Electronic programmer
3. Thermostat knob
4. Red thermostat led.
HOW TO OPERATE THE OVEN
• Turn the selector knob to the required function.
The oven light switches on.
• Turn the thermostat knob clockwise to the required temperature.
The thermostat led lights up, switching off again when the oven reaches the selected temperature.
At the end of cooking, turn the knobs to “0”.
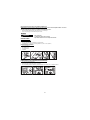
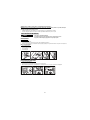
USING THE ELECTRONIC PROGRAMMER
Using the oven for the first time
Setting the time of day and the tone of the acoustic signal.
Upon connection of the oven to the mains power supply, AUTO and 0.00 flash on the display. To set the time of day, press buttons - and + at the same time: the central
dot flashes. Set the time of day using the buttons + and -. Having selected the desired value, press the middle button. The display shows “ton 1”. To select the desired
tone, press button –. Having selected the preferred tone, press the middle button. To change the time of day, proceed as described above.
Setting the timer
To set the timer, long-press the middle button: the display shows 0.00 and the bell symbol flashes. Set the timer using the button + (the maximum programmable
value is 23 hours and 59 minutes). The countdown begins after a few seconds. The display shows the time of day and the bell remains lit, confirming the timer has been
set. To view the countdown and change it if necessary, press the middle button again.
Setting cooking time
After selecting the cooking mode and temperature using the knobs, press the middle button: the display shows 0.00 and the bell symbol flashes. Press the middle
button again: on the display and 0.00 appear in sequence and AUTO flashes. Set cooking time using the buttons + and - (the maximum programmable value
is 10 hours). After a few seconds the display shows the time of day and AUTO remains lit, confirming the setting. To view the remaining cooking time and change it if
necessary, press the middle button for 2 seconds and then press it again a second time. At the end of the set time, the symbol switches off, the alarm sounds and
AUTO flashes on the display. Press any button to deactivate the alarm. Return the functions and temperature knob to zero and press the middle button for two seconds
to end cooking.
1. Button - : to decrease the value shown on the display
2. Button : for selecting the various settings:
a. Timer
b. Cooking time
c. Cooking end time setting
3. Button + : to increase the value shown on the display
A. The symbol
indicates that the timer function is in operation
B. The AUTO symbol confirms the setting has been made
2
4
3
A
U
T
O
2 31
A
B

GB8
Delaying cooking end time
After selecting cooking time, press the middle button: the display shows , cooking end time and AUTO flashing in sequence. Press the button + to view the
desired cooking end time (cooking can be delayed by a maximum of 23 hours and 59 minutes). After a few seconds the display shows the time of day, the symbol
switches off and AUTO remains lit, confirming the setting. To view cooking end time and change it if necessary, press the middle button and then press it again twice.
At the end of the countdown, the symbol lights up and the oven proceeds with the selected cooking mode.
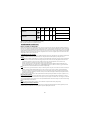
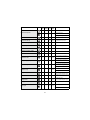
FUNCTION DESCRIPTION TABLE
FUNCTIONS KNOB
OFF To stop cooking and switch off the oven.
LAMP To switch the oven light on/off.
CONVENTIONAL
To cook any kind of dish on one shelf only. Use the 2nd shelf. Preheat the oven to the required temperature. The thermostat led
turns off when the oven is ready and food can be placed in it.
CONVECTION BAKE
For baking cakes with liquid filling (sweet or savoury) on a single shelf. This function can also be used for cooking on two
shelves. Switch the position of the dishes to cook food more evenly. Use the 2nd shelf to cook on one shelf only, and the 2nd and
4th to cook on two shelves. Preheat the oven before cooking.
GRILL
To grill steak, kebabs and sausages; to cook vegetables au gratin and toast bread. Place food on the 4th shelf. When grilling
meat, use the drip tray to collect the cooking juices. Position it on the 3rd shelf, adding approx. half a litre of water. Preheat the
oven for 3-5 min. During cooking the oven door must remain closed.
TURBO GRILL
To roast large joints of meat (legs, roast beef, chickens). Position the food on the middle shelves. Use the drip tray to collect the
cooking juices. Position it on the 1st/2nd shelf, adding approx. half a litre of water. It is advisable to turn the meat over during
cooking for more even browning. The oven does not have to be preheated. During cooking the oven door must remain closed.
DEFROST
To speed up defrosting of food. Place food on the middle shelf. Leave food in its packaging in order to prevent it from drying out
on the outside.
BOTTOM +
CONVECTION BAKE
For cooking fruit, cakes, vegetables, pizza, poultry, etc. on a single level.
FORCED AIR
Also to cook different types of food requiring the same cooking temperature (e.g. fish, vegetables, cakes) on a maximum of two
shelves at the same time. This function allows cooking without odours being transferred from one food to another. It is
advisable to use the 2nd level to cook on a single shelf. To cook on two shelves, it is advisable use the 1st and 3rd levels,
preheating the oven first.
BOTTOM
Use this function after cooking to brown the bottom of the dish. It is advisable to place the food on the 1st /2nd cooking level.
The function can also be used for slow cooking, such as vegetables and meat stews; in this case use the 2nd cooking level. The
oven does not have to be preheated.

GB9
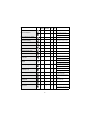
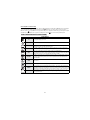
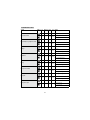
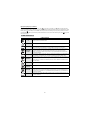
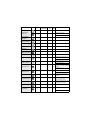
COOKING TABLE
Recipe Function Pre-
heating
Shelf (from
bottom)
Temp.
(°C)
Time
(min)
Accessories
Leavened cakes
Yes 2 150-175 35-90 Cake tin on wire shelf
Yes 1-3 150-170 30-90
Shelf 3: cake tin on wire shelf
Shelf 1: cake tin on wire shelf
Filled pies (cheesecake, strudel, apple pie)
Yes 2 150-190 30-85 Drip tray/ baking tray or cake tin on wire shelf
Yes 1-3 150-190 35-90
Shelf 3: cake tin on wire shelf
Shelf 1: cake tin on wire shelf
Biscuits / Tartlets
Yes 2 160-175 20-45 Drip tray / baking tray
Yes 1-3 150-175 20-45
Shelf 3: wire shelf
Shelf 1: drip tray / baking tray
Choux buns
Yes 2 175-200 30-40 Drip tray / baking tray
Yes 1-3 170-190 35-45
Shelf 3: oven tray on wire shelf
Shelf 1: drip tray / baking tray
Meringues
Yes 2 100 110-150 Drip tray / baking tray
Yes 1-3 100 130-150
Shelf 3: oven tray on wire shelf
Shelf 1: drip tray / baking tray
Bread / Pizza / Focaccia
Yes 2 190-250 12-50 Drip tray / baking tray
Yes 1-3 190-250 25-50
Shelf 1: oven tray on wire shelf
Shelf 3: drip tray / baking tray
Frozen pizza
Yes 2 250 10-15 Shelf 1: Drip tray / baking tray or wire shelf
Yes 1-3 250 10-20
Shelf 3: oven tray on wire shelf
Shelf 1: drip tray / baking tray
Savoury pies (vegetable pie, quiche)
Yes 2 175-200 40-50 Cake tin on wire shelf
Yes 1-3 175-190 55-65
Shelf 3: cake tin on wire shelf
Shelf 1: cake tin on wire shelf

GB10
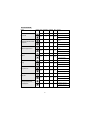
Vols-au-vent / Puff pastry crackers
Yes 2 175-200 20-30 Drip tray / baking tray
Yes 1-3 175-200 25-45
Shelf 3: oven tray on wire shelf
Shelf 1: drip tray / baking tray
Lasagne / Baked pasta / Cannelloni / Flans Yes 2 200 45-55 Oven tray on wire shelf
Lamb / Veal / Beef / Pork 1 Kg Yes 2 200 80-110 Drip tray or oven tray on wire shelf
Chicken / Rabbit / Duck 1 Kg Yes 2 200 50-100 Drip tray or oven tray on wire shelf
Turkey / Goose 3 Kg Yes 1/2 200 80-130 Drip tray or oven tray on wire shelf
Baked fish / en papillote (fillet, whole) Yes 2 175-200 40-60 Drip tray or oven tray on wire shelf
Stuffed vegetables (tomatoes, courgettes,
aubergines)
Yes 2 175-200 50-60 Oven tray on wire shelf
Toast Yes 4 200 2-5 grill
Fish fillets / steaks Yes 4 200 20-30
Shelf 4: wire shelf (turn food halfway through
cooking)
Shelf 3: drip tray with water
Sausages / Kebabs / Spare ribs / Hamburgers Yes 4 200 30-40
Shelf 4: wire shelf (turn food halfway through
cooking)
Shelf 3: drip tray with water
Roast chicken 1-1.3 Kg - 2 200 55-70
Shelf 2: wire shelf (turn food two thirds of the
way through cooking if necessary)
Shelf 1: drip tray with water
Roast chicken 1-1.3 Kg - 2 200 60-80
Shelf 2: turnspit
Shelf 1: drip tray with water
Roast Beef rare 1 Kg - 2 200 35-45
Oven tray on wire shelf (turn food two thirds of
the way through cooking if necessary)
Leg of lamb / Shanks - 2 200 60-90
Drip tray or oven tray on wire shelf (turn food
two thirds of the way through cooking if
necessary)
Roast potatoes - 2 200 45-55
Drip-tray / baking tray (if necessary, turn food
two thirds of the way through cooking)
Vegetable gratin - 2 200 20-30 Oven tray on wire shelf
Lasagna & Meat Yes 1-3 200 50-100
Shelf 3: oven tray on wire shelf
Shelf 1: drip tray or oven tray on wire shelf
Recipe Function Pre-
heating
Shelf (from
bottom)
Temp.
(°C)
Time
(min)
Accessories

GB11
The times given in the table are for cooking done with delayed start mode (if available). Cooking times may be longer, depending on the dish.
N.B.: the cooking function symbols can be slightly different from the drawing.
N.B.: cooking times and temperatures are approximate for 4 portions.
How to read the cooking table
The table indicates the best function to use for any given food, to be cooked on one or more shelves at the same time. Cooking times start from the moment food is
placed in the oven, excluding pre-heating (where required). Cooking temperatures and times are purely for guidance and will depend on the amount of food and type
of accessory used. Use the lowest recommended values to begin with and, if the food is not cooked enough, then move on to higher values. Use the accessories supplied
and preferably dark coloured metal cake tins and oven trays. You can also use pans and accessories in pyrex or stoneware, but bear in mind that cooking times will be
slightly longer. To obtain best results, follow the advice given in the cooking table for the choice of accessories (supplied) to be placed on the various shelves. When
cooking food that contains lots of water, preheat the oven.
Cooking different foods at the same time
Using the “CONVECTION BAKE” function (if present), you can cook different foods which require the same cooking temperature at the same time (for example: fish and
vegetables), using different shelves. Remove the food which requires less cooking time and leave food which requires longer cooking time in the oven.
Desserts
- Cook delicate desserts with the conventional function on one shelf only. Use dark coloured metal cake tins and always position them on the wire shelf supplied. To
cook on more than one shelf, select the forced air function and stagger the position of the cake tins on the shelves, aiding optimum circulation of the hot air.
- To check whether a raising cake is cooked, insert a wooden toothpick into the centre of the cake. If the toothpick comes out clean, the cake is ready.
- If using non-stick cake tins, do not butter the edges as the cake may not rise evenly around the edges.
- If the cake “sinks” during cooking, set a lower temperature the next time, perhaps reducing the amount of liquid in the mixture and mixing more gently.
- For sweets with moist fillings (cheesecake or fruit pies) use the “CONVECTION BAKE” function (if present). If the base of the cake is soggy, lower the shelf and
sprinkle the bottom of the cake with breadcrumbs or biscuit crumbs before adding the filling.
Meat
- Use any kind of oven tray or pyrex dish suited to the size of the piece of meat being cooked. For roast joints, it is best to add some stock to the bottom of the pan,
basting the meat during cooking for added flavour. When the roast is ready, let it rest in the oven for another 10-15 minutes, or wrap it in aluminium foil.
- When you want to grill meat, choose cuts with an even thickness all over in order to achieve uniform cooking results. Very thick pieces of meat require longer
cooking times. To avoid the meat from burning on the outside, lower the position of the wire shelf, keeping the food farther away from the grill. Turn the meat
two thirds of the way through cooking.
To collect the cooking juices it is advisable to place a drip-tray with half a litre of water directly under the grill on which the meat is placed. Top-up when necessary.
Turnspit (only in some models)
Use this accessory to evenly roast large pieces of meat and poultry. Place the meat on the spit rod, tying it with string if chicken, and check that it is secure before
inserting the rod in the seat located on the front wall of the oven and resting it on the respective support. To avoid smoke and to collect cooking juices, it is advisable
to place a drip-tray with half a litre of water on the first level. The rod has a plastic handle which must be removed before starting to cook, and used at the end of cooking
to avoid burns when taking the food out of the oven.
Pizza
Lightly grease the trays to ensure the pizza has a crispy base. Scatter the mozzarella over the pizza two thirds of the way through cooking.
Rising function (present only in specific models)
It is always best to cover the dough with a damp cloth before placing it in the oven. Dough proving time with this function is reduced by approximately one third
compared to proving at room temperature (20-25°C). Proving time for a 1 Kg batch of pizza dough is around one hour.
Meat & Potatoes Yes 1-3 200 45-100
Shelf 3: oven tray on wire shelf
Shelf 1: drip tray or oven tray on wire shelf
Fish & Vegetables Yes 1-3 175 30-50
Shelf 3: oven tray on wire shelf
Shelf 1: drip tray or oven tray on wire shelf
RECOMMENDED USE AND TIPS
Recipe Function Pre-
heating
Shelf (from
bottom)
Temp.
(°C)
Time
(min)
Accessories

SE12
DIN OCH ANDRAS SÄKERHET ÄR MYCKET VIKTIG
Både instruktionsboken och apparaten själv är utrustade med viktiga meddelanden som handlar om säkerhet - läs dessa och följt alltid råden.
Alla säkerhetsvarningar ger specifika detaljer om den potentiella risk som föreligger och indikerar hur du skall undvika personskada och annan skada samt elektriska
stötar på grund av felaktig användning av apparaten. Följ noggrannt dessa instruktioner:
- Apparaten skall alltid vara skild från elnätet innan arbete med installation utförs på apparaten.
- Installation och underhåll skall utföras av behörig fackman i enlighet med tillverkarens anvisningar och i enlighet med lokala säkerhetsbestämmelser.
Reparera inte eller byt ut delar på apparaten om detta inte direkt rekommenderas i instruktionsboken.
- Enligt lag är det obligatoriskt att ansluta denna apparat till jord.
- Elsladden måste vara tillräckligt lång för att apparat som är inbyggd i köksskåp skall kunna anslutas till ett eluttag.
- För att installationen skall uppfylla gällande säkerhetskrav, krävs att en enpolig strömbrytare med minst 3 mm kontaktavstånd används.
- Använd inte adaptrar eller förlängningssladdar.
- Dra inte i elsladden för att skilja apparaten från elnätet.
- När installationen är klar skall det inte gå att komma åt de elektriska komponenterna.
- Vidrör aldrig apparaten med våta kroppsdelar och var inte barfota när du använder den.
- Apparaten är uteslutande avsedd att användas i hushållet för tillagning av livsmedel. Det är inte tillåtet att använda apparaten för andra ändamål (t ex: värma
upp rum). Tillverkaren ansvarar inte för olämplig eller felaktig användning eller för felaktiga inställningar av kontrollerna.
- Apparaten får ej användas av personer (inklusive barn) med reducerad fysisk, känslomässig eller mental kapacitet, eller av personer utan lämplig kompetens eller
erfarenhet, såvida de inte fått instruktioner om apparatens användande från den eller de personer som ansvarar för deras säkerhet.
- Apparatens åtkomliga delar kan bli mycket heta under användning. Barn måste hållas under uppsikt så att de inte leker med apparaten.
- Under och efter användning av apparaten, skall du inte röra vid värmeelementen eller de inre panelerna eftersom detta kan leda till brännskador. Undvik kontakt
med trasor eller andra brännbara material tills alla apparatens komponenter har svalnat.
- När tillagningen är klar, öppna luckan försiktigt för att gradvis släppa ut den varma luften eller ångan, innan du försöker ta ut det som finns inuti apparaten. Med
luckan stängd kommer varmluften ut från öppningen som sitter över kontrollpanelen. Täpp aldrig till ventilationsöppningarna.
- Använd grytlappar för att ta ut kokkärl och tillbehör och var försiktig och vidrör aldrig värmeelementen inuti apparaten.
- Lägg aldrig lättantändligt material inne i apparaten eller i närheten av den. Om apparaten skulle slås på av misstag kan detta material fatta eld.
- Värm eller tillaga inte livsmedel i stängda burkar i apparaten. Det tryck som utvecklas i burken kan få den att explodera och skada apparaten.
- Använd inte kokkärl i syntetmaterial.
- Fett och upphettade oljor kan lätt fatta eld. Övervaka tillagningen när du lagar mat med mycket fett och olja.
- Lämna aldrig apparaten utan uppsyn när du torkar mat.
- Om alkoholhaltiga drycker används vid matlagningen (t.ex. rom, konjak, vin), tänk på att alkohol avdunstar vid höga temperaturer. Dessa ångor kan alltså fatta
eld när de kommer i kontakt med det elektriska värmeelementet.
Kassering av hushållsapparater
- Denna produkt är tillverkad av material som kan återanvändas eller återvinnas. Kassera den enligt lokala bestämmelser för avfallshantering. Innan du kasserar
apparaten, klipp av elsladden.
- För mer information om hantering, återvinning och återanvändning av elektriska hushållsapparater, var god kontakta de lokala myndigheterna, ortens
sophanteringstjänst eller butiken där produkten inhandlades.
VIKTIG SÄKERHETSINFORMATION
Detta är en säkerhetssymbol för fara, och symbolen varnar för eventuella risker för användaren och andra i närheten.
Alla säkerhetsmeddelanden följer efter symbolen för fara och följande ord:
FARA
Visar på en farlig siuation som, om den inte undviks, kommer att förorsaka svåra skador.
VARNING
Visar på en farlig siuation som, om den inte undviks, kan förorsaka svåra skador.

SE13
När ugnen har packats upp, kontrollera att ugnen inte har skadats under transporten och att ugnsluckan stänger ordentligt. Om du inte är säker, kontakta kundservice
eller närmaste återförsäljare. För att undvika eventuella skador, rekommenderar vi att du inte tar ut ugnen från sitt emballage förrän du skall installera den.
ATT FÖRBEREDA INBYGGNADSUTRYMMET
• De köksskåp som står intill ugnen måste vara värmetåliga (minst 90 °C).
• Utför alla utskärningar på inbyggnadsmöbeln innan du för in ugnen, och avlägsna noggrant allt sågspån och damm.
• Den undre delen av apparaten får inte vara åtkombar efter installation.
• För att apparaten skall fungera korrekt får du inte blockera öppningen mellan arbetsbänken och den övre delen av ugnen.
ANSLUTNING TILL STRÖMFÖRANDE NÄT
Försäkra dig om att den spänning som anges på apparatens typskylt överensstämmer med nätspänningen. Typskylten sitter på framkanten av ugnen (syns när luckan
är öppen).
• Eventuellt byte av strömkabel (av typ H05 RR-F 3 x 1,5 mm
2
) skall endast utföras av kvalificerad elektriker. Vänd dig till auktoriserad serviceverkstad.
ALLMÄNNA RÅD
Före första användning:
- Ta bort pappskydd, plastfilmer och etiketter på tillbehören.
- Ta ut alla tillbehör ur ugnen. Ställ in värmen på 200 °C och låt ugnen vara på i cirka en timme så att lukt och ånga från isoleringsmaterial och skyddsfett
elimineras.
Under användning:
- Lägg aldrig något tungt föremål på ugnsluckan, eftersom detta kan skada den.
- Håll inte i dig i luckan eller häng saker på dess handtag.
- Täck inte ugnens botten med aluminiumfolie.
- Häll aldrig vatten direkt in i en het ugn: emaljen kan skadas.
- Dra inte pannor eller andra kokkärl över bottnen, för att inte skada emaljen.
- Försäkra dig om att elsladdar till andra hushållsapparater inte vidrör heta delar och att de inte kan fastna i ugnsluckan.
- Undvik att utsätta ugnen för “väder och vind”.
Kassering av emballagematerialet
Emballagematerialet kan återvinnas till 100%, vilket framgår av återvinningssymbolen ( ). De olika delarna av förpackningen får inte kasseras som vanligt avfall,
utan skall återvinnas enligt bestämmelserna från lokala myndigheter.
Kassering av apparaten
- Denna apparat är märkt enligt EG-direktiv 2002/96/EG beträffande elektriskt och elektroniskt avfall (Waste Electrical and Electronic Equipment, WEEE).
- Genom att säkerställa en korrekt kassering av denna produkt bidrar du till att förhindra potentiella negativa konsekvenser för vår miljö och vår hälsa, som annars
kan bli följden om produkten inte hanteras på rätt sätt.
- Symbolen på apparaten och på de dokument som medföljer apparaten visar att denna apparat inte får skrotas som hushållsavfall, utan skall lämnas in på
miljöstation för återvinning av elektroniska apparater WEEE.
Energibesparing
- Förvärm endast ugnen om detta skall ske enligt tillagningstabellen eller om ditt recept kräver det.
- Använd mörka eller svartlackerade ugnsformar och bakplåtar, eftersom dessa absorberar värme mycket bättre än andra matlagningskärl.
- Stäng av ugnen 10-15 minuter innan den inställda koktiden löper ut. Om en maträtt kräver långkok kommer den att fortsätta tillagas ändå.
- Denna ugn, vilken är avsedd att komma i kontakt med livsmedel, följer den europeiska förordningen ( ) n. 1935/2004 och är designad, tillverkad och såld
enligt säkerhetskraven i Lågspänningsdirektiv 2006/95/EG (som ersätter 73/23/EG med ändringar) och skyddskraven i EMC-direktiv 2004/108/EG.
INSTALLATION
MILJÖSKYDDSRÅD
FÖRSÄKRAN OM ÖVERENSSTÄMMELSE

SE14
Ugnen fungerar inte:
• Kontrollera att spänningen kommer fram till eluttaget som ugnen är ansluten till.
• Stäng av och sätt på ugnen igen för att undersöka om problemet har löst sig.
Ugnsluckan är spärrad:
• Stäng av och sätt på ugnen igen för att undersöka om problemet har löst sig.
• VIKTIGT:Under självrengöring går det inte att öppna ugnsluckan. Vänta tills den automatiskt låses upp (se avsnittet “Rengöringscykel på ugn med
pyrolysfunktion”).
Programmeraren fungerar inte:
• På displayen visas “ ” följt av ett nummer - kontakta närmaste Kundtjänst. Specificera i detta fall numret som följer bokstaven “”.
Innan du kontaktar Kundtjänst:
1. Försök att lösa problemet på egen hand enligt anvisningarna i punkterna i kapitel “Felsökning”.
2. Stäng av och sätt på ugnen igen för att se om problemet har löst sig.
Om problemet kvarstår efter dessa kontroller bör du kontakta närmaste Kundtjänst.
Lämna alltid följande uppgifter:
• en kort beskrivning av felet,
• exakt ugnstyp och ugnsmodell,
• servicenumret (dvs numret som finns efter ordet Service på typskylten) som är placerat på höger innerkant i ugnsutrymmet (syns när ugnsluckan är öppen).
Servicenumret finns även i garantihäftet;
• fullständig adress,
• telefonnummer.
Vänd dig alltid till en auktoriserad serviceverkstad om det blir nödvändigt med reparation (som garanti för att originalreservdelar används och att reparationen
utförs på korrekt sätt).
Ugnens utsida
VIKTIGT:Använd inte frätande eller slipande rengöringsmedel. Om en produkt av denna typ av misstag skulle spillas på apparaten bör du
omedelbart torka bort den med en fuktig trasa.
• Rengör ytorna med en fuktig trasa. Om de är mycket smutsiga kan du tillsätta ett par droppar flytande diskmedel till vattnet. Torka med en torr trasa.
Ugnens insida
VIKTIGT:Använd inte slipande svampar, stålull eller metallskrapor. De kan skada de emaljerade ytorna och luckans glas.
• Efter varje användningstillfälle, låt ugnen svalna och rengör den helst medan den fortfarande är varm för att ta bort ansamlad smuts och fläckar som orsakats
av matrester (t.ex. mat med hög sockerhalt).
• Använd produkter som är speciellt avsedda för rengöring av ugnar (se Tillverkarens indikationer).
• Rengör luckans glas med ett specifikt flytande rengöringsmedel. Det går att ta av ugnsluckan för att underlätta rengöring av ugnen (se UNDERHÅLL).
• Grillelementet överst i ugnen kan sänkas (endast på vissa modeller) för att du ska kunna rengöra innertaket på apparaten (se UNDERHÅLL).
OBSERVERA:Under lång tillagning av mat med hög vattenhalt (t.ex. pizza, grönsaker) kan kondens bildas på ugnens insida och runt tätningen.
När ugnen har svalnat, torka av insidan med en trasa eller en svamp.
Tillbehör:
• Diska tillbehören med vanligt diskmedel direkt efter användningen, hantera dem med ugnsvantar om de fortfarande är varma.
• Matrester kan lätt avlägsnas med en diskborste eller svamp.
FELSÖKNING
KUNDTJÄNST
RENGÖRING
VARNING
- Använd inte ångrengöringsutrustning.
- Rengör ugnen endast när den är kall.
- Koppla loss ugnen från eluttaget före service.

SE15
Rengöring av den bakre panelen och de katalytiska sidopanelerna (beroende på modell):
VIKTIGT:använd aldrig slipande eller frätande rengöringsmedel, repande svampar, stålull eller ugnsrengöringsspray, eftersom dessa kan skada
de katalytiska panelernas förmåga till självrengöring.
• Töm ugnen, sätt på den, ställ in den på varmluft 200 °C och låt den stå på i ungefär en timme
• Sedan, när ugnen svalnat, använder du vid behov en fuktig trasa för att torka bort eventuella matrester.
ATT TA AV UGNSLUCKAN
Gör så här för att ta av luckan:
1. Öppna ugnsluckan helt.
2. Lyft de två spärrhakarna i gångjärnen och skjut dem framåt till anslaget (Bild 1).
3. Stäng luckan till spärren (A), lyft den (B) och vrid runt den (C) tills den lossnar (D) (Bild 2).
Gör så här för att sätta tillbaka ugnsluckan:
1. För in gångjärnen på sina platser.
2. Öppna ugnsluckan helt.
3. Skjut ned de två spärrhakarna.
4. Stäng luckan.
FLYTTA PÅ DET ÖVRE VÄRMEELEMENTET (ENDAST VISSA MODELLER)
1. Avlägsna tillbehörens guideskenor (Bild 3).
2. Dra ut elementet (Bild 4) en aning och sänk det (Bild 5).
3. För att sätta tillbaka elementet, lyft det, dra det en aning mot dig, och se till att det vilar i sina sidostöd.
UNDERHÅLL
VARNING
- Använd skyddshandskar.
- Utför följande ingrepp då apparaten har svalnat.
- Koppla loss ugnen från eluttaget före service.
Bild 1 Bild 2
Bild 3 Bild 4 Bild 5

SE16
BYTE AV LAMPA
För att byta den bakre ugnslampan (beroende på modell):
1. Skilj ugnen från elnätet.
2. Skruva loss lampglaset (Bild 6), byt ut glödlampan (se notering för typ av lampa) och skruva tillbaka lampglaset (Bild 7).
3. Återanslut ugnen till elnätet.
OBSERVERA:
- Använd endast glödlampor med följande märkdata: 25-40 W/230 V, typ E-14, T 300 °C.
- Lamporna finns hos vår Kundtjänst.
VIKTIGT:
- Sätt inte på ugnen förrän lampskyddet har satts på plats.
FÖR ELEKTRISK KOPPLING, SE KAPITLET OM INSTALLATION
1. Kontrollpanel
2. Övre ugnselement/grillelement
3. Kylsystem (på vissa modeller)
4. Typskylt (skall ej avlägsnas)
5. Lampor
6. Ventilationssystem för bakning (på vissa modeller)
7. Roterande grillspett (beroende på modell)
8. Nedre ugnselement (dolt)
9. Lucka
10. Hyllpositioner
11. Bakre vägg
OBSERVERA:
- Då tillagningen är klar och ugnen stängts av kan kylfläkten fortsätta fungera under en viss tidsrymd.
Bild 6 Bild 7
BRUKSANVISNING FÖR DENNA UGN
1
11
5
2
4
7
8
10
9
6
3

SE17
KOMPATIBLA TILLBEHÖR
(för tillbehören som medföljer ugnen, se det tekniska databladet)
Långpanna (Bild 1)
Långpannan är avsedd för att samla upp fett och matpartiklar när den placeras under gallerhyllan. Den kan också användas som plåt för att exempelvis tillaga kött,
kyckling och fisk, med eller utan grönsaker. Häll lite vatten i långpannan så blir det inte så mycket matos och fettstänk.
Bakplåt (Bild 2)
Kan användas för att baka småkakor, sockerkakor och pizza.
Galler (Bild3)
För grillning av mat eller som stöd för bakplåtar, kakformar och andra kokkärl. Gallerhyllan kan placeras på alla nivåer. Gallerhyllankan föras in med de bågformade
sidorna vända uppåt eller nedåt.
Katalytiska sidopaneler (Bild 4)
De katalytiska panelerna har en porös beläggning som absorberar fettstänk. Vi rekommenderar att du utför en automatisk rengöringscykel när du har tillagat mat med
extra hög fetthalt (se RENGÖRING).
Roterande grillspett (Bild 5)
Använd grillspettet såsom visas i Bild 9. Se även avsnittet “Råd och förslag” för mer information.
Grillset (Bild 6)
Grillsetet består av ett galler (6a) och en emaljerad plåt (6b). Detta set måste placeras på gallerhyllan (3) och användas tillsammans med grillfunktionen.
Fettfilter (Bild 7)
Använd fettfiltret endast för tillagning av mat med extra hög fetthalt. Haka fast filtret på den bakre väggen i ugnsutrymmet, mitt emot fläkten. Filtret kan rengöras i
diskmaskin och kan användas med funktioner där fläkten används.
Utdragbara hyllplan (Bild 8)
De gör att gallerhyllor och långpannor kan dras ut halvvägs under tillagning. Lämpliga för alla tillbehör och kan rengöras i diskmaskin.
Bild 1 Bild 2 Bild 3 Bild 4
Bild 5 Bild 6 Bild 7 Bild 8
Bild 9
6a
6b

SE18
BESKRIVNING AV KONTROLLPANELEN
1. Vred för val av funktion
2. Elektronisk programmerare
3. Termostatvred
4. Termostatens kontrollampa - röd
ANVÄNDNING AV UGNEN
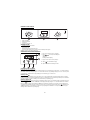
• Vrid funktionsväljaren till önskad funktion.
Ugnsbelysningen tänds.
• Vrid termostatvredet medurs till önskad temperatur.
Termostatens röda kontrollampa tänds och slocknar sedan när inställd temperatur har uppnåtts
Vrid tillbaka vredet till “0” när du är klar med tilllagningen.
ATT ANVÄNDA DEN ELEKTRONISKA PROGRAMMERAREN
Inställningar före första användningen
Inställning av klockslag och typ av akustisk signal.
Då ugnen kopplas till strömförande nät, visas AUTO och 0.00 blinkande på displayen. För att ställa in klockslag, tryck på knapparna - och + samtidigt: den mittersta
pricken blinkar. Ställ in klockslag med hjälp av knapparna + och -. Då du ställt in önskat värde, tryck på mittknappen. Displayen visar då “ton 1”. För att välja önskad
ton, tryck på knappen –. Då du valt önskad ton, tryck på mittknappen. För att ändra klocklag, gör så som beskrivs ovan.
Inställning av timer
För att ställa in timern, tryck på mittknappen en längre stund: displayen visa 0.00 och klocksymbolen blinkar. Ställ in timern med hjälp av knappen + (maximalt
inställbart värde är 23 timmar och 59 minuter). Nedräkningen börjar efter ett par sekunder. Displayen visar nuvarande klockslag och klockan lyser fast som bekräftelse
av att timern är inställd. För att visualisera nedräkningen, och eventuellt ändra den, tryck på mittknappen igen.
Inställning av tillagningstid
Efter att ha valt tillagningssätt och temperatur med vreden, tryck på mittknappen: displayen visar nu 0.00 och klocksymbolen blinkar. Tryck på mittknappen igen: på
displayen visas och 0.00 efter varandra, och AUTO blinkar. Ställ in tillagningstid med hjälp av knapparna + och - (maximalt inställbart värde är 10 timmar).
Efter ett par sekunder visar displayen nuvarande klockslag och AUTO lyser fast som bekräftelse på inställningen. För att visualisera återstående tillagningstid och
eventuellt ändra den, tryck på mittknappen under 2 sekunder, och tryck sedan ännu en gång på den. Då tiden runnit ut släcks symbolen och ljudsignalen lyder
och AUTO blinkar på displayen. Tryck på vilken knapp som helst för att stänga av ljudsignalen. För tillbaka funktions- och temperaturvredet till noll och tryck på
mittknappen under två sekunder för att stänga av tillagningen.
1. Knapp -: för att ändra det värde som visas på displayen
2. Knapp : för att välja de olika inställningarna:
Timer
Tillagningstid
Inställning av sluttid för tillagning
3. Knapp +: för att öka det värde som visas på displayen
A. Symbolen visar att timerfunktionen är igång
B. Symbolen AUTO bekräftar att inställningen har utförts
2
4
3
A
U
T
O
2 31
A
B

SE19
Att fördröja sluttiden på tillagningen
Efter att ha valt tillagningstid, tryck på mittknappen: på displayen visas , sluttid för tillagning och AUTO blinkande i sekvens. Tryck på knappen + för att
visualisera önskad sluttid för tillagning (tillagningen kan fördröjas maximalt 23 timmar och 59 minuter). Efter ett par sekunder visar displayen nuvarande klockslag,
symbolen släcks och AUTO lyser fast som bekräftelse på inställningen. För att visualisera sluttid för tillagning och eventuellt ändra den, tryck på mittknappen,
och tryck sedan två gånger till på den. I slutet av nedräkningen tänds symbolen och ugnen startar valt tillagningsläge.
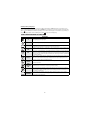
TABELL MED BESKRIVNING AV FUNKTIONER
FUNKTIONSRATT
OFF För att stoppa tillagningen och stänga av ugnen.
LAMPA För att tända/släcka ugnens innerbelysning.
ÖVER/UNDERVÄRME
Denna funktion kan användas för alla typer av tillagning på en nivå. Använd den 2:a ugnsfalsen. Förvärm ugnen till önskad
temperatur. Termostatens lysdiod stängs av då ugnen är redo och maten kan placeras i ugnen.
ÖVER/UNDERV.&
FLÄKT
För att baka tårta med flytande fyllning (söt eller kryddad) på en nivå. Denna funktion kan även användas för tillagning på två
nivåer. Låt maträtterna växla läge i ugnen under koktiden för att få en jämnare tillagning. Använd ugnsfals 2 då du endast
använder en nivå, och använd ugnsfalsarna 2 och 4 då du tillagar på två nivåer. Förvärm ugnen innan du startar tillagningen.
GRILL
För grillning av stekar, grillspett och korv, för att gratinera grönsaker och för att rosta bröd. Vi rekommenderar att du placerar
maträtterna på 4:e ugnsfalsen. Då du grillar köttbitar rekommenderar vi att du använder en långpanna under för att fånga upp
köttsaften. Placera den på 3:e ugnsfalsen och fyll den med en halvliter vatten. Förvärm ugnen i 3-5 minuter. Ugnsluckan skall
vara stängd under tillagningen.
TURBOGRILL
Används för att grilla större köttbitar (lammstek, rostbiff, kyckling). Placera köttet på de mittersta falsarna. Vi rekommenderar
att du använder en långpanna under för att fånga upp köttsaften. Placera den på 1:a eller 2:a ugnsfalsen och fyll den med en
halvliter vatten. Låt gärna maträtterna växla läge i ugnen under koktiden för att få en jämnare tillagning. Du behöver inte
förvärma ugnen. Ugnsluckan skall vara stängd under matlagningen.
UPPTINING
För att snabba på upptining av livsmedel. Placera maten på den mittersta ugnsfalsen. Låt maten ligga kvar i förpackningen.
Det förhindrar att ytan blir torr.
UNDRE
UPPVÄRMNING +
FLÄKT
Avsedd för tillagning på en och samma fals, t.ex. frukt, tårtor, grönsaker, pizza, kyckling.
VARMLUFT
Används när man vill laga flera olika maträtter som kräver samma temperatur (t ex: fisk, grönsaker, tårtor) på maximalt två
ugnsfalsar samtidigt. Funktionen gör det möjligt att tillaga maten utan risk att de drar åt sig arom från varandra. Du bör
placera rätten på den 2:a ugnsfalsen om du tillagar på endast en nivå. Om du tillagar på två nivåer, bör du använda den 1:a och
den 3:e ugnsfalsen, och förvärm ugnen.
UNDRE
UPPVÄRMNING
Använd denna funktion efter tillagning för att bryna rättens undersida. Du bör placera rätten på 1:a eller 2:a ugnsfalsen.
Denna funktion kan även användas för långsam tillagning, så som grönsaker och köttgrytor. Då bör du använda den 2:a
ugnsfalsen. Du behöver inte förvärma ugnen.
Sidan laddas ...
Sidan laddas ...
Sidan laddas ...
Sidan laddas ...
Sidan laddas ...
Sidan laddas ...
Sidan laddas ...
Sidan laddas ...
Sidan laddas ...
Sidan laddas ...
Sidan laddas ...
Sidan laddas ...
Sidan laddas ...
Sidan laddas ...
Sidan laddas ...
Sidan laddas ...
Sidan laddas ...
Sidan laddas ...
Sidan laddas ...
Sidan laddas ...
Sidan laddas ...
Sidan laddas ...
Sidan laddas ...
Sidan laddas ...
Sidan laddas ...
Sidan laddas ...
Sidan laddas ...
Sidan laddas ...
Sidan laddas ...
Sidan laddas ...
Sidan laddas ...
Sidan laddas ...
Sidan laddas ...
Sidan laddas ...
Sidan laddas ...
Sidan laddas ...
Sidan laddas ...
Sidan laddas ...
Sidan laddas ...
Sidan laddas ...
Sidan laddas ...
Sidan laddas ...
Sidan laddas ...
Sidan laddas ...
Sidan laddas ...
Sidan laddas ...
Sidan laddas ...
Sidan laddas ...
Sidan laddas ...
Sidan laddas ...
Sidan laddas ...
Sidan laddas ...
Sidan laddas ...
Sidan laddas ...
Sidan laddas ...
Sidan laddas ...
Sidan laddas ...
Sidan laddas ...
Sidan laddas ...
Sidan laddas ...
-
 1
1
-
 2
2
-
 3
3
-
 4
4
-
 5
5
-
 6
6
-
 7
7
-
 8
8
-
 9
9
-
 10
10
-
 11
11
-
 12
12
-
 13
13
-
 14
14
-
 15
15
-
 16
16
-
 17
17
-
 18
18
-
 19
19
-
 20
20
-
 21
21
-
 22
22
-
 23
23
-
 24
24
-
 25
25
-
 26
26
-
 27
27
-
 28
28
-
 29
29
-
 30
30
-
 31
31
-
 32
32
-
 33
33
-
 34
34
-
 35
35
-
 36
36
-
 37
37
-
 38
38
-
 39
39
-
 40
40
-
 41
41
-
 42
42
-
 43
43
-
 44
44
-
 45
45
-
 46
46
-
 47
47
-
 48
48
-
 49
49
-
 50
50
-
 51
51
-
 52
52
-
 53
53
-
 54
54
-
 55
55
-
 56
56
-
 57
57
-
 58
58
-
 59
59
-
 60
60
-
 61
61
-
 62
62
-
 63
63
-
 64
64
-
 65
65
-
 66
66
-
 67
67
-
 68
68
-
 69
69
-
 70
70
-
 71
71
-
 72
72
-
 73
73
-
 74
74
-
 75
75
-
 76
76
-
 77
77
-
 78
78
-
 79
79
-
 80
80


Whirlpool AKP 458/IX Användarguide
- Kategori
- Ugnar
- Typ
- Användarguide