
1
Original Bedienungsanleitung manual
Merano

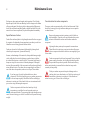
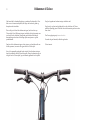
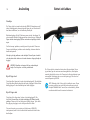
Hello.

Congratulations on your Merano.

4
Our brand stands for sustainable design and maximum functionality. We
don’t mind taking unconventional paths as long as the products we pass
on to our clients did fully convince us.
Please make sure to have read and understood the complete user manual
before using your Coboc e-bike, as it contains a lot of information relevant
to your personal safety. Non-observance may lead to serious accidents, as
well as personal or material damage.
Each other person using, repairing, servicing or disposing of your Coboc
e-bike, has to fully acknowledge and understand the content of the user
manuals.
If there still are any unanswered questions please contact your local Coboc
dealer. This user manual is part of the scope of delivery of your Coboc
e-bike. It is only valid for the product shipped along with it. Please make
sure to store this manual in a safe place.
Please also make sure to enquire information about your national gui-
delines before using your Coboc e-bike on public roads. Take note that
for improvement purposes. The contents of this manual could be altered
without prior public announcement.
You may nd possible updates at: www.coboc.biz/bedienungsanleitung
But for now we wish you an electrifying driving experience.
Your Coboc Team.
Welcome to Coboc
State December 2020

5
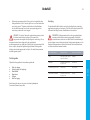
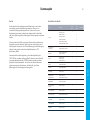
Overview to your Merano
Safety Instructions
Quick Start Guide
Legal provisions
Intended use
• Weight information for your Coboc e-bike
• Rack
• (Child) trailers
• Child seat
Before every ride
Handling
• Operating the Coboc Electric Drive
• Operating the lights
• Notes on using the brakes
• Level of motor support
• Two different driving modes
• Gear shift
Battery & Charger
• Range
• Charging the battery
• Storage
• Transport
• Disposal
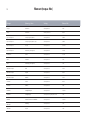
Page 6
Page 7
Page 8
Page 10
Page 11
Page 12
Page 13
Page 16
Page 19
Page 29
Page 29
Page 30
Page 31
Page 32
Page 33
Page 34
Page 35
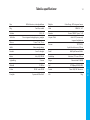
Maintainance & care
• Care instructions
• Safety instructions for carbon components
• Special features of carbon
• Care instructions for carbon components
• Inspection
• Wear parts
• Lubrication
• Repairing punctures
• Removing the rear wheel
• Installation of the rear wheel
• Adjusting the brakes
• Testing the brakes
• Aligning your brake caliper
• Checking the brake pads
• Checking the rims
• Derailleur
• Adjusting the derailleur systemically
• SRAM X-SYNC drive technology
• Adjusting the headset
Coboc App
Error codes
Tightening torques
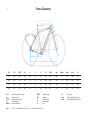
Technical specications
Frame geometry
Warranty & Guarantee
EG - Declaration of Conformity
Imprint
Content
English

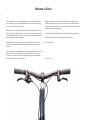
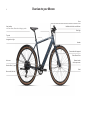
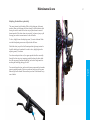
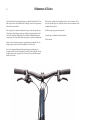
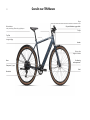
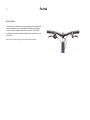
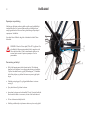
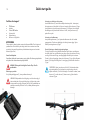
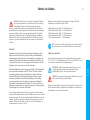
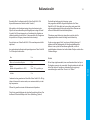
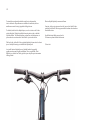
6Overview to your Merano
Motor cable (left side)
User Interface
with Power-Button, Bluetooth and charging socket
Hub motor
Rear derailleur (11 gears)
Integrated rear light
Headset
Down tube with integrated
Coboc Electric Drive
Pedal
Stem
Handlebar with brake- and shiftlever
Front Light
Bottom bracket
with torque sensor
Top tube

7
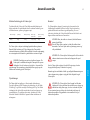
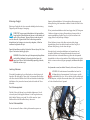
Safety Instructions
Please make sure that you’ve carefully read and understood the user
manual, before using your Coboc e-bike for the rst time, as it contains a
lot of safety relevant information.
Non-observance may lead to serious accidents, as well as personal and/or
material damage. If you borrow your Coboc e-bike to someone you should
insist that those borrowing it have completely read and understood the
manual before riding for the rst time.
The user manual is best kept close to your Coboc e-bike, so that it is
accessible at any time needed. Always drive responsibly, as cyclists are
exposed to increased risks, especially when riding on public roads. We
recommend wearing a safety helmet during every cycling trip. The safety
helmet should be correctly adjusted to your head and its intended purpo-
se. Follow the helmet manufacturers instructions. Wear a suitable outt. It
should be bright and you should attach reectors so that other road users
can recognize you early enough. Clothing in the leg area should have a
tight t so that your clothes can’t get caught in your Coboc e-bike.
Use cycle clips if needed. Entangling clothes in your Coboc e-bike may
result in an accident. Take into account the increased performance. Due
to the electric motor in your Coboc e-bike the performance is consider-
ably higher than that of ordinary bikes. On the one hand this means that
higher top speeds can be reached and on the other hand that more torque
is transmitted to the rear wheel. This may lead to unusual sliding of the
wheels, especially on wet ground.
Get used to your Coboc e-bike. The special characteristics of your Coboc
e-bike require you to familiarise with them in safe and open areas. Only
use your Coboc e-bike in public as soon as you have it under control.
Symbolism: for a more simple readability certain points in this user manual
are highlighted. We used the following symbolism for that:
INFO: This symbol highlights valuable information and points
worth knowing.
CAUTION: This symbol warns you against improper use, that may
lead to environmental pollution, damage to your Coboc e-bike or
other material damage.
WARNING: This symbol indicates possible health hazard and
danger to life, that may occur if the e-bike is being operated
incorrectly or used improperly.
English

8
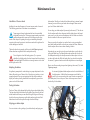
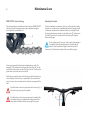
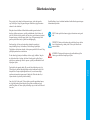
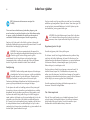
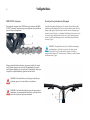
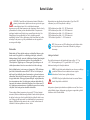
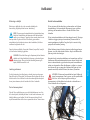
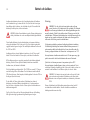
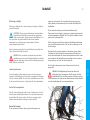
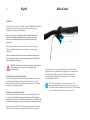
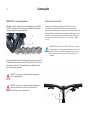
(1)
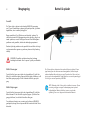
Aligning handlebar and stem
First loosen both screws (1). The tting hex socket key is included with delivery.
Align the handlebar in a way that stem and front wheel are in line with each
other. Now tighten screws (1) again. Afterwards loosen the four screws in the
stem (3). Turn the handlebar into desired driving position and tighten screws
afterwards. Make sure that you tighten all four screws (3) equally.
Adjusting brake levers
Loosen the clamp screws (4) and adjust the brake lever according to your
preferred grip position. It should be comfortable and safe at the same time.
Afterwards tighten the clamp screws (4) again.
Setting headset bearing
Check if the headset bearing has play. To do that, you must pull the front brake
while pushing your e-bike back and forth a couple of times. The handlebar
should be able to slightly move from left to right, while bearing clearance should
stay at a minimum. If there is bearing clearance, again loosen both screws (1)
and slowly tighten screw (2) until the bearing has no play anymore. Afterwards
tighten both screws (1) again.
Do not tighten screw (2) too much, as this may lead to a damaged
headset bearing. If the handlebar only turns with effort, then this could
mean that screw (2) has been tightened too much. If this is the case,
loosen screws (1) in order to slightly loosen screw (2). Afterwards tighten both
screws (1) again.
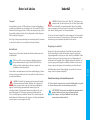
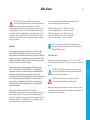
Quick start guide
(1)
(5)
(3)
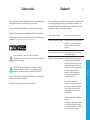
SCOPE OF DELIVERY
• Coboc Merano
• battery charger
• Coboc URB pedals
• hex socket key
• user manual
• reector set with bicycle bell
SET-UP
Coboc e-bikes are almost completely assembled at the point of delivery. However,
handlebar and pedals are loosened for transport, which is why, prior to your rst
ride, you must bear in mind the user manual while taking the following steps. Par-
ticularly take into consideration the safety instructions and the indicated tightening
torque for screw ttings (s. chapter Maintenance & Care such as Tightening torque).
Checking tire pressure
Check for tire pressure before the start of every journey. The correct pressure is
given on the side of the tire and can differ depending on the tire model.
The minimum air pressure of your Coboc e-bike should never fall below
32 psi, as allowing the pressure to get that low may lead to serious
damage on the rims.
Screwing on pedals
Lightly grease the pedal threads before screwing them into the intended cranks (5).
Both pedals have different threads and need to be screwed in at the
intended side. The right pedal has a right-handed thread, while the left
pedal has a left-handed thread. Mixing
them up may lead to damaged crank arms
or pedal threads. Make sure both pedals
are tightened.
(4)
(2)

9
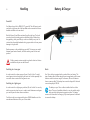
RIDING
Your Coboc e-bike drives like an ordinary bike – only it’s more dynamic. The more
force you use to tread the pedals, the more force is unfolded in the motor. As
soon as you stop treading the pedals, the motor stops supporting you.
You are going to be much more dynamic with your Coboc e-bike than
you are used to. Slowly get used to your Coboc e-bike.
Should you ever have the feeling that the motor support is tuning in too
early or too late, meaning at very low or very high pressure on the
pedals, note that you can always re-calibrate the torque sensor. You can
nd all the necessary information at our helpcenter www.support.coboc.biz/
navigating to 'Service and Care' g 'how do I calibrate my Coboc e-bike?'.
In the event of irregularities in operation or other mistakes, resetting the
user interface might help. To do this you need to press and hold the
power button (7) for about 20 seconds. Your e-bike is going to signalize
a successful reset by briey ashing the LEDs in blue and subsequently scrolling
them from left to right in green light.
CHARGING
The charging socket (8) is placed right behind the power button (7) at the user
interface. Simply connect the magnetic charging plug to start charging your
Coboc e-bike.
A full charge of the battery from 1 % to 100 % usually takes two and a half hours
with the regular Coboc charger ST 4A. However, the battery is already charged
to 90 % after two hours, which means that the charging time for the last 10 %
takes a bit longer (half an hour).
The ideal outside temperature for battery charging is somewhere between
5 ºC and 25 ºC. At temperatures below 0 ºC or above 40 ºC electronics disables
charging, in order to protect the battery from getting damaged.
Quick Start Guide
COBOC ELECTRIC DRIVE
Operating the Power Button
Briey pressing the power button (7) of the user interface,
positioned at the bottom side of the top tube, activates the
Coboc Electric Drive. Your LED display (6) is going to show
at least one lit LED, in order to indicate the battery level
of your Coboc e-bike. Putting more force into the pedals
means unfolding more motor power. As soon as you stop
pedaling, the motor support stops too.
Because of the electrical support you are going to
be much faster and dynamic on the road than you
are used to with ordinary bikes. We suggest you
take your time to get used to this new driving behavior.
Battery level – LEDs are lit up
Errors – LEDs are ashing
Turning your lights on and off
Your Coboc e-bike is equipped with a lighting system. You can turn this system
on and off by pressing down on the power button (7) for 3 seconds. This is also
possible if the Coboc Electric Drive is turned off.
(8) (7)
(6)
5 LEDs are lit up in blue gbattery level of 80 % to 100 %
4 LEDs are lit up in blue gbattery level of 60 % to 80 %
3 LEDs are lit up in blue gbattery level of 40 % to 60 %
2 LEDs are lit up in blue gbattery level of 20 % to 40 %
1 LED are lit up in blue gbattery level of 1 % to 20 %
4 LEDs are ashing red gsomething is wrong with the motor cable
3 LEDs are ashing red gsomething is wrong with the bottom bracket
torque sensor
2 LEDs are ashing red gother mistakes
1 LED are ashing blue gbattery level is too low
English

10
Please observe the existing regulations and laws in your country before
using your Coboc e-bike on public roads. Below are shown the current
most important regulations for Germany only. For a complete listing of
regulations we refer you to the according legislative texts. Since pedelecs
are a rather young vehicle category, so are related laws and regulations. As
these regulations are constantly changing, please make sure to frequently
check for any changes in legislation and regulation.
Within the EU, pedelecs with assisted pedalling up to 25 km/h and a
motor with a continuous performance of 250 watts are controlled with the
same regulations as ordinary bikes. E-Bikes with pedal assistance that may
reach higher top speeds and/or higher motor performance are, according
to EU directive 2002/24/EG, referred to as low-performance mopeds. Such
vehicles require a type approval, such as the duty to wear a helmet and an
insurance obligation.
Coboc e-bikes are shipped with 25 km/h and a motor performance of 250
watts as standard, which is why, according to EU directive 2002/24/EG,
they are exempt from type approval.
German road trafc regulations (StVO) and road trafc licensing act
(StVZO) apply if using public roads. Additionally, the StVZO requires the
following for e-bikes:
A clearly audible bell.
A permanently xed lighting system with white headlight and red rear
light. In order to use the lighting system, e-bikes need to be equipped
with either a generator or a rechargeable energy storage or a combination
of both.
The following reectors need to be attached to the e-bike:
• A white reector in the front.
• A red reector in the back, it may not be a triangular reector of the
category “Z”. It may, however, be integrated into the rear light.
• Laterally tted reectors have to be attached at the front and rear part
of the e-bikes, while at least one has to be attached to the spokes.
Alternatively, you may use tires with reective rings on both front and
rear ends. Every laterally tted reector needs to have the same colour
(yellow or white).
• Pedals need to be equipped with reectors radiating to front and
back.
According to StVZO, bicycle bell and reectors need to be attached to the
e-bike for use on public roads. If necessary a lighting system needs to be
retrotted to the e-bike. Please make sure that your lighting system is at
no time concealed. You may not use your Coboc e-bike on public roads if
the lighting system is somehow damaged. Please contact your local Coboc
dealer if repair or maintenance is necessary.
Responsibility for road safety for every Coboc e-bike remains with the
customers.
Legal provisions

11
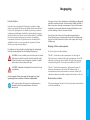
Intended use
Weight information for your Coboc e-bike
Don't overload your Coboc e-bike. The permissible total weight must
not be exceeded. It consists of the weight of the Coboc e-bike + rider +
luggage + other payload (child seat, e-bike trailer, etc. ...).
max. total weight bike weight max. rider weight max. rack load max. trailer total
weight
140 kg 16 kg 120 kg 10 kg + 10 kg 50 kg
Rack
A detachable Coboc rack and mudguards are installed on your Coboc
e-bike. A maximum of 10 kg may be loaded on each side of the luggage
rack. You should always bear in mind, that the permissible total weight
should not be exceeded even with luggage. Regularly check that moun-
ting screws for the mudguards and luggage rack are tightened rmly.
An attachment is available for your Coboc rack that offers you a conventi-
onal luggage carrier platform. You can get the attachment in two versions
from your Coboc specialist dealer:
1. with spring ap
2. with Racktime SnapIt2 system. With this attachment and the corre-
sponding Racktime Snap-It2 adapter it is possible to mount various
Racktime Snap-It system bags or / baskets on the carrier of your
Coboc E-Bike.
The total system carrier with attachment can be loaded with a maximum of
20 kg. It is essential that you have your Coboc dealer carry out the assem-
bly of your carrier attachment.
Don't take anyone with you. Your Coboc e-bike is designed solely
for the transportation of individuals. Exceptions are the transport
of children in a suitable child trailer or child seat. Observe the
national legislation and the permissible total weight of your Coboc e-bike.
According to the StVO, the transportation of luggage requires a suitable
device on the bicycle.
(Child) trailers
Your Coboc e-bike can pull a one or two-lane (child) trailer. It should be
installed on the KSA18 rear stand holder of your Coboc e-bike frame using
a Weber EU coupling and shall not exceed a total weight of 50 kg. The
maximum permissible total weight of your e-bike must not be exceeded
even with a trailer and payload. For more information, contact your Coboc
dealer. Always have a Coboc dealer carry out the installation of a trailer.
Child seat
Your Coboc e-bike is suitable for mounting a child seat with a clamp on
the seat tube (e.g. Römer Jockey) of your e-bike frame. Only use tested
and approved child seats with this type of attachment. For more informa-
tion, contact your Coboc dealer. Have the child seat installed by a Coboc
dealer.
Children sitting in child seats should always wear a suitable
helmet. If your Coboc e-bike is parked on the side stand, there
should not be any child sitting in the child seat, because there is
an increased risk of tipping over due to the shifted center of
gravity.
Your Coboc e-bike is not meant to be exposed to extreme stress
like riding stairs or ramps, so we recommend avoiding such
scenarios.
If your Coboc e-bike is equipped according to the national legislation, it
may be used on public and paved roads. Please bear in mind the tips in
chapter 5 – Legal regulations.
Also note that complying to the operation and maintenance conditions ex-
plained in this user manual is part of the intended use for Coboc e-bikes.
Your Coboc e-bike is not a toy. Do not let children handle your
Coboc e-bike without detailed instructions or leave them
unattended at any time. You should brief children on the dangers
associated with the use of electronic devices. Please follow the regulations
for minimum age of use that are valid in your country.
English

12 Before every ride
The A-weighted emission sound pressure level at the driver’s ears
is less than 70 dB(A).
Coboc, such as our dealers, assumes no liability for any use other than the
one intended, especially regarding non-compliance with the information
given in this user manual.
Make sure your Coboc e-bike is ready for operation and that it is adjusted
to your body height. Saddle height and handlebar position should be
adjusted properly. Your saddle should be set to a comfortable and safe
height.
Choosing a frame size that does not suit your height or a
defective adjustment may lead to loss of control and ultimately
may lead to slips or crashes which again may lead to serious
injuries and damage. If you have problems with picking the right frame size
or how to properly adjust your Coboc e-bike, please refer to your local
Coboc dealer.
Adjusting the saddle height
The seat post may under no circumstances be put higher than the
minimum depth of insertion. A mark at the seat post signals the
designated minimum depth of insertion. Pulling the seat post out
too far may result in crashes and serious damage to you and your e-bike.
By using your Coboc e-bike when the minimum insertion depth is
undershot, the Coboc manufacturer's warranty for any resulting damage to
your e-bike is void.
You may position your saddle in three different directions. First, make sure
that the seat post clamping at the frame and the saddle clamping at the
seat post are rmly tightened. Sit on the saddle and put one foot on the
pedal while posting your other foot on the ground. Now use your heel to
carefully tread the pedal until the crank arm is in line with the saddle tube.
If you are standing on the pedal but your leg is not fully extended, this
means that the saddle is probably too low. Vice versa if you have to reach
for the pedal or if you have to tip your pelvis forward, that means that your
saddle is positioned too high. If needed, you can loosen the seat post
clamping at the frame, adjust the correct saddle height and tighten the
clamping again.
Make sure that the saddle is in line with the top tube of your e-bike. Again,
you may loosen the seat post clamping, in order to move the saddle left
and right, before tightening it again. It is also possible to change the sadd-
le tilt relative to the top tube. Just loosen the clamping at the seat post,
adjust to your needs and tighten again.
Align the grips
Ergonomic Ergon GA30 grips are installed on your Merano. With their
enlarged contact surface on the ball of the hand, they effectively prevent
the wrists from kinking and enable fatigue-free riding.
So that they can perform their function optimally, they must be mounted
so that the contact surface is horizontal. The slot on the screw connection
of the handle should be horizontal to the surface.
Please bear in mind the permissible torque for all these steps (s.
table Tightening torque) and make sure that all screw ttings are
tightened before using your Coboc e-bike or sitting on your sadd-
le to adjust it again.
Regular monitoring
Make sure that the lighting system on your Coboc e-bike works in the front
and in the back.
You should be able to reach both braking levers without any problems.
Also make sure to know which braking lever applies to which brake. As
standard, the right brake lever applies to the rear brake and the left brake
lever applies to the front brake. Note that the braking distance increases
and that the tires might block faster if the ground is wet.
Make sure that the screws for your saddle, handlebar and brakes are
tightened enough (s. table Tightening torque). In case of doubt you can
try twisting saddle, handlebar or brakes. Nothing should move. Also make
sure to regularly check all other screw ttings and ensure yourself that they
are tightened correctly. Make sure that frame and fork are not damaged.
Check regularly for abrasion of friction components within the brakes (s.
chapter Maintenance & care).

13
Testing the brake system
Push your Coboc e-bike forward while pulling the rear brake. If everything
is adjusted correctly the rear wheel should be blocking. If applying the
front brake, your rear wheel should leave the ground. Steering should not
rattle or have any play. The brake levers should not be pulled more than
halfway through during this test.
Checking the wheels
Check the wheels and tire pressure! Inspect the tires and rims for abrasion,
damage, tears, deformations or smaller pieces that might be pushed in
(e.g. glass fragments or nails). We advise you to use a suitable bicycle
pump with built in pressure gauge. The optimal tire pressure is indicated
on the side of the tire and may differ depending on the tire model. In case
of doubt, or if you use components other than those already built in as
standard, please refer to the tire manufacturer, to ask for the correct tire
pressure. If tire pressure is too low, there is an increased risk of having at
tires due to rims pressing through the tire. Furthermore this might cause
sustainable damage to the rim.
If the pressure is too high, tires or rims might be damaged. In any case, wrong
tire pressure might cause crashes.
If you are not sure whether your Coboc e-bike is in technically
safe condition, do not start your ride. Let your local Coboc dealer
or a service partner check your e-bikes condition.
The minimum air pressure for your Coboc e-bike must not be less
than 2.2 bar. Driving with too little air pressure can damage the
rim.
If you use your Coboc e-bike extensively then make sure to have your
e-bike checked more regularly from your Coboc dealer or a service partner
(s. chapter Maintenance & care).
Before your ride, make sure that your battery level is high enough
for the intended journey (s. chapter Battery level).
We assume that as a Coboc e-bike user you have gathered enough basic
experience with ordinary bikes. If this is not the case, we recommend
practicing on a e-bike without motor support. Because of the strong acce-
leration and the increased maximum speed it is recommended for you to
be able to handle e-bikes very good.
Get used to your Coboc e-bike. The special driving characteristics for
Coboc e-bikes require for you to familiarize with it on different terrain.
Make sure that you got it under control before starting to use your Coboc
e-bike in public.
Operating the Coboc Electric Drive
Your Coboc e-bike has two operating modes:
“Bike off” / manual riding: You can always choose to ride your e-bike with-
out motor support. Motor support is turned off, if the ve LEDs on the top
tube are not lit up. You should keep motor support turned off, if storing or
not using your Coboc e-bike.
“Bike on” / riding with motor support: Pressing the power button turns on
motor support for your Coboc e-bike. Motor support is turned on, if the
ve LEDs on the top tube are lit up. In a turned on state LEDs indicate the
battery level and motor support goes up to maximum speeds of 25 km/h.
Turning off
To turn your e-bike back off, just press the power button again in “bike
on” mode. Your Coboc e-bike turns off automatically after staying unused
for more than three minutes.
Handling
English

14 Handling
Operating the lights
Your Coboc e-bike is equipped with an integrated lighting system, which
can also be operated by the power button. You can turn it on and off by
pressing down the power button for three seconds. The lighting system is
controllable in both “bike on” and “bike off” mode and turns off automati-
cally after your e-bike stays unused for more than four minutes.
Due to residual charge the lighting system can be used for up to two hours
after battery discharge.

15
Notes on using the brakes
Make sure to know which brake lever belongs to which brake before star-
ting your ride. As standard the right brake lever belongs to the rear wheel
brake and the left brake lever belongs to the front wheel brake.
Regularly check the friction components for wear.
It is important for you to also check the wear on your rim brake anks.
Also make sure to check for brake pad wear on the brake shoes (s. chapter
Maintenance & care).
If wear is too heavy on any of these components, this may lead to total
failure of the brake system. Hard falls and serious injury can be the result.
Use your brakes in a controlled and well-timed way. Too heavy
breaking may leave your wheels blocked and therefore lead to
loss of control. Hard falls and serious injury can be the result.
Hydraulic disc brakes
Avoid using the brakes permanently if riding downhill for longer periods
as this might cause steam bubble formation and therefore lead to loss of
control. Hard falls and serious injury can be the result. Always try to fully
release the brakes or to switch between front and rear wheel brakes. That
way the brake system can cool off. If necessary take a short break to cool
it off. Always check the braking point before your journey. If you are able
to pull the lever all the way back to the handlebar or of the braking point
changes while riding you may not continue riding. Let your Coboc dealer
either bleed your brake or x it, if needed.
Level of motor support
The level of motor support adapts to your driving behavior. The stronger
you tread the pedals, the more torque value is in the motor. This makes a
“level of support” choice unnecessary. However, you can apply a ne-tun-
ing of your Coboc Electric Drive on your phone via our Coboc App. Please
note, that you may not use the Coboc App while riding your e-bike (s.
chapter Coboc App).
Two different driving modes
Since rmware version 3.34 you are able to choose between two different
driving modes. You can either acces them via our Coboc App or by simply
operating the power button on your e-bike.
Drive settings for both modes can be adjusted individually and remain
even if smartphone and e-bike are not connected.
A double press of the power button allows you to switch between the two
driving modes. The second mode switches colors for the LEDs from blue
to sea green.
Only start pedaling if seated securely on your Coboc e-bike. As
soon as pressure is applied to the pedals, the motor support is
set free. If you want to sit on your e-bike by putting on foot on
the pedal while swinging over the saddle with the other leg, be aware that
the e-bike might abruptly start moving. Risk of falling!
Stop pedaling in time. Motor support is stopped as soon as the crank
stops turning. Be aware of this especially before road crossings and curves.
If you have any problems with your drive (ie. because you did not stop
pedaling in time) you may always stop the motor by using the rear wheel
brake.
Handling
English

16 Handling
Reach
Your Coboc e-bike is equipped with a modern lithium-ion battery. This
type of battery offers the best state-of-the-art energy density, which means
maximum reach at minimum weight. Furthermore, lithium-ion batteries
have no memory effect. This battery has a nominal voltage of 36 volts and
a nominal capacity of 380 Wh.
The battery on your Coboc e-bike is installed into the e-bikes
frame. This way of installation allows for a very low vehicle weight
while providing ideal protection against moisture. The battery
remains in the frame even for charging. Only trained personnel is allowed
to remove the battery.
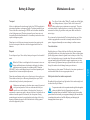
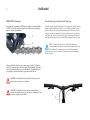
Gear shift
Your Merano has a built-in SRAM GX 11-gear shift. The shift lever is positi-
oned at the right lower side of the handlebar and is connected to the rear
derailleur installed on the rear wheel.
Both shift levers (A) and (B) are activated by pulling the lever. They both
come back into their starting positions after being pulled. Make sure to
keep pedaling, while gear shifting in order to succesfully carry it out. Do
not tread into the pedals backwards during a gear switch as this may cause
damage to the gear shift.
Reduce pressure on the pedals during gear shift. That way you can switch
between gears fast and smooth, while also reducing wear on chain and
sprocket.
Shifting gears at maximum weight may lead to chain tear. Serious
accidents and injuries can be the result.
Switching to a lower gear
In order to switch to a lower gear push lever (A) until it clicks. To switch
several gears at a time keep pushing the lever until it clicks repeatedly. You
can switch down a maximum of ve gears at once.
Switching to a higher gear
In order to switch to a higher gear push lever (B) until it clicks. You can only
switch one gear at a time here, so in order to switch between several gears
you need to press the lever down several times.
For further insight on montage and function of SRAM derailleurs visit the
manufacturers website or talk to your Coboc dealer.
(A)
(B)
Battery & Charger

17
Battery level is displayed on the user interface. Up to ve LEDs light up
after turning on the Coboc e-bike. They are split up as follows:
If more than one LED is ashing red this indicates an error within
the drive system. See chapter “Error codes” for more insight.
Charging the battery
The ideal ambient temperature for battery charging is somewhere bet-
ween 5 ºC and 25 ºC. At temperatures between 0 ºC and 40 ºC electronics
disable charging, in order to protect the battery from getting damaged.
Please refrain from using any charger other than the one included
in your delivery from Coboc or chargers authorized by Coboc.
Modern lithium-ion batteries require chargers that are perfectly
matched, as everything else could lead to the battery catching re or even
exploding.
Make sure to check the charger for any external damage (case,
plug or cables). Under no circumstances should you use a
damaged or faulty charger.
The charging socket is situated at the bottom side of the top tube. You can
only insert the plug in one direction. Socket and plug are magnetic and
stay attached if connected correctly.
Battery & Charger
5 LEDs are lit up in blue gbattery level of 80 % to 100 %
4 LEDs are lit up in blue gbattery level of 60 % to 80 %
3 LEDs are lit up in blue gbattery level of 40 % to 60 %
2 LEDs are lit up in blue gbattery level of 20 % to 40 %
1 LEDs are lit up in blue gbattery level of 1 % to 20 %
Do not remove the battery by yourself! Under no circumstances
should the cover at the bottom of the down tube be opened.
Only trained personnel should carry out maintenance or repairs
on the installed drive system. Carrying out maintenance or repairs may
result in danger to life due to live parts such as cables and contacts.
Furthermore, the drive system is being protected against moisture by a
special sealing technology, which is why warranty obligations become inva-
lid if the down tube is being opened without the approval by Coboc.
Reach: The range of your Coboc e-bike is heavily dependent on various
inuencing factors and can therefore uctuate. These include the following
factors, among others: the type of surface, incline/slope of the route, wind
conditions, tire characteristics, air pressure, driver weight, cadence, driving
speed and temperature. The settings of the drive parameters also have an
impact on the range of your Coboc e-bike. Information about the Coboc
app and the setting of the individual drive parameters can be found here:
www.coboc.biz/en/the-coboc-app/.
With a fully charged battery and on level terrain, preset mode 1 (blue
LEDSs) can be used to achieve approx. 75-110 km. When driving on as-
phalt roads, a low tire pressure can increase the rolling resistance and thus
reduce the range. Headwinds or hilly terrain will also have a negative im-
pact on the range. Increasing the drive parameters via the Coboc app will
express itself in stronger support but in return in a shorter range. A higher
total weight will also reduce the range of your Coboc e-bike. If you drive
over 25 km/h in return, the motor support is switched off and you ride your
e-bike like a normal e-bike. This increases the remaining range accordingly.
On hot days (battery temperature of more than 60° C) the battery turns its-
elf off for safety reasons. After that, it has to cool down before you are able
to use it again. If your e-bike has not been turned on or charged for more
than 30 days, it automatically sets itself into a deep sleep mode in order to
save battery power. If in deep sleep mode, your Coboc e-bike can not be
turned on. However, you can reactivate it rst by plugging in the charger.
English

18 Battery & Charger
Before plugging in the charging plug, check whether metallic
objects have adhered to the plug's magnets. This could lead to a
short circuit when plugging in the charging plug.
Only charge the battery at dry and well ventilated places, as the charger
should not be exposed to rain, water or moisture. Make sure that there are
no ammable or hazardous substances in the room when charging your
e-bike. Always keep your charger in a safe place, in order for it not to fall
down or tip over.
You should only use your charger in indoor areas. Also, notice
further hints directly on the charger and the provided user manual
for the charger.
In order to charge your battery you need to plug the mains into a tting
outlet and connect the charger with your Coboc e-bike. Make sure that
the mains and the needed voltage meet your countries standards. The
provided charger is designed for a line voltage of 220V and 240V.
Charging begins as soon as the charger is connected and turns your Co-
boc e-bike off it was turned on beforehand. You can not turn your Coboc
e-bike on while charging it.
LEDs are now lighting up one after the other in order to indicate the
charging process. If your Coboc e-bike is fully charged it turns itself off
automatically. As soon as that is the case the charger indicates that the
e-bike is fully charged.
A complete charge from 1 % to 100 % takes two and a half hours with the
Coboc charger ST 4A. However, the battery is already charged to 90 %
after two hours, which means that the charging time for the last 10 % takes
a bit longer (half an hour).
You can keep your Coboc e-bike connected to the charger even after
charging is completed. The battery does not overcharge. However, we
recommend you to unplug the charger from your Coboc e-bike and the
mains out of safety reasons.
Make sure that your homeowner’s and re insurances cover lithium-ion
battery charge and pedelecs in general. Also regularly check newspapers
for any changes in the legal situation.
Storage
If your e-bike is not going to be used for a long time, it should be
fully charged beforehand. If the e-bike has been fully charged, it
must be connected to a charger after eight months at the latest.
The e-bike should never be stored with an incompletely charged battery. If
the battery is deeply discharged because it has not been charged for too
long or the e-bike has been stored with insufcient battery, the damage is
not covered by the warranty or the manufacturer's guarantee.
A permanently high state of charge causes the battery to age faster, while
deep discharge can permanently damage or even destroy the battery. We
therefore recommend charging the e-bike completely before storing it,
removing the charger and storing it in cool temperatures of around 15 °C.
Lithium-ion batteries discharge themselves over time. Therefore, the
battery level falls within the optimal range for storage within the rst few
days, until the E-Bike automatically switches to energy-saving mode after
30 days. If the battery is fully charged, it must be fully charged again after
8 months at the latest. If it is not fully charged, earlier accordingly.
Your e-bike should not be stored permanently at temperatures warmer
than 20 °C. To prevent deep discharge, your Coboc e-bike automatically
switches to an energy-saving mode after it has not been used for a long
time. The e-bike cannot be switched on in this state. It can only be reacti-
vated by connecting the charger.
Never store the battery with the charger plugged in all the time. If
the battery is permanently charged to 100 %, aging will accelerate
and the battery will quickly lose capacity.

19
Transport
Lithium-ion batteries with stored energy higher than 100 Wh are subject to
international legislation on dangerous goods. The battery installed in your
Coboc e-bike has a stored energy of 380 Wh and is therefore classied as
a class 9 dangerous good. Therefore, transport by road, sea or air must
be specically authorized beforehand. It is mandatory to seek advice of an
expert on dangerous goods.
Please bear in mind, that many transport companies have certain guide-
lines for the transport of devices or vehicles equipped with lithium-ion
batteries.
Disposal
Do not dispose of your Coboc e-bike, battery or charger in the household
waste.
Within the EU there is an obligation for the consumer to return no
longer usable batteries and a redemption obligation for dealers,
manufacturers and importers. In accordance with EC directive
2002/66/EC, faulty or used batteries have to be collected separately and
disposed of in an environmentally-friendly manner.
Please take used batteries with you to a collection point for recycling, your
Coboc dealer or directly to us. Removing the battery from your Coboc
e-bike should only be done by trained personnel.
Maintenance and repairs on the drive system may only be carried
out by trained personnel. Under no circumstances should you
open the cover at the bottom of the down tube. Carrying out
maintenance or repairs may result in danger to life due to live parts such as
cables and contacts opened. Furthermore, the drive system is being
protected against moisture by a special sealing technology, which is why
warranty obligations become invalid if the down tube is being opened
without the approval by Coboc.
Maintainance & care
Turn off your Coboc e-bike (“Bike off”, possibly turn off the lights,
too). Always make sure, that your Coboc e-bike is turned off
before performing any maintenance or repair work. The motor
could start abruptly, if repairs are done on a turned on Coboc e-bike or
contacts at the motor plug could be under power. Both could lead to
serious injury.
Do not remove the bottom bracket! The bottom bracket on your Coboc
e-bike is equipped with a sensor that is internally wired with the drive
system. Improper disassembly can cause damage to cables or sensor.
Care instructions
Regularly clean your Coboc e-bike from dirt. Not only does it preserve
good looks but also can it help keep functions alive. Never use hard water
jets like high-pressure cleaners or garden hose to clean your e-bike. Only
wash it by hands and never put it upside down. Electronics and ball bea-
rings are sealed tightly, which allows for regular operation even on rainy
days. However, high-pressure cleaning might cause uids or dirt to enter
through the seals and could damage bearings or electronics.
Always keep your chain greased. This allows for a low-noise operation and
minimizes wear. Make sure to use appropriate chain oil.
Safety instructions for carbon components
We added a high-quality and very light carbon fork to reduce weight and
to rene looks of your Merano.
Components made out of composite material might be damaged at
places not visible at rst sight. Damaged parts may lead to
immediate failure and cause falls. Therefore, having the according
parts checked for functionality or non-apparent damage by the manufacturer
is mandatory after crashes or hard falls. Replacing and destroying the
damaged parts is also an option.
English
Battery & Charger

20
Furthermore, carbon parts need regular visual inspections. Check if single
layers like paint, nish or ber are detaching. Look for changes on the surface
of the according parts, like chipping, holes or deep scratches. Make sure to
check if the components are getting softer or less stiff and solid. If this is the
case with one or more components, they should be replaced immediately.
Special features of carbon
Carbon ber reinforced plastic is a lightweight material that has very speci-
c properties. Understanding these properties is mandatory in order for a
hazard-free use and a long operation without defect.
Carbon can be used to build extremely lightweight high-strength and
robust bicycle components, if processed correctly.
However, a disadvantage of this material is, that possible damages might
not be visible from the outside right away, as carbon does not deform
at overload like aluminum or steel might do. The material might keep its
shape even tough the inner structure is already damaged. A damaged
structure inuences stability of the component and therefore might lead to
serious falls and injuries. If you have concerns regarding the condition of
one of the carbon components, make sure to visit your Coboc dealer.
If you hear pops, this might indicate defect on a carbon
component. Check the screw ttings on your carbon components
for correct torque regularly. Should there still be audible pops,
make sure to contact your Coboc dealer. Under no circumstances should
you continue using the damaged component.
Carbon components should never be heated up to high
temperatures, as would be the case for powder coating or
stove-enamel nishes. The appearing heat might damage compo-
nents. Also avoid storing your e-bike in a vehicle that is exposed to strong
sunlight.
Care instructions for carbon components
Clean your carbon components with a soft cloth and clear water. If that
should not be enough you might add some detergent or use a petrole-
um-based cleaner.
Never use degreasers containing acetone, methyl chloride or
trichloroethylene. Chemical or not neutral cleaners that contain
solvents could attack the surface and therefore weaken the
component.
Lightweight carbon parts may be exposed to increased wear.
Please follow the instructions on service intervals and have your
carbon components checked for defect or wear regularly by your
Coboc dealer.
Carbon components should never be greased. Doing so leads to
grease entering the surface, which makes tight clamping within
the permitted torque value impossible. We recommend using
carbon paste instead, as increased friction makes less torque value
necessary to clamp safely.
Check your carbon components for optical damage such as
notches, dents, tears, discoloration, etc, Should you notice any of
these defects, make sure to contact your Coboc dealer and
refrain from using your Coboc e-bike until doing so.
Maintainance & care
Sidan laddas...
Sidan laddas...
Sidan laddas...
Sidan laddas...
Sidan laddas...
Sidan laddas...
Sidan laddas...
Sidan laddas...
Sidan laddas...
Sidan laddas...
Sidan laddas...
Sidan laddas...
Sidan laddas...
Sidan laddas...
Sidan laddas...
Sidan laddas...
Sidan laddas...
Sidan laddas...
Sidan laddas...
Sidan laddas...
Sidan laddas...
Sidan laddas...
Sidan laddas...
Sidan laddas...
Sidan laddas...
Sidan laddas...
Sidan laddas...
Sidan laddas...
Sidan laddas...
Sidan laddas...
Sidan laddas...
Sidan laddas...
Sidan laddas...
Sidan laddas...
Sidan laddas...
Sidan laddas...
Sidan laddas...
Sidan laddas...
Sidan laddas...
Sidan laddas...
Sidan laddas...
Sidan laddas...
Sidan laddas...
Sidan laddas...
Sidan laddas...
Sidan laddas...
Sidan laddas...
Sidan laddas...
Sidan laddas...
Sidan laddas...
Sidan laddas...
Sidan laddas...
Sidan laddas...
Sidan laddas...
Sidan laddas...
Sidan laddas...
Sidan laddas...
Sidan laddas...
Sidan laddas...
Sidan laddas...
Sidan laddas...
Sidan laddas...
Sidan laddas...
Sidan laddas...
Sidan laddas...
Sidan laddas...
Sidan laddas...
Sidan laddas...
Sidan laddas...
Sidan laddas...
Sidan laddas...
Sidan laddas...
Sidan laddas...
Sidan laddas...
Sidan laddas...
Sidan laddas...
Sidan laddas...
Sidan laddas...
Sidan laddas...
Sidan laddas...
Sidan laddas...
Sidan laddas...
Sidan laddas...
Sidan laddas...
Sidan laddas...
Sidan laddas...
Sidan laddas...
Sidan laddas...
Sidan laddas...
Sidan laddas...
Sidan laddas...
Sidan laddas...
Sidan laddas...
Sidan laddas...
Sidan laddas...
Sidan laddas...
Sidan laddas...
Sidan laddas...
Sidan laddas...
Sidan laddas...
Sidan laddas...
Sidan laddas...
Sidan laddas...
Sidan laddas...
Sidan laddas...
Sidan laddas...
Sidan laddas...
Sidan laddas...
Sidan laddas...
Sidan laddas...
Sidan laddas...
Sidan laddas...
Sidan laddas...
Sidan laddas...
Sidan laddas...
Sidan laddas...
Sidan laddas...
Sidan laddas...
Sidan laddas...
Sidan laddas...
Sidan laddas...
Sidan laddas...
Sidan laddas...
Sidan laddas...
Sidan laddas...
Sidan laddas...
Sidan laddas...
Sidan laddas...
Sidan laddas...
Sidan laddas...
Sidan laddas...
Sidan laddas...
Sidan laddas...
Sidan laddas...
Sidan laddas...
Sidan laddas...
Sidan laddas...
Sidan laddas...
Sidan laddas...
Sidan laddas...
Sidan laddas...
Sidan laddas...
Sidan laddas...
Sidan laddas...
Sidan laddas...
Sidan laddas...
Sidan laddas...
Sidan laddas...
Sidan laddas...
Sidan laddas...
Sidan laddas...
-
 1
1
-
 2
2
-
 3
3
-
 4
4
-
 5
5
-
 6
6
-
 7
7
-
 8
8
-
 9
9
-
 10
10
-
 11
11
-
 12
12
-
 13
13
-
 14
14
-
 15
15
-
 16
16
-
 17
17
-
 18
18
-
 19
19
-
 20
20
-
 21
21
-
 22
22
-
 23
23
-
 24
24
-
 25
25
-
 26
26
-
 27
27
-
 28
28
-
 29
29
-
 30
30
-
 31
31
-
 32
32
-
 33
33
-
 34
34
-
 35
35
-
 36
36
-
 37
37
-
 38
38
-
 39
39
-
 40
40
-
 41
41
-
 42
42
-
 43
43
-
 44
44
-
 45
45
-
 46
46
-
 47
47
-
 48
48
-
 49
49
-
 50
50
-
 51
51
-
 52
52
-
 53
53
-
 54
54
-
 55
55
-
 56
56
-
 57
57
-
 58
58
-
 59
59
-
 60
60
-
 61
61
-
 62
62
-
 63
63
-
 64
64
-
 65
65
-
 66
66
-
 67
67
-
 68
68
-
 69
69
-
 70
70
-
 71
71
-
 72
72
-
 73
73
-
 74
74
-
 75
75
-
 76
76
-
 77
77
-
 78
78
-
 79
79
-
 80
80
-
 81
81
-
 82
82
-
 83
83
-
 84
84
-
 85
85
-
 86
86
-
 87
87
-
 88
88
-
 89
89
-
 90
90
-
 91
91
-
 92
92
-
 93
93
-
 94
94
-
 95
95
-
 96
96
-
 97
97
-
 98
98
-
 99
99
-
 100
100
-
 101
101
-
 102
102
-
 103
103
-
 104
104
-
 105
105
-
 106
106
-
 107
107
-
 108
108
-
 109
109
-
 110
110
-
 111
111
-
 112
112
-
 113
113
-
 114
114
-
 115
115
-
 116
116
-
 117
117
-
 118
118
-
 119
119
-
 120
120
-
 121
121
-
 122
122
-
 123
123
-
 124
124
-
 125
125
-
 126
126
-
 127
127
-
 128
128
-
 129
129
-
 130
130
-
 131
131
-
 132
132
-
 133
133
-
 134
134
-
 135
135
-
 136
136
-
 137
137
-
 138
138
-
 139
139
-
 140
140
-
 141
141
-
 142
142
-
 143
143
-
 144
144
-
 145
145
-
 146
146
-
 147
147
-
 148
148
-
 149
149
-
 150
150
-
 151
151
-
 152
152
-
 153
153
-
 154
154
-
 155
155
-
 156
156
-
 157
157
-
 158
158
-
 159
159
-
 160
160
-
 161
161
-
 162
162
-
 163
163
-
 164
164
-
 165
165
-
 166
166
-
 167
167
-
 168
168
-
 169
169
-
 170
170
-
 171
171


på andra språk
- eesti: Coboc MERANO Omaniku manuaal
- English: Coboc MERANO Owner's manual
- dansk: Coboc MERANO Brugervejledning


