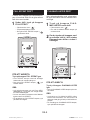
Thermia 12 ZP-TO Bruksanvisningar
- Typ
- Bruksanvisningar

SPLIT TYPE
ROOM AIR / AIR HEAT PUMP
OPERATION MANUAL
SPLITT-TYPE
ROM LUFT/LUFT VARMEPUMPE
BRUKERMANUAL
JAETTU
ILMALÄMPÖPUMPPU
KÄYTTÖOPAS
LUFT/LUFTVÄRMEPUMP
BRUKSANVISNING
ENGLISH SUOMI NORSK SVENSKA
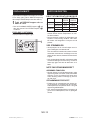
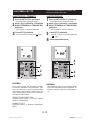
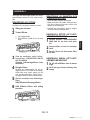
INDOOR UNIT
INNENDØRSENHET
SISÄYKSIKKÖ
INOMHUSENHET
12 ZP-TI 12 ZP-TO
OUTDOOR UNIT
UTENDØRSENHET
ULKOYKSIKKÖ
UTOMHUSENHET

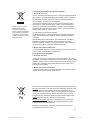
Attention: Your product is
marked with this symbol. It
means that used electrical and
electronic products should
not be mixed with general
household waste. There is a
separate collection system for
these products.
A. Information on Disposal for Users (private households)
1. In the European Union
Attention: Do not dispose of this equipment with ordinary household
waste!
Used electrical and electronic equipment must be treated separately and
in accordance with legislation that requires proper treatment, recovery and
recycling of used electrical and electronic equipment.
Following the implementation by member states, private households within
the EU states may return their used electrical and electronic equipment
to designated collection facilities free of charge*. In some countries* your
local retailer may also take back your old product free of charge if you
purchase a similar new one.
*) Please contact your local authority for further details.
If your used electrical or electronic equipment has batteries or
accumulators, please dispose of these separately beforehand according to
local requirements.
By disposing of this product correctly you will help ensure that the waste
undergoes the necessary treatment, recovery and recycling and thus
prevent potential negative effects on the environment and human health
which could otherwise arise due to inappropriate waste handling.
2. In other Countries outside the EU
If you wish to discard this product, please contact your local authorities and
ask for the correct method of disposal.
For Switzerland: Used electrical or electronic equipment can be returned
free of charge to the dealer, even if you don’t purchase a new product.
Further collection facilities are listed on the homepage of www.swico.ch or
www.sens.ch.
B. Information on Disposal for Business Users.
1. In the European Union
If the product is used for business purposes and you want to discard it:
Please contact your installer who will inform you about the take-back of
the product. You might be charged for the costs arising from take-back and
recycling. Small products (and small amounts) might be taken back by your
local collection facilities.
For Spain: Please contact the established collection system or your local
authority for take-back of your used products.
2. In other Countries outside the EU
If you wish to discard of this product, please contact your local authorities
and ask for the correct method of disposal.
The battery supplied with this product contains traces of Lead.
For EU: The crossed-out wheeled bin implies that used batteries should
not be put to the general household waste! There is a separate collection
system for used batteries, to allow proper treatment and recycling in
accordance with legislation. Please contact your local authority for details
on the collection and recycling schemes.
For Switzerland: The used battery is to be returned to the selling point.
For other non-EU countries: Please contact your local authority for correct
method of disposal of the used battery.
GB
Contains uorinated greenhouse gases covered by the Kyoto Protocol
R410A (Global warming potential 1975)
Pb

GB-1
ENGLISH
Please read this manual carefully before using the product. This manual
should be kept in a safe place for handy reference.
ENGLISH
CONTENTS
• SAFETY PRECAUTIONS ................................. GB-1
• PART NAMES ................................................... GB-2
• USING THE REMOTE CONTROL .................... GB-4
• TIPS ON SAVING ENERGY ............................. GB-5
• AUXILIARY MODE ........................................... GB-5
• BASIC OPERATION ......................................... GB-6
• ADJUSTING THE AIR FLOW DIRECTION ...... GB-7
• COANDA AIRFLOW .......................................... GB-7
• FULL POWER OPERATION ............................. GB-8
• PLASMACLUSTER OPERATION ..................... GB-8
• SELF CLEAN OPERATION .............................. GB-9
• 1-HOUR OFF TIMER ........................................ GB-9
• TIMER OPERATION ......................................... GB-10
• MAINTENANCE FUNCTION OPERATION .......GB-11
• DISPLAY BUTTON ........................................... GB-12
• NOTES ON OPERATION ................................. GB-12
• MAINTENANCE ................................................ GB-13
• BEFORE CALLING FOR SERVICE ................. GB-14
SAFETY PRECAUTIONS
WARNING
• Do not pull or deform the power supply cord.
Pulling and misuse of the power supply cord
can result in damage to the unit and cause
electrical shock.
• Be careful not to expose your body directly to
the outlet air for a long time. It may affect your
physical conditions.
• When using the air/air heatpump for infants,
children, elderly, bedridden, or disabled people
make sure the room temperature is suitable for
those in the room.
• Never insert objects into the unit. Inserting
objects can result in injury due to the high
speed rotation of internal fans.
• Ground the air/air heatpump without fail. Do not
connect the grounding wire to gas pipe, water
pipe, lightning rod or telephone grounding
wire. Incomplete grounding may cause electric
shock.
• If anything is abnormal with the air/air
heatpump (ex. a burning smell), stop the
operation immediately and turn the circuit
breaker OFF.
• The appliance shall be installed in accordance
with national wiring regulations. Improper cable
connection can cause the power supply cord,
plug and the electrical outlet to overheat and
cause re.
• If the supply cord is damaged, it must be
replaced by the manufacturer or its service
agent or a similarly qualied person in order
to avoid a hazard. Use only the manufacture-
specied power cord for replacement.
• Do not splash or pour water directly on the unit.
Water can cause electrical shock or equipment
damage.
• Do not attempt to install/remove/repair the unit
by yourself. Incorrect work will cause electric
shock, water leak, re etc. Consult your dealer
or other qualified service personnel for the
installation/removal/repair of the unit.
CAUTION
• Open a window or door periodically to
ventilate the room, especially when using gas
appliances. Insufcient ventilation may cause
oxygen shortage.
• Do not operate the buttons with wet hand. It
may cause electric shock.
• For safety, turn the circuit breaker off when not
using the unit for an extended period of time.
• Check the outdoor unit mounting rack
periodically for wear and to make sure it is
rmly in place.
• Do not put anything on the outdoor unit nor step
on it. The object or the person may fall down or
drop, causing injury.
• This unit is designed for residential use. Do not
use for other applications such as in a kennel
or greenhouse to raise animals or grow plants.
• Do not place a vessel with water on the unit.
If water penetrates into the unit, electrical
insulations may deteriorate and cause electric
shock.
• Do not block the air inlets nor outlets of the
unit. It may cause insufcient performance or
troubles.
• Be sure to stop the operation and turn the
circuit breaker off before performing any
maintenance or cleaning. A fan is rotating inside
the unit and you may get injured.
• This appliance is not intended for use by young
children or inrm persons without supervision.
Young children should be supervised to ensure
that they do not play with the appliance.
• Make sure to connect the air/air heatpump
to power supply of the rated voltage and fre-
quency. Use of a power supply with improper
voltage and frequency can result in equipment
damage and possible re.
• Do not install the unit in a place where inam-
mable gas may leak. It may cause re.
Install the unit in a place with minimal dust,
fumes and moisture in the air.
• Arrange the drain hose to ensure smooth drain-
age. Insufcient drainage may cause wetting of
the room, furniture etc.
• Make sure a leak breaker or a circuit breaker is
installed, depending on the installation location,
to avoid electrical shock.

GB-2
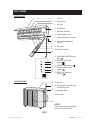
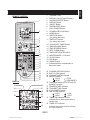
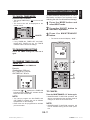
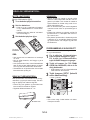
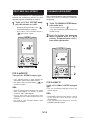
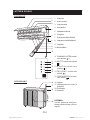
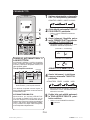
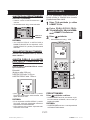
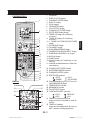
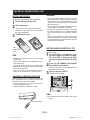
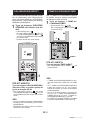
PART NAMES
INDOOR UNIT
11 PLASMACLUSTER Lamp
(blue )
12 OPERATION Lamp
(green )
13 TIMER Lamp (orange )
14 FULL POWER Lamp
(green )
15 SELF CLEAN Lamp
(green )
1
2
3
4
5
6
7
8
9
10
11
12
13
14
15
OUTDOOR UNIT 16 Air inlet
17 Refrigerant Tube and Inter-
connecting Cord
18 Drainage Hose
19 Air outlet
NOTE:
Actual units might vary slightly
from those shown above.
16
17
18
19
1 Air inlet
2 Open Panel
3 Air Filter
4 Aux Button
5 Receiver Window
6 Power Supply Cord
7 Vertical Adjustment Louvre
8 Horizontal Adjustment
Louvre
9 Air outlet
10 Remote Control

GB-3
ENGLISH
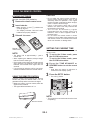
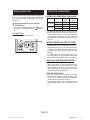
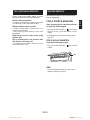
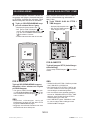
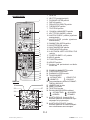
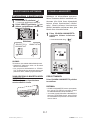
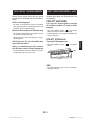
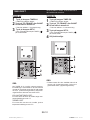
REMOTE CONTROL
DISPLAY
22 COANDA AIRFLOW Symbol
23 SELF CLEAN Symbol
24 PLASMACLUSTER Symbol
25 MODE Symbols
: AUTO
: COOL
: HEAT : DEHUMIDIFY
26 Thermostat setting for AUTO and DE-
HUMIDIFY modes
27 TEMPERATURE Indicator
28 TRANSMITTING Symbol
29 FULL POWER Symbol
30 FAN SPEED Symbols
: AUTO
: LOW
: HIGH : SOFT
31 TIMER ON Indicator/CLOCK
Indicates the on timer preset time or
current time.
32 TIMER OFF Indicator
Indicates the preset time for off timer
or 1-hour off timer.
3
4
5
6
7
8
9
10
11
12
13
14
15
16
17
18
19
20
21
22
1 TRANSMITTER
2 DISPLAY (Liquid Crystal Display)
3 PLASMACLUSTER Button
4 DISPLAY Button
5 ON/OFF Button
6 THERMOSTAT Button
7 FULL POWER Button
8 COANDA AIRFLOW Button
9 MODE Button
10 TIMER ON Button
(for setting the timer)
11 TIMER OFF Button
(for setting the timer)
12 1-HOUR OFF TIMER Button
13 TIME ADVANCE Button
14 TIME REVERSE Button
15 SELF CLEAN Button
16 TIMER SET/CANCEL Button
17 MAINTENANCE +10° Button
18 CLOCK Button
19 FAN Button
20 SWING Button
21 Indicates battery compartment is
below this mark
2
1
23
24
25
26
27
28
29
30
31
32

GB-4
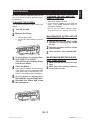
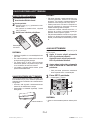
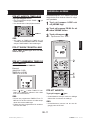
USING THE REMOTE CONTROL
LOADING BATTERIES
Use two size-AAA (R03) batteries.
1
Remove the remote control cover.
2
Insert batteries.
• Make sure the (+) and (
-
) polarities are
correctly a lign ed.
• The display indicates “AM 6:00” when
batteries are properly installed.
3
Reinstall the cover.
Remote
control cover
NOTE:
• The battery life is approximately 1 year in
normal use.
• When replacing the batteries, always change
both and use the same type.
• If the remote control does not operate properly
after replacing the batteries, take out the
batteries and reinstall them again after 30
seconds.
• If you will not be using the unit for a long time,
remove the batteries from the remote control.
2
3
1
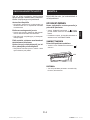
USING THE REMOTE CONTROL
Point the remote control towards the receiver
window and press the desired button. The unit
generates a beep when it receives the signal.
• Make sure nothing, such as curtains, block the
signal receiver window.
• The signal effective distance is 7 m.
SETTING THE CURRENT TIME
There are two clock modes: 12-hour mode and
24-hour mode.
1
To set to the 12-hour mode, press
the CLOCK button once.
To set to the 24-hour mode, press
the CLOCK button twice.
2
Press the TIME ADVANCE or
REVERSE button to set the current
time.
• Hold down the button to advance or
reverse the time display quickly.
3
Press the SET/C button.
• The colon (:) blinks.
NOTE:
• The current time cannot be set when the timer
is operating.
CAUTION:
• Do not allow the signal receiver window to
receive strong direct sunlight, since it can
adversely affect its operation. If the signal
receiver window is exposed to direct sunlight,
close a curtain to block the light.
• Using a fluorescent lamp with a quick
starter in the same room may interfere with
transmission of the signal.
• The unit can be affected by signals
transmitted from the remote control of a
television, VCR or other equipment used in
the same room.
• Do not leave the remote control in direct
sunlight or near a heater. Also,protect the unit
and remote control from moisture and shock
which can discolour or damage them.
Receiver window

GB-5
ENGLISH
TIPS ON SAVING ENERGY AUXILIARY MODE
AUX
Below are some simple ways to save en-
ergy when you use your air/air heatpump.
Set the proper temperature
• Setting the temperature to higher or lower
than necessary will result in increased power
consumption.
Block direct sunlight and prevent drafts
• Blocking direct sunlight during cooling opera-
tion will reduce power consumption.
• Close the windows and doors during cooling
and heating operations.
Keep lter clean to ensure the most ef-
cient operation
Turn off the circuit breaker when the
unit is not used for an extended period
of time
• The indoor unit still consumes a small amount
of power when it is not operating.
Use this mode when the remote control is
not available.
TO TURN ON
Lift the open panel of the indoor unit
and press the AUX button.
• The green OPERATION lamp ( ) on the
unit will light and the unit will start operating in
the AUTO mode.
• The fan speed and temperature setting are
set to AUTO.
TO TURN OFF
Press the AUX button again.
• The green OPERATION lamp ( ) on the
unit will turn off.
NOTE:
• If the AUX button is pressed during normal
operation, the unit will turn off.

GB-6
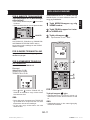
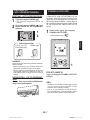
1
Press the MODE button to select
the operation mode.
AUTO HEAT COOL DEHUMIDIFY
2
Press the ON/OFF button to start
operation.
• The green OPERATION lamp ( ) on
the unit will light.
3
Press the THERMOSTAT button
to set the desired temperature.
AUTO/DEHUMIDIFY MODE
• The temperature can be changed up to an
additional ±2 °C from the automatically set
of temperature.
COOL/HEAT MODE
• The temperature setting range:18-32 °C.
4
Press the FAN button to set
the desired fan speed.
AUTO SOFT LOW HIGH
• In the DEHUMIDIFY mode, the fan speed
is preset to AUTO and cannot be changed.
5
To turn off the unit, press the ON/
OFF button again.
• The green OPERATION lamp ( ) on
the unit will turn off.
BASIC OPERATION
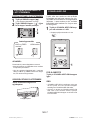
TIPS ABOUT AUTO MODE
In the AUTO mode, the temperature setting
and mode are automatically selected accord-
ing to the room temperature and outdoor tem-
perature when the unit is turned on.
2
5
3
1
4
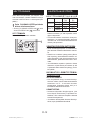
Modes and Temperature Settings
The gures in ( ) are temperature settings
During operation, if the outdoor temperature
changes, the temperature settings will auto-
matically slide as shown in the chart.
AUTO CHANGEOVER
During seasons when you need COOLING
at daytime and HEATING at night, or if the
room temperature should become extremely
higher than the temperature setting, due to
supplementary heating equipment, the mode
will automatically switch between HEAT and
COOL mode to keep the comfortable room
temperature.
(Example: 1°C higher)
C
(Example: 2°C lower)
C
Heat Heat
Heat
Cool
DEHUMIDIFY
Cool Cool
Outdoor temp.
Indoor
temp.
(Room temp. -2℃)

GB-7
ENGLISH
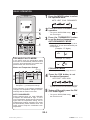
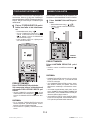
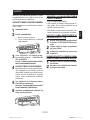
VERTICAL AIR FLOW DIRECTION
1
Press the SWING button( ).
• The vertical adjustment louvre will swing.
2
Press the SWING button( ) again
to stop at the desired position.
HORIZONTAL AIR FLOW DIRECTION
Adjust the horizontal air ow direction
with the louvre lever.
ADJUSTING THE AIR FLOW
DIRECTION
Louvre levers
COANDA AIRFLOW
Adjustment range
1
2
COOL and DEHU-
MIDIFY modes HEAT mode
In cool or dehumidify mode, vertical airow
louvre is set obliquely upward to deliver
cool air to the ceiling in order to avoid di-
rect airow. In heat mode, vertical airow
louvre is set downward to deliver the warm
air down to the oor.
1
During operation, press the
COANDA AIRFLOW button.
• The remote control will display
“ ”.
TO CANCEL
Press the COANDA AIRFLOW button
again.
NOTE:
• The COANDA AIRFLOW setting is cancelled
when you press FULL POWER button while
COANDA AIRFLOW is set.
• If you want COANDA AIRFLOW operation
in FULL POWER mode, press COANDA
AIRFLOW button during FULL POWER
operation.
1
CAUTION:
Never attempt to adjust the vertical airow lou-
vre manually.
• Manual adjustment of the vertical airow lou-
vre can cause the unit to malfunction.
• When the vertical adjustment louvre is posi-
tioned at the lowest position in the COOL or
DEHUMIDIFY mode for an extended period of
time, condensation may result.

GB-8
PLASMACLUSTER OPERATION
FULL POWER OPERATION
In this operation, the air/air heat pump
works at the maximum power to make the
room cool or warm rapidly.
1
During operation, press the
FULL POWER button.
• The remote control will display “ ”.
• The temperature display will go off.
• The green FULL POWER lamp ( )
on the unit will light up.
TO CANCEL
Press the FULL POWER button again.
• The FULL POWER operation will also be can-
celled when the operation mode is changed,
or when the unit is turned off.
• The green FULL POWER lamp ( ) on
the unit will turn off.
NOTE:
• The air/air heat pump will operate at “Extra
HIGH” fan speed for 15 minutes, and then
shift to “HIGH” fan speed.
• You can not set the temperature or fan speed
during the FULL POWER operation.
• To turn off the FULL POWER lamp, press the
DISPLAY button.
1
Active air purification mode with
plasmacluster ions. Actively reduces
airborne mold.
1
Press the PLASMACLUSTER
button during operation.
• The remote control will display “ ”.
• The blue PLASMACLUSTER lamp on the
unit will light up.
2
If you pressed the button
while unit is not in operation,
Plasmacluster operation starts
in fan only mode.
1
2
TO CANCEL
Press the PLASMACLUSTER button
again.
• The blue PLASMACLUSTER lamp on the unit
will turn off.
NOTE:
• Use of the PLASMACLUSTER operation will
be memorized, and it will be activated the
next time you turn on the air/air heat pump.
• To turn off the PLASMACLUSTER lamp,
press the DISPLAY button.

GB-9
ENGLISH
When the 1-HOUR OFF TIMER is set, the
unit will automatically turn off after one
hour.
1
Press the 1-HOUR OFF TIMER
button.
• The remote control displays “ ”.
• The orange TIMER lamp ( ) on the
unit will light up.
TO CANCEL
Press the TIMER CANCEL button.
• The orange TIMER lamp ( ) on the unit will
turn off.
NOTE:
• The 1-HOUR OFF TIMER operation has
priority over TIMER ON and TIMER OFF
operations.
• If the 1-HOUR OFF TIMER is set while the
unit is not operating, the unit will operate for
an hour at the formerly set condition.
• If you wish to operate the unit for another
hour before the 1-HOUR OFF TIMER is
activated, press the 1-HOUR OFF TIMER
button again during operation.
• If TIMER ON and/or TIMER OFF are set,
TIMER CANCEL button cancels every
setting.
SELF CLEAN OPERATION 1-HOUR OFF TIMER
1
CANCEL
SELF CLEAN operation will reduce the
growth mold fungus with Plasmacluster
ions, and dry inside of the air/air heat pump
unit. Utilize the operation at seasonal
change over terms.
1
Press the SELF CLEAN button
when the unit is not operating.
• The remote control displays “ ”.
• The green OPERATION lamp ( ), the
green SELF CLEAN lamp ( ) and the
blue PLASMACLUSTER lamp on the unit
will light up.
• The unit will stop operation after forty
minutes.
1
TO CANCEL
Press the SELF CLEAN button.
Alternatively, turn the unit off by
pressing the ON/OFF button.
• The green OPERATION lamp ( ), the
green SELF CLEAN lamp ( ) and the blue
PLASMACLUSTER lamp on the unit will turn
off.
NOTE:
• You cannot set the temperature, fan speed,
air ow direction or timer setting during the
SELF CLEAN operation.
• Mold fungus already grown can not be
eliminated by this operation.

GB-10
TIMER OPERATION
TIMER OFF
1
Press the TIMER OFF button.
• The TIMER OFF indicator will blink.
2
Press the TIME ADVANCE or RE-
VERSE button to set the desired
time.
• The time can be set in 10-minute incre-
ments.
3
Press the SET/C button.
• The orange TIMER lamp ( ) on the
unit will light.
1
2
3
TIMER ON
1
Press the TIMER ON button.
• The TIMER ON indicator will blink.
2
Press the TIME ADVANCE or RE-
VERSE button to set the desired
time.
• The time can be set in 10-minute incre-
ments.
3
Press the SET/C button.
• The orange TIMER lamp ( ) on the
unit will light.
4
Select the operation condition.
NOTE:
• The unit will turn on prior to the set time
to allow the room to reach the desired
temperature by the programmed time.
(Awaking function)
4
1
2
3
Before setting the timer, make sure the
clock is properly set with the current time.
NOTE:
When the TIMER OFF mode is set, the
temperature setting is automatically adjusted to
prevent the room from be coming excessively
hot or too cold while you sleep. (Auto Sleep
function) The Auto Sleep function will not
activate during the AUTO mode.
COOL/DEHUMIDIFY MODE:
One hour after the timer is set, the temperature
setting rises by 1°C.
HEAT MODE:
One hour after the timer is set, the temperature
setting drops 3°C.

GB-11
ENGLISH
MAINTENANCE FUNCTION OPERATION
A maintenance temperature of 10°C
eliminates moisture and extreme cold,
reducing the risk of mold and frost damage.
1 Press the MODE button and
select HEAT mode.
2 Press the ON/OFF button to
start HEAT operation.
3 Press the MAINTENANCE
button.
• The remote control will display “ 10°C ” .
TO CANCEL
Press the MAINTENANCE +10° button again.
• MAINTENANCE FUNCTION operation will
also be cancelled when the operation mode is
changed, or when the unit is turned off.
NOTE:
• MAINTENANCE FUNCTION operation will
not be available during AUTO mode opera-
tion.
2
1
3
TO COMBINE TIMER ON AND
TIMER OFF
Set the TIMER OFF and TIMER ON.
Example:
(Current time: 9:00 p.m)
OFF TIMER at 11:00 p.m.
ON TIMER at 7:00 a.m.
• The arrow ( or ) between the TIMER ON
indicator and the TIMER OFF indicator shows
which timer will activate rst.
NOTE:
• You cannot program the ON-TIMER and
OFF-TIMER to operate the unit at different
temperatures or other settings.
• Either timer can be programmed to activate
prior to the other.
TO CANCEL TIMER MODE
Press the SET/C button.
• The orange TIMER lamp ( ) on the unit will
turn off.
•
The current time will be displayed on the
remote control.
NOTE:
• If any TIMER ON, TIMER OFF and ONE-
HOUR OFF TIMER are set, the TIMER
CANCEL button cancels all settings.
TO CHANGE TIME SETTING
Cancel the TIMER setting rst, then set it
again.
CANCEL

GB-12
NOTE ON OPERATIONDISPLAY BUTTON
OPERATING TEMPERATURE RANGE
INDOOR
TEMP.
OUTDOOR
TEMP.
COOLING upper limit 32˚C 43˚C
lower limit 21˚C –10˚C
HEATING upper limit 27˚C 24˚C
lower limit – –
• The built-in protective device may prevent the
unit from operating when used out of this range.
• Condensation may form on the air outlet if the
unit operates continuously in the COOL or
DEHUMIDIFY mode when humidity is over 80
percent.
WHEN POWER FAILURE OCCURS
• This air/air heat pump has a memory function
to store settings when a power failure occurs.
After power recovery, the unit will automatical-
ly restart in the same settings which were ac-
tive before the power failure, except for timer
settings.
• If a power failure occurs while the timer is set,
the timer setting will be cancelled and will not
be retrieved even after the power is restored.
NOTE ON HEATING OPERATION
DEFROSTING FUNCTION
• When frost forms on the outdoor unit during
heating operation, the unit will perform auto-
matic defrosting for about 5 to 10 minutes to
remove the frost. During defrosting, the inside
and outside fans stop operating.
HEATING EFFICIENCY
• The unit employs a heat pump that draws
heat from the outside air and releases it into
the room. The outside temperature therefore
greatly affects the heating efciency.
• If the heating efciency is reduced due to low
outside temperatures, use an additional heat-
er.
Press the DISPLAY button when the lamps on
the unit are too bright. (The green OPERATION
lamp and the orange TIMER lamp can not be
turned off.)
1
During operation, press the DIS-
PLAY button.
• The blue PLASMACLUSTER lamp( ) and/or
the green FULL POWER lamp ( )will turn
off.
TO LIGHT UP
Press the DISPLAY button again.
1

GB-13
ENGLISH
MAINTENANCE
Be sure to stop the operation and turn off
the circuit breaker before performing any
maintenance.
CLEANING THE FILTERS
The air lters should be cleaned every two
weeks.
1
Turn off the unit.
2
Remove the lters.
1 Lift the open panel.
2 Pull the air lters down to remove
them.
3
(If using optional air purifying lters:
PART CODE CFIL-A124JBKZ)
Take off the air purifying lters
from the air lters.
4
Clean the lters.
Use a vacuum cleaner to remove dust.
If the lters are dirty, wash them with
warm water and a mild detergent. Dry
lters in the shade before reinstalling.
5
(If using optional air purifying lters)
Reinstall the air purifying lters.
6
Reinstall the filters and close
the open panel.
CLEANING THE UNIT AND THE
REMOTE CONTROL
• Wipe them with a soft cloth.
• Do not directly splash or pour water on
them. It can cause electrical shock or
equipment damage.
• Do not use hot water, thinner, abra-
sive powders or strong solvents.
MAINTENANCE AFTER AIR/AIR
HEAT PUMP SEASON
1
Operate the unit in the SELF CLEAN
operation to thoroughly dry inside
the unit.
2
Stop the operation and turn off the
circuit breaker.
3
Clean the lters, then reinstall them.
MAINTENANCE BEFORE AIR/AIR
HEAT PUMP SEASON
1
Make sure that the air lters are not
dirty.
2
Make sure that nothing obstructs
the air inlet or outlet.

GB-14
BEFORE CALLING FOR SERVICE
The following conditions do not denote
equipment malfunctions
UNIT DOES NOT OPERATE
• The unit will not operate if it is turned on
immediately after it is turned off. The unit
will not operate immediately after the mode
is changed. This is to protect the internal
mechanisms. Wait 3 minutes before operating
the unit.
UNIT DOES NOT SEND OUT WARM AIR
• In heating operation, the indoor fan may not
start for 2 to 5 minutes after the unit is turned
on to prevent cold air from blowing out of the
unit.
• The unit is defrosting. Wait for 5 to 10 minutes.
ODORS
• Carpet and furniture odors that entered into
the unit may be sent out from the unit.
CRACKING NOISE
• The unit may produce a cracking noise. This
sound is generated by the friction of the front
panel and other components expanding or
connecting due to a temperature change.
A LOW BUZZING NOISE EMITTED
• This is a sound emitted when the unit is
generating Plasmacluster ions.
SWISHING NOISE
• The soft, swishing noise is the sound of the
refrigerant owing inside the unit.
MIST SEEN AT INDOOR AIR OUTLET
• In cooling operation, this is caused by the dif-
ference between the room air temperature
and the air discharged.
WATER VAPOUR
• In the HEAT operation, water vapour may ow
out of the outdoor unit during de-icing.
THE OUTDOOR UNIT DOES NOT STOP
• After stopping the operation, the outdoor unit
will rotate its fan for about a minute to cool
down the unit.
ODOR EMITTED FROM THE PLASMA-
CLUSTER AIR OUTLET
• This is the smell of ozone generated from the
Plasmacluster Ion generator. The ozone con-
centration is very small, posing no adverse ef-
fect on your health. The ozone discharged into
the air rapidly decomposes, and its density in
the room will not increase.
If the unit appears to be malfunctioning,
check the following points before calling
for service.
IF THE UNIT FAILS TO OPERATE
Check to see if the circuit breaker has tripped or
the fuse has blown.
IF THE UNIT FAILS TO COOL (OR
HEAT) THE ROOM EFFECTIVELY
• Check the lters. If dirty, clean them.
• Check the outdoor unit to make sure nothing
is blocking the air inlet or outlet.
• Check the thermostat is proper setting.
• Make sure windows and doors are closed
tightly.
• A large number of people in the room can
prevent the unit from achieving the desired
temperature.
• Check whether any heat-generating
appliances are operating in the room.
IF THE UNIT FAILS TO RECEIVE THE
REMOTE CONTROL SIGNAL
• Check whether the remote control batteries
have become old and weak.
• Try to send the signal again with the remote
control pointed properly towards the unit’s
signal receiver window.
• Check whether the remote control batteries
are installed properly.
Please call for service when OPERATION
lamp, TIMER lamp and/or PLASMACLUS-
TER lamp on the unit blink.


Obs: Produktet vil ha dette
symbolet. Det betyr at det
er snakk om elektrisk eller
elektronisk utstyr som ikke
bør blandes med alminnelige
husholdningsavfall. Det nnes
et separat gjennbrukssystem til
slike produkter.
A. Informasjon om gjenvinning og gjenbruk for brukere (private
husholdninger)
1. I EU - land
Obs: Hvis du ønsker og gjenvinne dette apparatet, bør du ikke kaste dette i
en alminnelig søppelkasse.
Brukt elektrisk og elektronisk utstyr skal behandles i overensstemmelse
med lov om korrekt behandling og gjenbruk av elektrisk og elektronisk
utstyr.
Som følge av EU-medlemslandenes implementering av denne lov, har
private husstander i EU rett til og sende inn elektrisk og elektronisk utstyr
på angitte gjenvinningsstasjoner*. I noen land* er det muligens gratis og
levere inn det brukte produktet hos den lokale forhandler hvis du kjøper et
tilsvarende produkt.
*) Kontakt de lokale myndigheter hvis du ønsker ytterligere informasjon.
Hvis ditt brukte elektriske eller elektroniske utstyr inneholder batterier
eller akkumulatorer, skal disse håndteres separat i henhold til gjeldende
miljøforskrifter før du levere inn utstyret.
Ved å håndtere produktet i henhold til disse forskrifter, vil du være med
på og sikre at vårt avfall behandles og gjenbrukes riktig. Dermed utsettes
verken miljøet eller vår helse for overlast som følge av uhensiktsmessige
avfallshåndteringer.
2. I land utenfor EU
Hvis du ønsker og kvitte deg med dette produktet, bes du kontakte de
lokale myndigheter og spørre dem om hvordan produktet gjenvinnes
korrekt.
B. Informasjon om gjenvinning og gjenbruk for virksomheter.
1. Innenfor EU
Hvis dette produktet brukes i forbindelse med virksomhetens drift, og du
ønsker å kvitte deg med det:
Kontakt din installatør, som vil fortelle deg hvordan produktet kan
innleveres. Du vil muligens måtte betale for omkostningene i forbindelse
med innlevering og gjenbruk. Små produkter (i små mengder) kan muligens
leveres på din lokale gjenvinningsstasjon.
2. I land utenfor EU
Hvis du ønsker og kvitte deg med dette produktet, bes du kontakte de
lokale myndigheter og spørre dem om hvordan produktet gjenvinnes
korrekt .
Batteriet som medfølger dette produktet kan innehold spor av bly.
For EU: Batteriet er merket med en søppeltønne med kryss over, hvilket
betyr at det ikke skal kastes sammen med vanlig husavfall. Det er eget
innsamlingssystem for batterier av denne typen, for å forenkle korrekt
behandling og gjenvinning, i henhold til gjeldende forskrifter. Vær vennlig
å kontakte de lokale myndigheter for videre informasjon om innsamling og
gjenvinning.
For Sveits: Brukte batterier leveres til utsalgssted.
For land utenfor EU: Kontakt de lokale myndigheter for informasjon om
gjeldende sorterings- og gjenvinnings forskrifter for brukte batterier.
NO
Inneholder uoriserende drivhusgasser som omfattes av Kyoto-protokoll.
R410A (Potensiale for global oppvarming, 1975)
Pb

NO-1
NORSK
Les denne manualen nøye før produktet tas i bruk. Denne manualen må
oppbevares på et trygt sted for enkel tilgang ved behov for referanser.
NORSK
INNHOLD
• SIKKERHETSFORHOLDSREGLER ................ NO-1
• NAVN PÅ DELENE ........................................... NO-2
• BRUK AV FJERNKONTROLL ........................... NO-4
• TIPS OM ENERGISPARING ............................ NO-5
• RESERVEMODUS ...........................................NO-5
• GRUNNLEGGENDE DRIFT .............................NO-6
•
JUSTERING AV RETNINGEN PÅ LUFTSTRØMMEN
...... NO-7
• COANDA AIRFLOW .......................................... NO-7
• DRIFT MED FULL EFFEKT .............................. NO-8
• PLASMACLUSTER-DRIFT ...............................NO-8
• SELVRENGJØRING ......................................... NO-9
• TIDSUR SLÅS AV ETTER 1 TIME .................... NO-9
• TIDSURDRIFT .................................................. NO-10
• VEDLIKEHOLDSVARME ...................................NO-11
• DISPLAY-KNAPP .............................................. NO-12
• NOTE OM DRIFTEN ......................................... NO-12
• VEDLIKEHOLDMAINTENANCE....................... NO-13
•
FØR DU KONTAKTER SERVICEREPRESENTANTEN
.... NO-14
SIKKERHETSFORHOLDSREGLER
ADVARSEL
• Ikke trekk i eller deformer strømledningen. Det
kan føre til skade på enheten og elektrisk støt.
• Pass på at du ikke oppholder deg rett ved
luftavløpet over lengre tid. Det kan gi helseska-
der.
• Hvis varmepumpen brukes i rom der det opp-
holder seg spedbarn, mindre barn eller eldre,
sengeliggende eller bevegelseshemmede per-
soner, må du sørge for at romtemperaturen er
passelig for disse.
• Stikk aldri gjenstander inn i enheten. Det kan
føre til skader, fordi de innvendige viftene rote-
rer med høy hastighet.
• Kontroller at jording av varmepumpen blir utført
på riktig måte. Ikke jord enheten til gassrør,
vannrør, lynavleder eller jord på telefonanleg-
get. Ufullstendig jording kan føre til elektrisk
støt.
• Dersom du har mistanke om at det er noe galt
med enheten (hvis det for eksempel lukter
brent), må du øyeblikkelig avbryte driften og slå
kretsbryteren til AV.
• Enheten skal installeres i samsvar med gjel-
dende forskrifter for elektrisk anlegg. Feil tilko-
pling kan føre til at strømledningen, støpslet og
det elektriske utløpet overopphetes, noe som
kan medføre brannfare.
• Dersom strømledningen skades, må den skif-
tes av produsenten, en servicerepresentant
eller annen kvalisert person, slik at risiko unn-
gås. Bruk bare den strømledningen som angis
av produsenten ved eventuelt skifte.
• Ikke sprut eller hell vann direkte på enheten.
Vann kan forårsake elektrisk støt eller skade
på utstyret.
• Ikke forsøk å installere/ demontere/ reparere
enheten selv. Feilaktig utført arbeid kan forår-
sake elektrisk støt, vannlekkasje, brann osv.
Kontakt forhandleren eller annet kvalifisert
servicepersonell for installering/ demontering/
reparasjon av enheten.
FORSIKTIG
• Åpne vinduer eller dører med jevne mellomrom
for å ventilere rommet, særlig når du bruker
gassutstyr. Ved utilstrekkelig ventilasjon kan
det oppstå oksygenmangel.
• Ikke betjen knappene med fuktige hender. Det
kan forårsake elektrisk støt.
• Slå for sikkerhets skyld av kretsbryteren der-
som enheten ikke skal brukes over lengre tid.
• Kontroller monteringsrammen til utendørsen-
heten med jevne mellomrom for å se etter tegn
på slitasje, og påse at den er skikkelig festet.
• Ikke plasser gjenstander på utendørsenheten
og unngå å tråkke eller stå på den. Gjenstan-
den eller personen som står på utendørsenhe-
ten kan falle ned og pådra seg skade.
• Anlegget er beregnet på bruk i boliger. Ikke
bruk anlegget i andre lokaler, for eksempel i
rom for dyr eller i drivhus.
• Ikke plasser et kar med vann på enheten. Hvis
det trenger vann inn i anlegget, kan det skade
den elektriske isoleringen og forårsake elek-
trisk støt.
• Ikke blokker enhetens luftinntak eller luftutløp.
Det kan forårsake mangelfulle ytelser eller an-
dre problemer.
• Pass alltid på at du slår av enheten og krets-
bryteren før det utføres reparasjon, vedlikehold
eller rengjøring på enheten. En vifte roterer
inne i enheten og kan skade deg.
• Dette utstyret er ikke ment brukt av barn eller
uerfarne personer uten tilsyn. Barn må overvå-
kes for å påse at de ikke leker med utstyret.
• Påse at tilkoblingen av varmepumpen skjer
til strømnett med spenning og frekvens som
stemmer med utstyret. Bruk av strøm med feil
spenning og/eller frekvens kan føre til skade
på utstyret og fare for brann.
• Ikke installer enheten på steder hvor det kan
forekomme brannfarlige gasser. Det kan utløse
eksplosjon og brann.
Installer enheten på et sted hvor det er mini-
malt med støv, røyk og fuktighet i luften.
• Plasser dreneringsslangen slik at det sikres
jevn drenering. Utilstrekkelig drenering kan
føre til vannskader i rommet, på møbler osv.
• Sørg for at det er installert lekkasjebryter eller
kretsbryter, avhengig av installeringsstedet, for
å unngå elektrisk støt.

NO-2
NAVN PÅ DELENE
INNENDØRSENHET
11 PLASMACLUSTER-lampe
(blå )
12 DRIFTS-lampe (grønn )
13 TIDSUR-lampe (oransje )
14 FULL EFFEKT-lampe
(grønn )
15 SELVRENGJØRINGS lam-
pe (grønn )
1
2
3
4
5
6
7
8
9
10
11
12
13
14
15
UTENDØRSENHET 16 Luftinntak
17 Kjølevæskerør og forbin-
delsesledning
18 Dreneringsslange
19 Luftavløp
OBS:
Det faktiske produktet kan
se noe annerledes ut enn på
illustrasjonen til venstre.
16
17
18
19
1 Luftinntak
2 Åpent panel
3 Luftlter
4 AUX-knapp
5 Mottaksvindu
6 Strømledning
7 Vertikalt luftspjeld
8 Horisontalt luftspjeld
9 Luftavløp
10 Fjernkontroll
Sidan laddas ...
Sidan laddas ...
Sidan laddas ...
Sidan laddas ...
Sidan laddas ...
Sidan laddas ...
Sidan laddas ...
Sidan laddas ...
Sidan laddas ...
Sidan laddas ...
Sidan laddas ...
Sidan laddas ...
Sidan laddas ...
Sidan laddas ...
Sidan laddas ...
Sidan laddas ...
Sidan laddas ...
Sidan laddas ...
Sidan laddas ...
Sidan laddas ...
Sidan laddas ...
Sidan laddas ...
Sidan laddas ...
Sidan laddas ...
Sidan laddas ...
Sidan laddas ...
Sidan laddas ...
Sidan laddas ...
Sidan laddas ...
Sidan laddas ...
Sidan laddas ...
Sidan laddas ...
Sidan laddas ...
Sidan laddas ...
Sidan laddas ...
Sidan laddas ...
Sidan laddas ...
Sidan laddas ...
Sidan laddas ...
Sidan laddas ...
Sidan laddas ...
Sidan laddas ...
Sidan laddas ...
Sidan laddas ...
Sidan laddas ...
Sidan laddas ...
Sidan laddas ...
Sidan laddas ...
-
 1
1
-
 2
2
-
 3
3
-
 4
4
-
 5
5
-
 6
6
-
 7
7
-
 8
8
-
 9
9
-
 10
10
-
 11
11
-
 12
12
-
 13
13
-
 14
14
-
 15
15
-
 16
16
-
 17
17
-
 18
18
-
 19
19
-
 20
20
-
 21
21
-
 22
22
-
 23
23
-
 24
24
-
 25
25
-
 26
26
-
 27
27
-
 28
28
-
 29
29
-
 30
30
-
 31
31
-
 32
32
-
 33
33
-
 34
34
-
 35
35
-
 36
36
-
 37
37
-
 38
38
-
 39
39
-
 40
40
-
 41
41
-
 42
42
-
 43
43
-
 44
44
-
 45
45
-
 46
46
-
 47
47
-
 48
48
-
 49
49
-
 50
50
-
 51
51
-
 52
52
-
 53
53
-
 54
54
-
 55
55
-
 56
56
-
 57
57
-
 58
58
-
 59
59
-
 60
60
-
 61
61
-
 62
62
-
 63
63
-
 64
64
-
 65
65
-
 66
66
-
 67
67
-
 68
68


