
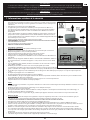
503-0839 LEV1
MODEL No: 203P1 & 203M1
28/37/50mbar
2 COOK 3
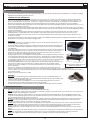
MODEL: 203P1
MODEL: 203M1
USER INSTRUCTIONS
NOTE! PRODUCT MAY VARY FROM ILLUSTRATIONS
EN DE DK ES FR IT NL NO PL SE SI FI TR

EN
Recycling packaging material! Place the packaging material in the appropriate recycling waste bins wher-
ever possible.
Explanation of Symbols

11
CAUTION
Provide ample ventilation. This gas appliance consumes air (oxygen). Do not use this appliance in an unventilated space to
avoid endangering your life. If still more gas appliances and/or occupants using gas are added to the space, additional ventilation must
be provided.
IMPORTANT
Read these instructions carefully so as to familiarise yourself with the appliance before fitting the appliance to a gas cylinder.
Retain these instructions for future reference.
EN
1. Safety information
These instructions are for your safety and to help you avoid risk of injury and/or damage.
All warranties will become void if you do not follow these instructions.
• This appliance complies to BS EN 484.
• Gas appliances require ventilation for efficient performance and to ensure the safety of
users and other persons in close proximity, do not use the appliance in an unventilated
area. It is intended for outdoor use only.
• The room where this appliance is used should have a window or a door that can be
opened or partially open during use. If there is no window or door available for room
ventilation, extra ventilation must be installed for your safety.
• Ensure that the appliance is used in a well-ventilated area.
• WARNING: ACCESSIBLE PARTS MAY BE VERY HOT. KEEP YOUNG CHILDREN AWAY.
• Read these instructions carefully before using the appliance.
• FOR OUTDOOR USE ONLY!
Assembly and use
• Do not use the appliance if it has damaged or worn seals.
• Do not use an appliance that is leaking, damaged or which does not operate properly.
• Handle the appliance with care, do not drop it.
• Always operate the appliance on a firm level surface.
• Ensure that the assembled product is stable and does not rock.
• This appliance is not suitable for installation or connection to a reticulated gas supply.
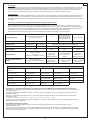
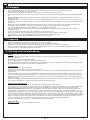
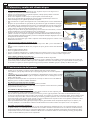
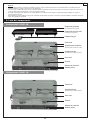
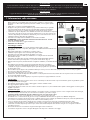
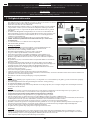
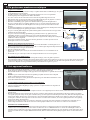
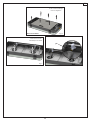
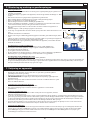
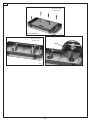
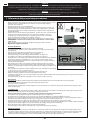
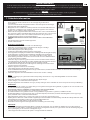
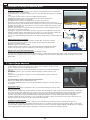
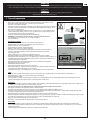
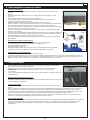
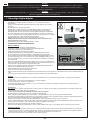
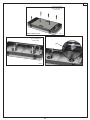
• This appliance must be kept away from flammable materials during use. Minimum safe
distances are: Above the appliance 120cm. At the rear and sides 60cm. (fig 1a)
• When using a pot, the minimum recommended pot size is 180mm and maximum
recommended size is 250mm.
• Do not use any cooking surface or pot that is larger than the recommended size. Our
cooking surfaces have been specifically designed to allow gas combustion to escape and
the closer of this space could affect the performance of this appliance.
• Do not modify this appliance, any modification may be dangerous. Do not use it for
anything for which it has not been designed.
• Do not move the appliance during use.
• Never leave the appliance unattended when lit.
• During use, parts of the appliance will become hot (particularly the burner) Avoid
touching hot parts with bare hands. The use of gloves is recommended.
• Do not use the appliance without the pot stands being in place and properly located.
Hose
• The hose must be checked for wear or damage before every use and before connecting to the gas container.
• Do not use the appliance if it has a damaged or worn hose. Replace the hose.
• Do not twist or pinch the hose.
• The hose length should be no less than 0.8m and shall not exceed 1.2m. Replace when the hose is damaged or shows signs of brittleness or
cracks.
Gas Container
• Gas is supplied to the unit via a hose and regulator. The hose and regulator can be connected to a gas cylinder, a gas cartridge, or a Power
Pak which is a unit that takes two or more gas cartridges.
• IT COULD BE HAZARDOUS TO ATTEMPT TO FIT OTHER TYPES OF GAS CARTRIDGES.
• This appliance must only be used with an approved hose and regulator.
• Only to be used with a gas cylinder that does not exceed 500mm in height (not including the regulator) and 400mm in width.
• Ensure that the gas container is fitted or changed in a well-ventilated location, preferably outdoors, away from any sources of ignition such
as naked flames, pilots, electric fires and away from other people.
• Keep gas containers away from heat and flame. Do not place on a stove or any other hot surface.
• Refillable containers are to be used only in the upright position so as to ensure proper fuel withdrawal. Failure to adhere to this may cause
liquid discharge from the gas container resulting in a dangerous operating conditions.
• Do not try to remove the gas container whilst the appliance is in operation.
• The gas container must be disconnected from the appliance aer use or when in storage.
Light back
• In the event of light back (where the flame burns back and ignites inside the burner or venturi housing), immediately turn off the gas supply
by firstly closing the control valve on the gas cylinder and then the appliance valve. Aer the flame is extinguished, remove the regulator
and check the condition of the seal; replace the seal if in doubt. Re-light the appliance.
• Should the flame persistently light back, return the product to your authorized repair agent.
Fig. 1a
Fig. 1b
180mm
250mm
60mm

22
EN
Leaks
• If there is a gas leak on your appliance (smell of gas), immediately turn off the gas supply by turning the control knob clockwise to the “OFF”
position and take it into a flame free location where the gas leak may be detected and stopped. If you wish to check for gas leaks on your
appliance, do it outside. Do not try to detect gas leaks using a flame; use soapy water.
How to check the appliance is connected to the gas supply in a sound fashion
• It is important that all gas connections have been correctly connected to prevent any gas leaks.
• The correct way is to smear the joint, i.e. where the gas container connects to the appliance, with soapy water. Turn the appliance control knob
slightly anti-clockwise to turn the gas on. If bubbles form, then there is a gas leak. Immediately turn the gas off and disconnect the gas supply
from the appliance. Check that all the connections are properly fitted. Check that the seal is in place and in good condition before connecting
the gas supply. Re-check with soapy water aer refitting the gas supply.
• If a gas leak persists, return the product to your local dealer for inspection/repair.
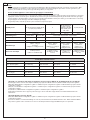
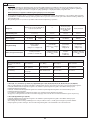
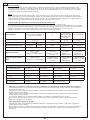
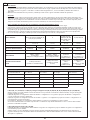
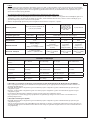
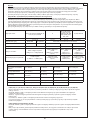
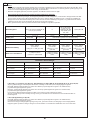
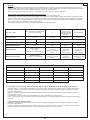
Country of Use BE, CH, CY, CZ, ES, FR, GB, GR, IE,
IT, LT, LU, LV, PT, SK & SI PL
BE, CY, DK, EE, FR,
FI, HU, IT, LT, NL,
NO, SE, SI, SK, RO,
HR, TR, BG, IS,LU,
MT, & ZA
AT, CH, DE & SK
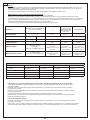
Appliance Catagories I3+(28-30/37) I3B/P (37) I3B/P (30) I3B/P (50)
Allowable gasses Butane-G30 Propane-G31 Butane-G30, Propane-G31 or their mixture
Gas Pressure 28-30mbar 37mbar 37mbar 28-30mbar 50mbar
Jet Number 0.73 0.69 0.73 0.64
Nominal Usage
Butane - 160 g/h
per burner
(160g/h x 2 = 320g/h in total)
Butane - 160 g/h
per burner
(160g/h x 2 = 320g/h
in total)
Butane - 160g/h
per burner
(160g/h x 2 =
320g/h in total)
Butane - 160g/h
per burner
(160g/h x 2 =
320g/h in total)
Gross nom. heat input 2.2kW per burner
(2kW x 2 = 4.4kW in total)
2.2kW per burner
(2.2kW x 2 = 4.4kW
in total)
2.2kW per burner
(2.2kW x 2 =
4.4kW in total)
2.2kW per burner
(2.2kW x 2 = 4.4kW
in total)
Country Name and Abbreviations
AE = United Arab Emirates AL = Albania AT = Austria BE = Belgium CH = Switzerland
CZ = Czech Republic DE = Germany DK = Denmark ES = Spain FI = Finland
FR = France GB = United Kingdom GR = Greece HR = Croatia IT = Italy
JP = Japan KR = Korea NL = Netherlands NO = Norway PL = Poland
PT = Portugal RO = Romania RU = Russia RS = Serbia SI = Slovenia
SK = Slovakia SE = Sweden TR = Turkey ZA = South Africa
I 3B/P (30), I 3+ (28-30/37) and I 3B/P (37), Appliance categories: (DK, FI, NO, NL, SE, AT, DE, BE, ES, FR, IE, IT, PT, GB, CH)
Push an approved hose onto the valve tailpiece until it is properly seated. On the other end, attach a suitable low pressure regulator.
I3B/P(30) : 30mbar Butane configurations regulator or 30mbar Propane configurations regulator or 30mbar butane/propane mixture
configuration regulator.
I3B/P(37) : 37mbar Butane configurations regulator or 37mbar Propane configurations regulator or 37mbar butane/propane mixture
configuration regulator.
I3+(28-30/37) : 30mbar Butane configurations regulator or 37mbar Propane configurations regulator.
Again making sure that the hose is properly seated. The type of hose used shall comply with the relevant EN standard and locate
requirement.
I 3B/P (50) Appliance category: (AT, DE)
I3B/P(50) : 50mbar Butane configurations regulator or 50mbar Propane configurations regulator or 50mbar butane/propane mixture
configurations regulator.
Screw a hose with the correct threaded fittings on each end, onto the le hand 1/4” BSP thread of the valve. Attach a suitable 50mbar
low-pressure regulator on the end of the hose. The hose assembly used must comply with DIN 4815 part 2 or equivalent.

33
2. Fitting and Changing the Gas Supply
Connecting the gas supply
• Before connecting the appliance to a gas supply, ensure that the rubber seal on the regulator is in
position and in good condition.
• Before connecting the hose and regulator to the appliance, check that the appliance control knob is
in the “OFF” position.
• Carry out this check each time you fit the appliance to a gas cylinder.
• Blow out any dust from the gas supply opening to prevent possible blockage of the jet.
• Fit an approved hose and regulator to the appliance.
• Only use the hose assembly as supplied for connection to the gas supply.
• Ensure that the gas supply (gas cylinder/gas cartridge) is fitted in a well-ventilated location away
from any source of ignition, such as naked flames and away from other people.
• Do not twist or pinch the hose. Ensure that it is routed away from the stove body so as to prevent
deterioration / damage to the hose caused by heat.
• Make sure that the gas cylinder is kept upright at all times, connect to the cylinder by screwing on
hand tight until fully engaged.
• Ensure that a complete gas seal has been made (check for the smell of gas around the connection
joint). Do not check for leaks with a naked flame. Use warm soapy water only, applied to the joints
and connections of the appliance. Any leakage will show up as bubbles around the leakage area.
• If you cannot rectify the gas leak do not use the appliance. If you are in doubt, contact your nearest
stockist.
Disconnecting and changing the gas supply
• Aer use, turn the appliance control knob to the “OFF” position and close the gas supply.
• When you need to replace your empty cylinder, make sure that the gas is closed at the cylinder
valve.
• Do not smoke while changing the cylinder.
• Remove the regulator from the empty cylinder.
• Attach the regulator to the full cylinder, refer to the instructions above on how to connect the gas
supply.
• Apply the same care and checking procedures as if fitting a new gas cylinder.
How to check if your gas cylinder is empty
• The easiest way to check if you are low on gas is by picking up your gas cylinder.
• If you think your gas cylinder is feeling a little lighter than you’d like, weighing the bottle is a great way to see how much gas is le. Most
cylinders will have the empty weight stamped on either the neck or foot ring, and if the weight indicated on the stamp and the weight of your
cylinder are the same, you’re out of gas. You can then approximate the amount of gas you have le by the difference in weight.
3. Operating the Appliance
• When operating this appliance, please take care to ensure that all parts are in good working order
and that you have checked for any gas leaks before lighting the appliance with every use.
• Cooking surfaces can simply be placed and are ready to use. No assembly required.
• PLEASE NOTE: Please ensure all protective packaging and plastic are removed from the appliance
before use.
• The appliance is designed for use with cooking vessels of not less than 180mm in diameter and not
greater than 250mm in diameter.
Precautions to observe before lighting.
• Use this appliance only on a firm level surface.
• Aer prolonged storage, inspect the appliance for any insects and webs, which may affect gas flow.
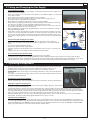
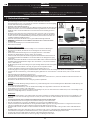
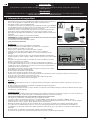
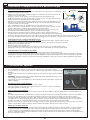
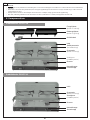
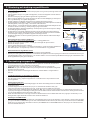
Lighting the appliance using the piezo
• It is recommended to remove any cooking surfaces when trying to light the appliance. This way it will
be easy to see the burner when it is lit.
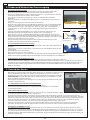
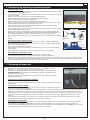
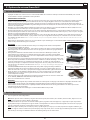
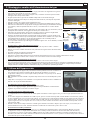
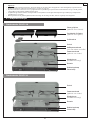
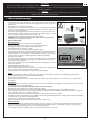
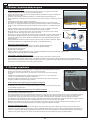
• To light up the appliance using the piezo igniter, push and turn the control knob 90° in an anti-clockwise direction, then press the piezo
button to ignite the gas (see Fig. 3). If the gas does not ignite on the first spark, turn the control knob back to its “OFF” position. Try again,
by pushing and turning the control knob anti-clockwise and push the piezo button to ignite the gas. If the gas has not ignited in the first two
to three seconds you should close the control valve by turing the control knob back to its “OFF” position.
• Wait approximately thirty seconds to let any accumulated gas within the burner escape. Repeat the above process if necessary until the
flame ignites. The flame should normally light up within the first one to two seconds.
Lighting up using a BBQ lighter
• When starting cold, the appliance may be lit from the top prior to fitting the desired cooking surface. When lighting up a hot appliance, it
is recommended that this be done by sticking a barbecue lighter through one of the vent holes underneath the burner, until it is in line with
the burner (DO NOT place the BBQ lighter through the large hole directly underneath the burner). Ignite the BBQ lighter. Whilst the BBQ
lighter is lit, push and turn the control knob anti-clockwise to light the burner.
Fig. 3
EN
Fig. 2b
Fig. 2a
Piezo
button

44
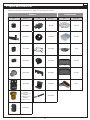
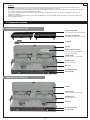
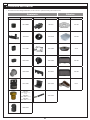
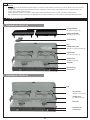
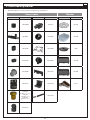
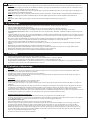
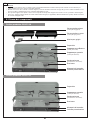
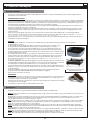
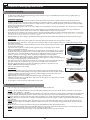
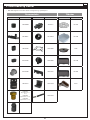
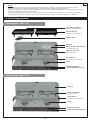
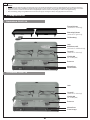
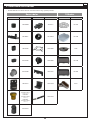
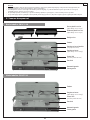
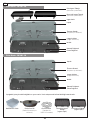
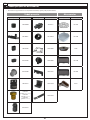
4. Component List
Product code: 203P1-20
EN
General
• Once the appliance is lit, the flame intensity may be adjusted by turning the control knob anti-clockwise to reduce the flame or clockwise to
increase the flame.
• When cooking food with a high fat content, flaring may occur if the selected heat setting is too high. Should this happen, turn the heat down
until the flaring ceases.
• Do not move the appliance when in use. It is unsafe practice to move the appliance whilst lit and may cause flaring.
• Aer use, first close the control valve on the gas cylinder (where applicable). When the flame has extinguished, close the control valve on
the appliance.
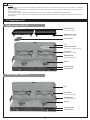
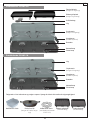
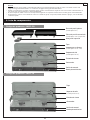
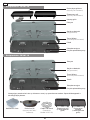
Ribbed Grill Plate
(used for Grilling)
Lid
Burner
Control Knob
Flat Grill Plate
(used for frying)
Pot Stand
(used for Boiling)
Grill Handle
Wind Shield
(wind protection)
Coffee Pot Stand
(used for Coffee making)
Piezo Button
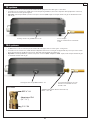
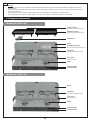
Product code: 203P1-10
Lid
Burner
Piezo Button
Control Knob
Pot Stand
(used for Boiling)
Wind Shield
(wind protection)

55
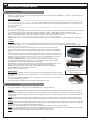
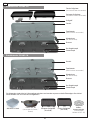
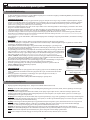
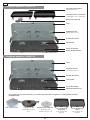
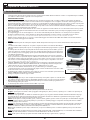
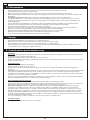
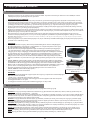
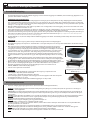
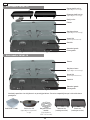
Ribbed Grill Plate
(used for Grilling)
Lid
Burner
Piezo Button
Control Knob
Flat Grill Plate
(used for Frying)
Pot Stand
(used for Boiling)
Grill Handle
Wind Shield
(wind protection)
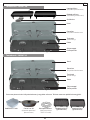
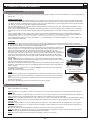
Product code: 203M1-20
The following surfaces are not included and are sold separately. Check availability with your local stockist.
So Soak 2 Cook Paella Pan 30
(used for Paella/Frying)
Lid
Burner
Piezo Button
Control Knob
Pot Stand
(used for Boiling)
Wind Shield
(wind protection)
Product code: 203M1-10
EN
Ribbed Grill
(with handle)
Flat Grill
(with handle)
Coffee Pot Stand
(Standard with
203P1-20 model)

66
5. GreenGrill Cooking Options
GreenGrill Cooking
Most of the cooking surfaces have our GreenGrill coating. This ceramic coating is completely PFOA-free; it contains no toxic substances, and
guarentees healthier cooking!
PREPARATION & USE
• ‘Seasoning’: before using the cooking surface for the first time, you can season it to give the cooking surface a thin protective layer that prevents food
from sticking. It is not required but we do recommend it. It’s very easy: lightly rub cooking oil on the surface and then place over medium heat
for 2 - 3 minutes. When it cools, wash the cooking surface with soapy water before use and grease it lightly with some oil (cooking oil of your
choice, e.g. sunflower oil).
It’s ready to go!
• Note: GreenGrill coating conducts heat better than products with a regular (PTFE) non-stick coating. We therefore recommend using only 75% of the
power of what you are used to.
• Never leave the cooking surface on the heat source without oil. Apply a thin layer of oil with a kitchen paper towel or a brush before placing the
cooking surface on the heat source. Make sure you have oiled all parts, so with e.g. a BBQ grid include the raised edges as well.
• We recommend frying in sunflower oil or Rapeseed Oil because of the high burning point. Olive oil can have a relatively low burning point,
which can cause the ingredients to stick to the pan or burn. We therefore do not recommend using olive oil.
Tip: bring meat or fish to room temperature before frying. This will prevent sticking to the cooking surface.
• Always use silicone and/or wooden utensils so that the GreenGrill coating is not damaged. Never use metal utensils as this can damage the
coating.
CLEANING
• Let the cooking surface cool down before cleaning. Extreme temperature changes can cause deformation of the cooking surface.
• The GreenGrill coating is ‘Easy Clean’. Warm soapy water with a so sponge is sufficient for cleaning the cooking surfaces with GreenGrill
coating. Avoid scouring pads or steel wool.
• If the cooking surface has food particles remaining from a previous use they can adhere to the
coating, which can lead to brown spots. In these places, ingredients can stick to the cooking surface
because the coating is no longer reached. Make sure that these spots are properly removed before
use.
• For stubborn stains or residues, you can try the ‘vinegar method’ for the paella pan or chef pan: pour
a layer of vinegar into the pan and heat the pan slightly. The vinegar does not have to boil and should
certainly not evaporate completely. Pour the vinegar out of the pan, clean the pan with soapy water
and the pan is as good as new. Note: heating vinegar can give off an unpleasant smell.
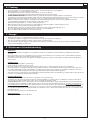
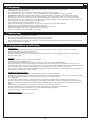
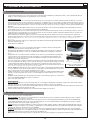
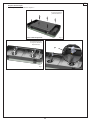
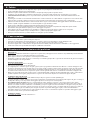
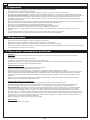
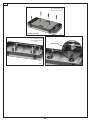
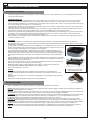
• The CADAC | DOMETIC So Soak (sold seperately) is the ideal companion product to facilitate
overnight soaking. When using the So Soak, we recommend placing the cooking surface face
down which allows for maximum soaking and also uses less water.
• Note that in the case of using the So Soak 2 Cook, you can soak both grids simultaneously. To do so
place one grid cooking side up, and the other facing downwards as seen in the images.
• Any stubborn stains that remain aer soaking, can be loosened and brushed away using the
CADAC | DOMETIC So Soak Brush (sold seperately)
• Dry with a so cloth and you’re done!
MAINTENANCE
• We recommend to add a little oil to the cooking surface aer cleaning and spread it with kitchen paper
The oil seals the surface from the outside air and moisture. It also ensures that the food does not burn into
the surface.
• Place the cooking surface in a plastic bag before you put it into its storage bag so you are ensured the
storage bag remains clean and oil free.
• The storage bag prevents damage to the GreenGrill coating and your product.
Cooking Options
• These are the available cooking options. (Use windshields in case of windy conditions)
Grilling: This cooking option is ideal for fat-free grilling of chicken, sausages, chops, kebabs, fish or vegetables. For this type of cooking, use
the grill plate.
Caution: Please note that when cooking fatty meats some fat will splatter onto the unit which may cause flare-ups. Please use caution when
handling such meats. The cooking temperatures are easily adjusted to suit your own requirements by turning the control knob to regulate the
degree of heat.
Frying: This option is ideal for stir-fries, fish, breakfast, pancakes, prawns, paella and vegetables. For this type of cooking, use the flat grill.
Please note that being a shallow pan, it is not suitable for deep-frying. The easy clean surface encourages the minimum use of fat for healthy
cooking.
Boiling: For this type of cooking, place the pot stand in its locator grooves ensuring that it is properly seated. Place a suitable pot (not less than
180mm diameter and not more than 250mm diameter). One liter of water will boil in approximately 6 minutes depending on the conditions,
size of pot used, etc. Use windshields in case of windy conditions
Note: When using small sized pots do not attempt to use pots with plastic handles as these can get extremely hot.
Paella: This cooking option is ideal for preparing paellas, risottos, pasta dishes, traditional breakfasts etc. The Paella Pan is made from a high
quality pressed aluminium which allows for excellent heat distribution and retention.
Coffee: This option is ideal for brewing a hot cup of coffee. Ideal for anytime, anywhere.
EN
Soaking with the So Soak 2 Cook
(Grills not included)
So Soak Brush

77
6. Cleaning
• It is recommended to clean your appliance aer every use. This will prolong the life of your appliance.
• Allow the appliance to cool down before you clean it.
• Use a damp cloth wrung out in a solution of soapy water to clean exterior surfaces.
• To clean the stove body, simply wipe with a damp cloth using a little detergent, if necessary.
• DO NOT IMMERSE IN WATER as this will allow water to get into the burner tube causing the appliance to malfunction.
• The grill plate is coated with a tough durable ceramic non-stick coating that has been used with great success on some of the best cookware
in the world. Never the less, taking care of it can help you to enjoy extra years of healthy, easy, non-stick cooking.
• Whilst the ceramic non-stick coating is very durable, it can easily be damaged by the use of metal cooking utensils. It is therefore
recommended that only plastic or wooden utensils be used when cooking.
• Always allow the grill/flat plate to cool before immersing it in water.
• Make sure that no water gets onto the burners or pilot/light area. Wipe the appliance completely dry before use.
• Do not use abrasive cleaners as they may damage the surfaces.
• Clean the appliance aer each use. Aer cleaning recondition the cooking surface with a light wipe of oil.
• Do not use any high-pressure steam equipment or a water jet to clean the appliance.
• Note: For stubborn stains, CADAC oven cleaner may be used.
7. Storage
• Always allow the unit to cool down and be cleaned before storing.
• Turn off the gas supply to the appliance, disconnect and remove the gas supply from the appliance.
• Never store an appliance with the gas supply connected, this is an unsafe practice.
• Store the appliance and gas supply in a well-ventilated area away from combustible material. Storage of cylinders should preferably be
outdoors and must NOT be in a basement.
8. Maintenance & troubleshooting
Maintenance
• If you clean and maintain your appliance on a regular basis, the life of your appliance will extend and the possibility of problems will
decrease.
• We recommend the service of your appliance to be every twelve (12) months by a service agent to ensure continued efficient operation.
• This appliance must only be serviced by an authorized person.
• Check your gas hose and connections regularly for any signs of leaks and every time the gas cylinder is re-filled or fitted to the appliance
with every use.
Troubleshooting
In the case of a spattering flame or jet blockage:
• Clean your burner ports in case of an over spill.
• We recommend to clean or replace the jets every six (6) months to ensure continued efficient operation of your appliance.
• Should the appliance operate abnormally aer storage and all checks have not isolated the problem, the jet may be blocked. A blocked
jet would be indicated by a weaker yellowish flame or no flame at all in extreme cases. Under these circumstances it will be necessary to
remove and check and thoroughly clean out any foreign matter which may have gathered in the appliance.
• This may be done by removing the jet using standard tools and blow any dirt from the jet, alternatively, you may purchase new jets from your
local store. Do not attempt to clean the jet mechanically.
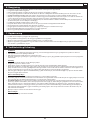
Replacing a Blocked Jet:
• Your appliance is fitted with a specific size jet to regulate the correct amount of gas.
• Should the hole in the jet become blocked, this may result in a small flame or no flame at all. Do not attempt to clean the jet with a pin or
other such device as this may damage the orifice, which could make the appliance unsafe.
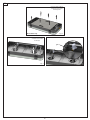
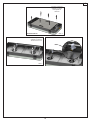
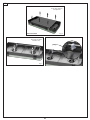
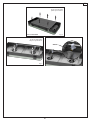
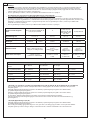
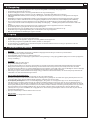
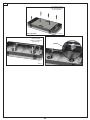
• To replace the jet: Remove any cooking surfaces, close the lid and turn the appliance upside down. Gently unscrew the bottom panel by
removing the screws (Fig. 4)(Only for 203P1 models). Unscrew the screw for the affected burner(s) (Fig. 5), carefuly loosen and drop the
burner as illustrated, to expose the jet. Note that the burner is connected to the piezo cable, aer replacing the jet and reassembling, check
that this cable is still connected. The jet can now be seen on the valve, remove the jet using a suitable spanner (Fig. 6). Do not use pliers on
the jet as this may damage the jet, making it unusable or impossible to remove. Screw the new jet into the valve. Do not over-tighten as this
may damage the jet.
• Reverse the above procedure to re-assemble the unit.
Replacing the Hose:
• The fitting of a hose is described in Section 2.
EN

88
Fig. 4
unscrew each of these
screws to remove the
bottom panel
Model 203P1 only
EN
Jet
Fig. 5 Fig. 6
unscrew each of these
screws to loosen the
burner(s).

99
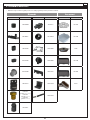
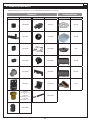
9. Spares and Accessories
• Always use genuine spares as they have been designed to give optimum performance.
Item Spare No.
202-SP004
202-SP012
203P-SP001
203P-SP003
203P-SP008
203P-SP015
HM6-073
(Jet 0.73 28-30 mbar)
HM6-069
(Jet 0.69 37mbar)
HM6-064
(Jet 0.64 50mbar)
203P-SP023
Item Spare No.
202-SP011
202-SP020
203P-SP002
203P-SP005
203P-SP011
203P-SP018
203P-SP012
Item Spare No.
203-100
203-900
8640
203-200
203-300
98326
Spares Accessories
EN

1010
EN
10. Warranty
CADAC Europe BV hereby warrants to the ORIGINAL PURCHASER of this appliance for 2 years, that it will be free of defects in material and
workmanship from the date of purchase as follows:
Valves: 2 Years
Plastic parts: No Warranty
Enamel parts: 2 Years
Die-casting: 1 Years
Burners: 1 Year
The warranty will only apply if the unit is assembled and operated in accordance with the printed instructions.
CADAC Europe BV may require reasonable proof of your date of purchase. THEREFORE, YOU SHOULD RETAIN YOUR SALES SLIP OR
INVOICE.
This Limited Warranty shall be limited to the repair or replacement of parts that prove defective under normal use and service and which
on examination shall indicate, to CADAC Europe BV’s satisfaction, they are defective. Before returning any parts, contact the customer
service representative in your region using the contact information provided with your manual. If CADAC Europe BV confirms the defect
and approves the claim, CADAC Europe BV will elect to replace such parts without charge. CADAC Europe BV will return parts to the
purchaser, freight or postage prepaid.
This Limited Warranty does not cover any failures or operating difficulties due to accident, abuse, misuse, alteration, misapplication,
vandalism, improper installation or improper maintenance or service, or failure to perform normal and routine maintenance, including but
not limited to damage caused by insects within the burner tubes, as set out in this owner’s manual.
Deterioration or damage due to severe weather conditions such as hail, hurricanes, earthquakes or tornadoes, discoloration due to
exposure to chemicals either directly or in the atmosphere, is not cover by this Limited Warranty.
There are no other express warrants except as set forth herein and any applicable implied warranties of merchantability and fitness are
limited in duration to the period of coverage of this express written Limited Warranty. Some regions do not allow limitation on how long an
implied warranty lasts, so this limitation may not apply to you.
CADAC Europe BV is not liable for any special, indirect or consequential damages. Some regions do not allow the exclusion or limitation of
incidental or consequential damages, to this limitation or exclusion may not apply to you.
CADAC Europe BV does not authorize any person or company to assume for it any obligation or liability in connection with the sale,
installation, use, removal, return, or replacement of its equipment; and no such representations are binding on CADAC Europe BV.
This Warranty applies only to products sold at retail.
To enjoy and ensure longevity of your CADAC Europe BV product, please refer to the cleaning and maintenance section of the user manual
with particular attention to the care of the Stainless Steel.

1111
Verpackungsmaterial recyceln! Geben Sie das Verpackungsmaterial nach Möglichkeit in die entsprechen-
den Wertstofftonnen.
Erklärung der Symbole
DE

1212
VORSICHT
Es wird ausreichend Ventilation benötigt, denn dieses Gasgerät verbraucht Luft (Sauerstoff). Benutzen Sie das Gerät nur im Freien und
sorgen Sie für ausreichend Frischluftzufuhr
WICHTIG
Lesen Sie diese Anweisungen bitte sorgfältig durch, damit Ihnen das Gerät vertraut ist, bevor Sie einen Gasbehälter an das Gerät
anschließen. Heben Sie sich diese Anleitungen für späteres Nachlesen auf.
DE
1. Sicherheitshinweise
Diese Anleitungen bestehen für Ihre Sicherheit und um Ihnen dabei zu helfen,
Verletzungsgefahren und / oder Schäden zu vermeiden. Alle Garantien werden ungültig,
wenn Sie diese Anleitungen nicht befolgen.
• Das Gerät entspricht BS EN 484:2019
• Gasgeräte benötigen eine Belüung für eine effiziente Leistung und um die Sicherheit der
Benutzer und anderer Personen in unmittelbarer Nähe zu gewährleisten. Verwenden Sie
das Gerät nicht in einem unbelüeten Bereich. Es ist nur für die Verwendung im Freien
bestimmt.
• Der Raum, in dem dieses Gerät verwendet wird, sollte ein Fenster oder eine Tür haben,
die während des Gebrauchs geöffnet oder teilweise geöffnet werden kann. Wenn kein
Fenster oder keine Tür zur Raumbelüung vorhanden ist, muss zu Ihrer Sicherheit eine
zusätzliche Belüung installiert werden.
• Achten Sie darauf, dass das Gerät an einem gut belüeten Ort aufgestellt wird.
• WARNUNG: ZUGÄNGLICHE TEILE KÖNNEN SEHR HEISS SEIN. HALTEN SIE KLEINE
KINDER FERN.
• Lesen Sie die Anleitungen, bevor Sie das Gerät benutzen.
• Nur im Freien benutzen!
Montage und Verwendung
• Verwenden Sie das Gerät nicht mit beschädigten oder verschlissenen Dichtungen.
• Benutzen Sie kein Gerät, das undicht oder beschädigt ist oder das nicht richtig
funktioniert.
• Behandeln Sie das Gerät mit angemessener Sorgfalt; lassen Sie es nicht fallen.
• Betreiben Sie das Gerät immer auf einer festen, ebenen Fläche
• Achten Sie bitte darauf, dass das zusammengebaute Gerät fest steht und nicht wackelt.
• Dieses Gerät ist nicht für die Installation oder den Anschluss an eine Netzgasversorgung
vorgesehen
• Achten Sie darauf, dass das Gerät von allen brennbaren Materialien entfernt benutzt wird.
Die Mindest-Sicherheitsabstände betragen: über dem Gerät = 1,2m, hinten und an den
Seiten = 0.6m (Abb. 1a).
• Die Mindestgröße für die Verwendung eines Topfes beträgt 180 mm und die Höchstgröße
250 mm.
• Verwenden Sie keine Kochfläche oder Topf, der größer als die empfohlene Größe
ist. Unsere Kochflächen wurden speziell entwickelt, um das Entweichen von
Verbrennungsgasen zu ermöglichen, und das Schließen dieses Raums könnte die Leistung dieses Geräts beeinträchtigen.
• Verändern Sie dieses Gerät nicht, jede Veränderung kann gefährlich sein. Verwenden Sie es nicht für etwas, wofür es nicht entwickelt
wurde.
• Das Gerät während der Benutzung nicht bewegen.
• Lassen Sie das Gerät niemals unbeaufsichtigt, wenn es angezündet ist.
• Beim Betrieb werden Teile des Gerätes heiß (besonders der Brenner). Vermeiden Sie es, heiße Teile mit bloßen Händen zu berühren. Es
wird empfohlen, Handschuhe zu benutzen.
• Benutzen Sie das Gerät nicht ohne die richtig eingesetzten Topfständer.
Schlauch
• Der Schlauch und die Dichtung am Regler müssen vor jeder Benutzung und vor der Verbindung mit dem Gasbehälter auf Abnutzung oder
Beschädigungen überprü werden.
• Verwenden Sie das Gerät nicht, wenn der Schlauch beschädigt oder abgenutzt ist. Tauschen Sie den Schlauch aus.
• Den Schlauch nicht verdrehen oder einklemmen.
• Die Schlauchlänge sollte nicht kürzer als 0.8m und nicht länger als 1,2m sein. Tauschen Sie den Schlauch aus, wenn er beschädigt ist oder
Anzeichen von Sprödigkeit und / oder Rissen vorweist.
Gasbehälter
• Das Gas wird dem Gerät über einen Schlauch und einen Regler zugeführt. Der Schlauch und der Regler können an eine Gasflasche, eine
Gaskartusche oder ein Power Pak angeschlossen werden, bei dem es sich um eine Einheit handelt, die zwei oder mehr Gaskartuschen
aufnimmt.
• ES KANN GEFÄHRLICH SEIN, ANDERE ARTEN VON GASKARTUSCHEN ZU MONTIEREN
• Dieses Gerät darf nur mit einem zugelassenen Schlauch und Regler verwendet werden.
• Nur mit einer Gasflasche verwenden, die 500 mm hoch (ohne Regler) und 400 mm breit ist.
• Achten Sie darauf, dass der Gasbehälter an einem gut belüeten Ort eingesetzt oder ausgetauscht wird - vorzugsweise im Freien und
entfernt von Zündquellen wie offenen Flammen und nicht in der Nähe anderer Personen.
• Den Gasbehälter nicht in der Nähe von Hitze und Flammen aufstellen. Nicht auf einen Ofen oder irgendeine andere heiße Oberfläche
stellen.
• Nachfüllbehälter sollten nur in aufrechter Position verwendet werden, um eine ordnungsgemäße Krastoffentnahme zu gewährleisten.
Andernfalls kann Flüssigkeit aus dem Gastank austreten, was zu gefährlichen Betriebsbedingungen führen kann.
• Versuchen Sie nicht, den Gasbehälter zu entfernen, während das Gerät in Betrieb ist.
• Der Gasbehälter muss nach Gebrauch oder bei Lagerung vom Gerät getrennt werden.
Abb. 1a
Abb. 1b
180mm
250mm
60mm

1313
Licht zurück
• Im Fall eines Rückschlags (wenn die Flamme zurückschlägt und sich an der Düse entzündet) stellen Sie sofort die Gaszufuhr ab, indem Sie
zuerst das Reglerventil am Gasbehälter und danach das Geräteventil schließen. Nachdem die Flamme gelöscht worden ist, entfernen Sie
den Regler und überprüfen den Zustand der Dichtung. Im Zweifelsfall tauschen Sie die Dichtung aus. Zünden Sie das Gerät erneut an.
Sollte die Flamme anhaltend zurückschlagen, dann geben Sie das Gerät bitte an Ihren autorisierten Händler zurück.
Undichtigkeiten
• Wenn an Ihrem Gerät ein Gasleck auritt (Gasgeruch), schalten Sie sofort die Gaszufuhr ab, indem Sie den Bedienknopf im Uhrzeigersinn auf
die Position „OFF“ drehen, und bringen Sie es an einen flammenfreien Ort, an dem das Gasleck erkannt und gestoppt werden kann . Wenn
Sie Ihr Gerät auf Gaslecks prüfen möchten, tun Sie dies im Freien. Versuchen Sie nicht, Gaslecks mit einer Flamme zu erkennen; verwenden Sie
Seifenlauge.
So prüfen Sie, ob das Gerät ordnungsgemäß an die Gasversorgung angeschlossen ist
• Es ist wichtig, dass alle Gasanschlüsse korrekt verbunden sind, um Gaslecks zu vermeiden.
• Wenn Sie Ihr Gerät auf Lecks überprüfen möchten, dann tun Sie das bitte im Freien. Versuchen Sie niemals, ein Leck mit einer Flamme zu
finden; benutzen Sie Seifenwasser. Richtig ist es, die Verbindungsteile mit Seifenwasser zu benetzen. Wenn sich Blasen bilden, haben Sie das
Leck gefunden. Stellen Sie sofort die Gaszufuhr ab, indem Sie zuerst das Kontrollventil am Gasbehälter und dann das Geräteventil schließen;
überprüfen Sie auch, ob alle Verbindungen korrekt montiert sind. Überprüfen Sie die Stellen erneut mit Seifenwasser.
• Sollte das Gasleck weiterhin bestehen, geben Sie das Gerät bitte Ihrem Händler zur Inspektion / Reparatur zurück.
Verwendungsland BE, CH, CY, CZ, ES, FR, GB, GR, IE,
IT, LT, LU, LV, PT, SK & SI PL
BE, CY, DK, EE, FR,
FI, HU, IT, LT, NL, NO,
SE, SI, SK, RO, HR, TR,
BG, IS,LU, MT, & ZA
AT, CH, DE & SK
Geräte-Kategorie I3+(28-30/37) I3B/P (37) I3B/P (30) I3B/P (50)
Erlaubte Gase Butane-G30 Propane-G31 Butan-G30, Propan-G31 oder deren Mischung
Betriebsdruck 28-30mBar 37mBar 37mBar 28-30mBar 50mBar
Düse Nummer 0.73 0.69 0.73 0.64
Nenngebrauch
Butane - 160 g/h
pro Brenner
(160g/h x 2 = 320g/h in Summe)
Butane - 160 g/h
pro Brenner
(160g/h x 2 =
320g/h in Summe)
Butane - 160 g/h
pro Brenner (160g/h
x 2 = 320g/h in
Summe)
Butane - 160 g/h
pro Brenner
(160g/h x 2 =
320g/h in Summe)
Nominale brutto Wärmee-
intrag
2.2kW pro Brenner
(2.2kW x 2 = 4.4kW in Summe)
2.2kW pro Brenner
(2.2kW x 2 =
4.4kW in Summe)
2.2kW pro Brenner
(2.2kW x 2 = 4.4kW
in Summe)
2.2kW pro Brenner
(2.2kW x 2 = 4.4kW
in Summe)
I 3B/P (30), I 3+ (28-30/37) und I 3B/P (37), Gerätekategorien: (DK, FI, NO, NL, SE, AT, DE, BE, ES, FR , IE, IT, PT, GB, CH)
Schieben Sie einen zugelassenen Schlauch auf das Ventilendstück, bis er richtig sitzt. Schließen Sie am anderen Ende einen geeigneten
Niederdruckregler an.
I3B/P(30) : 30 mbar Butan-Konfigurationsregler oder 30 mbar Propan-Konfigurationsregler oder 30 mbar Butan/Propan-Gemisch
Konfigurationsregler.
I3B/P(37) : 37 mbar Butan-Konfigurationsregler oder 37 mbar Propan-Konfigurationsregler oder 37 mbar Butan/Propan-Gemisch
Konfigurationsregler.
I3+(28-30/37): 30 mbar Butan-Konfigurationsregler oder 37 mbar Propan-Konfigurationsregler.
Vergewissern Sie sich erneut, dass der Schlauch richtig sitzt. Der verwendete Schlauchtyp muss der einschlägigen EN-Norm und den
Standortanforderungen entsprechen.
I 3B/P (50) Gerätekategorie: (AT, DE)
I3B/P(50): 50 mbar Butan-Konfigurationsregler oder 50 mbar Propan-Konfigurationsregler oder 50 mbar Butan/Propan-
Mischkonfigurationsregler.
Schrauben Sie einen Schlauch mit den richtigen Gewindeanschlüssen an jedem Ende auf das linke 1/4-Zoll-BSP-Gewinde des Ventils.
Bringen Sie am Ende des Schlauchs einen geeigneten 50-mbar-Niederdruckregler an. Die verwendete Schlauchleitung muss DIN 4815
Teil 2 oder gleichwertig entsprechen.
DE
Abkürzungen für Ländernamen
AE = Vereinigte Arabische
Emirate
AL = Albanien AT = Österreich BE = Belgien CH = Schweiz
CZ = Tschechien DE = Deutschland DK = Dänemark ES = Spanien FI = Finnland
FR = Frankreich GB = Großbritannien GR = Griechenland HR = Kroatien IT = Italien
JP = Japan KR = Korea NL = Niederlande NO = Norwegen PL = Polen
PT = Portugal RO = Rumänien RU = Russland RS = Serbien SI = Slowenien
SK = Slowakei SE = Schweden TR = Türkei ZA = Südafrika

1414
2. Einbau und Wechsel der Gasversorgung
Anschließen der Gasversorgung
• Bevor Sie den Gasbehälter an das Gerät anschließen sollten Sie sicherstellen, dass sich die
Gummidichtung am Regler in der richtigen Position und in gutem Zustand befindet.
• Bevor Sie den Schlauch und den Regler an das Gerät anschließen, vergewissern Sie sich, dass sich
der Bedienknopf am Gerät in der Position „OFF” befindet.
• Führen Sie diese Überprüfung jedes Mal aus, wenn Sie einen Gasbehälter an das Gerät
anschließen.
• Blasen Sie den Staub aus der Gasbehälter-Öffnung, um eine mögliche Blockierung der Düsen zu
vermeiden.
• Bringen Sie einen zugelassenen Schlauch und Regler am Gerät an.
• Stellen Sie sicher, dass die Gasversorgung (Gasflasche/Gaskartusche) an einem gut belüeten Ort,
entfernt von Zündquellen wie offenem Feuer und entfernt von anderen Personen angebracht ist.
• Den Schlauch nicht verdrehen oder einklemmen. Stellen Sie sicher, dass er vom Ofenkörper
weggeführt wird, um eine Beeinträchtigung / Beschädigung des Schlauchs durch Hitze zu
vermeiden.
• Achten Sie darauf, dass der Gasbehälter jederzeit aufrecht gestellt ist. Schließen Sie den
Gasbehälter durch feste Verschraubung mit der Hand an, bis er voll angepasst ist.
• Stellen Sie sicher, dass eine vollständige Gasabdichtung hergestellt wurde (überprüfen Sie den
Gasgeruch um die Armatur herum). Nicht mit offener Flamme auf Lecks prüfen. Verwenden Sie nur
warmes Seifenwasser, das auf Gelenke und Anschlüsse des Geräts aufgetragen wird. Jedes Leck wird
als Blasen um den Leckbereich herum angezeigt
• Wenn Sie das Gasleck nicht reparieren können, dann benutzen Sie das Gerät nicht sondern
kontaktieren Sie Ihren örtlichen Händler für Unterstützung.
So trennen und ändern Sie die Gasversorgung
• Drehen Sie nach Gebrauch den Bedienknopf des Geräts auf die Position „OFF” und schließen Sie die
Gaszufuhr.
• Wenn Sie Ihre leere Flasche ersetzen müssen, vergewissern Sie sich, dass das Gas am Flaschenventil
geschlossen ist.
• Beim Gasflaschenwechsel nicht rauchen.
• Entfernen Sie den Regler von der leeren Flasche.
• Bringen Sie den Regler an der vollen Flasche an, siehe obige Anweisungen zum Anschließen der Gasversorgung.
• Wenden Sie die gleiche Sorgfalt und die gleichen Prüfverfahren an wie beim Einbau einer neuen Gasflasche.
So überprüfen Sie, ob Ihre Gasflasche leer ist
• Der einfachste Weg, um zu überprüfen, ob Ihr Gasstand niedrig ist, besteht darin, Ihre Gasflasche aufzuheben.
• Wenn Sie feststellen, dass Ihre Gasflasche etwas leichter als gewöhnlich ist, können Sie die Flasche wiegen, um festzustellen, wie viel Gas noch
vorhanden ist. Die meisten Flaschen haben einen Tara-Gewichtsstempel am Hals oder am Basisring, und wenn das Gewicht auf dem Stempel
mit dem Gewicht Ihrer Flasche übereinstimmt, haben Sie kein Gas mehr. Aus der Gewichtsdifferenz können Sie dann die verbleibende
Gasmenge abschätzen.
3. Betrieb des Geräts
• Bitte achten Sie beim Betrieb dieses Gerätes darauf, dass alle Teile in einwandfreiem Zustand sind und
dass Sie das Gerät bei jedem Gebrauch auf Gaslecks überprü haben, bevor Sie es anzünden.
• Kochflächen können einfach aufgestellt werden und sind einsatzbereit. Keine Montage erforderlich.
• BITTE BEACHTEN: Sorgen Sie bitte dafür, dass alle Schutzverpackungen und Plastikteile von dem
Gerät vor Gebrauch entfernt worden sind.
• Das Gerät ist für Kochgeräte mit einem Durchmesser von nicht weniger als 180 mm und nicht größer
als 250 mm entwickelt worden.
Vor dem Anzünden zu beachtende Vorsichtsmaßnahmen
• Verwenden Sie dieses Gerät nur auf einer festen, ebenen Oberfläche.
• Untersuchen Sie das Gerät nach längerer Lagerung auf Insekten und Netze, die den Gasfluss
beeinträchtigen könnten
Zünden des Geräts mit dem Piezo
• Es wird empfohlen, alle Kochflächen zu entfernen, wenn Sie versuchen, das Gerät anzuzünden, damit
Sie leichter sehen können, wann der Brenner angezündet ist.
• Um das Gerät mit dem Piezozünder einzuschalten, drücken und drehen Sie den Bedienknopf um 90 ° gegen den Uhrzeigersinn und
drücken Sie dann auf den Piezoknopf, um das Gas einzuschalten (siehe Abb. 3). Wenn das Gas beim ersten Funken nicht zündet, drehen Sie
den Steuerknopf zurück in die Position „OFF“. Versuchen Sie es erneut, indem Sie den Steuerknopf drücken und gegen den Uhrzeigersinn
drehen und den Piezo-Knopf drücken, um das Gas zu zünden. Wenn sich das Gas nicht innerhalb der ersten zwei bis drei Sekunden
entzündet, schließen Sie das Steuerventil, indem Sie den Steuerknopf zurück in die Position „OFF“ drehen.
• Warten Sie etwa 30 Sekunden, bis im Brenner angesammeltes Gas entweichen kann. Wiederholen Sie den obigen Vorgang, falls
erforderlich, bis die Flamme zündet. Die Flamme sollte normalerweise innerhalb der ersten ein bis zwei Sekunden aufleuchten.
Anzünden mit einem BBQ-Feuerzeug
• Beim Kaltstart kann das Gerät von oben angezündet werden, bevor die gewünschte Kochfläche angebracht wird. Wenn Sie ein heißes
Gerät anzünden, wird empfohlen, dazu einen Grillanzünder durch eines der Lüungslöcher unter dem Brenner zu stecken, bis er sich auf
einer Linie mit dem Brenner befindet (stecken Sie den Grillanzünder NICHT durch das große Loch direkt darunter der Brenner). Zünden Sie
den Grillanzünder an. Während der Grillanzünder angezündet ist, drücken und drehen Sie den Bedienknopf gegen den Uhrzeigersinn, um
den Brenner anzuzünden.
Abb. 2b
Siegel
Regler
Schlauch
Schlauchschelle
hier montieren
Flaschen-
ventil
Piezo
Knopf
Abb. 3
DE
Abb. 2a

1515
Allgemein
• Sobald das Gerät angezündet ist, kann die Flammenintensität eingestellt werden, indem der Steuerknopf gegen den Uhrzeigersinn
gedreht wird, um die Flamme zu verringern, oder im Uhrzeigersinn, um die Flamme zu erhöhen.
• Beim Garen von Speisen mit hohem Fettgehalt kann es zu einem Aufflammen kommen, wenn die Kochstufe zu hoch gewählt ist. Drehen Sie
in diesem Fall die Hitze herunter, bis das Aufflackern aufhört.
• Bewegen Sie das Gerät nicht, wenn es in Betrieb ist. Es ist unsicher, das Gerät zu bewegen, während es angezündet ist, und kann ein
Aufflackern verursachen.
• Schließen Sie nach Gebrauch zuerst das Regelventil an der Gasflasche (wenn anwendbar). Wenn die Flamme erloschen ist, schließen Sie
das Regelventil am Gerät
Deckel
Brenner
Piezo-Knopf
Der Reglerknopf
Topfständer
(zum Kochen verwendet)
Windschutz
(für Windschutz)
Produktcode: 203P1-10
Gerippte Grillplatte
(wird zum Grillen verwendet)
Flache Grillplatte
(wird zum Braten verwendet)
Grillgriff
Produktcode: 203P1-20
4. Komponentenliste
Deckel
Brenner
Der Reglerknopf
Topfständer
(zum Kochen verwendet)
Windschutz
(für Windschutz)
Kaffeekannenständer
(wird für die Kaffeezubere-
itung verwendet)
Piezo-Knopf
DE

1616
Gerippte Grillplatte
(wird zum Grillen verwendet)
Deckel
Brenner
Piezo-Knopf
Der Reglerknopf
Flache Grillplatte
(wird zum Braten verwendet)
Topfständer
(zum Kochen verwendet)
Grillgriff
Windschutz
(für Windschutz)
Produktcode: 203M1-20
Die folgenden sind nicht im Lieferumfang enthalten und werden separat verkau.Erkundigen Sie sich bei
Ihrem Händler vor Ort nach der Verfügbarkeit.
So Soak 2 Cook Paella Pan 30
(verwendet für Paella /
Braten)
Deckel
Brenner
Piezo-Knopf
Der Reglerknopf
Topfständer
(zum Kochen verwendet)
Windschutz
(für Windschutz)
Produktcode: 203M1-10
Gerippte Grillplatte
(mit Griff)
Flache Grillplatte
(mit Griff)
Kaffee-
kannenständer
(Standard bei
Modell 203P1-20)
DE

1717
5. GreenGrill-Kochen
GreenGrill-Kochen
Die meisten Kochflächen haben unsere GreenGrill-Beschichtung. Diese Keramikbeschichtung ist komplett PFOA-frei; es enthält keine giigen
Substanzen und garantiert gesünderes Kochen!
VORBEREITUNG UND VERWENDUNG
• „Einbrennen“: Bevor Sie das Kochfeld zum ersten Mal verwenden, können Sie es würzen, um dem Kochfeld eine dünne Schutzschicht zu
verleihen, die das Anhaen von Speisen verhindert. Es ist nicht erforderlich, aber wir empfehlen es. Es geht ganz einfach: Reiben Sie leicht
Speiseöl auf die Oberfläche und stellen Sie es dann für 2 - 3 Minuten auf mittlere Hitze. Spülen Sie die Kochfläche nach dem Abkühlen vor
Gebrauch mit Seifenwasser ab und fetten Sie sie leicht mit etwas Öl (Speiseöl Ihrer Wahl, z. B. Sonnenblumenöl) ein. Es ist startklar!
• Hinweis: GreenGrill-Beschichtung leitet Wärme besser als Produkte mit normaler (PTFE) Antihabeschichtung. Wir empfehlen daher, nur 75 %
der gewohnten Leistung zu verwenden.
• Lassen Sie die Kochfläche niemals ohne Öl auf der Wärmequelle. Tragen Sie eine dünne Schicht Öl mit einem Küchenpapier oder einer Bürste
auf, bevor Sie die Kochfläche auf die Wärmequelle legen. Stellen Sie sicher, dass Sie alle Teile geölt haben, also mit z.B. Ein BBQ-Gitter umfasst
auch die erhöhten Kanten.
• Aufgrund des hohen Brennpunktes empfehlen wir das Braten in Sonnenblumenöl oder Rapsöl. Olivenöl kann einen relativ niedrigen
Brennpunkt haben, was dazu führen kann, dass die Zutaten an der Pfanne haen bleiben oder anbrennen. Daher raten wir von der
Verwendung von Olivenöl ab. Tipp: Fleisch oder Fisch vor dem Braten auf Zimmertemperatur bringen. Dadurch wird ein Anhaen an der
Kochfläche verhindert.
• Verwenden Sie immer Silikon- und/oder Holzutensilien, damit die GreenGrill-Beschichtung nicht beschädigt wird. Verwenden Sie niemals
Metallutensilien, da dies die Beschichtung beschädigen kann.
REINIGUNG
• Lassen Sie die Kochfläche vor der Reinigung abkühlen. Extreme Temperaturschwankungen können zu
Verformungen der Kochfläche führen.
• Die GreenGrill-Beschichtung ist „Easy Clean“. Warme Seifenlauge mit einem weichen Schwamm reicht
aus, um die Kochflächen mit GreenGrill-Beschichtung zu reinigen. Vermeiden Sie Scheuerschwämme
oder Stahlwolle.
• Wenn die Kochfläche Essensreste vom vorherigen Gebrauch aufweist, können diese an der Beschichtung
haen bleiben und braune Flecken verursachen. An diesen Stellen können Zutaten an der Kochfläche
haen bleiben, da die Beschichtung nicht mehr erreicht werden kann. Stellen Sie sicher, dass diese
Flecken vor dem Gebrauch ordnungsgemäß entfernt werden.
• Bei hartnäckigen Flecken oder Rückständen auf der Paellapfanne oder Kochpfanne können Sie versuchen,
sie über Nacht in heißem Seifenwasser einzuweichen oder die „Essigmethode“ anwenden: Gießen Sie
eine Schicht Essig in die Pfanne und erhitzen Sie die Pfanne leicht. Der Essig muss nicht kochen und sollte
nie vollständig verdunsten. Gießen Sie den Essig aus der Pfanne, reinigen Sie die Pfanne mit Seifenwasser
und die Pfanne ist wie neu. Hinweis: Erhitzen von Essig kann einen unangenehmen Geruch abgeben.
• Das CADAC | DOMETIC So Soak (separat erhältlich) ist das ideale Begleitprodukt, um das Einweichen
über Nacht zu erleichtern. Bei Verwendung des So Soak empfehlen wir, die Kochfläche mit der
Vorderseite nach unten zu platzieren, was ein maximales Einweichen ermöglicht und auch weniger
Wasser verbraucht.
• Beachten Sie, dass Sie bei Verwendung des So Soak 2 Cook beide Roste gleichzeitig einweichen
können. Legen Sie dazu einen Rost mit der Kochseite nach oben und den anderen nach unten, wie in den Bildern zu sehen.
• Nach dem Einweichen verbleibende hartnäckige Flecken können mit der CADAC | DOMETIC So Soak Brush (separat erhältlich) gelöst und
weggebürstet werden.
• Mit einem weichen Tuch abtrocknen, fertig!
WARTUNG
• Wir empfehlen, nach der Reinigung etwas Öl auf die Kochfläche zu geben und mit Küchenpapier zu
verteilen. Das Öl dichtet die Oberfläche gegen Außenlu und Feuchtigkeit ab. Es sorgt auch dafür, dass
das Essen nicht in die Oberfläche einbrennt.
• Legen Sie das Kochfeld in eine Plastiktüte, bevor Sie es in die Aufbewahrungstasche legen, damit
sichergestellt ist, dass die Aufbewahrungstasche sauber und ölfrei bleibt.
• Die Aufbewahrungstasche verhindert Schäden an der GreenGrill-Beschichtung und an Ihrem Produkt.
Kochmöglichkeiten
• Dies sind die verfügbaren Kochoptionen. (Bei Wind Windschutz verwenden)
Grillen: Diese Garoption ist ideal zum fettfreien Grillen von Hähnchen, Würstchen, Koteletts, Kebabs, Fisch oder Gemüse. Verwenden Sie für
diese Art des Garens die Griddleplatte. / ‘grill plate’
Achtung: Bitte beachten Sie, dass beim Garen von fettem Fleisch etwas Fett auf das Gerät spritzt, was zu einem Aufflammen führen kann.
Seien Sie vorsichtig im Umgang mit solchem Fleisch. Die Gartemperaturen lassen sich einfach an die eigenen Bedürfnisse anpassen, indem
man den Bedienknopf dreht, um die Hitze zu regulieren.
Braten: Diese Option ist ideal für Pfannengerichte, Fisch, Frühstück, Pfannkuchen, Garnelen, Paella und Gemüse. Verwenden Sie für diese
Art des Garens den Flachgrill. Bitte beachten Sie, dass sie als flache Pfanne nur zum flachen Braten geeignet ist. Die leicht zu reinigende
Oberfläche fördert die minimale Verwendung von Fett für ein gesundes Kochen.
Kochen: Setzen Sie für diese Art des Kochens den Topfständer in seine Aufnahmerillen und stellen Sie sicher, dass er richtig sitzt. Stellen Sie
einen geeigneten Topf auf (mindestens 180 mm Durchmesser und nicht mehr als 250 mm Durchmesser). Ein Liter Wasser kocht in etwa 6
Minuten, abhängig von den Bedingungen, der Größe des verwendeten Topfes usw. Bei Wind Windschutz verwenden.
Hinweis: Wenn Sie einen kleinen Topf verwenden, versuchen Sie, keinen Topf mit Plastikgriffen zu verwenden, da diese sehr heiß werden
können.
Paella: Diese Kochoption ist ideal für die Zubereitung von Paellas, Risottos, Nudelgerichten, traditionellen Frühstücken usw. Die Paella-Pfanne
30 ist aus hochwertigem gepresstem Aluminium gefertigt, das eine hervorragende Wärmeverteilung und -speicherung ermöglicht.
Kaffee: Diese Option ist ideal für die Zubereitung einer heißen Tasse Kaffee. Ideal für jede Zeit, jeden Ort, überall.
Einweichen mit dem So Soak 2 Cook
(Grills nicht enthalten)
So Soak Brush
DE

1818
6. Reinigung
• Es wird empfohlen, das Gerät nach jedem Gebrauch zu reinigen. Damit wird die Lebensdauer Ihres Gerätes verlängert.
• Lassen Sie das Gerät abkühlen, bevor Sie es reinigen.
• Verwenden Sie zur Reinigung der Außenflächen ein feuchtes, in Seifenlauge ausgewrungenes Tuch.
• Um den Gerätekörper sauber zu machen, wischen Sie ihn einfach mit einem feuchten Tuch und, falls notwendig, mit ein wenig Spülmittel
ab.
• NICHT IN WASSER EINTAUCHEN, denn dadurch kann Wasser in die Brennerrohre eindringen, wodurch das Gerät dann nicht richtig
funktionieren wird.
• Die Grillplatte ist mit einer robusten, haltbaren keramischen Antihabeschichtung versehen, die mit großem Erfolg in einigen der besten
Kochgeschirre der Welt verwendet wird. Wenn Sie sich jedoch darum kümmern, können Sie jahrelang gesundes, einfaches Antiha-Kochen
genießen.
• Obwohl die keramische Antihabeschichtung sehr langlebig ist, kann sie durch die Verwendung von Kochutensilien aus Metall leicht
beschädigt werden. Es wird daher empfohlen, beim Kochen nur Utensilien aus Kunststoff oder Holz zu verwenden.
• Lassen Sie den Grill/die flache Platte immer abkühlen, bevor Sie ihn in Wasser eintauchen.
• Achten Sie darauf, dass kein Wasser auf die Brenner oder den Zündflammenbereich gelangt. Wischen Sie das Gerät vor Gebrauch
vollständig trocken.
• Verwenden Sie keine Scheuermittel, da diese die Oberflächen beschädigen können.
• Reinigen Sie das Gerät nach jedem Gebrauch. Reiben Sie die Kochfläche nach der Reinigung leicht mit Öl ein.
• Verwenden Sie keine Hochdruckdampfgeräte oder einen Wasserstrahl, um das Gerät zu reinigen.
• Hinweis: Bei hartnäckigen Flecken kann CADAC Ofenreiniger verwendet werden
7. Lagerung
• Lassen Sie das Gerät immer abkühlen und reinigen Sie es, bevor Sie es verstauen.
• Schalten Sie die Gaszufuhr zum Gerät ab, trennen und entfernen Sie die Gaszufuhr vom Gerät.
• Bewahren Sie niemals ein Gerät mit angeschlossener Gasversorgung auf, dies ist eine unsichere Vorgehensweise.
• Lagern Sie das Gerät und die Gasversorgung in einem gut belüeten Bereich fern von brennbaren Materialien. Gasflaschen sollten
vorzugsweise im Freien und NICHT im Keller gelagert werden.
8. Wartung und Fehlerbehebung
Wartung
• Wenn Sie Ihr Gerät regelmäßig reinigen und warten, wird die Lebensdauer Ihres Geräts verlängert und die Wahrscheinlichkeit von
Problemen verringert.
• Dieses Gerät erfordert keine planmäßige Wartung.
• Dieses Gerät darf nur von einer autorisierten Person gewartet werden.
• Überprüfen Sie Ihren Gasschlauch und Ihre Anschlüsse regelmäßig auf Anzeichen von Undichtigkeiten und jedes Mal, wenn die Gasflasche
bei jedem Gebrauch neu gefüllt oder an das Gerät angeschlossen wird.
Fehlerbehebung
Bei spritzender Flamme oder verstope Düse
• Reinigen Sie Ihre Brenneröffnungen im Falle eines Überlaufens.
• Wir empfehlen, die Düsen alle sechs (6) Monate zu reinigen oder auszutauschen, um einen dauerhaen effizienten Betrieb Ihres Geräts zu
gewährleisten.
• Sollte das Gerät nach der Lagerung anormal funktionieren und alle Kontrollen das Problem nicht isoliert haben, kann die Düse verstop
sein. Ein verstoper Strahl würde im Extremfall durch eine schwächere gelbliche Flamme oder gar keine Flamme angezeigt. Unter diesen
Umständen ist es erforderlich, alle Fremdkörper, die sich möglicherweise im Gerät angesammelt haben, zu entfernen, zu überprüfen und
gründlich zu reinigen.
• Entfernen Sie dazu die Düse mit Standardwerkzeugen und blasen Sie etwaigen Schmutz aus der Düse. Alternativ können Sie neue Düsen in
Ihrem örtlichen Geschä kaufen. Versuchen Sie nicht, die Düse mechanisch zu reinigen.
Ersetzen einer blockierten Düse:
• Ihr Gerät ist mit einer Düse spezieller Größe ausgestattet, um die richtige Gasmenge zu regulieren.
• Sollte das Loch in der Düse verstop sein, kann dies zu einer kleinen Flamme oder gar keiner Flamme führen. Versuchen Sie nicht, die Düse
mit einer Nadel oder einem ähnlichen Gerät zu reinigen, da dies die Öffnung beschädigen und das Gerät unsicher machen könnte.
• So tauschen Sie die Düse aus: Entfernen Sie alle Kochflächen, schließen Sie den Deckel und drehen Sie das Gerät um. Schrauben Sie
die Bodenplatte vorsichtig ab, indem Sie die Schrauben entfernen (Abb. 4) (nur für 203P1-Modelle). Lösen Sie die Schraube für den/die
betroffenen Brenner (Abb. 5), lösen Sie den Brenner vorsichtig und lassen Sie ihn wie abgebildet fallen, um die Düse freizulegen. Beachten
Sie, dass der Brenner mit dem Piezokabel verbunden ist, überprüfen Sie nach dem Austausch der Düse und dem Zusammenbau, ob dieses
Kabel noch angeschlossen ist. Die Düse ist jetzt auf dem Ventil zu sehen, entfernen Sie die Düse mit einem geeigneten Schraubenschlüssel
(Abb. 6). Verwenden Sie keine Zange an der Düse, da dies die Düse beschädigen und unbrauchbar oder unmöglich machen kann, sie zu
entfernen. Schrauben Sie die neue Düse in das Ventil. Nicht zu fest anziehen, da dies die Düse beschädigen kann.
• Gehen Sie in umgekehrter Reihenfolge vor, um das Gerät wieder zusammenzubauen.
Schlauch ersetzen:
• Montieren Sie den Schlauch wie in Abschnitt 2 beschrieben
DE
Sidan laddas...
Sidan laddas...
Sidan laddas...
Sidan laddas...
Sidan laddas...
Sidan laddas...
Sidan laddas...
Sidan laddas...
Sidan laddas...
Sidan laddas...
Sidan laddas...
Sidan laddas...
Sidan laddas...
Sidan laddas...
Sidan laddas...
Sidan laddas...
Sidan laddas...
Sidan laddas...
Sidan laddas...
Sidan laddas...
Sidan laddas...
Sidan laddas...
Sidan laddas...
Sidan laddas...
Sidan laddas...
Sidan laddas...
Sidan laddas...
Sidan laddas...
Sidan laddas...
Sidan laddas...
Sidan laddas...
Sidan laddas...
Sidan laddas...
Sidan laddas...
Sidan laddas...
Sidan laddas...
Sidan laddas...
Sidan laddas...
Sidan laddas...
Sidan laddas...
Sidan laddas...
Sidan laddas...
Sidan laddas...
Sidan laddas...
Sidan laddas...
Sidan laddas...
Sidan laddas...
Sidan laddas...
Sidan laddas...
Sidan laddas...
Sidan laddas...
Sidan laddas...
Sidan laddas...
Sidan laddas...
Sidan laddas...
Sidan laddas...
Sidan laddas...
Sidan laddas...
Sidan laddas...
Sidan laddas...
Sidan laddas...
Sidan laddas...
Sidan laddas...
Sidan laddas...
Sidan laddas...
Sidan laddas...
Sidan laddas...
Sidan laddas...
Sidan laddas...
Sidan laddas...
Sidan laddas...
Sidan laddas...
Sidan laddas...
Sidan laddas...
Sidan laddas...
Sidan laddas...
Sidan laddas...
Sidan laddas...
Sidan laddas...
Sidan laddas...
Sidan laddas...
Sidan laddas...
Sidan laddas...
Sidan laddas...
Sidan laddas...
Sidan laddas...
Sidan laddas...
Sidan laddas...
Sidan laddas...
Sidan laddas...
Sidan laddas...
Sidan laddas...
Sidan laddas...
Sidan laddas...
Sidan laddas...
Sidan laddas...
Sidan laddas...
Sidan laddas...
Sidan laddas...
Sidan laddas...
Sidan laddas...
Sidan laddas...
Sidan laddas...
Sidan laddas...
Sidan laddas...
Sidan laddas...
Sidan laddas...
Sidan laddas...
Sidan laddas...
Sidan laddas...
Sidan laddas...
Sidan laddas...
Sidan laddas...
Sidan laddas...
Sidan laddas...
Sidan laddas...
Sidan laddas...
Sidan laddas...
Sidan laddas...
Sidan laddas...
Sidan laddas...
Sidan laddas...
Sidan laddas...
Sidan laddas...
Sidan laddas...
Sidan laddas...
-
 1
1
-
 2
2
-
 3
3
-
 4
4
-
 5
5
-
 6
6
-
 7
7
-
 8
8
-
 9
9
-
 10
10
-
 11
11
-
 12
12
-
 13
13
-
 14
14
-
 15
15
-
 16
16
-
 17
17
-
 18
18
-
 19
19
-
 20
20
-
 21
21
-
 22
22
-
 23
23
-
 24
24
-
 25
25
-
 26
26
-
 27
27
-
 28
28
-
 29
29
-
 30
30
-
 31
31
-
 32
32
-
 33
33
-
 34
34
-
 35
35
-
 36
36
-
 37
37
-
 38
38
-
 39
39
-
 40
40
-
 41
41
-
 42
42
-
 43
43
-
 44
44
-
 45
45
-
 46
46
-
 47
47
-
 48
48
-
 49
49
-
 50
50
-
 51
51
-
 52
52
-
 53
53
-
 54
54
-
 55
55
-
 56
56
-
 57
57
-
 58
58
-
 59
59
-
 60
60
-
 61
61
-
 62
62
-
 63
63
-
 64
64
-
 65
65
-
 66
66
-
 67
67
-
 68
68
-
 69
69
-
 70
70
-
 71
71
-
 72
72
-
 73
73
-
 74
74
-
 75
75
-
 76
76
-
 77
77
-
 78
78
-
 79
79
-
 80
80
-
 81
81
-
 82
82
-
 83
83
-
 84
84
-
 85
85
-
 86
86
-
 87
87
-
 88
88
-
 89
89
-
 90
90
-
 91
91
-
 92
92
-
 93
93
-
 94
94
-
 95
95
-
 96
96
-
 97
97
-
 98
98
-
 99
99
-
 100
100
-
 101
101
-
 102
102
-
 103
103
-
 104
104
-
 105
105
-
 106
106
-
 107
107
-
 108
108
-
 109
109
-
 110
110
-
 111
111
-
 112
112
-
 113
113
-
 114
114
-
 115
115
-
 116
116
-
 117
117
-
 118
118
-
 119
119
-
 120
120
-
 121
121
-
 122
122
-
 123
123
-
 124
124
-
 125
125
-
 126
126
-
 127
127
-
 128
128
-
 129
129
-
 130
130
-
 131
131
-
 132
132
-
 133
133
-
 134
134
-
 135
135
-
 136
136
-
 137
137
-
 138
138
-
 139
139
-
 140
140
-
 141
141
-
 142
142
-
 143
143
-
 144
144
-
 145
145
-
 146
146


på andra språk
- italiano: Dometic 203P1 Manuale utente
- Deutsch: Dometic 203P1 Benutzerhandbuch
- français: Dometic 203P1 Manuel utilisateur
- Türkçe: Dometic 203P1 Kullanım kılavuzu
- dansk: Dometic 203P1 Brugermanual
- Nederlands: Dometic 203P1 Handleiding