Pioneer PD-50AE Bruksanvisning
- Kategori
- DVD-spelare
- Typ
- Bruksanvisning

> Before Start > Part Names > Install > Playback
Advanced Setup | Others
En
F
r
Es
It
Nl
S
v
De
SUPER AUDIO CD PLAYER
PD-50AE
Instruction
Manual
Before Start
Safety Information .................................................................. 2
What's in the box .................................................................... 3
Part Names
Front Panel ............................................................................. 4
Rear Panel .............................................................................. 5
Remote Controller .................................................................. 6
Display .................................................................................... 7
Install
Connections with an amplifier ................................................. 8
Connecting the power cord, etc. ............................................11
Playback
Playing discs ......................................................................... 12
Using this unit as a D/A converter ........................................ 14
Adjusting sound quality ......................................................... 15
Advanced Setup
Advanced Settings................................................................. 16
Others
Troubleshooting .................................................................... 17
Other notes............................................................................ 18
General Specifications........................................................... 19

2
> Before Start > Part Names > Install > Playback
Advanced Setup | Others
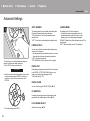
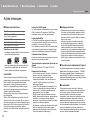
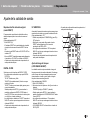
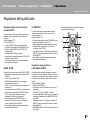
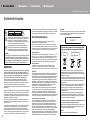
Safety Information
Before Start
WARNING
RISK OF ELECTRIC SHOCK
DO NOT OPEN
RISQUE DE CHOC ELECTRIQUE
NE PAS OUVRIR
AVIS
7KHOLJKWQLQJIODVKZLWKDUURZKHDGV\PEROZLWKLQDQ
HTXLODWHUDOWULDQJOHLVLQWHQGHGWRDOHUWWKHXVHUWRWKH
SUHVHQFHRIXQLQVXODWHG³GDQJHURXVYROWDJH´ZLWKLQWKH
SURGXFW¶VHQFORVXUHWKDWPD\EHRIVXႈFLHQWPDJQLWXGHWR
FRQVWLWXWHDULVNRIHOHFWULFVKRFNWRSHUVRQV
7KHH[FODPDWLRQSRLQWZLWKLQDQHTXLODWHUDOWULDQJOHLV
LQWHQGHGWRDOHUWWKHXVHUWRWKHSUHVHQFHRILPSRUWDQW
RSHUDWLQJDQGPDLQWHQDQFHVHUYLFLQJLQVWUXFWLRQVLQWKH
OLWHUDWXUHDFFRPSDQ\LQJWKHDSSOLDQFH
&$87,21
7235(9(177+(5,6.2)(/(&75,&6+2&.'21275(029(
&29(525%$&.1286(56(59,&($%/(3$576,16,'(
5()(56(59,&,1*7248$/,),('6(59,&(3(56211(/
:$51,1*
7235(9(177+(5,6.2)(/(&75,&6+2&.'21275(029(
&29(525%$&.1286(56(59,&($%/(3$576,16,'(
5()(56(59,&,1*7248$/,),('6(59,&(3(56211(/
7KLVHTXLSPHQWLVQRWZDWHUSURRI7RSUHYHQWD¿UHRUVKRFNKD]DUGGR
QRWSODFHDQ\FRQWDLQHU¿OOHGZLWKOLTXLGQHDUWKLVHTXLSPHQWVXFKDVD
YDVHRUÀRZHUSRWRUH[SRVHLWWRGULSSLQJVSODVKLQJUDLQRUPRLVWXUH
7RSUHYHQWD¿UHKD]DUGGRQRWSODFHDQ\QDNHGÀDPHVRXUFHVVXFK
DVDOLJKWHGFDQGOHRQWKHHTXLSPHQW
'RQRWXVHRUVWRUHEDWWHULHVLQGLUHFWVXQOLJKWRURWKHUH[FHVVLYHO\KRW
SODFHVXFKDVLQVLGHDFDURUQHDUDKHDWHU7KLVFDQFDXVHEDWWHULHV
WROHDNRYHUKHDWH[SORGHRUFDWFK¿UH,WFDQDOVRUHGXFHWKHOLIHRU
SHUIRUPDQFHRIEDWWHULHV
6WRUHVPDOOSDUWVRXWRIWKHUHDFKRIFKLOGUHQDQGLQIDQWV,IDFFLGHQWDOO\
VZDOORZHGFRQWDFWDGRFWRULPPHGLDWHO\
6ORWVDQGRSHQLQJVLQWKHFDELQHWDUHSURYLGHGIRUYHQWLODWLRQWRHQVXUH
UHOLDEOHRSHUDWLRQRIWKHSURGXFWDQGWRSURWHFWLWIURPRYHUKHDWLQJ7R
SUHYHQW¿UHKD]DUGWKHRSHQLQJVVKRXOGQHYHUEHEORFNHGRUFRYHUHG
ZLWKLWHPVVXFKDVQHZVSDSHUVWDEOHFORWKVFXUWDLQVRUE\RSHUDWLQJ
WKHHTXLSPHQWRQWKLFNFDUSHWRUDEHG
5LVNRIH[SORVLRQLIEDWWHU\LVUHSODFHGE\DQLQFRUUHFWW\SH5LVNRI
H[SORVLRQ,IGLVSRVDORIDEDWWHU\LQWR¿UHRUDKRWRYHQRUPHFKDQLFDOO\
FUXVKLQJRUFXWWLQJRIDEDWWHU\
3UHFDXWLRQV
,I\RXLQVWDOOWKHDSSDUDWXVLQDEXLOWLQLQVWDOODWLRQVXFKDVDERRNFDVH
RUUDFNHQVXUHWKDWWKHUHLVDGHTXDWHYHQWLODWLRQ
/HDYHFP´RIIUHHVSDFHDWWKHWRSDQGVLGHVDQGFP´DW
WKHUHDU7KHUHDUHGJHRIWKHVKHOIRUERDUGDERYHWKHDSSDUDWXVVKDOO
EHVHWFP´DZD\IURPWKHUHDUSDQHORUZDOOFUHDWLQJDÀXHOLNH
JDSIRUZDUPDLUWRHVFDSH
2SHUDWLQJ(QYLURQPHQW
2SHUDWLQJHQYLURQPHQWWHPSHUDWXUHDQGKXPLGLW\&WR&
)WR)OHVVWKDQ5+FRROLQJYHQWVQRWEORFNHG
'RQRWLQVWDOOWKLVXQLWLQDSRRUO\YHQWLODWHGDUHDRULQORFDWLRQVH[SRVHG
WRKLJKKXPLGLW\RUGLUHFWVXQOLJKWRUVWURQJDUWL¿FLDOOLJKW
,PSRUWDQW1RWLFH
7KHPRGHOQXPEHUDQGVHULDOQXPEHURIWKLVHTXLSPHQWDUHRQWKHUHDU
RUERWWRP5HFRUGWKHVHQXPEHUVRQ\RXUHQFORVHGZDUUDQW\FDUGDQG
NHHSLQDVDIHSODFHIRUIXWXUHUHIHUHQFH
&$87,21
7KHSRZHUVZLWFKEXWWRQRQWKLVXQLWZLOOQRWFRPSOHWHO\VKXWRIIDOO
SRZHUIURPWKH$&RXWOHW6LQFHWKHSRZHUFRUGVHUYHVDVWKHPDLQ
GLVFRQQHFWGHYLFHIRUWKHXQLW\RXZLOOQHHGWRXQSOXJLWIURPWKH$&
RXWOHWWRVKXWGRZQDOOSRZHU7KHUHIRUHPDNHVXUHWKHXQLWKDVEHHQ
LQVWDOOHGVRWKDWWKHSRZHUFRUGFDQEHHDVLO\XQSOXJJHGIURPWKH
$&RXWOHWLQFDVHRIDQDFFLGHQW7RDYRLG¿UHKD]DUGWKHSRZHUFRUG
VKRXOGDOVREHXQSOXJJHGIURPWKH$&RXWOHWZKHQOHIWXQXVHGIRUD
ORQJSHULRGRIWLPHIRUH[DPSOHZKHQRQYDFDWLRQ
7KLVSURGXFWLVIRUJHQHUDOKRXVHKROGSXUSRVHV$Q\IDLOXUHGXHWRXVH
IRURWKHUWKDQKRXVHKROGSXUSRVHVVXFKDVORQJWHUPXVHIRUEXVLQHVV
SXUSRVHVLQDUHVWDXUDQWRUXVHLQDFDURUVKLSDQGZKLFKUHTXLUHV
UHSDLUZLOOEHFKDUJHGIRUHYHQGXULQJWKHZDUUDQW\SHULRG
3RZHU&RUG&DXWLRQ
+DQGOHWKHSRZHUFRUGE\WKHSOXJ'RQRWSXOORXWWKHSOXJE\WXJJLQJ
WKHFRUGDQGQHYHUWRXFKWKHSRZHUFRUGZKHQ\RXUKDQGVDUHZHW
DVWKLVFRXOGFDXVHDVKRUWFLUFXLWRUHOHFWULFVKRFN'RQRWSODFHWKH
XQLWDSLHFHRIIXUQLWXUHHWFRQWKHSRZHUFRUGRUSLQFKWKHFRUG
1HYHUPDNHDNQRWLQWKHFRUGRUWLHLWZLWKRWKHUFRUGV7KHSRZHU
FRUGVVKRXOGEHURXWHGVXFKWKDWWKH\DUHQRWOLNHO\WREHVWHSSHGRQ$
GDPDJHGSRZHUFRUGFDQFDXVHD¿UHRUJLYH\RXDQHOHFWULFDOVKRFN
&KHFNWKHSRZHUFRUGRQFHLQDZKLOH:KHQ\RXILQGLWGDPDJHG
DVN\RXUQHDUHVWRXUDXWKRUL]HGVHUYLFHFHQWHURU\RXUGHDOHUIRUD
UHSODFHPHQW
&$87,21
7KLVSURGXFWLVDFODVVODVHUSURGXFWFODVVL¿HGXQGHUWKH6DIHW\RI
ODVHUSURGXFWV,(&
CLASS 1 LASER PRODUCT
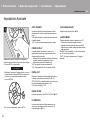
,QIRUPDWLRQIRUXVHUVRQFROOHFWLRQDQGGLVSRVDO
RIROGHTXLSPHQWDQGXVHGEDWWHULHV
Symbol for
equipment
Pb
Symbol examples
for batteries
7KHVHV\PEROVRQWKHSURGXFWVSDFNDJLQJDQGRUDFFRPSDQ\LQJ
GRFXPHQWVPHDQWKDWXVHGHOHFWULFDODQGHOHFWURQLFSURGXFWVDQG
EDWWHULHVVKRXOGQRWEHPL[HGZLWKJHQHUDOKRXVHKROGZDVWH
)RUSURSHUWUHDWPHQWUHFRYHU\DQGUHF\FOLQJRIROGSURGXFWVDQG
XVHGEDWWHULHVSOHDVHWDNHWKHPWRDSSOLFDEOHFROOHFWLRQSRLQWVLQ
DFFRUGDQFHZLWK\RXUQDWLRQDOOHJLVODWLRQ
%\GLVSRVLQJRIWKHVHSURGXFWVDQGEDWWHULHVFRUUHFWO\\RXZLOOKHOS
WRVDYHYDOXDEOHUHVRXUFHVDQGSUHYHQWDQ\SRWHQWLDOQHJDWLYH
HႇHFWVRQKXPDQKHDOWKDQGWKHHQYLURQPHQWZKLFKFRXOG
RWKHUZLVHDULVHIURPLQDSSURSULDWHZDVWHKDQGOLQJ
)RUPRUHLQIRUPDWLRQDERXWFROOHFWLRQDQGUHF\FOLQJRIROGSURGXFWV
DQGEDWWHULHVSOHDVHFRQWDFW\RXUORFDOPXQLFLSDOLW\\RXUZDVWH
GLVSRVDOVHUYLFHRUWKHSRLQWRIVDOHZKHUH\RXSXUFKDVHGWKH
LWHPV
7KHVHV\PEROVDUHRQO\YDOLGLQWKH(XURSHDQ8QLRQ
)RUFRXQWULHVRXWVLGHWKH(XURSHDQ8QLRQ
,I\RXZLVKWRGLVFDUGWKHVHLWHPVSOHDVHFRQWDFW\RXUORFDO
DXWKRULWLHVRUGHDOHUDQGDVNIRUWKHFRUUHFWPHWKRGRIGLVSRVDO
:(((
KWWSZZZRQN\RFRPPDQXDOZHHHZHHHSGI

> Before Start > Part Names > Install > Playback
Advanced Setup | Others
3
En
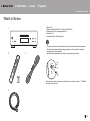
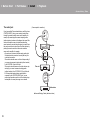
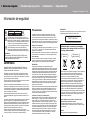
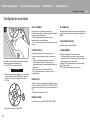
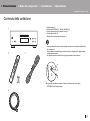
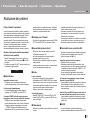
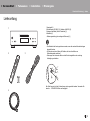
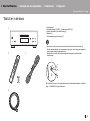
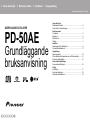
What's in the box
1. Main unit (1)
2. Remote controller (RC-980C) (1), Batteries (AAA/R03) (2)
3. Analog Audio Cable (For testing operation) (1)
4. Power Cord (1)
• Instruction Manual (This document) (1)
• The power cord must be connected only after all other cable connections are completed.
• We will not accept responsibility for damage arising from the connection of equipment
manufactured by other companies.
• Specifications and appearance are subject to change without prior notice.
The main power cannot be turned on or off with the remote controller. Use the 8 STANDBY/
ON button on the main unit.
1
32
4

4
> Before Start >Part Names > Install > Playback
Advanced Setup | Others
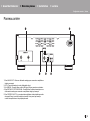
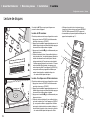
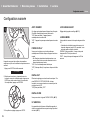
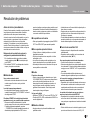
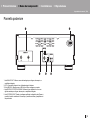
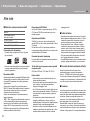
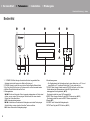
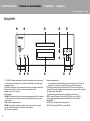
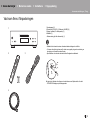
Front Panel
Part Names
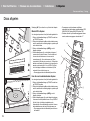
1. 8 STANDBY/ON button/indicator: Switch the main power of the unit on and off. When
starting up the unit, the indicator in the center of the button lights blue.
2. STANDBY indicator: Lights red when the unit is in standby mode.
3. Disc tray: Place discs here. 8-cm discs can also be used.
4. ; button: Open or close the disc tray.
5. Play buttons:
u t : Return to the beginning of the track being played. Press again to move to the
track before. Press and hold to rewind the track quickly.
q
/h : Play or pause play.
y i : When pressed during play, move to the next track. Press and hold to fast-
forward through the track.
g
: This button stops playback.
6. Remote control sensor
• The reception range of the remote controller is within a distance of approx. 16´/5 m,
and an angle of 20° in vertical direction and 30° to right and left.
7. CD/SACD button/indicator: Switch between CD/SACD as the source. When playing a
hybrid SACD, the layer being played switches if you press this during play. (P18)
The indicator lights blue when SACD is selected.
8. DIRECT button/indicator: Switch the DIRECT mode ON and OFF. (P15)
The indicator lights blue when the DIRECT mode is ON.
9. Display (P7)
10.
SOURCE button: Switches the source to be played.
11.
SETUP button: Displays the SETUP menu. (P16)
6bkbl87 9
14352

> Before Start >Part Names > Install > Playback
Advanced Setup | Others
5
En
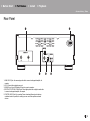
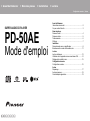
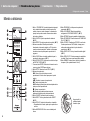
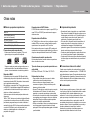
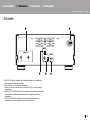
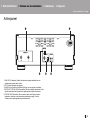
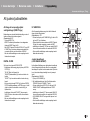
Rear Panel
1. ANALOG OUT jack: Use an analog audio cable to connect an integrated amplifier, for
example.
2. AC IN: Connect the supplied power cord.
3. USB DAC port: Use a USB cable (A-B type) to connect a computer.
4. DIGITAL OUT OPTICAL/COAXIAL jack: Use a digital optical cable or digital coaxial cable
to connect an integrated amplifier, for example.
5. CONTROL IN/OUT jack: By connecting Pioneer brand amplifiers and audio devices,
centralized control is possible, for example you can control the amplifiers and audio
devices.
12
345

6
> Before Start >Part Names > Install > Playback
Advanced Setup | Others
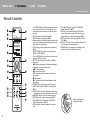
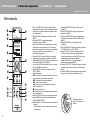
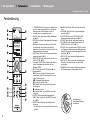
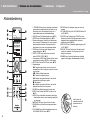
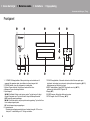
Remote Controller
1. ^ STANDBY/ON button: When the main power of the unit
is on, this turns the unit on or into standby mode. The
main power cannot be turned on or off with the remote
controller.
2. SHUFFLE button: Set shuffle play. (P13)
3. REPEAT button: Set repeat play. (P13)
4. Numbered buttons: Use to directly input the track number
of a music CD when selecting tracks. Also used to enter
track numbers for program play.
5. CLEAR button: Clear the content set for program play.
(P13)
6. DIGITAL FILTER button: Select one of three types of
DIGITAL FILTER. (P15)
7. Cursors, ENTER button: Select the item with the cursors
and press ENTER to confirm.
8. SETUP button: Displays the SETUP menu. (P16)
9. Play buttons:
u : Return to the beginning of the track being played.
Press again to move to the track before.
/h : Play or pause play.
i : Move to the next track.
t : Press and hold to fast-rewind through the track
being played.
g : Stop playback.
y : Press and hold to fast-forward through the track
being played.
10.
SOURCE button: Switches the source to be played.
11.
DIRECT button: Switch the DIRECT mode on and off.
(P15)
12.
DISPLAY button: Switch the information on the display.
• Depending on the source, the operation may not start.
13.
; OPEN/CLOSE button: Open or close the disc tray.
14.
PROGRAM button: Used for program play. (P13)
15.
LOCK RANGE button: Displays the LOCK RANGE
ADJUST settings screen. (P15)
16.
RETURN button: Returns the display to the previous
state.
17.
UP SAMPLING button: Switch the UP SAMPLING
feature ON and OFF. (P15)
18.
CD/SACD button: Switch between CD/SACD as the
source. When playing a hybrid SACD, the layer being
played switches if you press this during play. (P18)
19.
DIGITAL OUT button: Switch the digital output ON and
OFF. (P16)
20.
DISPLAY OFF button: Press to turn off the display of this
unit. Press again to turn the display on.
21.
DIMMER button: You can adjust the brightness of the
display in three steps. (Default Value: Level 3)
9
8
7
6
5
bp
bq
bn
bo
2
3
1
4
bk
br
bs
bl bt
bm ck
cl
Match the polarity when
inserting the batteries.

> Before Start >Part Names > Install > Playback
Advanced Setup | Others
7
En
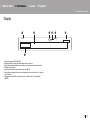
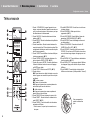
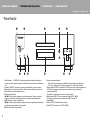
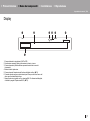
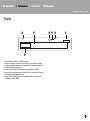
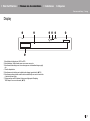
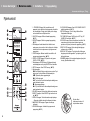
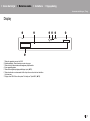
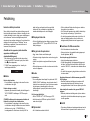
Display
1. Lights during play of SACD and DSD.
2. Message display: Displays information about tracks and menus.
3. Lights when operations with the cursor buttons on the remote controller are possible.
4. Displays the play status.
5. Lights when the digital audio output setting is on. (P16)
6. Lights when showing such items as the remaining time for a track or the disc, or the total
time of the disc.
7. Display when an MQA file or stream is played. For details, refer to "Playing MQA".
(P18)
DSD
DIGITAL
TOTAL REMAIN
1
7
52 63 4

> Before Start > Part Names >Install > Playback
Advanced Setup | Others
8
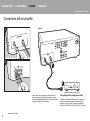
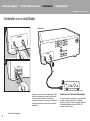
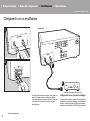
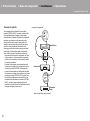
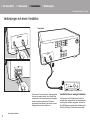
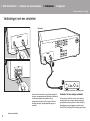
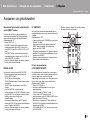
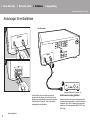
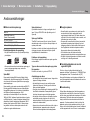
Connections with an amplifier
Install
a
1
2
a
Play the audio from discs played on this unit and from
devices connected to this unit through speaker systems
connected to integrated amplifiers or AV receivers. Connect
to suit the input jacks on your amplifier.
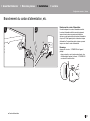
Connecting with an analog audio cable
The signal is converted to analog in the D/A converter of
this unit and then output to an integrated amplifier, for
example. Connect the LINE IN jacks on an integrated
amplifier to the ANALOG OUT jack (RCA jack) on this unit.
a
1
2
This unit
Integrated amplifier, AV receiver, etc.
a Analog Audio Cable

9
> Before Start > Part Names >Install > Playback
Advanced Setup | Others
En
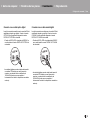
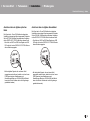
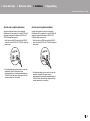
Connecting with a digital optical cable
The signal is converted to analog in the D/A converter of the
integrated amplifier, for example. Connect the OPTICAL IN
jack on an integrated amplifier to the DIGITAL OUT
OPTICAL jack on this unit.
• The audio of SACD and DSD or input from USB DAC is
not output from the DIGITAL OUT OPTICAL jack of this
unit.
• The digital signals that can be output by this unit are
linear PCM signals with a sampling frequency and
quantization bit rate of 192 kHz/24 bit (operation may not
be possible with all connected devices or environments).
Connecting with a digital coaxial cable
The signal is converted to analog in the D/A converter of the
integrated amplifier, for example. Connect the COAXIAL IN
jack on an integrated amplifier to the DIGITAL OUT
COAXIAL jack on this unit.
• The audio of SACD and DSD or input from USB DAC is
not output from the DIGITAL OUT COAXIAL jack of this
unit.
• The digital signals that can be output by this unit are
linear PCM signals with a sampling frequency and
quantization bit rate of 192 kHz/24 bit (operation may not
be possible with all connected devices or environments).

10
> Before Start > Part Names >Install > Playback
Advanced Setup | Others
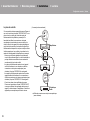
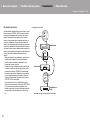
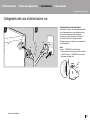
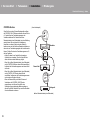
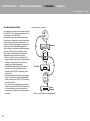
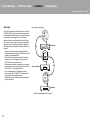
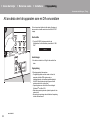
The control jack
If you have multiple Pioneer brand devices, and if they have
CONTROL IN/OUT jacks, you can centrally control them
through the remote controller sensor on the amplifier, for
example. By connecting with monaural miniplug cables
(without resistors) as shown in the diagram, then even if this
unit and other devices are put in locations where they
cannot receive the remote controller signal, you can still use
the remote controller to control this unit or other devices by
pointing the remote controller at the remote controller
sensor on the amplifier, for example.
• Also make sure to connect with the analog audio cable.
Centralized control cannot work correctly with only the
control jack connection.
• The remote controller sensor on this unit stops working if
you connect a monaural miniplug cable (without resistor)
to the CONTROL IN jack of this unit.
• The remote controller sensors on the other devices stop
working if you connect a monaural miniplug cable
(without resistor) to the CONTROL OUT jack of this unit.
• If a Pioneer brand network player and amplifier is
connected by the CONTROL IN/OUT jack, you can
perform basic operations on this unit, the network player,
and amplifier on a smart phone app over a network.
(One example of connection)
a
CONTROL
IN
OUT
CONTROL
IN
OUT
a
This unit
Amplifier
Audio device
a Monaural Miniplug Cables (without resistors)

11
> Before Start > Part Names >Install > Playback
Advanced Setup | Others
En
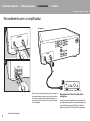
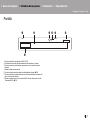
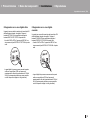
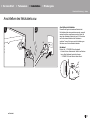
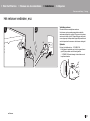
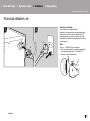
Connecting the power cord, etc.
a
1 2
a
Power cord connection
This model includes a removable power cord.
The power cord must be connected only after all other
connections are completed. Make sure you first connect the
power cord to AC IN terminal of the unit and then connect to
the outlet. Always disconnect the outlet side first when
disconnecting the power cord.
Starting up
Press 8 STANDBY/ON on the main unit.
• When starting up, press until the button goes in. When
starting up the unit, the 8 STANDBY/ON indicator in the
center of the button lights blue.
a Power Cord

12
> Before Start > Part Names > Install > Playback
Advanced Setup | Others
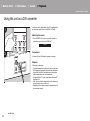
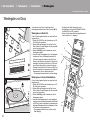
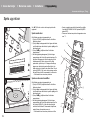
Playing discs
Playback
Refer to (P18) for discs you can play on this unit.
Playing music CDs
Perform the following procedure when the unit is on.
1. Press CD/SACD on the remote controller to set the
source to CD/SACD.
2. Press ; on the main unit to open the disc tray, and after
putting the disc on the tray, press ; again to close the
tray.
3. Press /h (g) on the remote controller to start play.
4. Use play buttons (h) to stop play or choose tracks to play.
You can also select by entering the track number with
number buttons (b). When entering a 2-digit track
number, press the +10 button as many times as the value
of the second (tens) digit, then press the value of the first
digit. If you press DISPLAY (d), you can switch the
display to show the elapsed time or remaining time of the
disc, etc.
• The content displayed depends on the disc.
Playing a disc with music files
Perform the following procedure when the unit is on.
1. Press CD/SACD on the remote controller to set the
source to CD/SACD.
2. Press ; on the main unit to open the disc tray, and after
putting the disc on the tray, press ; again to close the
tray.
3. Press /h (g) on the remote controller to start play.
4. Use play buttons (h) to stop play or choose tracks to play.
If you press DISPLAY (d), you can switch the display to
show the elapsed time or remaining time of the disc, the
file name of the track, or the track name, etc.
• The content displayed depends on the disc and file.
• Track name display is supported with MP3/WMA/
FLAC/AAC (M4A only)/DSD (DSF only) format music
files only.
• Characters that cannot be displayed by this unit
appear as "".
1
2
e
f
a
b
c
d
g
h

> Before Start > Part Names > Install > Playback
Advanced Setup | Others
13
En
Repeat play
1. Repeatedly press REPEAT (a) during play to display
or on the display.
: Repeat play of all tracks.
: Repeat play of the being played track.
To cancel repeat play, press REPEAT (a) several times to
display on the display.
Shuffle play
1. Press SHUFFLE (f) during play or stop to display on
the display.
: Play all tracks randomly.
To cancel shuffle play, press SHUFFLE (f) to display
on the display.
Program play
You can select the order to play tracks on a music CD.
1. Press PROGRAM (e) while stopped.
"P00" is displayed when nothing has been registered.
Enter the track number you want to register with the
number buttons (b). When entering a 2-digit track
number, press the +10 button as many times as the value
of the second (tens) digit, then press the value of the first
digit. The number in "P00" increases each time you
register a track. Up to 24 tracks can be registered.
• To play the registered program, press /h (g) on the
remote controller.
• If you press CLEAR (c) while registering tracks, the
tracks are cleared in order, starting from the one you
registered last.
• If you press PROGRAM (e) while registering tracks, all
the tracks you registered are cleared.
• If the total play time of the registered program exceeds
99 minutes 59 seconds, " : " is displayed on the
display.
ALL
1
ALL
1
OFF
OFF
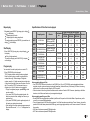
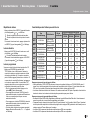
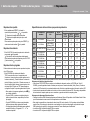
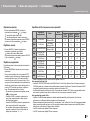
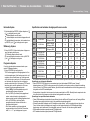
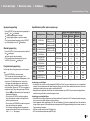
Specifications of files that can be played
* When playing files exceeding 48 kHz, use files that have been recorded on a DVD disc.
Notes regarding all types of files
• Use CD/CD-R/CD-RW discs that conform to the ISO9660 level 1/level 2 CD-ROM file system standard and that are
recorded using the system conforming to extended formatting (Joliet and Romeo). When using DVD discs, then along
with the above, use discs recorded using the UDF file system.
• Folder structure is limited to eight levels and the maximum number of tracks is 3000. However, depending on the folder
structure, not all folders and tracks may be recognized and played.
Notes regarding specific types of files
• Encode WMA files using applications certified by the Microsoft Corporation of the United States. Operation may not be
correct if you use uncertified applications.
• This unit supports play of AAC files with the extension ".m4a" that have been encoded using iTunes. However, play not be
possible if the file has been protected with DRM copy protect (copyright protection) or with some versions of iTunes used
for encoding.
• WAV files include uncompressed PCM digital audio.
• AIFF files include uncompressed PCM digital audio.
Sampling rates Bitrates
Quantization
bit
Types of discs that can be played
Extension
CD-R/
CD-RW
DVD-R/
DVD-RW
DVD+R/
DVD+RW
MP3 44.1/48 kHz
Between 8 kbps and
320 kbps and VBR.
–.mp3
WMA 44.1/48 kHz
Between 5 kbps and
192 kbps and VBR.
–.wma
AAC 44.1/48/88.2/96 kHz
Between 8 kbps and
320 kbps and VBR.
–
*
.aac/
.m4a
WAV
44.1/48/88.2/96/
176.4/192 kHz
– 8/16/24 bit
*
.wav
AIFF
44.1/48/88.2/96/
176.4/192 kHz
– 8/16/24 bit
*
.aif/
.aiff
FLAC
44.1/48/88.2/96/
176.4/192 kHz
– 8/16/24 bit
*
.flac
ALAC
44.1/48/88.2/96/
176.4/192 kHz
– 8/16/24 bit
*
.m4a
DSD 2.8/5.6 MHz – 1 bit –
.dsf/
.dff
MQA
44.1/48/88.2/96/176.4/
192/352.8/384 kHz
– 8/16/24 bit
*
.flac/
.wav

> Before Start > Part Names > Install > Playback
Advanced Setup | Others
14
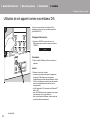
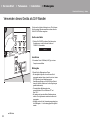
Using this unit as a D/A converter
a
2
1
You can convert the digital audio of the PC to analog on this
unit, and then output it from the ANALOG OUT jacks.
Switching the source
1. Press SOURCE of this unit or the remote controller to
switch the source of the unit to "USB DAC".
Connections
2. Use an A-B type USB cable to connect a computer.
Playback
3. Start play on the player.
• The digital signals that can be input by this unit are linear
PCM signals with a sampling frequency and quantization
bit rate of 48 kHz/32 bit (operation may not be possible
with all connected devices or environments).
• Supported OSs of PC to be connected are Windows10
®
and Mac OS X.
• With OSs other than the supported ones, the sound may
be interrupted or may not come out.
• Depending on the usage environment, playback may not
be performed normally.
USB DAC
a USB Cable

> Before Start > Part Names > Install > Playback
Advanced Setup | Others
15
En
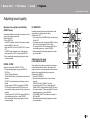
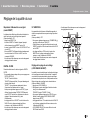
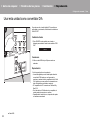
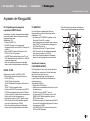
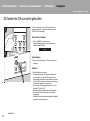
Adjusting sound quality
Reproduce the original sound faithfully
(DIRECT mode)
Processing that affects sound quality is shut down so sound
closer to the original is reproduced.
(Default Value): OFF
1. Press DIRECT (d).
• The DIRECT indicator on the front of the main unit lights
when the DIRECT mode is ON.
• When the DIRECT mode is ON, DIGITAL OUT is turned
OFF.
• In DIRECT mode, the display turns off automatically
while playing CD or SACD, or connecting USB DAC.
• When switching the setting during playback, the audio
may be interrupted.
DIGITAL FILTER
Select one of three types of DIGITAL FILTER.
1. The setting changes each time you press DIGITAL
FILTER (a).
"SLOW": Soft and fluid sound
"SHARP" (Default Value): Sound with more structure and
firmness
"SHORT": Sound that starts quick and seems to move
forward
• You can also press SETUP (c) to display the DIGITAL
FILTER setting screen from the SETUP menu. In this
case, select the setting value with / (b) on the remote
controller.
• The setting is fixed to "SHORT" while playing MQA-CD or
a disc containing music files, or using USB DAC.
• When switching the setting during playback, the audio
may be interrupted.
UP SAMPLING
Increasing the sampling frequency helps achieve sound
reproduction with a higher degree of clarity.
(Default Value): OFF
1. You can also press UP SAMPLING (g) to turn the feature
ON and OFF.
• This function cannot be used when the DIRECT mode is
set to ON or during playback of SACD or DSD.
• The setting is fixed to "ON" while playing MQA-CD or a
disc containing music files, or using USB DAC.
• When switching the setting during playback, the audio
may be interrupted.
Adjusting the lock range
(LOCK RANGE ADJUST)
Sound quality is improved by narrowing the lock range to
reduce incidental sounds. However, narrowing the lock
range too much can cause interruptions to sound and noise.
Adjust the lock range while listening to some audio.
(Default Value): RANGE 6
1. Press LOCK RANGE (e).
2. Select the setting value with / (f) on the remote
controller.
"RANGE 6" (broad) to "RANGE 1" (narrow)
• You can also press SETUP (c) to display the LOCK
RANGE ADJUST setting screen from the SETUP menu.
• The setting is fixed to "6" while playing MQA-CD or a disc
containing music files, or using USB DAC.
• LOCK RANGE ADJUST has no effect on the audio of
SACD and DSD.
• When switching the setting during playback, the audio
may be interrupted.
a
b
c
d
e
f
g

16
> Before Start > Part Names > Install > Playback
Advanced Setup |Others
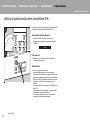
Advanced Settings
Advanced Setup
The unit allows you to configure advanced settings to
provide you with an even better experience.
1. Press SETUP on the remote controller.
2. Select the content or the setting with the cursors on the
remote controller and press ENTER to confirm your
selection. To return to the previous screen, press
RETURN.
3. To exit the settings, press SETUP.
AUTO STANDBY
This setting places the unit on standby automatically after
20 minutes of inactivity without any audio input.
"ON" (Default Value): The unit will automatically enter
standby mode.
"OFF": The unit will not automatically enter standby mode.
POWER ON PLAY
You can set it so that the disc automatically starts playing
when this unit is turned on.
• By using an externally connected auto timer, you can use
timer play when the power automatically switches on.
"ON": To play discs automatically
"OFF" (Default Value): When discs are not to be played
DIGITAL OUT
Make settings for digital audio output. When not connecting
to the DIGITAL OUT OPTICAL/COAXIAL jack, you can
listen to even clearer audio by setting this OFF.
"ON" (Default Value), "OFF"
DIGITAL FILTER
You can select the type of DIGITAL FILTER. (P15)
UP SAMPLING
Increasing the sampling frequency helps achieve sound
reproduction with a higher degree of clarity. (P15)
LOCK RANGE ADJUST
Adjust the lock range. (P15)
LOADING MODE
The loading time for CD can be shortened.
• Activating this function allows loading time to be
shortened depending on the CD, however, sound
skipping may occur at the beginning of playback.
"NORMAL" (Default Value): When the loading time for CD is
not shortened
"FAST": When the loading time for CD is shortened
1
AUTO STANDBY

17
> Before Start > Part Names > Install > Playback
Advanced Setup | Others
En
Troubleshooting
Others
Before starting the procedure
When operation is unstable, problems may be solved by
simply turning the power on or to standby or disconnecting/
connecting the power cord, rather than reviewing settings
and operations. Try the simple measures on both the unit
and the connected device. If the problem isn't fixed after
referring to "Troubleshooting", resetting the unit to the
status at the time of shipment may solve the problem.
Resetting the unit (this resets the unit settings to
the default)
1. With the power on and no disc inserted, while pressing
and holding g on the main unit, press DIRECT.
2. "CLEAR" is displayed, the unit switches to standby, and
the settings are reset.
■ Power
Cannot turn on the unit
• Unplug the power cord from the wall outlet, wait
2 minutes or more, then plug it in again.
The unit turns off unexpectedly
• The unit automatically switches to standby when the
"AUTO STANDBY" setting in the SETUP menu functions.
The STANDBY indicator on the main unit continues to
flash red and operations are not possible
• Unplug the power cord from the wall outlet, wait
2 minutes or more, then plug it in again. The indicator will
continue to flash, but press 8 STANDBY/ON on the
main unit to turn the main power ON. If this doesn't fix the
issue, there may be a malfunction. Unplug the power
cord from the wall outlet and contact the dealer or our
customer support.
■ The display doesn't light
• It is possible that the display has been turned off by
pressing DISPLAY OFF. Press DISPLAY OFF to turn the
display on.
■ Cannot play discs
• Place the disc in the disc tray so the label is facing up.
• Play may not be possible if the disc is scratched or dirty.
• Sound files that are protected by copyright cannot be
played.
• The disc tray opens if you insert a disc that this unit does
not support.
■ Audio
Sound is interrupted
• Narrowing the lock range too much with the LOCK
RANGE ADJUST setting can cause interruptions to
sound and also may cause noise. Sound interruptions
caused by adjustments to the lock range are not covered
by our guarantees of operation. Listen to some audio
while adjusting the lock range.
There is no digital sound
• Set "DIGITAL OUT" in the SETUP menu to "ON".
• The audio of SACD and DSD or input from USB DAC is
not digital-output.
■ Remote Controller
• Make sure that the batteries are installed with the correct
polarity.
• Install new batteries. Do not mix different types of
batteries, or old and new batteries.
• Make sure that this unit is not subjected to direct
sunshine or inverter-type fluorescent lights. Relocate if
necessary.
• If this unit is installed in a rack or cabinet with colored-
glass doors or if the doors are closed, the remote
controller may not work reliably.
■ D/A converter feature
• Make sure that the devices are properly connected.
• Play audio compatible with the input jacks on this unit.
(P14)
Cannot play audio from computers
• Cancel the muting on your computer.
• Select this unit in the audio output settings on your
computer. If the source of this unit is set to anything other
than "USB DAC", the PC cannot detect this unit.
• If there are multiple applications running on the
computer, shut down those applications that you are not
using.
Sampling frequency is always the same through the
USB DAC input
• Depending on the computer settings, even if the
sampling frequencies of the files being played are
different, they are converted to the same sampling
frequency for output.
Computer sounds other than music are heard through
the USB DAC input
• Depending on the settings on the computer, sounds such
as the computer startup tone or error sounds may be
played through this unit.
■ SACD
• Due to the differences in recording methods, there may
be a difference in volume between SACD and CD.
CLEAR

18
> Before Start > Part Names > Install > Playback
Advanced Setup | Others
Other notes
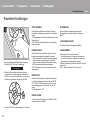
■ Discs that can be played
Precautions for Playback
• Compact discs (CDs) with the following logo on the label
surface can be used.
• Note that some discs may not play back because of the
disc characteristics, scratches, contamination or the
recording state.
Playing MQA
This unit includes the MQA (Master Quality Authenticated)
technology, which enables playback of MQA audio files and
streams, delivering the sound of the original master
recording.
This unit is a CD player that can recognise an MQA-CD.
The built-in MQA decoder will restore the high-resolution
signal heard in the studio and confirm it, using the
authentication signature.
Visit www.mqa.co.uk/customer/mqacd for more information.
‘MQA’ or ‘MQA.’ indicates that the product is decoding and
playing an MQA stream or file, and denotes provenance to
ensure that the sound is identical to that of the source
material. ‘MQA.’ indicates it is playing an MQA Studio file,
which has either been approved in the studio by the artist/
producer or has been verified by the copyright owner.
Playing hybrid SACD
Hybrid SACD consist of two layers; the SACD layer and the
CD layer. Press CD/SACD to select the layer you want to
listen to.
Playing DualDisks
"DualDisk" is a disc with video and audio conforming to the
DVD standard on one side, and audio that can be played on
a CD player on the other.
On the audio side that is not the DVD side, play may not
always be possible due to the fact that the disc does not
conform to the physical specifications of standard CDs.
Operations during play
Direct search does not work while playing discs with music
data.
Types of discs that cannot be played on this unit
DVD Video, DVD Audio, CD-G, Video CD, DTS-CD
Notes on discs
• Be careful not to catch your hand or fingers when
opening or closing the disc tray.
• Never use discs which have an unusual shape (such as
hearts or octagons). These types of discs could jam and
damage the unit.
• Some audio CDs with copy-control functionality do not
comply with official CD standards. These are special
discs and cannot be played with this unit.
• Do not use discs with residue from cellophane tape,
rental discs with labels which are peeling off, or discs with
decorative labels. This type of disc could get stuck in the
unit, or could damage the unit.
• Do not leave a disc having a label printed with an inkjet
printer in the unit for a long time. The disc could get stuck
in the unit, or could damage the unit.
■ Cleaning the player
• Normally, wipe the player with a soft cloth. For tough dirt,
apply some neutral detergent diluted in 5 to 6 parts water
to a soft cloth, wring out thoroughly, wipe off the dirt, then
wipe again with a dry cloth.
• Note that getting alcohol, thinner, benzene or insecticide
on the player could cause the print and coating to peel
off. Also, avoid leaving rubber or vinyl products in contact
with the player for long periods of time, as this could
damage the cabinet.
• When using chemical-impregnated wipes, etc., read the
wipe’s cautions carefully.
• When dust attached on the disc tray is hard to remove,
apply an adhesive tape, etc. to remove the dust.
■ Precautions when moving the unit
When moving the unit, remove any discs in it and close the
disc tray. Then press 8 STANDBY/ON on the main unit,
wait for 10 seconds after [OFF] disappears from the display,
and then unplug the power cord. Moving the unit while a
disc is still in it may cause damage.
■ Condensation
Drops of water can form inside this unit if it is taken from a
cold place to a warm room or when a cold room is rapidly
warmed by a heater. This is called condensation. This may
not only cause the unit to malfunction, but it can also
damage the disc or parts of the unit. We recommend
removing discs from the unit if it is not to be used for a
while. If there is a possibility that condensation has formed,
unplug the power cord and allow the unit to stand for at
least 3 hours at room temperature.
MQA-CD
SACD (Super Audio CD)
(2-channel area only)
CD, CD-R, CD-RW
DVD-R, DVD-R (DL), DVD-RW
DVD+R, DVD+R (DL), DVD+RW

19
> Before Start > Part Names > Install > Playback
Advanced Setup | Others
En
General Specifications
■ Analog Audio Output
Rated Output Level and Impedance
• RCA OUT : 2.3 Vrms (1 kHz, 0 dB) / 100
Frequency Response
• CD: 2 Hz - 20 kHz,
SACD: 2 Hz - 50 kHz (-3 dB)
Signal to Noise Ratio
• CD: 116 dB or more (A-weighting),
SACD: 116 dB or more (A-weighting)
THD+N
• CD: 0.002 % or less,
SACD: 0.002 % or less
■ Digital Audio Input
USB DAC
• Type B, USB Audio Class 1.0
■ Digital Audio Output
Coaxial Digital Output
• RCA Jack, 0.5 Vp-p / 75
Optical Digital Output
• Optical Jack, -14 - -21 dBm / 660 nm
■ Other
Control In
• Ø3.5 mini-jack (mono)
Control Out
• Ø3.5 mini-jack (mono)
■ General
Power Supply
• AC 220 - 230 V, 50/60 Hz
Power Consumption
•43W
• 0.3 W (In Standby)
AUTO STANDBY
• ON (20 min) / OFF
Dimensions (W H D)
• 435 mm 138 mm 413 mm
Weight
• 13.1 kg

20
Sidan laddas ...
Sidan laddas ...
Sidan laddas ...
Sidan laddas ...
Sidan laddas ...
Sidan laddas ...
Sidan laddas ...
Sidan laddas ...
Sidan laddas ...
Sidan laddas ...
Sidan laddas ...
Sidan laddas ...
Sidan laddas ...
Sidan laddas ...
Sidan laddas ...
Sidan laddas ...
Sidan laddas ...
Sidan laddas ...
Sidan laddas ...
Sidan laddas ...
Sidan laddas ...
Sidan laddas ...
Sidan laddas ...
Sidan laddas ...
Sidan laddas ...
Sidan laddas ...
Sidan laddas ...
Sidan laddas ...
Sidan laddas ...
Sidan laddas ...
Sidan laddas ...
Sidan laddas ...
Sidan laddas ...
Sidan laddas ...
Sidan laddas ...
Sidan laddas ...
Sidan laddas ...
Sidan laddas ...
Sidan laddas ...
Sidan laddas ...
Sidan laddas ...
Sidan laddas ...
Sidan laddas ...
Sidan laddas ...
Sidan laddas ...
Sidan laddas ...
Sidan laddas ...
Sidan laddas ...
Sidan laddas ...
Sidan laddas ...
Sidan laddas ...
Sidan laddas ...
Sidan laddas ...
Sidan laddas ...
Sidan laddas ...
Sidan laddas ...
Sidan laddas ...
Sidan laddas ...
Sidan laddas ...
Sidan laddas ...
Sidan laddas ...
Sidan laddas ...
Sidan laddas ...
Sidan laddas ...
Sidan laddas ...
Sidan laddas ...
Sidan laddas ...
Sidan laddas ...
Sidan laddas ...
Sidan laddas ...
Sidan laddas ...
Sidan laddas ...
Sidan laddas ...
Sidan laddas ...
Sidan laddas ...
Sidan laddas ...
Sidan laddas ...
Sidan laddas ...
Sidan laddas ...
Sidan laddas ...
Sidan laddas ...
Sidan laddas ...
Sidan laddas ...
Sidan laddas ...
Sidan laddas ...
Sidan laddas ...
Sidan laddas ...
Sidan laddas ...
Sidan laddas ...
Sidan laddas ...
Sidan laddas ...
Sidan laddas ...
Sidan laddas ...
Sidan laddas ...
Sidan laddas ...
Sidan laddas ...
Sidan laddas ...
Sidan laddas ...
Sidan laddas ...
Sidan laddas ...
Sidan laddas ...
Sidan laddas ...
Sidan laddas ...
Sidan laddas ...
Sidan laddas ...
Sidan laddas ...
Sidan laddas ...
Sidan laddas ...
Sidan laddas ...
Sidan laddas ...
Sidan laddas ...
Sidan laddas ...
Sidan laddas ...
Sidan laddas ...
Sidan laddas ...
Sidan laddas ...
Sidan laddas ...
Sidan laddas ...
Sidan laddas ...
Sidan laddas ...
Sidan laddas ...
Sidan laddas ...
Sidan laddas ...
Sidan laddas ...
-
 1
1
-
 2
2
-
 3
3
-
 4
4
-
 5
5
-
 6
6
-
 7
7
-
 8
8
-
 9
9
-
 10
10
-
 11
11
-
 12
12
-
 13
13
-
 14
14
-
 15
15
-
 16
16
-
 17
17
-
 18
18
-
 19
19
-
 20
20
-
 21
21
-
 22
22
-
 23
23
-
 24
24
-
 25
25
-
 26
26
-
 27
27
-
 28
28
-
 29
29
-
 30
30
-
 31
31
-
 32
32
-
 33
33
-
 34
34
-
 35
35
-
 36
36
-
 37
37
-
 38
38
-
 39
39
-
 40
40
-
 41
41
-
 42
42
-
 43
43
-
 44
44
-
 45
45
-
 46
46
-
 47
47
-
 48
48
-
 49
49
-
 50
50
-
 51
51
-
 52
52
-
 53
53
-
 54
54
-
 55
55
-
 56
56
-
 57
57
-
 58
58
-
 59
59
-
 60
60
-
 61
61
-
 62
62
-
 63
63
-
 64
64
-
 65
65
-
 66
66
-
 67
67
-
 68
68
-
 69
69
-
 70
70
-
 71
71
-
 72
72
-
 73
73
-
 74
74
-
 75
75
-
 76
76
-
 77
77
-
 78
78
-
 79
79
-
 80
80
-
 81
81
-
 82
82
-
 83
83
-
 84
84
-
 85
85
-
 86
86
-
 87
87
-
 88
88
-
 89
89
-
 90
90
-
 91
91
-
 92
92
-
 93
93
-
 94
94
-
 95
95
-
 96
96
-
 97
97
-
 98
98
-
 99
99
-
 100
100
-
 101
101
-
 102
102
-
 103
103
-
 104
104
-
 105
105
-
 106
106
-
 107
107
-
 108
108
-
 109
109
-
 110
110
-
 111
111
-
 112
112
-
 113
113
-
 114
114
-
 115
115
-
 116
116
-
 117
117
-
 118
118
-
 119
119
-
 120
120
-
 121
121
-
 122
122
-
 123
123
-
 124
124
-
 125
125
-
 126
126
-
 127
127
-
 128
128
-
 129
129
-
 130
130
-
 131
131
-
 132
132
-
 133
133
-
 134
134
-
 135
135
-
 136
136
-
 137
137
-
 138
138
-
 139
139
-
 140
140
-
 141
141
-
 142
142
-
 143
143
-
 144
144


Pioneer PD-50AE Bruksanvisning
- Kategori
- DVD-spelare
- Typ
- Bruksanvisning
på andra språk
- italiano: Pioneer PD-50AE Manuale del proprietario
- español: Pioneer PD-50AE El manual del propietario
- Deutsch: Pioneer PD-50AE Bedienungsanleitung
- français: Pioneer PD-50AE Le manuel du propriétaire
- English: Pioneer PD-50AE Owner's manual
- Nederlands: Pioneer PD-50AE de handleiding
Relaterade papper
Andra dokument
-
Haier SERIES 7 HWS77GDAU1 VINSKAP Användarmanual
-
Cooper 703EUR-00 Installation And Programming Manual
-
Candy KRCDJ642 Användarmanual
-
LG 32LB561V Användarmanual
-
LG 39LB561V Användarmanual
-
Panasonic TC21S3RC Bruksanvisningar
-
-
Soehnle Chill & Go Plus Bruksanvisningar
-
Soehnle Chill & Go XL Bruksanvisningar
-
Samsung SR8F40 Bruksanvisning