
Molift Smart 150
BM09299 Rev. B 2021-06-08
Contents
User manual - English - 3
Gebrauchsanweisung - Deutsch - 19
Brukermanual - Norsk - 35
Bruksanvisning - Svenska - 51
Käyttöohje - Suomi - 67
Manual utente - Italiano - 83
Manual d`utilisation - Francais - 99
Manual de usuarioo - Español - 115
Handleiding - Nederlands - 131
Brugsvejledning - Dansk - 147


Molift Smart 150
EN - User manual
BM09201 Rev. H 2021-06-08
User manual - English

4
Molift Smart 150 / www.etac.com
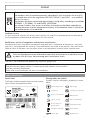
Important
This user manual contains important safety
instructions and information regarding the use of
the lifter and accessories.
In this manual the user is the person being lifted.
The assistant is the person operating the lifter.
Warning!
This symbol indicates important
information related to safety.
Follow these instructions carefully.
Read User Manual before use!
It is important to fully understand
the content of the user manual
before attempting to use the
equipment.
Visit www.etac.com for download of documenta-
tion to ensure you have the latest version.
English manual

5
Molift Smart 150 / www.etac.com
ENNO DEFR ITES FI SVNLDA
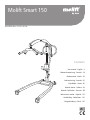
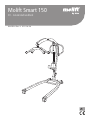
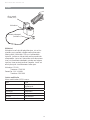
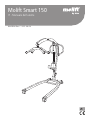
Molift Smart 150
Molift Smart 150 is a foldable mobile lifter
intended for lifting and transferring a person from/
to bed, floor, chair, wheelchair or toilet with a
sling. The lifter is made of light-weight materials,
has castors and electric actuator and is powered
by a battery. It has manual adjustable legs and a
lifting capacity of 150 kg ( 330 lbs).
It is ideal for hospitals and institutional care
settings, and can also be used in privates homes.
The lifter should only be used for transfers across
short distances, such as between a chair and a
bed or into bathroom / rest room. The lifter is
not intended to transport the user over longer
distances.
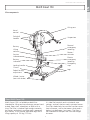
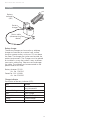
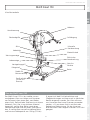
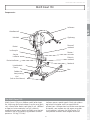
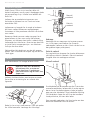
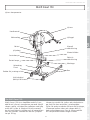
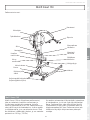
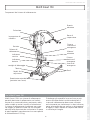
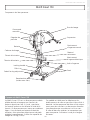
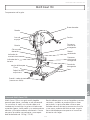
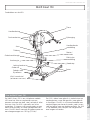
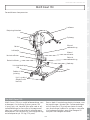
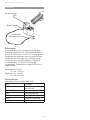
About Molift Smart 150
Lifter components:
Lifting arm
Push/pull
handles
Motor /
actuator
Emergency
stop
Legs
Electric
emergency
lowering
Chassis
Suspension
Battery
Lifting
column
Manual
emergency
lowering
Hand
control
Wheel / castor
(rear with brake)
Battery
indicator
Pedals for leg
adjustment
Locking handle
Service
indicator

6
Molift Smart 150 / www.etac.com
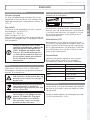
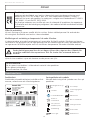
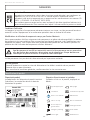
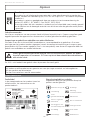
Product label
The Product labels barcode contain article number,
serial number and production date.
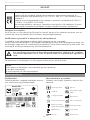
Warning labels and symbols
Symbols used on the product, explained in more
detail:
Type BF applied part Battery light
CE marked
60601-1
Certification body mark
Refer to user manual Manufacturer
Indoor use only
YYYY-MM-DD
Date of manufacture
Do not dispose in
general waste Catalogue number
Emergency lowering Serial number
Service light Medical Device
Smart 150
Gross weight 176kg / 388lbs
SWL 150kg / 330lbs
14.4V DC, IP24
Duty cycle 10%
60601-1
Product identification
General
CE declaration
The product, and its related accessories, described in this instruction for use (IFU),
is in compliance with the regulation (EU) 2017/745 of 5. April 2017 – as a medical
device, risk class I.
The product has been tested and approved by a third party according to standards
IEC 60601-1, IEC 60601-1-2 and EN/ISO 10535:2006.
Any serious incident that occurs in relation to the device should be reported to
the manufacturer and the competent authority of the Member State in which the
user and/or patient is established.
Conditions for use
Lift and transfer of a person will always pose a certain risk, and only trained personnel are allowed to
use the equipment and accessories covered by this user manual.
Modifications and use of components made by other manufacturers.
We recommend only using Molift components and spare parts. Declaration of conformity is not valid
and Etac is not responsible for warranty if any modifications are made to the product. Etac shall not be
liable for faults or accidents that can occur when using components made by other manufacturers.
Only certified personnel are allowed to open lifter or accessories to perform service
or repair. Risk of injury from rotating parts and electric shock.
The lifter is not intended to be operated by the person being lifted.
Warranty notice
Two-year warranty against defects in workmanship and materials of our products.
One-year warranty for batteries.
Please refer to www.etac.com for terms and conditions.

7
Molift Smart 150 / www.etac.com
ENNO DEFR ITES FI SVNLDA
Safe Working Load (SWL)
150 kg (330 lbs)
Weight of unit
Ex. battery: 25 kg / incl. battery: 25,8 kg
Battery:
Art: 0541000
14.4 V NiMH 2.6 Ah
Battery charger:
100-240 V AC, 50-60 Hz
0,9 A output
Lifting speed
50,7 mm/second (1.99 inches/second)
with 75kg (165 lbs) load
Protection class
Hand control IP24
Lift motor IP24
Maximum A-weighted sound power level
LWA = 49,4 dB
Operating forces button
Buttons on handset: 3.4 N
Material:
Aluminum, plastic, steel
Motor
Lifting motor/actuator: 12 V DC
Turning diameter:
1300 mm (51,2 inches)
Number of lifts with fully charged battery:
40 lifts ( 75 kg / 165 lbs, 50 cm / 20 inches)
Expected Lifetime:
The lifter has an expected lifetime of 30 000
cycles or 10 years.
Measurements folded (LxWxH):
1160 x 475 x 355mm (45.66 x 18.7 x 14”)
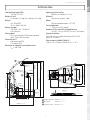
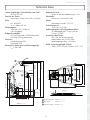
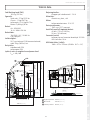
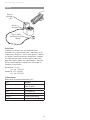
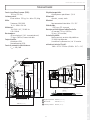
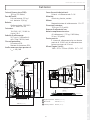
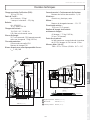
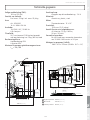
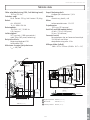
Technical data
1 Highest position 1860mm
2 Maximum reach position 1260mm
3 Lowest position 400mm
A Maximum reach at 600 mm 610mm
B Maximum reach from base 630 mm
C Reach from base with legs spread to 700 mm 240mm
D Base height 105mm
E Base clearance 45mm
F Min. distance from wall to CSP (1) 455mm
G Min. distance from wall to CSP (2) 200mm
H Min. distance from wall to CSP (3) 885mm
K Maximum height of CSP 1880mm
L Minimum height of CSP 410mm
M Hoisting range 1450mm
P Maximum internal width 925mm
Q Internal width at maximum reach 860mm
R Minimum internal width 545mm
Fig 1,12,14 ISO 10535
w=700
h=600
CSP
1665 mm
(65
/in
)
1905 mm (75in)
1030 mm (40
/in
)
925 mm (36
/in
)
660 mm (25
/
)
545mm (21
/in
)
820 mm
(32
/in
)
1180 mm
(46
/in
)
1065 mm
(41
/in
)
530 mm
(20
/in
)
215 mm
(8
/in
)
1315 mm (51
/in
)
1200 mm (47
/in
)
W 190mm
7 / in
110mm
(4
/in
)
1860 mm (73
/in
)
1260 mm (49
/in
)
400 mm (15
/in
)
610 mm
(24
/in
)
630 mm
(24
/in
)
240 mm
(9
/in
)
455 mm
(17
/in
)
200 mm
(7
/in
)
885 mm
(34
/in
)
1880 mm
(74
/in
)
410 mm
(16
/in
)
1450 mm
(57
/in
)
860 mm
(33
/in
)
545 mm
(21
/
)
1 Highest position:
2 Max reach:
3 Lowest position:
1
2
3
475 mm (18
/
)

8
Molift Smart 150 / www.etac.com
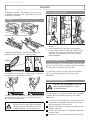
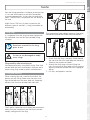
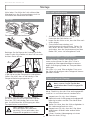
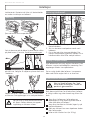
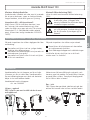
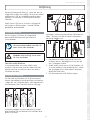
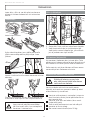
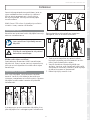
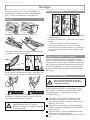
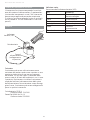
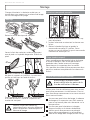
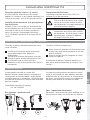
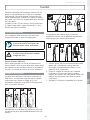
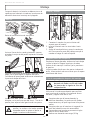
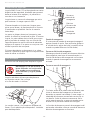
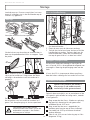
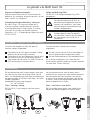
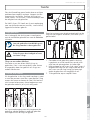
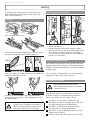
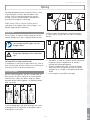
Assembly
Charge the battery. The battery must not be in
the battery holder on the lifting column during
assembly or folding.
Assembly
Remove the transport elastic band.
Engange the break on the rear castors by step-
ping on the left pedal set. Open the legs.
Lift up the lifting column and slide it down into
the bracket on the chassis. Make sure it is placed
completely in the bottom of chassis.
The column must be fixed with the locking handle
on the back of the chassis. Pull the suspension
out of the transport hook
Be careful not to get legs/arms/hands
caught between the parts when rais-
ing/folding down the lifting column.
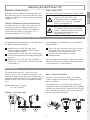
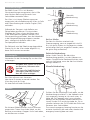
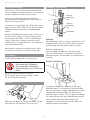
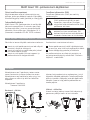
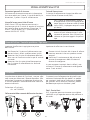
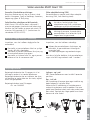
Battery and Hand control
1. Connect hand control to bottom of battery
holder.
2. Insert battery with terminals facing down.
3. Pull out elastic band and guide hand control
through. Pull some of the cable through so
the hand control does not fall to the floor
when dropped.
Folding (Transport mode)
Run the lifting arm all the way down, and remove
battery. Fold the lifter in reverse order of assembly.
Fix the suspension back into the hook.
It is possible to split the lifter into two separate
parts by lifting the column from the chassis
completely.
Checklist after assembly
Do not use the product until you
have checked all points in the
checklist below
Use this checklist to verify that the lifter is properly
installed and can operate correctly and safely
before use.
Ensure that the lifting arm, lifting column and
suspension are properly fixed and that there
are no loose parts on the lifter.
Make sure battery is charged (no lights on the
battery indicator).
Check that the lifter has no apparent damage
or other faults.
Perform a lift with load (approximately 50 kg)

9
Molift Smart 150 / www.etac.com
ENNO DEFR ITES FI SVNLDA
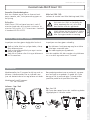
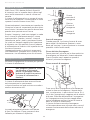
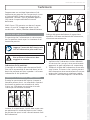
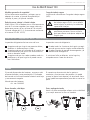
How to use Molift Smart 150
The hand control has 2 buttons, one for lifting
and another for lowering of lifting arm. The
hand control has an indicator that will illuminate
when battery level is low and the battery requires
charging.
Hand Control 2 buttons
Art. no. 0440002
Lifting Arm - Up / Down
Leg spread mechanism is mechanical, and oper-
ated by two pedals. One pedal for legs inwards
and one pedal for legs outwards. Step on selected
pedal to open or close legs.
Legs - In / Out
NB! Open legs provides increased stability and
better access to chair or toilet.
Hand control
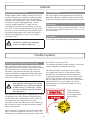
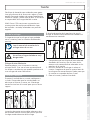
General safety precautions
Use only accessories and slings that are adjusted to
fit the user, type of disability, size, weight and type
of transfer.
Working pause ratio/Duty Cycle.
Molift Smart 150 should not be run constantly for
more than 2 minutes (with maximum load), and
rest for minimum 18 minutes.
Duty cycle 10% intermittence.
Safe working load (SWL)
The lifter is marked with Safe Working Load (SWL)
The lowest SWL shall always be used
if safe working load (SWL) differs
between lifter, suspension and body
support unit
Molift lifters shall only be used to lift
persons. Never use the lifter to lift or
move objects of any kind.
Inspection to be performed daily or before use:
Make sure lifter has no visible damage, defects
or deformations
Make sure battery indicator is not illuminated
and service indicator is green
Make sure wheels are rolling freely and lifter is
easy to manouvre
Inspection to be performed monthly:
Test all the lifters functions and make sure
lifter does not make any abnormal sounds
Test emergency stop button and emergency
lowering
If there are any faults or defects, the lift needs to
be taken out of operation and marked ”out of
order”
Before use / Daily check / Monthly

10
Molift Smart 150 / www.etac.com
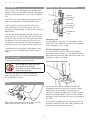
Safety devices
Molift Smart 150 is equipped with several safety
devices, which are intended to prevent damage to
personnel and equipment in the case of incorrect
use.
The lifter has an overload sensor preventing the
lifter to be operated if the load exceeds SWL.
The lifting arm is hinged to prevent the arm
and suspension from squeezing the user. The
actuator will not produce any force when moving
downwards.
The legs are folded together during transport to
make the lifter as small as possible. When assem-
bling the lifter, the legs must be opened to work-
ing position. The lifting column will not fix into
the bracket if the legs are not adjusted beyond
transport position - a safety feature ensures this.
The electronics are disabled if overheated. Wait
until the lifter has cooled down before using it
again.
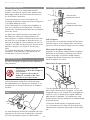
Push / Pull handles
Use the pull handles to move the lifter.
Do not push or pull the user,
lifting arm or actuator.
This may cause instability and
lifter may tip over.
The lifter shall only be used for movement
over short distances. It is not a replacement
for wheelchair or similar.
Brakes
Rear castors are equipped with brakes. Step on
pedal to lock brakes. Flip up to unlock.
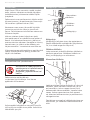
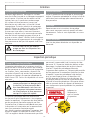
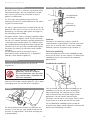
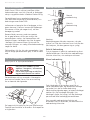
Emergency Stop / Emergency lowering
Emergency stop
The emergency stop shuts off the power when
pushed in. Turn clockwise to reset (OK to operate
when the green ring is visible).
Electrical emergency lowering
Push and hold button for electrical emergency
lowering to lower lifting arm. The electrical emer-
gency lowering function does not work when the
emergency stop is activated.
Manual emergency lowering
Pull handle on the actuator upwards to start
emergency lowering, and the lifting arm moves
downwards when loaded. The lowering will
increase in speed the higher the handle is pulled.
Release the handle gently. Releasing the handle
too quickly may cause person injury or damage to
the lifter.
The manual emergency lowering function on the
actuator should only be used when the electrical
emergency lowering does not work.
Emergency
stop
Electrical
Emergency
lowering
Manual
Emergency
lowering

11
Molift Smart 150 / www.etac.com
ENNO DEFR ITES FI SVNLDA
Transport and operating conditions
Transport and storage
For long time storage it is recommended that the
emergency stop button is activated (pushed in).
The lifter can be stored and transported under
temperatures between -25 - 70 °C.
Operating
The lifter is designed for use at standard room
temperatures (+5 to +40°C).
Air pressure: 70 - 106 kPa
Relative humidity: 15 - 93 %
Following storage or transport at other tempera-
tures leave the lifter in a room with a suitable
temperature until it reaches a safe operating
temperature.
Medical electrical equipment
requires special precautions regard-
ing electromagnetic compatibility
(EMC). Portable or mobile radio
communication equipment may
affect the medical electrical equip-
ment, and should be kept minimum
25 cm (10 inches) from the lifters
electronics.
Battery
Molift Smart 150 is equipped with a 14.4 V 2.6Ah
NiMH battery. The battery has a life expectancy of
approx. 500 charging cycles.
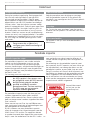
Recharge battery upon receipt, and
then every six months, to avoid
battery failure.
Used batteries must be disposed
of as special waste according to
local rules and regulations. Do not
dispose in general waste
x2
Batteries must be fully charged
and drained completely a couple of
times before it achieves full capac-
ity. Also follow this procedure if
the lifter has not been in use for a
long period (4 weeks or more)
Battery and service indicator (LED)
The lifter has two indicator lights on battery
holder.
Service indicator
Battery indicator
The electrical system has a power save function
which will turn off the electrical system after ten
minutes without activity. All lights will turn off.
The system is activated when pushing one of the
operating buttons
Battery indicator (LED)
The battery indicator (LED) will illuminate and
make a sound when battery level is low and the
lifter requires charging. When this occurs the lifter
will have sufficient power available for one full lift-
ing cycle with max load. When battery is critically
low it is only possible to lower the lifting arm.
Service indicator
Number of lifts performed is calculated and
recorded by the lifters electronics.
After a certain period of operation a signal is given
to indicate that service is required.
Service indicator Mode
No light Power saving (Stand by)
Green Ready for use
Yellow Order service
Red Perform service
Red + sound Perform service
immediately
Service scope
Service involves replacing the lifting motor and
inspection/replacement of worn parts. This must
be carried out by authorized personnel.
Service is needed when the service light is red
(calculated 10.000 lifts in SWL.)
Electronics

12
Molift Smart 150 / www.etac.com
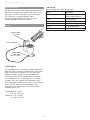
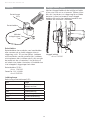
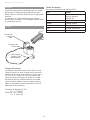
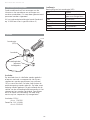
Charging
Battery charger
The battery charger can be used as a tabletop
charger or mounted to a vertical wall surface
close to a power outlet, minimum 120 cm above
the floor. The charger has to be used outside the
patient environment. The Charger must be placed
or installed in a way that makes it easy to discon-
nect mains cable plug. Take care not to damage
the cable. The charger can be connected to the
power outlet at all times.
Battery charger 12-24V
Art. no. 1340100
PowerPac 14,4 V NiMH
Art. no. 0541000
Charger indicator
Description of battery indicator (LED):
LED Mode
Yellow Ready for use, no bat-
tery connected
Yellow blinking Initialization
Red Fast Charge
Green/Yellow Top-off charge
Green Trickle charge
Red/Green Error
Battery
indicator
(LED)
Battery
charger
Mains cable
(disconnecting
device)

13
Molift Smart 150 / www.etac.com
ENNO DEFR ITES FI SVNLDA
Transfer
Plan the lifting operation in advance to ensure that
it is as safe and smooth as possible. Remember
to work ergonomically. Assess the risks and take
notes. The assistant is responsible for the safety of
the user.
Molift Smart 150 has a 4-point suspension for
different types of transfers; sitting, recumbent or
ambulating.
Using slings
It is important that the sling has been tested with
the individual user and for the intended lifting
situation.
Read user manual for the sling
prior to use.
Do not to use damaged or badly
worn slings.
Slings made by other manufacturers
We recommend only using Molift slings. Etac shall
not be liable for faults or accidents that can occur
when using slings made by other manufacturers.
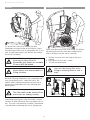
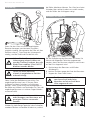
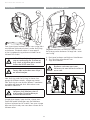
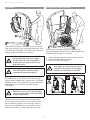
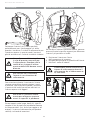
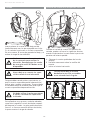
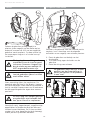
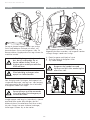
Lifting and lowering
When moving the user, stand to the side of the
person you are lifting. Make sure that arms and
legs do not obstruct the seat, bed, etc. Keep eye
contact with the user to help them feel safe.
The 4-point suspension must always be positioned
across the user, to prevent the user from uninten-
tionally sliding out of the sling.
The suspensions hook design prevents sling to be
inadvertently detached when mounted correct.
1. Check that the sling is correctly fitted around
the user and that the strap loops are correctly
fitted to the suspension hooks.
2. Stretch the sling straps without lifting the
user. Ensure that all four loops of the sling are
securely fastened to avoid the user slipping or
falling.
3. Lift user, and perform transfer.

14
Molift Smart 150 / www.etac.com
Transfer
Try to position the user as low as possible
(preferably resting the feet on the chassis) when
transferring the lifter with a suspended user. In this
way the centre of gravity will be low and reduce
the risk of instability.
Never lift the user higher than
necessary to carry out a lift.
Remember that wheels on a mobile
lift must NOT be locked.
Never leave a user unattended in a
lifting situation.
Be careful during movement, the suspended user
may swing during turns, stops and starts. Be
careful when manoeuvring close to furniture to
prevent the suspended user from colliding with
these objects.
The lifter shall not be used to lift or
move users on sloping surfaces
Avoid deep pile carpets, high thresholds, uneven
surfaces or other obstacles that may block the cas-
tors. The lifter may become unstable if forced over
such obstacles increasing the risk of tipping over.
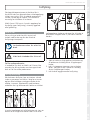
Lowering into sitting
When transferring the user into sitting, the follow-
ing techniques can be used when lowering the
user as far back into the seat as possible:
A Position the user with the help of the push
handle
B Push gently on the user’s knees
C Tilt the seat backwards
User must be facing lifter when
lifting or lowering from or into a
chair.

15
Molift Smart 150 / www.etac.com
ENNO DEFR ITES FI SVNLDA
Accessories
Recommended optional equipment and acces-
sories for Molift Smart 150.
Slings
Etac supplies a wide selection of slings for dif-
ferent types of transfers.
The Molift RgoSling sling series is developed to be
combined with a 4-point suspension but the sling
also works with a 2-point suspension.
See the combination list in the slings user manual
for the correct sling and suspension combination.
The Molift RgoSling sling series is available in sizes
XXS – XXL, in polyester and polyester mesh.
Rgosling Mediumback Padded (XS-XXL)
Rgosling Highback Padded (XS-XXL)
Rgosling Mediumback Net (XXS-XXL)
Rgosling Highback Net (XXS-XXL)
Rgosling Toilet Lowback (XXS-XXL)
Rgosling Toilet Highback (XXS-XXL)
Rgosling Ampu Mediumback (XXS-XXL)
Rgosling Ampu Highback (XXS-XXL)
Rgosling Ambulating Vest
Rgosling Comfort Highback (S-L)
Accessories:
Rgosling Extension Loops
Art. no.: 1721600
Rgosling Ambulating Vest Groin strap (XXS-XL)
Transport/Storage
Travel Suitcase for Molift Smart 150
Art. no. 0990200
This hard shell suitcase provides additional
protection when transporting by
air. It is TSA approved for air travel and
ideal for the client with an active life.
Travel Bag for Molift Smart 150
Art. no. 3049175
The soft shell travel bag has extra large
transport wheels. It protects the lift, and
enables easy transporting.

16
Molift Smart 150 / www.etac.com
Maintenance
Cleaning and disinfection
Clean on a regular basis. Clean surfaces with
a damp cloth using an appropriate pH-neutral
detergent. Do not use solvents or strong liquids,
this may damage surfaces on the lifter. For
disinfection when needed; use isopropyl alcohol.
Avoid abrasive cleaning products. Remove hair
and pile from the castors and verify that the
castors rotates freely. Clean contact and hand
control with isopropyl alcohol to remove grease
and dirt. Check emergency stop and emergency
lowering after cleaning. The lift should not be
exposed to running water.
Make sure not to damage or
remove labels when cleaning.
Reconditioning
Follow cleaning and assembly procedure, complete
periodic inspection and use checklist after assem-
bly to recondition the lifter.
Recycling
Refer to “Recycling instructions” for how to
properly dispose of product. This can be found on
www.etac.com.
Spare parts
A list of spare parts is available on request.
Periodic inspection
Periodic inspection scope
Periodic inspection is a visual examination (particu-
larly of the lifter’s load bearing structure and lifting
mechanism with attachments, brakes, controls,
safety devices and person-support devices) accord-
ing to Periodic inspection report for Molift Smart
150. This can be found on www.etac.com.
If there is any problems with the
lifter that could jeopardize some-
ones safety, the lifter shall imme-
diately be taken out of service and
marked “out of order”. Do not use
the lifter untill it is repaired.
Periodic inspection shall be performed annually or
more frequently if required by local requirements.
The inspection must be performed by service
personnel authorized by Etac.
Contact Etac at molift@etac.com for training and
authorization or recommendation of an approved
service partner.
When performing a periodic inspection, the
inspector shall fill out the inspection report for
Molift Smart 150. The reports should be retained
by the person(s) responsible for servicing the lifter.
If the inspection reveals defects and damages, the
owner shall be notified.
When periodic inspection is completed the
inspector shall mark the lifter with a sticker on
the control label showing the date when periodic
inspection is performed and a label (with 6-digit
ID from Etac or distributor) showing who has
performed the periodic control. The control label
can be found on the right side of the battery
holder, and this will then indicate the date when
next Inspection is due.
Mark label
with month
and year of
inspection

17
Molift Smart 150 / www.etac.com
ENNO DEFR ITES FI SVNLDA
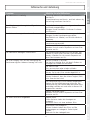
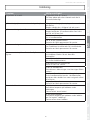
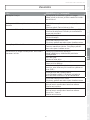
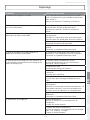
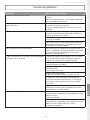
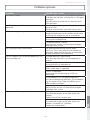
Troubleshooting
Symptom Possible cause / action
The lifting column is wobbly The lifting column is not correctly positioned in
the chassis.
Assemble column and chassis, and lock column by
the locking handle on the chassis.
The lifter moves unevenly on a plane surface The castors move unevenly because of pile and
dust.
Clean the castors. Remove hair and dirt.
The lifting arm moves uncontrolled. Short circuit between hand control and lifter.
Clean hand control plug surfaced with alcohol to
remove grease.
Defective hand control.
Replace hand control.
The control electronics has failed.
Contact local representative for service.
The lifting legs move uncontrolled. The leg opening mechanism has failed. The
product is unsafe to operate . Contact local
representative for service
The lifter does not respond to hand control action
/ The lifting arm does not move. Emergency stop button is activated.
Turn button clockwise to reset emergency stop.
Battery is empty.
Change or charge battery.
The lifters electronics is overheated.
Wait for it to cool down.
The lifter is overloaded.
Make sure the load does not exceed SWL.
Hand control is not plugged in properly.
Plug in Hand control properly. Hand control, plug
or cord can be broken an should be replaced.
Defective control electronics.
Contact local representative for service.
Battery does not charge Faulty battery.
Check indicators on charger when charging.
Try another battery.
Faulty battery charger.
Check indicators on charger when charging. See
chapter “Charging”.
Try another charger.

Etac A/S
Parallelvej 3
DK-8751 Gedved
www.etac.com

Molift Smart 150
DE - Bedienungsanleitung
BM09202 Rev. H 2021-06-08
Gebrauchsanweisung - Deutsch

20
Molift Smart 150 / www.etac.com
Wichtiger Hinweis
Diese Bedienungsanleitung enthält wichtige
Hinweise und Informationen für den sicheren
Gebrauch des Lifters und des Zubehörs.
In dieser Bedienungsanleitung bezeichnet
„Benutzer“ diejenige Person, die gehoben wird.
Der „Helfer“ ist diejenige Person, die den Lifter
bedient.
Warnung!
Dieses Symbol weist auf wichtige
Sicherheitshinweise hin. Befolgen
Sie diese Anweisungen bitte genau.
Lesen Sie vor dem Gebrauch die
Bedienungsanleitung!
Es ist sehr wichtig, dass Sie
vor Inbetriebnahme des
Geräts mit dem Inhalt der
Bedienungsanleitung genau ver-
traut sind.
Besuchen Sie www.etac.com und vergewissern
Sie sich, dass Sie über die neueste Version der
Bedienungsanleitung verfügen.
Deutsche Bedienungsanleitung
Sidan laddas...
Sidan laddas...
Sidan laddas...
Sidan laddas...
Sidan laddas...
Sidan laddas...
Sidan laddas...
Sidan laddas...
Sidan laddas...
Sidan laddas...
Sidan laddas...
Sidan laddas...
Sidan laddas...
Sidan laddas...
Sidan laddas...
Sidan laddas...
Sidan laddas...
Sidan laddas...
Sidan laddas...
Sidan laddas...
Sidan laddas...
Sidan laddas...
Sidan laddas...
Sidan laddas...
Sidan laddas...
Sidan laddas...
Sidan laddas...
Sidan laddas...
Sidan laddas...
Sidan laddas...
Sidan laddas...
Sidan laddas...
Sidan laddas...
Sidan laddas...
Sidan laddas...
Sidan laddas...
Sidan laddas...
Sidan laddas...
Sidan laddas...
Sidan laddas...
Sidan laddas...
Sidan laddas...
Sidan laddas...
Sidan laddas...
Sidan laddas...
Sidan laddas...
Sidan laddas...
Sidan laddas...
Sidan laddas...
Sidan laddas...
Sidan laddas...
Sidan laddas...
Sidan laddas...
Sidan laddas...
Sidan laddas...
Sidan laddas...
Sidan laddas...
Sidan laddas...
Sidan laddas...
Sidan laddas...
Sidan laddas...
Sidan laddas...
Sidan laddas...
Sidan laddas...
Sidan laddas...
Sidan laddas...
Sidan laddas...
Sidan laddas...
Sidan laddas...
Sidan laddas...
Sidan laddas...
Sidan laddas...
Sidan laddas...
Sidan laddas...
Sidan laddas...
Sidan laddas...
Sidan laddas...
Sidan laddas...
Sidan laddas...
Sidan laddas...
Sidan laddas...
Sidan laddas...
Sidan laddas...
Sidan laddas...
Sidan laddas...
Sidan laddas...
Sidan laddas...
Sidan laddas...
Sidan laddas...
Sidan laddas...
Sidan laddas...
Sidan laddas...
Sidan laddas...
Sidan laddas...
Sidan laddas...
Sidan laddas...
Sidan laddas...
Sidan laddas...
Sidan laddas...
Sidan laddas...
Sidan laddas...
Sidan laddas...
Sidan laddas...
Sidan laddas...
Sidan laddas...
Sidan laddas...
Sidan laddas...
Sidan laddas...
Sidan laddas...
Sidan laddas...
Sidan laddas...
Sidan laddas...
Sidan laddas...
Sidan laddas...
Sidan laddas...
Sidan laddas...
Sidan laddas...
Sidan laddas...
Sidan laddas...
Sidan laddas...
Sidan laddas...
Sidan laddas...
Sidan laddas...
Sidan laddas...
Sidan laddas...
Sidan laddas...
Sidan laddas...
Sidan laddas...
Sidan laddas...
Sidan laddas...
Sidan laddas...
Sidan laddas...
Sidan laddas...
Sidan laddas...
Sidan laddas...
Sidan laddas...
Sidan laddas...
Sidan laddas...
Sidan laddas...
Sidan laddas...
Sidan laddas...
Sidan laddas...
Sidan laddas...
Sidan laddas...
-
 1
1
-
 2
2
-
 3
3
-
 4
4
-
 5
5
-
 6
6
-
 7
7
-
 8
8
-
 9
9
-
 10
10
-
 11
11
-
 12
12
-
 13
13
-
 14
14
-
 15
15
-
 16
16
-
 17
17
-
 18
18
-
 19
19
-
 20
20
-
 21
21
-
 22
22
-
 23
23
-
 24
24
-
 25
25
-
 26
26
-
 27
27
-
 28
28
-
 29
29
-
 30
30
-
 31
31
-
 32
32
-
 33
33
-
 34
34
-
 35
35
-
 36
36
-
 37
37
-
 38
38
-
 39
39
-
 40
40
-
 41
41
-
 42
42
-
 43
43
-
 44
44
-
 45
45
-
 46
46
-
 47
47
-
 48
48
-
 49
49
-
 50
50
-
 51
51
-
 52
52
-
 53
53
-
 54
54
-
 55
55
-
 56
56
-
 57
57
-
 58
58
-
 59
59
-
 60
60
-
 61
61
-
 62
62
-
 63
63
-
 64
64
-
 65
65
-
 66
66
-
 67
67
-
 68
68
-
 69
69
-
 70
70
-
 71
71
-
 72
72
-
 73
73
-
 74
74
-
 75
75
-
 76
76
-
 77
77
-
 78
78
-
 79
79
-
 80
80
-
 81
81
-
 82
82
-
 83
83
-
 84
84
-
 85
85
-
 86
86
-
 87
87
-
 88
88
-
 89
89
-
 90
90
-
 91
91
-
 92
92
-
 93
93
-
 94
94
-
 95
95
-
 96
96
-
 97
97
-
 98
98
-
 99
99
-
 100
100
-
 101
101
-
 102
102
-
 103
103
-
 104
104
-
 105
105
-
 106
106
-
 107
107
-
 108
108
-
 109
109
-
 110
110
-
 111
111
-
 112
112
-
 113
113
-
 114
114
-
 115
115
-
 116
116
-
 117
117
-
 118
118
-
 119
119
-
 120
120
-
 121
121
-
 122
122
-
 123
123
-
 124
124
-
 125
125
-
 126
126
-
 127
127
-
 128
128
-
 129
129
-
 130
130
-
 131
131
-
 132
132
-
 133
133
-
 134
134
-
 135
135
-
 136
136
-
 137
137
-
 138
138
-
 139
139
-
 140
140
-
 141
141
-
 142
142
-
 143
143
-
 144
144
-
 145
145
-
 146
146
-
 147
147
-
 148
148
-
 149
149
-
 150
150
-
 151
151
-
 152
152
-
 153
153
-
 154
154
-
 155
155
-
 156
156
-
 157
157
-
 158
158
-
 159
159
-
 160
160
-
 161
161
-
 162
162
-
 163
163
-
 164
164


på andra språk
- italiano: Molift 150 Smart Manuale utente
- eesti: Molift 150 Smart Kasutusjuhend
- español: Molift 150 Smart Manual de usuario
- Deutsch: Molift 150 Smart Benutzerhandbuch
- français: Molift 150 Smart Manuel utilisateur
- dansk: Molift 150 Smart Brugermanual
- Nederlands: Molift 150 Smart Handleiding