Jack HR6071,6070


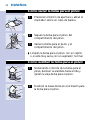
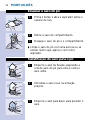
Important
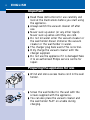
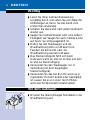
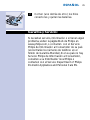
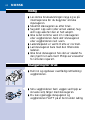
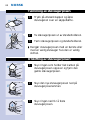
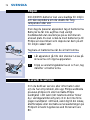
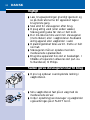
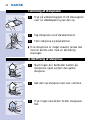
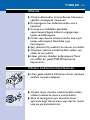
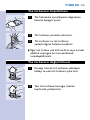
◗ Read these instructions for use carefully and
look at the illustrations before you start using
the appliance.
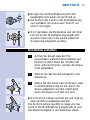
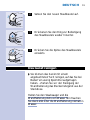
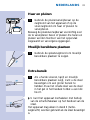
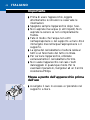
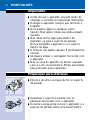
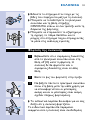
◗ Always switch the vacuum cleaner off after
use.
◗ Never suck up water (or any other liquid).
Never suck up ashes until they are cold.
◗ Do not let water enter the vacuum cleaner or
the wall holder.Never immerse the vacuum
cleaner or the wall holder in water.
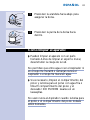
◗ The charger plug feels warm.This is normal.
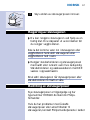
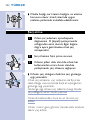
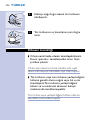
◗ Only charge the vacuum cleaner with the
charger supplied.
◗ Do not use the appliance if it is damaged.Take
it to an authorised Philips service centre for
repair.
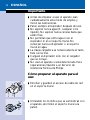
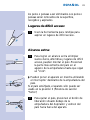
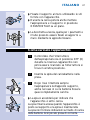
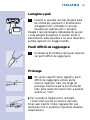
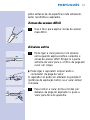
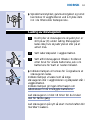
Preparing the appliance for use
C
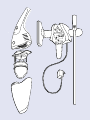
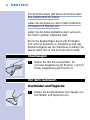
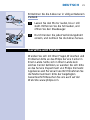
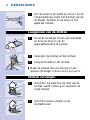
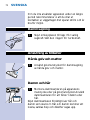
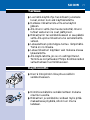
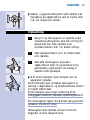
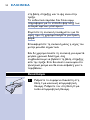
◗ Wind and store excess mains cord in the wall
holder.
C
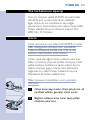
◗ Screw the wall holder to the wall with the
screws supplied with the appliance.
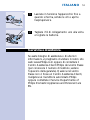
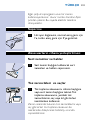
◗ You can also place the vacuum cleaner and
the wall holder FLAT on a table during
charging.
ENGLISH6

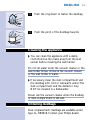
C
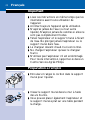
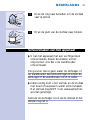
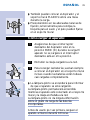
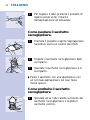
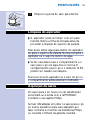
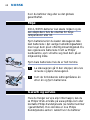
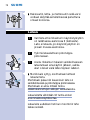
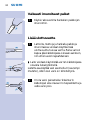
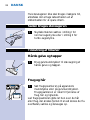
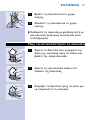
◗ The crevice tool,floor nozzle and the stick
can be attached to the wall holder by pushing
them into the appropriate fastening slots.
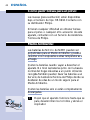
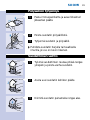
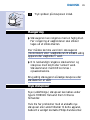
Charging the appliance
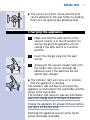
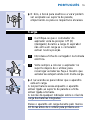
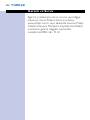
1 Make sure that the slide switch of the
vacuum cleaner is in the off position (0)
during charging.The appliance will not
charge if the slide switch is in another
position.
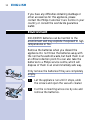
2 Insert the charger plug into the wall
socket.
C
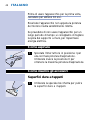
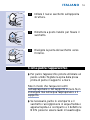
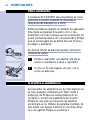
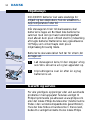
3 Always put the vacuum cleaner back onto
the holder after use to recharge the
batteries,even if the batteries are still
almost fully charged.
C
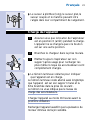
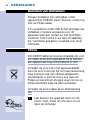
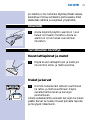
◗ The indicator light will come on to indicate
that the appliance is charging.
The indicator light will stay on as long as the
appliance is connected to the wall holder and the
plug is in the wall socket.
The indicator light does not give any information
about the charge level of the built-in batteries.
Charge the appliance for at least 16 hours before
you use it for the first time.
Recharge the appliance as soon as the motor
power decreases noticeably.
ENGLISH 7

If you are not going to use the appliance for a
longer period of time,we advise you to remove
the charger plug from the wall socket to save
energy.
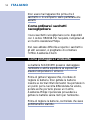
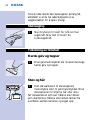
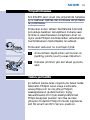
Vacuum cleaning
C
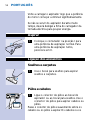
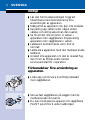
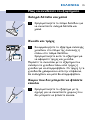
1 Set the slide switch to position I for
normal suction power.Set it to position II
for turbo suction power.
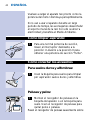
Connecting accessories
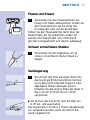
Hard floors and carpets
C
1 Use the floor nozzle for vacuum cleaning
hard floors and carpets.
Fluff and hair
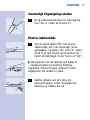
C
1 Assemble the fluff collector onto the
nozzle of the appliance or onto the floor
nozzle.Use the fluff collector to remove
hair or fluff.
Pass the fluff collector gently over the hairs or fluff
to be removed.The hairs or fluff will be worked
loose from the surface,collected and then sucked
up.
ENGLISH8

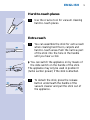
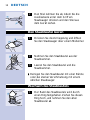
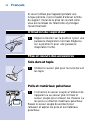
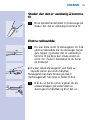
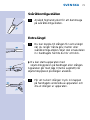
Hard-to-reach places
C
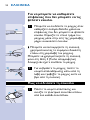
1 Use the crevice tool for vacuum cleaning
hard-to-reach places.
Extra reach
C
1 You can assemble the stick for extra reach
when cleaning hard floors,carpets and
hard-to-reach areas.Push the narrow part
of the stick into the hole in the handle
until you hear a click.
C
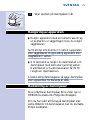
◗ You can switch the appliance on by means of
the slide switch on the handle of the stick.
The appliance may only be used in position II
(turbo suction power) if the stick is attached.
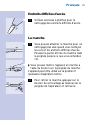
C
2 To detach the stick,press the release
button underneath the handle of the
vacuum cleaner and pull the stick out of
the appliance.
ENGLISH 9

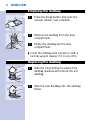
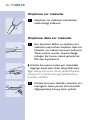
Emptying the dustbag
C
1 Press the break button and open the
vacuum cleaner over a dustbin.
C
2 Remove the dustbag from the dust
compartment.
3 Empty the dustbag and the dust
compartment.
◗ Clean the dustbag with a brush or with a
normal vacuum cleaner if it is very dirty.
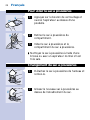
Replacing the dustbag
C
1 Slide the ring holding the edge of the
dustbag upwards and remove the old
dustbag.
C
2 Slide the new dustbag onto the dustbag
frame.
ENGLISH10

C
3 Push the ring down to fasten the dustbag.
C
4 Push the point of the dustbag inwards.
Cleaning the appliance
◗ You can clean the appliance with a damp
cloth.Remove the mains plug from the wall
socket before cleaning the wall holder.
Do not let water enter the vacuum cleaner or the
wall holder. Never immerse the vacuum cleaner
or the wall holder in water.
◗ If necessary,clean the dust compartment and
the dustbag with cold or lukewarm water.The
dust compartment and the deflector may
NOT be cleaned in a dishwasher.
Never use the vacuum cleaner when the dustbag
or dust compartment is still wet.
Ordering dustbags
New (replacement) dustbags are available under
type no.HR6918.Contact your Philips dealer.
ENGLISH 11

If you have any difficulties obtaining dustbags or
other accessories for this appliance,please
contact the Philips Customer Care Centre in your
country or consult the worldwide guarantee
leaflet.
Environment
NiCd/NiMH batteries can be harmful to the
environment and may explode if exposed to high
temperatures or fire.
Remove the batteries when you discard the
appliance.Do not throw the batteries away with
the normal household waste,but hand them in at
an official collection point.You can also take the
batteries to a Philips service centre,which will
dispose of them in an environmentally safe way.
Only remove the batteries if they are completely
empty.
C
1 Let the appliance run until it stops,undo
the screws and open the vacuum cleaner.
C
2 Cut the connecting wires one by one and
remove the batteries.
ENGLISH12

Guarantee & service
If you need information or if you have a problem,
please visit the Philips Web site at
www.philips.com or contact the Philips Customer
Care Centre in your country (you will find its
phone number in the worldwide guarantee
leaflet).If there is no Customer Care Centre in
your country,turn to your local Philips dealer or
contact the Service Department of Philips
Domestic Appliances and Personal Care BV.
ENGLISH 13

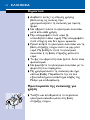
Wichtig
◗ Lesen Sie diese Gebrauchsanweisung
sorgfältig durch,und sehen Sie sich dabei die
Abbildungen an,bevor Sie das Gerät zum
ersten Mal verwenden.
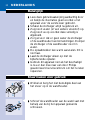
◗ Schalten Sie das Gerät nach jedem Gebrauch
wieder aus.
◗ Saugen Sie niemals Wasser oder eine andere
Flüssigkeit auf.Saugen Sie auch niemals Asche
auf,bevor sie völlig ausgekühlt ist.
◗ Halten Sie den Staubsauger und die
Wandhalterung stets von Wasser fern.
Tauchen Sie das Gerät oder die
Wandhalterung niemals in Wasser.
◗ Das Steckernetzgerät fühlt sich beim
Gebrauch warm an.Das ist normal und kein
Grund zur Beunruhigung.
◗ Verwenden Sie den Staubsauger nur in
Verbindung mit dem beigefügten
Steckernetzgerät.
◗ Verwenden Sie das Gerät nicht,wenn es in
irgendeiner Hinsicht defekt oder beschädigt
ist.Lassen Sie es von einer durch Philips
autorisierten Werkstatt instand setzen.
Vor dem Gebrauch
C
◗ Wickeln Sie überschüssiges Netzkabel in der
Wandhalterung auf.
DEUTSCH14

C
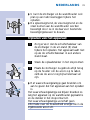
◗ Bringen Sie die Wandhalterung mit den
beigefügten Schrauben an der Wand an.
◗ Sie können das Gerät in der Wandhalterung
zum Aufladen der Akkus auch FLACH auf
einen Tisch legen.
C
◗ Die Fugendüse,die Bodendüse und der Stiel
können an der Wandhalterung angebracht
werden,indem Sie in die jeweils passende
Aussparung eingesetzt werden.
Die Akkus aufladen
1 Achten Sie darauf,dass der Ein-
/Ausschalter während des Aufladens auf
Position 0 steht.Steht der Schalter auf
einer anderen Position,werden die Akkus
nicht aufgeladen.
2 Stecken Sie das Steckernetzgerät in die
Steckdose.
C
3 Setzen Sie das Gerät nach Gebrauch stets
in die Wandhalterung zurück,damit die
Akkus aufgeladen werden,selbst dann,
wenn die Akkus noch fast voll sind.
C
◗ Die Kontroll-Lampe leuchtet auf und zeigt an,
dass die Akkus aufgeladen werden.
Die Kontroll-Lampe leuchtet so lange,wie das
Gerät in der Wandhalterung angebracht ist und
das Steckernetzgerät in der Steckdose steckt.
DEUTSCH 15

Die Kontroll-Lampe gibt keine Information über
den Ladezustand der Akkus.
Laden Sie die Akkus vor dem ersten Gebrauch
mindestens 16 Stunden auf.
Laden Sie die Akkus spätestens dann auf,wenn
der Motor spürbar schwächer läuft.
Wenn Sie beabsichtigen,das Gerät für längere
Zeit nicht zu benutzen,so empfiehlt es sich,das
Steckernetzgerät aus der Steckdose zu ziehen. Sie
sparen damit Strom und schonen die Umwelt.
Staubsaugen
C
1 Stellen Sie den Ein-/Ausschalter für
normale Saugleistung auf Position I und für
Turbo-Saugleistung auf Position II.
Vor dem Gebrauch
Hartböden und Teppiche
C
1 Setzen Sie die Bodendüse zum Saugen von
Hartböden und Teppichen ein.
DEUTSCH16

Flusen und Haare
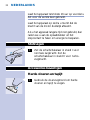
C
1 Verwenden Sie den Flusensammler,um
Flusen und Haare aufzunehmen.Setzen Sie
den Flusensammler auf die Düse des
Grundgeräts oder auf die Bodendüse.
Führen Sie den Flusensammler leicht über die
Flusen/Haare,die Sie aufnehmen wollen.So
werden die Flusen/Haare vom Untergrund
gelockert,eingesammelt und danach aufgesaugt
Schwer erreichbare Stellen
C
1 Verwenden Sie die Fugendüse,um an
schwer erreichbaren Stellen Staub zu
saugen.
Verlängerung
C
1 Sie können den Stiel einsetzen,damit Sie
das Gerät auf Entfernung führen können;
sei es dass Sie Hartböden,Teppiche oder
abgelegene Stellen absaugen wollen.
Schieben Sie das engere Ende des Stiels in
das Loch am Griff,bis Sie ein "Klick"
vernehmen.
C
◗ Sie können das Gerät mit dem Schalter am
Griff ein- und ausschalten.
Das Gerät kann in Position II (Turbo-Saugleistung)
nur verwendet werden,wenn der Stiel in das
Gerät eingesetzt ist.
DEUTSCH 17

C
2 Den Stiel nehmen Sie ab,indem Sie die
Auslösetaste unter dem Griff am
Staubsauger drücken und den Stiel aus
dem Gerät ziehen.
Den Staubbeutel leeren
C
1 Drücken Sie die Verriegelung,und öffnen
Sie den Staubsauger über einem Mülleimer.
C
2 Nehmen Sie den Staubbeutel aus der
Staubkammer.
3 Leeren Sie den Staubbeutel und die
Staubkammer.
◗ Reinigen Sie den Staubbeutel mit einer Bürste
oder,bei starker Verschmutzung,mit einem
üblichen Staubsauger.
Wechseln des Staubbeutels
C
1 Der Rand des Staubbeutels wird durch
einen Ring festgehalten.Ziehen Sie diesen
Ring hoch,und nehmen Sie den alten
Staubbeutel ab.
DEUTSCH18

C
2 Setzen Sie den neuen Staubbeutel auf.
C
3 Drückenen Sie den Ring zur Befestigung
des Staubbeutels wieder hinunter.
C
4 Drücken Sie die Spitze des Staubbeutels
einwärts.
Das Gerät reinigen
◗ Sie können das Gerät mit einem
angefeuchteten Tuch reinigen,auf das Sie bei
Bedarf ein wenig Spülmittel aufgetragen
haben.- Ziehen Sie vor der Reinigung der
Wandhalterung das Steckernetzgerät aus der
Steckdose.
Halten Sie den Staubsauger und die
Wandhalterung stets von Wasser fern.Tauchen
Sie das Gerät oder die Wandhalterung niemals in
Wasser.
DEUTSCH 19

◗ Reinigen Sie bei Bedarf die Staubkammer und
den Staubbeutel mit kaltem oder lauwarmem
Wasser.Die Staubkammer und der
Staubbeutel dürfen NICHT im Geschirrspüler
gereinigt werden.
Verwenden Sie den Staubsauger niemals,solange
der Staubbeutel und/oder die Staubkammer noch
nass oder feucht sind.
Staubbeutel nachbestellen
Neue Staubbeutel erhalten Sie bei Ihrem Philips
Händler unter der Type HR 6918.
Sollten passende Staubbeutel oder andere
Zusatzteile beim örtlichen Handel nicht erhältlich
sein,so wenden Sie sich bitte an das Philip Service
Center in Ihrem Lande oder schlagen Sie in der
Gerantieschrift nach.
Umweltschutz
Akkus enthalten Substanzen,welche die Umwelt
gefährden können.
Sie sind als Verbraucher gesetzlich dazu
verpflichtet,leere Batterien und Akkus der
Wiederverwertung zuzuführen. Sie können das
Gerät dem Philips Service Center zustellen.Wir
kümmern uns dann um eine ordnungsgemäße
Entsorgung. - Wenn Sie die Akkus selbst
entnehmen wollen,so gehen Sie bitte wie folgt
vor:
DEUTSCH20
Sidan laddas...
Sidan laddas...
Sidan laddas...
Sidan laddas...
Sidan laddas...
Sidan laddas...
Sidan laddas...
Sidan laddas...
Sidan laddas...
Sidan laddas...
Sidan laddas...
Sidan laddas...
Sidan laddas...
Sidan laddas...
Sidan laddas...
Sidan laddas...
Sidan laddas...
Sidan laddas...
Sidan laddas...
Sidan laddas...
Sidan laddas...
Sidan laddas...
Sidan laddas...
Sidan laddas...
Sidan laddas...
Sidan laddas...
Sidan laddas...
Sidan laddas...
Sidan laddas...
Sidan laddas...
Sidan laddas...
Sidan laddas...
Sidan laddas...
Sidan laddas...
Sidan laddas...
Sidan laddas...
Sidan laddas...
Sidan laddas...
Sidan laddas...
Sidan laddas...
Sidan laddas...
Sidan laddas...
Sidan laddas...
Sidan laddas...
Sidan laddas...
Sidan laddas...
Sidan laddas...
Sidan laddas...
Sidan laddas...
Sidan laddas...
Sidan laddas...
Sidan laddas...
Sidan laddas...
Sidan laddas...
Sidan laddas...
Sidan laddas...
Sidan laddas...
Sidan laddas...
Sidan laddas...
Sidan laddas...
Sidan laddas...
Sidan laddas...
Sidan laddas...
Sidan laddas...
Sidan laddas...
Sidan laddas...
Sidan laddas...
Sidan laddas...
Sidan laddas...
Sidan laddas...
Sidan laddas...
Sidan laddas...
Sidan laddas...
Sidan laddas...
Sidan laddas...
Sidan laddas...
Sidan laddas...
Sidan laddas...
Sidan laddas...
Sidan laddas...
Sidan laddas...
Sidan laddas...
Sidan laddas...
Sidan laddas...
Sidan laddas...
Sidan laddas...
Sidan laddas...
Sidan laddas...
Sidan laddas...
Sidan laddas...
-
 1
1
-
 2
2
-
 3
3
-
 4
4
-
 5
5
-
 6
6
-
 7
7
-
 8
8
-
 9
9
-
 10
10
-
 11
11
-
 12
12
-
 13
13
-
 14
14
-
 15
15
-
 16
16
-
 17
17
-
 18
18
-
 19
19
-
 20
20
-
 21
21
-
 22
22
-
 23
23
-
 24
24
-
 25
25
-
 26
26
-
 27
27
-
 28
28
-
 29
29
-
 30
30
-
 31
31
-
 32
32
-
 33
33
-
 34
34
-
 35
35
-
 36
36
-
 37
37
-
 38
38
-
 39
39
-
 40
40
-
 41
41
-
 42
42
-
 43
43
-
 44
44
-
 45
45
-
 46
46
-
 47
47
-
 48
48
-
 49
49
-
 50
50
-
 51
51
-
 52
52
-
 53
53
-
 54
54
-
 55
55
-
 56
56
-
 57
57
-
 58
58
-
 59
59
-
 60
60
-
 61
61
-
 62
62
-
 63
63
-
 64
64
-
 65
65
-
 66
66
-
 67
67
-
 68
68
-
 69
69
-
 70
70
-
 71
71
-
 72
72
-
 73
73
-
 74
74
-
 75
75
-
 76
76
-
 77
77
-
 78
78
-
 79
79
-
 80
80
-
 81
81
-
 82
82
-
 83
83
-
 84
84
-
 85
85
-
 86
86
-
 87
87
-
 88
88
-
 89
89
-
 90
90
-
 91
91
-
 92
92
-
 93
93
-
 94
94
-
 95
95
-
 96
96
-
 97
97
-
 98
98
-
 99
99
-
 100
100
-
 101
101
-
 102
102
-
 103
103
-
 104
104
-
 105
105
-
 106
106
-
 107
107
-
 108
108
-
 109
109
-
 110
110


Philips hr 6070 jack Användarmanual
- Typ
- Användarmanual
- Denna manual är också lämplig för
på andra språk
- italiano: Philips hr 6070 jack Manuale utente
- español: Philips hr 6070 jack Manual de usuario
- Deutsch: Philips hr 6070 jack Benutzerhandbuch
- português: Philips hr 6070 jack Manual do usuário
- français: Philips hr 6070 jack Manuel utilisateur
- Türkçe: Philips hr 6070 jack Kullanım kılavuzu
- English: Philips hr 6070 jack User manual
- dansk: Philips hr 6070 jack Brugermanual
- suomi: Philips hr 6070 jack Ohjekirja
- Nederlands: Philips hr 6070 jack Handleiding
Relaterade papper
-
Philips Daisy Deluxe FC6065 Bruksanvisning
-
-
Philips FC6092 Användarmanual
-
-
-
Philips FC6051/01 Användarmanual
-
Philips FC8246 Användarmanual
-
Philips FC8390/01 Användarmanual
-
-