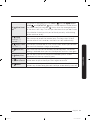
Samsung DV70M5020KW Bruksanvisning
- Kategori
- Torktumlare
- Typ
- Bruksanvisning
Denna manual är också lämplig för

Heat Pump Dryer
User manual
DV9*M52****/DV8*M52****/DV7*M52****/DV9*M50****/
DV8*M50****/DV7*M50****
Untitled-2 1 2017-10-12 12:41:04
Sidan laddas...


English4
Safety information
Congratulations on your new Samsung dryer. This manual contains important information
on the installation, use, and care of your appliance. Please take the time to read this
manual to take full advantage of your dryer’s many benets and features.
What you need to know about the safety instructions
Warnings and Important Safety Instructions in this manual do not cover all possible
conditions and situations that may occur. It is your responsibility to use common sense,
caution, and care when installing, maintaining, or operating your dryer.
Always contact your manufacturer about problems or conditions you do not understand.
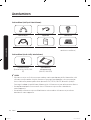
Important safety symbols
What the icons and signs in this user manual mean:
WARNING
Hazards or unsafe practices that may result in severe personal injury, death and/or
property damage.
CAUTION
Hazards or unsafe practices that may result in personal injury and/or property damage.
NOTE
Indicates that a risk of personal injury or material damage exists.
Read the instructions
These warning signs are here to prevent injury to yourself and others.
Please follow them explicitly.
After reading this manual, store it in a safe place for future reference.
Read all instructions before using the appliance.
As with any equipment that uses electricity and moving parts, potential hazards exist.
To safely operate this appliance, familiarize yourself with its operation and exercise care
when using it.
WARNING - Risk of Fire
• Clothes dryer installation must be performed by a qualied technician.
• Install the clothes dryer according to the manufacturer’s instructions and local codes.
• To reduce the risk of severe injury or death, follow all installation instructions.
Safety information
Untitled-2 4 2017-10-12 12:41:04
Sidan laddas...
Sidan laddas...
Sidan laddas...
Sidan laddas...
Sidan laddas...
Sidan laddas...
Sidan laddas...
Sidan laddas...
Sidan laddas...

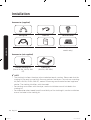
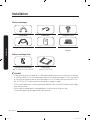
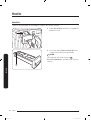
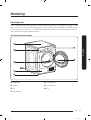
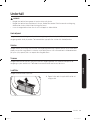
Installation
English14
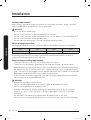
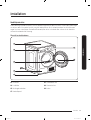
Installation
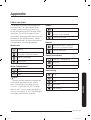
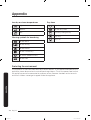
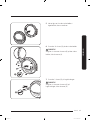
Accessories (supplied)
Hose guide Cable tie Hose connector
Long drain hose (2 m) User manual Rack Dry (applicable
models only)
Accessories (not supplied)
Bracket-Stacking kit
(Part # SK-DH; SK-DA; SKK-
DF)
Stacking kit
(SKK-DD, SKK-DDX)
NOTE
• The stacking kit allows the dryer to be stacked on top of a washer. Please note that the
stacking kit can only be used with Samsung washers and dryers. To purchase a stacking
kit (Part # SK-DH; SK-DA; SKK-DF), contact a Samsung service center or local appliance
retailer. The stacking kit differs with the model.
• For stacking instructions with the dryer, see the installation manual included in the
stacking kit.
• For information about model-specic availability of the stacking kit, see the installation
manual included in the stacking kit.
Untitled-2 14 2017-10-12 12:41:06

English 15
Installation
Installation requirements
NOTE
This dryer must be installed by a qualied installer. If service is required due to poor or
faulty installation, it is considered the owner’s responsibility and may void the warranty.
Keep these instructions for future reference.
WARNING
• Do not plug the power cord into a wall outlet before the dryer is completely installed.
• Have two or more persons help move the dryer.
• Do not let children or pets play in, on, or around the dryer. Proper supervision is
necessary at all times.
• Keep all packaging materials away from children.
• Do not replace a damaged power cord or power plug yourself. Have Samsung or a
qualied service technician replace a damaged power cord or power plug.
• Do not attempt to repair, disassemble, or modify the dryer. For any repairs, contact the
nearest Samsung service center.
• Remove the door/lids from all discarded appliances to avoid children from suffocating.
• If the dryer generates a strange noise, burning smells, or smoke, unplug the power plug
immediately and contact the nearest Samsung service center.
• Do not unplug the dryer while it is operating.
• Do not place ammable objects near the dryer.
Untitled-2 15 2017-10-12 12:41:06
Sidan laddas...
Sidan laddas...
Sidan laddas...
Sidan laddas...
Sidan laddas...

English 21
Installation
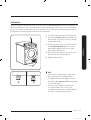
Installation checklist
• The dryer is plugged into a properly grounded outlet.
• All packaging material is completely removed and properly disposed.
• The dryer is level and standing rmly on the oor.
• Start the dryer to make sure that it runs, heats, and shuts off.
• Run a TIME DRY
cycle for 20 minutes to see if the HC information code is displayed.
If this is the case, contact a local service center.
• After installation, we recommend that you wait at least 1 hour before using the dryer.
Before using the dryer
• Make sure no accessory remains inside the drum.
• Plug in the power cord just before operating the dryer.
• Do not block the air inlet hole of the cooling grill at the front of the dryer.
• Do not place inammable objects near the dryer and keep the surroundings clean.
• Keep the dryer level with the ground.
• Do not remove the adjustable levelling legs of the dryer. They are necessary to keep
the dryer level with the ground.
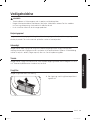
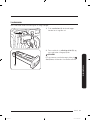
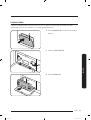
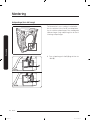
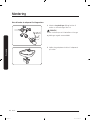
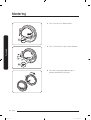
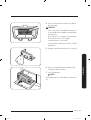
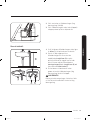
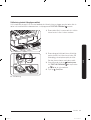
Door reversal
You might want to reverse the direction of the door, depending on your site conditions or
to your needs.
WARNING
Make sure door reversal is performed by a qualied technician.
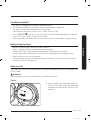
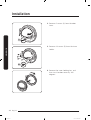
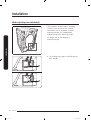
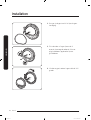
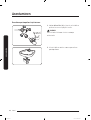
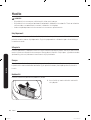
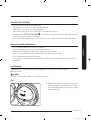
Type 1
1. Open the door, and then loosen the two
screws on the door hinge. While holding
the door with both hands, slightly lift to
remove it.
Untitled-2 21 2017-10-12 12:41:07
Sidan laddas...

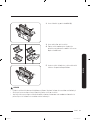
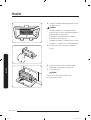
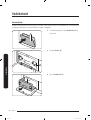
English 23
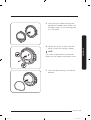
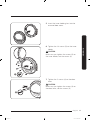
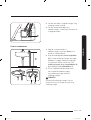
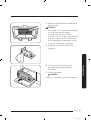
Installation
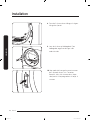
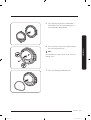
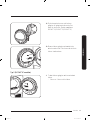
5. Insert the glass holder into the new
position of the door cover. Make sure
the door hinge is in the same position
as in the gure.
6. Tighten the upper 3 screws and the
lower 3 screws on the glass holder.
NOTE
The screw shapes differ by dimension.
Make sure you tighten the correct screw.
7. Insert the door sealing in the correct
position.
Untitled-2 23 2017-10-12 12:41:08
Sidan laddas...
Sidan laddas...
Sidan laddas...
Sidan laddas...
Sidan laddas...

English 29
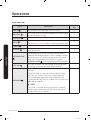
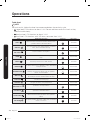
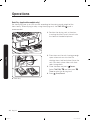
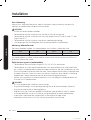
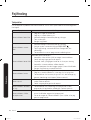
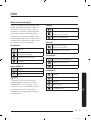
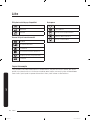
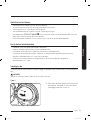
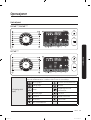
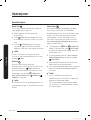
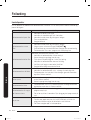
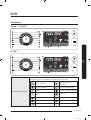
Operations
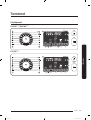
Control panel
DV9*M5*****/DV8*M5*****
01
02
11
12
03
04
05 06 07
09
10
DV7*M5*****
01
02
11
12
03
04
05 06 08
09
10
Operations
Untitled-2 29 2017-10-12 12:41:10

Operations
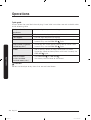
English30
Operations
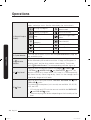
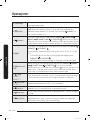
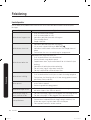
01 Digital Graphic
Display
Displays all cycle information, including cycle time, information
codes, and dryer status. See the table below for status details.
Drying in progress
Child Lock activated/
deactivated
Cooling in progress Wrinkle Prevent
Stop
Heat-exchanger clean
alarm
Wrinkle Prevent in
progress
Sound on/off
Check lter Mixed Load Bell
Delay End Smart Check
Empty the water tank
02 Cycle Selector
Turn the dial to select a cycle. See the Cycle overview on page 32
for available cycles.
03
Wrinkle
Prevent
Adds approximately 2 hours of intermittent tumbling at the end
of the selected cycle to reduce wrinkles. A large circle appears in
display panel, and the drum rotates intermittently. To activate,
press
Wrinkle Prevent. The corresponding indicator lights up.
04
Dry Level
Press to select the dryness level in the SHIRTS
, TOWELS
, COTTON , MIXED LOAD , and SYNTHETICS cycles. The
dryness can be set in three levels (1-3). Level 1 is used to partially
dry items that lay at or hang to dry. Level 3 is the strongest and is
used to dry larger or bulk loads.
05
Time
Press to adjust the cycle time for TIME DRY
, WARM AIR , and
COOL AIR
cycles.
The following time options (unit: minute) are available: 30, 60, 90,
120, and 150.
• 120 minutes and 150 minutes are not available for WARM AIR
and COOL AIR cycles.
• The exact drying time differs depending on the humidity of the
load.
Untitled-2 30 2017-10-12 12:41:13
Sidan laddas...
Sidan laddas...
Sidan laddas...
Sidan laddas...

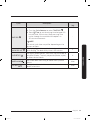
English 35
Operations
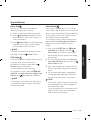
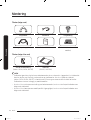
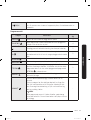
Getting started
Simple steps to start
1. Press Power to turn the dryer on.
2. Load the dryer and close the door.
3. Turn the Cycle Selector to select a cycle.
4. Change the cycle settings (
Dry Level, and Time) as necessary.
5. Select necessary settings and options to your preference. (
Wrinkle Prevent,
Lamp,
Mixed Load Bell, and/or Delay End).
6. Press
Start/Pause. The dryer indicator lights up, and the estimated cycle time
appears on the display.
NOTE
The number of available settings and options differs with the cycle.
To change the cycle during operation
1. Press
Start/Pause to stop operation.
2. Select a different cycle.
3. Press and hold
Start/Pause to start new cycle.
Sorting and loading
• Put only one wash load in the dryer at a time.
• Avoid mixing heavy and lightweight items together.
• To increase drying efciency when drying one or two items, add a dry towel to the
load.
• For best results, untangle items before inserting into the dryer.
• Overloading restricts the tumbling process, resulting in uneven drying and wrinkling.
• Unless recommended on the care label, avoid drying woolens or berglass items.
• Avoid drying unwashed items.
• Do not dry items soiled with oil, alcohol, gasoline, etc.
Untitled-2 35 2017-10-12 12:41:15
Sidan laddas...
Sidan laddas...
Sidan laddas...
Sidan laddas...
Sidan laddas...
Sidan laddas...
Sidan laddas...
Sidan laddas...
Sidan laddas...
Sidan laddas...
Sidan laddas...
Sidan laddas...

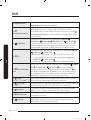
Appendix
English48
Appendix
Iron dry or steam temperatures
High
Medium
Low
Warning symbols for laundering
Do Not Wash
Do Not Wring
Do Not Bleach
Do Not Tumble Dry
No Steam (added to iron)
Do Not Iron
Dry-clean
Dry-clean
Do Not dry-clean
Line Dry/ Hang to Dry
Drip Dry
Dry Flat
Protecting the environment
This appliance is manufactured from recyclable materials. If you decide to dispose of this
appliance, please observe local waste disposal regulations. Cut off the power cord so that
the appliance cannot be connected to a power source. Remove the door so that animals
and small children cannot get trapped inside the appliance.
Untitled-2 48 2017-10-12 12:41:22
Sidan laddas...

Appendix
English50
Appendix
DV9*M50****, DV8*M50****, DV7*M50****
TYPE FRONT LOADING DRYER
DIMENSIONS
A 600 mm
B 850 mm
C 600 mm
D 640 mm
E 1095 mm
WEIGHT 50 kg
ELECTRICAL REQUIREMENTS
220–240 V /
50 Hz
750-850 W
ALLOWABLE TEMPERATURE 5-35 °C
Untitled-2 50 2017-10-12 12:41:22

English 51
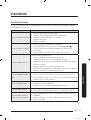
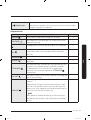
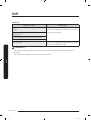
Appendix
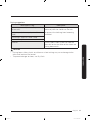
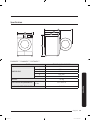
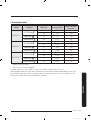
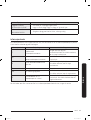
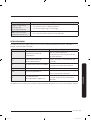
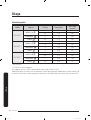
Consumption data
Model Program Load (kg)* Energy (kWh)
Max. Duration
(Minutes)
DV9*M52****
COTTON
**
9 1.56 188
4.5 0.9 130
IRON DRY
**
9 1.1 130
SYNTHETICS
4.5 0.71 86
DV8*M52****
COTTON
**
8 1.43 169
4 0.8 120
IRON DRY
**
8 1.02 118
SYNTHETICS
4 0.65 80
DV7*M52****
COTTON
**
7 1.26 148
3.5 0.73 110
IRON DRY
**
7 0.94 108
SYNTHETICS
3.5 0.61 75
* : Weight of dry laundry
** : EN 61121:2013 test program
All data without a “star” against it was calculated using EN 61121:2013
Consumption data can vary from the nominal values given above depending in the size
of the load, types of textiles, residual moisture levels after spinning, uctuations in the
electricity supply and any extra options selected.
Untitled-2 51 2017-10-12 12:41:22

Appendix
English52
Appendix
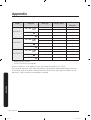
Model Program Load (kg)* Energy (kWh)
Max. Duration
(Minutes)
DV9*M50****
COTTON
**
9 2.20 190
4.5 1.12 130
IRON DRY
**
9 1.70 155
SYNTHETICS
4.5 0.85 78
DV8*M50****
COTTON
**
8 1.87 170
4 1.10 125
IRON DRY
**
8 1.54 140
SYNTHETICS
4 0.78 72
DV7*M50****
COTTON
**
7 1.67 150
3.5 1.00 120
IRON DRY
**
7 1.43 130
SYNTHETICS
3.5 0.67 68
* : Weight of dry laundry
** : EN 61121:2013 test program
All data without a “star” against it was calculated using EN 61121:2013
Consumption data can vary from the nominal values given above depending in the size
of the load, types of textiles, residual moisture levels after spinning, uctuations in the
electricity supply and any extra options selected.
Untitled-2 52 2017-10-12 12:41:22

English 53
Appendix
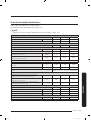
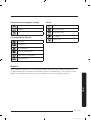
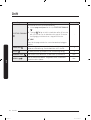
Sheet of household tumble driers
Data sheet for Domestic Tumble Driers
As detailed in EU regulation No. 392/2012
NOTE
“*” Asterisk(s) means variant model and can be varied (0-9) or (A-Z).
Samsung
Model Name DV7*M52**** DV8*M52**** DV9*M52****
Capacity kg 7 8 9
Type Condenser Condenser Condenser
Energy Efciency
A+++ (highest efciency) to D (least efcient) A+++ A+++ A+++
Energy Consumption
Annual Energy Consumption (AE_C)
1)
kWh/yr 158 176 194
Automatic dryness detector Yes Yes Yes
Energy consumption (E_dry) standard cotton
programme at full load
kWh 1.26 1.43 1.56
Energy consumption (E_dry.1/2) standard cotton
programme at partial load
kWh 0.73 0.80 0.90
off mode and left-on mode
The power consumption off-mode (P_o) at full load W 0.50 0.50 0.50
The power consumption in left-on mode (P_l) at
full load
W 5.00 5.00 5.00
Duration of the left-on mode min 10 10 10
Programme to which the information on the label and the Sheet
relate
2)
Cotton + Dry Level 2 (Wrinkle Prevent off)
programme duration of the standard program
Weighted Programme time standard cotton
programme at full load and partial load
min 126 141 155
Programme Time (T_dry) standard cotton
programme at full load
min 148 169 188
Programme Time (T_dry.1/2) standard cotton
programme with partial load
min 110 120 130
condensation efciency class
A (most efcient) to G (least efcient) B B B
Average condensation efciency at full load % 81 81 81
Average condensation efciency at partial load % 81 81 81
Weighted condensation efciency % 81 81 81
Airborne noise emissions
Dry at full load dB (A) re 1 pW 65 65 65
Name of company Samsung Electronics Co., Ltd.
Untitled-2 53 2017-10-12 12:41:22
Sidan laddas...

English 55
Appendix
NOTE
1. Energy consumption is measured as the annual 9 kg 258 kWh (8 kg 235 kWh) used per
year, based on 160 drying cycles of the standard cotton programme at full and partial
load, and the consumption of the low-power modes. Actual energy consumption per
cycle will depend on how the appliance is used.
2. ‘standard cotton programme’ used at full and partial load is the standard drying
programme to which the information in the label and the che relates, that this
programme is suitable for drying normal wet cotton laundry and that it is the most
efcient programme in terms of energy consumption for cotton. Consumption data can
vary from the nominal values given above depending in the size of the load, types of
textiles, residual moisture levels after spinning, uctuations in the electricity supply
and any extra options selected.
Untitled-2 55 2017-10-12 12:41:23
Sidan laddas...

Varmepumpetørretumbler
Brugervejledning
DV9*M52****/DV8*M52****/DV7*M52****/DV9*M50****/
DV8*M50****/DV7*M50****
Untitled-3 1 2017-10-12 12:46:59
Sidan laddas...
Sidan laddas...

Dansk4
Sikkerhedsinformationer
Tillykke med din nye tørretumbler fra Samsung. Denne brugervejledning indeholder vigtige
oplysninger om montering, betjening og vedligeholdelse af din nye maskine. Tag dig tid til at læse
denne vejledning for at få fuldt udbytte af tørretumblerens mange fordele og funktioner.
Dette skal du vide om sikkerhedsinstruktionerne
Advarslerne og de vigtige sikkerhedsinstruktioner i denne vejledning dækker ikke alle tænkelige
forhold og situationer, som måtte opstå. Det er dit ansvar at bruge din sunde fornuft og være
forsigtig og omhyggelig ved montering, vedligeholdelse og brug af din tørretumbler.
Kontakt altid producenten ved problemer eller forhold, som du ikke forstår.
Vigtige sikkerhedssymboler
Ikonerne og symbolerne i denne brugervejledning betyder følgende:
ADVARSEL
Risici og andre usikre fremgangsmåder, der kan medføre alvorlig personskade eller beskadigelse af
materiel.
FORSIGTIG
Risici og andre usikre fremgangsmåder, der kan medføre personskade og/eller beskadigelse af
materiel.
BEMÆRK
Angiver at der ndes en risiko for personskade eller skade på materiel.
Læs instruktionerne
Disse advarselstegn er her for at undgå skade på dig selv og andre.
Følg dem fuldstændigt.
Når du har læst denne vejledning, skal du gemme den et sikkert sted for fremtidig reference.
Læs alle instruktioner før brug af apparatet.
Som ved alt elektrisk udstyr med bevægelige dele er der en potentiel farerisiko. For sikkert at kunne
betjene apparatet skal du kende dets funktioner og være forsigtig under brug.
ADVARSEL - risiko for brand
• Tørretumblere skal monteres af en kvaliceret tekniker.
• Monter tørretumbleren i henhold til producentens anvisninger og lokale regler.
• For at reducere risikoen for alvorlig personskade eller dødsfald skal alle
monteringsinstruktioner følges.
Sikkerhedsinformationer
Untitled-3 4 2017-10-12 12:46:59
Sidan laddas...
Sidan laddas...
Sidan laddas...
Sidan laddas...
Sidan laddas...
Sidan laddas...
Sidan laddas...
Sidan laddas...
Sidan laddas...
Sidan laddas...
Sidan laddas...
Sidan laddas...

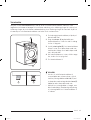
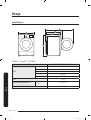
Dansk 17
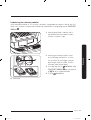
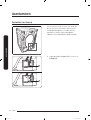
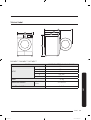
Installation
Tørretumbler
Sørg for at læse Installationskrav på side 15 før du installerer tørretumbleren. Bemærk, at de
følgende instruktioner er beregnet til installation uden brug af en aedningsslange. Se næste afsnit,
Aedningsslange, for instruktioner vedrørende brug af en aedningsslange. For nemheds skyld kan
du overveje at installere tørretumbleren ved siden af din vaskemaskine.
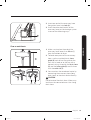
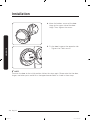
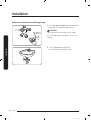
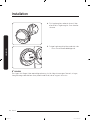
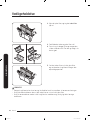
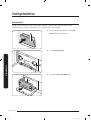
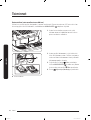
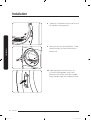
A
B
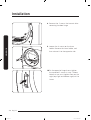
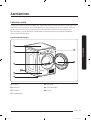
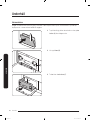
1. Skub forsigtigt tørretumbleren på plads på
det ønskede sted.
2. Brug et vaterpas (A) og kontrollér, om
tørretumbleren er i vater fra side til side og
fra for- til bagside.
3. Justér justeringsfod (B), hvis tørretumbleren
ikke er i vater. Hvis foden drejes mod uret,
trækkes den tilbage. Hvis foden drejes mod
uret, udskydes den.
4. Når tørretumbleren er i vater, skal du sørge
for, at den står fast på gulvet.
5. Slut tørretumbleren til.
C D
BEMÆRK
• Hvis du vil indstille tørretumbleren til
samme højde som vaskemaskinen, skal du
trække justeringsfødderne helt ind (C) ved
at dreje dem mod uret og derefter løsne (D)
fødderne ved at dreje dem med uret.
• Udskyd kun justeringsfoden så meget, som
det er nødvendigt. Unødvendig udskydning
af justeringsfoden kan få tørretumbleren til
at vibrere.
Untitled-3 17 2017-10-12 12:47:01
Sidan laddas...
Sidan laddas...
Sidan laddas...

Dansk 21
Installation
Tjekliste til brug ved installation
• Tørretumbleren er sluttet til en korrekt jordforbundet stikkontakt.
• Al emballage er ernet og bortskaffet på korrekt vis.
• Tørretumbleren er i vater, og står fast på gulvet.
• Start tørretumbleren for at kontrollere, at den kører, opvarmer og slukker.
• Kør programmet TIDSSTYRET TØRRING
i 20 minutter for at se, om oplysningskoden HC vises.
Hvis det er tilfældet, skal du kontakte et lokalt servicecenter.
• Vi anbefaler, at du venter mindst en time med at bruge tørretumbleren, efter den er installeret.
Før tørretumbleren tages i brug
• Sørg for, at der ikke ligger noget tilbehør inde i tromlen.
• Tilslut strømkablet, lige før du bruger tørretumbleren.
• Du må ikke blokere for luftindsugningshullet ved kølegitteret foran på tørretumbleren.
• Anbring ikke brandbare genstande i nærheden af tørretumbleren, og hold omgivelserne rene.
• Sørg for, at tørretumbleren er i vater (står vandret).
• Fjern ikke tørretumblerens justérbare justeringsfødder. De er nødvendige for at holde
tørretumbleren i vater.
Vending af luge
Du kan vende retningen af lugen afhængigt af forholdene hos dig eller dine behov.
ADVARSEL
Sørg for, at vending af lugen udføres af en kvaliceret tekniker.
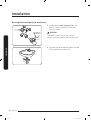
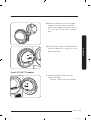
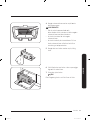
Type 1
1. Åbn lugen, og løsn derefter de to skruer
på lugens hængsel. Hold lugen med begge
hænder, og løft den så lidt for at erne den.
Untitled-3 21 2017-10-12 12:47:03
Sidan laddas...
Sidan laddas...
Sidan laddas...
Sidan laddas...
Sidan laddas...
Sidan laddas...
Sidan laddas...
Sidan laddas...
Sidan laddas...
Sidan laddas...
Sidan laddas...
Sidan laddas...
Sidan laddas...
Sidan laddas...
Sidan laddas...
Sidan laddas...
Sidan laddas...
Sidan laddas...
Sidan laddas...
Sidan laddas...
Sidan laddas...
Sidan laddas...
Sidan laddas...
Sidan laddas...
Sidan laddas...
Sidan laddas...
Sidan laddas...
Sidan laddas...
Sidan laddas...
Sidan laddas...
Sidan laddas...
Sidan laddas...
Sidan laddas...
Sidan laddas...
Sidan laddas...
Sidan laddas...
Sidan laddas...
Sidan laddas...
Sidan laddas...
Sidan laddas...
Sidan laddas...
Sidan laddas...
Sidan laddas...
Sidan laddas...
Sidan laddas...
Sidan laddas...
Sidan laddas...
Sidan laddas...
Sidan laddas...
Sidan laddas...
Sidan laddas...
Sidan laddas...
Sidan laddas...
Sidan laddas...
Sidan laddas...
Sidan laddas...
Sidan laddas...
Sidan laddas...
Sidan laddas...
Sidan laddas...
Sidan laddas...
Sidan laddas...
Sidan laddas...
Sidan laddas...
Sidan laddas...
Sidan laddas...
Sidan laddas...
Sidan laddas...
Sidan laddas...
Sidan laddas...
Sidan laddas...
Sidan laddas...
Sidan laddas...
Sidan laddas...
Sidan laddas...
Sidan laddas...
Sidan laddas...
Sidan laddas...
Sidan laddas...
Sidan laddas...
Sidan laddas...
Sidan laddas...
Sidan laddas...
Sidan laddas...
Sidan laddas...
Sidan laddas...
Sidan laddas...
Sidan laddas...
Sidan laddas...
Sidan laddas...
Sidan laddas...
Sidan laddas...
Sidan laddas...
Sidan laddas...
Sidan laddas...
Sidan laddas...
Sidan laddas...
Sidan laddas...
Sidan laddas...
Sidan laddas...
Sidan laddas...
Sidan laddas...
Sidan laddas...
Sidan laddas...
Sidan laddas...
Sidan laddas...
Sidan laddas...
Sidan laddas...
Sidan laddas...
Sidan laddas...
Sidan laddas...
Sidan laddas...
Sidan laddas...
Sidan laddas...
Sidan laddas...
Sidan laddas...
Sidan laddas...
Sidan laddas...
Sidan laddas...
Sidan laddas...
Sidan laddas...
Sidan laddas...
Sidan laddas...
Sidan laddas...
Sidan laddas...
Sidan laddas...
Sidan laddas...
Sidan laddas...
Sidan laddas...
Sidan laddas...
Sidan laddas...
Sidan laddas...
Sidan laddas...
Sidan laddas...
Sidan laddas...
Sidan laddas...
Sidan laddas...
Sidan laddas...
Sidan laddas...
Sidan laddas...
Sidan laddas...
Sidan laddas...
Sidan laddas...
Sidan laddas...
Sidan laddas...
Sidan laddas...
Sidan laddas...
Sidan laddas...
Sidan laddas...
Sidan laddas...
Sidan laddas...
Sidan laddas...
Sidan laddas...
Sidan laddas...
Sidan laddas...
Sidan laddas...
Sidan laddas...
Sidan laddas...
Sidan laddas...
Sidan laddas...
Sidan laddas...
Sidan laddas...
Sidan laddas...
Sidan laddas...
Sidan laddas...
Sidan laddas...
Sidan laddas...
Sidan laddas...
Sidan laddas...
Sidan laddas...
Sidan laddas...
Sidan laddas...
Sidan laddas...
Sidan laddas...
Sidan laddas...
Sidan laddas...
Sidan laddas...
Sidan laddas...
Sidan laddas...
Sidan laddas...
Sidan laddas...
Sidan laddas...
Sidan laddas...
Sidan laddas...
Sidan laddas...
Sidan laddas...
Sidan laddas...
Sidan laddas...
Sidan laddas...
Sidan laddas...
Sidan laddas...
Sidan laddas...
Sidan laddas...
Sidan laddas...
Sidan laddas...
Sidan laddas...
Sidan laddas...
Sidan laddas...
Sidan laddas...
Sidan laddas...
Sidan laddas...
Sidan laddas...
Sidan laddas...
-
 1
1
-
 2
2
-
 3
3
-
 4
4
-
 5
5
-
 6
6
-
 7
7
-
 8
8
-
 9
9
-
 10
10
-
 11
11
-
 12
12
-
 13
13
-
 14
14
-
 15
15
-
 16
16
-
 17
17
-
 18
18
-
 19
19
-
 20
20
-
 21
21
-
 22
22
-
 23
23
-
 24
24
-
 25
25
-
 26
26
-
 27
27
-
 28
28
-
 29
29
-
 30
30
-
 31
31
-
 32
32
-
 33
33
-
 34
34
-
 35
35
-
 36
36
-
 37
37
-
 38
38
-
 39
39
-
 40
40
-
 41
41
-
 42
42
-
 43
43
-
 44
44
-
 45
45
-
 46
46
-
 47
47
-
 48
48
-
 49
49
-
 50
50
-
 51
51
-
 52
52
-
 53
53
-
 54
54
-
 55
55
-
 56
56
-
 57
57
-
 58
58
-
 59
59
-
 60
60
-
 61
61
-
 62
62
-
 63
63
-
 64
64
-
 65
65
-
 66
66
-
 67
67
-
 68
68
-
 69
69
-
 70
70
-
 71
71
-
 72
72
-
 73
73
-
 74
74
-
 75
75
-
 76
76
-
 77
77
-
 78
78
-
 79
79
-
 80
80
-
 81
81
-
 82
82
-
 83
83
-
 84
84
-
 85
85
-
 86
86
-
 87
87
-
 88
88
-
 89
89
-
 90
90
-
 91
91
-
 92
92
-
 93
93
-
 94
94
-
 95
95
-
 96
96
-
 97
97
-
 98
98
-
 99
99
-
 100
100
-
 101
101
-
 102
102
-
 103
103
-
 104
104
-
 105
105
-
 106
106
-
 107
107
-
 108
108
-
 109
109
-
 110
110
-
 111
111
-
 112
112
-
 113
113
-
 114
114
-
 115
115
-
 116
116
-
 117
117
-
 118
118
-
 119
119
-
 120
120
-
 121
121
-
 122
122
-
 123
123
-
 124
124
-
 125
125
-
 126
126
-
 127
127
-
 128
128
-
 129
129
-
 130
130
-
 131
131
-
 132
132
-
 133
133
-
 134
134
-
 135
135
-
 136
136
-
 137
137
-
 138
138
-
 139
139
-
 140
140
-
 141
141
-
 142
142
-
 143
143
-
 144
144
-
 145
145
-
 146
146
-
 147
147
-
 148
148
-
 149
149
-
 150
150
-
 151
151
-
 152
152
-
 153
153
-
 154
154
-
 155
155
-
 156
156
-
 157
157
-
 158
158
-
 159
159
-
 160
160
-
 161
161
-
 162
162
-
 163
163
-
 164
164
-
 165
165
-
 166
166
-
 167
167
-
 168
168
-
 169
169
-
 170
170
-
 171
171
-
 172
172
-
 173
173
-
 174
174
-
 175
175
-
 176
176
-
 177
177
-
 178
178
-
 179
179
-
 180
180
-
 181
181
-
 182
182
-
 183
183
-
 184
184
-
 185
185
-
 186
186
-
 187
187
-
 188
188
-
 189
189
-
 190
190
-
 191
191
-
 192
192
-
 193
193
-
 194
194
-
 195
195
-
 196
196
-
 197
197
-
 198
198
-
 199
199
-
 200
200
-
 201
201
-
 202
202
-
 203
203
-
 204
204
-
 205
205
-
 206
206
-
 207
207
-
 208
208
-
 209
209
-
 210
210
-
 211
211
-
 212
212
-
 213
213
-
 214
214
-
 215
215
-
 216
216
-
 217
217
-
 218
218
-
 219
219
-
 220
220
-
 221
221
-
 222
222
-
 223
223
-
 224
224
-
 225
225
-
 226
226
-
 227
227
-
 228
228
-
 229
229
-
 230
230
-
 231
231
-
 232
232
-
 233
233
-
 234
234
-
 235
235
-
 236
236
-
 237
237
-
 238
238
-
 239
239
-
 240
240
-
 241
241
-
 242
242
-
 243
243
-
 244
244
-
 245
245
-
 246
246
-
 247
247
-
 248
248
-
 249
249
-
 250
250
-
 251
251
-
 252
252
-
 253
253
-
 254
254
-
 255
255
-
 256
256
-
 257
257
-
 258
258
-
 259
259
-
 260
260
-
 261
261
-
 262
262
-
 263
263
-
 264
264
-
 265
265
-
 266
266
-
 267
267
-
 268
268
-
 269
269
-
 270
270
-
 271
271
-
 272
272
-
 273
273
-
 274
274
-
 275
275
-
 276
276
-
 277
277
-
 278
278
-
 279
279
-
 280
280


Samsung DV70M5020KW Bruksanvisning
- Kategori
- Torktumlare
- Typ
- Bruksanvisning
- Denna manual är också lämplig för
på andra språk
Relaterade papper
-
Samsung DV90M8204AW Bruksanvisning
-
Samsung DV90M6200EW Bruksanvisning
-
Samsung DV80M52102W Användarmanual
-
-
-
-
-
Samsung DV90N62632X Användarmanual
-
Samsung DV90N8289AW Användarguide
-
Samsung DV90N62632W Bruksanvisning