Silvercrest 77153 Operating Instructions Manual
- Kategori
- Järn
- Typ
- Operating Instructions Manual
Denna manual är också lämplig för

IAN 77153 IAN 77153
KOMPERNASS GMBH
Burgstraße 21
D-44867 Bochum
www.kompernass.com
Last Information Update · Tietojen tila · Informationsstatus
Tilstand af information · Stand der Informationen:
07 / 2012 · Ident.-No.: SDBK2200A1052012-1
STEAM IRON SDBK 2200 A1
STEAM IRON
Operating instructions
DAMPSTRYGEJERN
Betjeningsvejledning
ÅNGSTRYKJÄRN
Bruksanvisning
HÖYRYSILITYSRAUTA
Käyttöohje
GB / IE Operating instructions Page 1
FI Käyttöohje Sivu 11
SE Bruksanvisning Sidan 21
DK Betjeningsvejledning Side 31
DE / AT / CH Bedienungsanleitung Seite 41
Before reading, unfold the page containing the illustrations and familiarise yourself with all functions of
the device.
Käännä ennen lukemista kuvallinen sivu esiin ja tutustu seuraavaksi laitteen kaikkiin toimintoihin.
Vik ut bildsidan och ha den till hands när du läser igenom anvisningarna och gör dig bekant med
apparatens / maskinens funktioner.
Før du læser, vend siden med billeder frem og bliv bekendt med alle apparatets funktioner.
Klappen Sie vor dem Lesen die Seite mit den Abbildungen aus und machen Sie sich anschließend mit allen
Funktionen des Gerätes vertraut.
DAMPFBÜGELEISEN
Bedienungsanleitung
CV_77153_SDBK2200A1_LB3_FI_SE_DK.indd 1-3CV_77153_SDBK2200A1_LB3_FI_SE_DK.indd 1-3 04.07.12 12:1304.07.12 12:13

CV_77153_SDBK2200A1_LB3_FI_SE_DK.indd 4-6CV_77153_SDBK2200A1_LB3_FI_SE_DK.indd 4-6 04.07.12 12:1304.07.12 12:13

- 1 -
CONTENT PAGE
Introduction 2
Intended Use 2
Items supplied 2
Operating Elements 2
Technical data 2
Safety instructions 3
Before the First Use 6
Tips for utilisation 6
Filling the water tank 7
Plugging in and ironing 7
Steam ironing 8
Ironing with steam blast 8
Temporarily setting the steam iron aside 8
Taking the steam iron out of service 8
Drip-Stop Function 8
Cleaning 9
Self-cleaning function .......................................................................................................................9
Housing .............................................................................................................................................9
Metal parts........................................................................................................................................9
Troubleshooting 9
Disposal 10
Warranty and Service 10
Importer 10
Read the operating instructions carefully before using the device for the first time and preserve this booklet
for later reference. Pass this manual on to whoever might acquire the device at a future date.
IB_77153_SDBK2200A1_LB3_FI_SE_DK.qxp 12.07.2012 15:32 Uhr Seite 1

- 2 -
STEAM IRON
Introduction
Congratulations on the purchase of your new appli-
ance.
You have clearly decided in favour of a quality
product. These operating instructions are a part of
this product. They contain important information in
regard to safety, use and disposal. Before using the
product, familiarise yourself with all of these operating
and safety instructions. Use the product only as des-
cribed and only for the specified areas of application.
In addition, pass these documents on, together with
the product, to any future owner.
Intended Use
The steam iron is intended exclusively for the ironing
of textiles. The iron may only be used indoors and
in private households. All other use is deemed
improper use.
Items supplied
Steam iron
Station
Cable base
Measuring beaker
Operating instructions
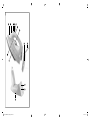
Operating Elements
1 Water jet
2 Filler opening for the water tank
3 Steam regulator
4 Button for fine water spray
5 Button for steam blast
6 Temperature control lamp
7 Temperature regulator
8 Cable base
9 Power cable
0 Unlocking switch
q Station
w Cable retainer
e Ironing sole
r Self-clean button
Technical data
Power Supply Voltage: 220 - 240 V
~
/ 50 Hz
max. power consumption: 2200 W
IB_77153_SDBK2200A1_LB3_FI_SE_DK.qxp 12.07.2012 15:32 Uhr Seite 2

- 3 -
Safety instructions
Risk of Burns!
•Grasp the steam iron only by the handle when it is hot.
•Children should be supervised to ensure that they do not
play with the appliance.
•Never hold your hand over the steam spray or on hot
metal parts.
•You should not open the filler opening of the water reser-
voir while the iron is in use. First allow the steam iron to
cool down and remove the plug from the power socket.
•The iron and its connecting cable must, when it is switched
on or cooling down, be kept out of the reach of children
who are younger than 8 years old.
Risk of Injury! Risk of fire!
•Never leave a steam iron that is hot, switched on or
connected to the mains power supply unattended.
•Put the steam iron into storage only when it has cooled
down completely.
•This steam iron must be used and parked on a stable surface.
•When ironing, use only the temperatures detailed in the
garment care instructions, or those suitable for the material.
Otherwise, you could damage the textiles. Should care in-
structions not be given or known, start with the lowest tem-
perature setting.
IB_77153_SDBK2200A1_LB3_FI_SE_DK.qxp 12.07.2012 15:32 Uhr Seite 3

- 4 -
•NEVER permit children to use the steam iron.
•Place the station on a level and heat-resistent surface. The
station must be stable when you place the steam iron onto it.
•If you want to put the steam iron down, place it only on the
cable base or back into the station.
•The iron may be used only with the supplied parking device
(resp. cable plinth).
Danger of electrical shocks.
•The rating of the local power supply must tally completely
with the details given on the rating plate of the appliance.
•To avoid potential risks, arrange for a defective appliance
to be checked and possibly repaired by qualified tech-
nicians, or contact our Customer Service Department.
•Arrange for defective power plugs and/or cables to be
replaced at once by qualified technicians or our Customer
Service Department.
•To disconnect from the power spource, pull only on the
plug itself, not on the cable.
•Never bend (kink) or crush the power cable. Arrange it
in such a way that it cannot come into contact with hot
surfaces and so that no-one can step on it or trip over it.
•After every use, before cleaning and when refilling with
water, remove the plug from the power socket.
•Always unroll the power cable fully before switching on
and do not use an extension cable.
•Never touch the power cable or the power plug with wet
hands.
IB_77153_SDBK2200A1_LB3_FI_SE_DK.qxp 12.07.2012 15:32 Uhr Seite 4

- 5 -
•Never use the steam iron adjacent to water contained in a
bath, shower, wash basin or other vessels. The proximity of
moisture presents a danger, even when the appliance is
switched off.
•Under no circumstances should you submerge the steam
iron in any liquid or permit liquids to penetrate into the
housing of the steam iron. Do not expose the appliance to
humidity and do not use it outdoors. Should liquids enter
the housing, unplug the appliance from the power socket
immediately and arrange for it to be repaired by a quali-
fied technician.
•You may not open the housing of the steam iron. Permit
only authorised technicians to repair a defective appliance
should repairs be necessary.
•Under NO circumstance should you use the appliance if it
shows visible signs of damage, has fallen or leaks water.
Arrange for it to be repaired by qualified specialists.
•Discontinue use of the appliance if the anti-kink protection
on the power cable is damaged!
•This appliance may be used by children aged 8 years or
more and by individualss with reduced physical, sensory or
mental capabilities or lack of experience and/or knowled-
ge if they are supervised, or have been instructed in the
safe use of the appliance and have understood the poten-
tial risks. Children may not play with the appliance.
Cleaning and user maintenance by children should not be
carried out without supervision of them.
IB_77153_SDBK2200A1_LB3_FI_SE_DK.qxp 12.07.2012 15:32 Uhr Seite 5

- 6 -
Attention!
• Should the clothing care instructions forbid iro-
ning, (Symbol ), the clothing item may not be
ironed. If you do so, the clothing item could be
permanently damaged.
• The water tank is to be filled exclusively with
mains or distilled water. You will otherwise da-
mage the steam iron.
• You may not clean the steam iron with solvents,
alcohol or abrasive cleaning agents. These
could damage it.
Before the First Use
• Remove the steam iron from the packaging.
• Remove all protective coverings and protective
foils from the steam iron and from the ironing
sole e.
Risk of asphyxiation!
Plastic bags can be dangerous. To avoid the risks of
asphyxiation, keep plastic bags out of the reach of
toddlers and small children.
• Pour water into the water tank (see chapter
"Filling the water tank").
• Connect the steam iron with the cable base 8
and with the station q (see chapter "Instructions
for Use").
• Insert the plug into a wall power socket supply-
ing an electrical current as detailed on the rating
plate.
• Place the temperature regulator 7 into the posi-
tion "MAX".
• Heat the steam iron up for several minutes at this
highest setting.
• Remove the steam iron from the station q
(see chapter “Tips for utilisation”).
• Press the button for the steam blast 5 a few ti-
mes such that steam exits from the ironing sole e.
• Then iron a piece of material that is no longer
required, to remove possible contamination from
the ironing sole e.
Tips for utilisation
In addition to the typical utilisation with a cable,
you can also separate the steam iron from the cable
base 8 for a short period to iron textiles which are
not located close to an electrical power socket.
To separate the steam iron from the cable base 8:
• Place the steam iron, with the cable base 8
engaged, onto the station q. The unlocking
switch 0 must be in the position .
• Slide the unlocking switch 0 into the
position . The steam iron now allows itself
to be lifted off. The cable base 8 remains
combined with the station q.
Note:
As the steam iron cannot be heated up without the
cable base 8, you can only work for a short period
without the cable base 8. Reconnect the steam iron
with the cable base 8 as soon as the steam blast
or the ironing quality diminishes.
To reconnect the steam iron with the cable base 8:
• Insert the steam iron into the cable base 8
connected to the station q. Slide the unlocking
switch 0 to . You can now lift the steam
iron with the cable base 8 from the station q.
Should you wish to secure the steam iron to the
station q, for safekeeping for example, slide the un-
locking switch 0 with the preplaced steam iron to .
The steam iron can now no longer be removed from
the station q.
IB_77153_SDBK2200A1_LB3_FI_SE_DK.qxp 12.07.2012 15:32 Uhr Seite 6

- 7 -
Filling the water tank
• In a cooled condition, place the steam iron
horizontally on its ironing sole e.
• Slide off the cover of the filler opening for the
water tank 2.
• Using the measuring beaker, fill the water tank
with water to the "Max" marking, but no further.
• Slide the cover of the filler opening for the water
tank 2 back to close it.
Note:
Should the mains water at your locality be rated as
hard, it is recommended that you mix mains water
with some distilled water. Otherwise, the jets for the
steam blast function could calcify (become blocked)
prematurely.
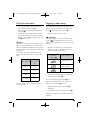
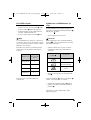
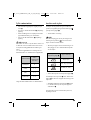
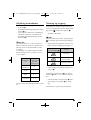
To extend the optimal steam blast function, mix
mains water with distilled water according to the
table.
The water hardness level can be queried at your
local water works.
Water hardness
Ratios - distilled
water to mains
water
very soft / soft 0
medium 1 : 1
hard 2 : 1
very hard 3 : 1
Plugging in and ironing
Dry ironing without steam is possible at all temperatures,
steam ironing is first possible from the adjustment
range on the temperature regulator 7.
• Insert the plug into a power socket.
Attention!
Should the clothing care instructions forbid ironing,
(Symbol ), the clothing item may not be ironed.
If you do so, the clothing item could be permanently
damaged.
• Check the care instructions on the labels in the
garment to see if it is suitable for being ironed,
and at which temperature setting.
• Select the best suitable temperature setting with
the temperature controller 7.
The control lamp for the temperature 6 glows.
When the set temperature has been reached, the
temperature control lamp 6 goes out.
• Wait until the temperature control lamp 6
extinguishes.
• To moisten the laundry, press the spray button 4.
This function is suitable for very dry and very crumpled
garments.
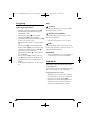
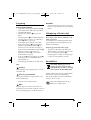
Symbol
Temperature
regulator 7
Type of Material
Acrylic, rayon
Silk, wool, polyester
blended fabrics
Cotton, linen, viscose
IB_77153_SDBK2200A1_LB3_FI_SE_DK.qxp 12.07.2012 15:32 Uhr Seite 7

- 8 -
Steam ironing
• Programme the steam regulator 3 to the desired
steam setting.
• The temperature regulator 7 must be turned into
at least the adjustment range . Otherwise it
cannot produce any steam.
Ironing with steam blast
The steam blast is especially suitable for smoothing
difficult to reach parts of a garment.
• Slightly raise the steam iron.
• For a steam blast, press the steam blast button
5.
Temporarily setting the steam
iron aside
Risk of fire!
NEVER leave the hot, mains-connected or switched-
on steam iron unattended.
• Place the temperature regulator 7 into the
position "MIN".
• Place the steam iron only on the cable base 8
or insert it onto the station q.
Taking the steam iron out of
service
• Remove the plug from the wall power socket.
• Empty the water tank and clean the ironing sole
e.
• Place the cooled down steam iron on the station
q and secure it, in that you slide the unlocking
switch 0 into the position .
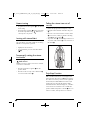
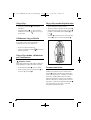
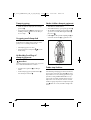
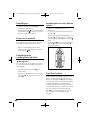
• The power cable 9 can be wrapped and stored
around the cable retainer w on the underside of
the station q:
Drip-Stop Function
With conventional steam irons it can happen that
water drips from the ironing sole e at low tempera-
tures. This iron however possesses a new equipment
characteristic, the DRIP-STOP function. At low tem-
peratures the iron automatically switches off the
steam-blast function. When this happens, a “CLICK”
is to be heard. You must then re-set a suitable tem-
perature with the temperature controller 7. As soon
as this is reached, steam production is continued.
IB_77153_SDBK2200A1_LB3_FI_SE_DK.qxp 12.07.2012 15:32 Uhr Seite 8

- 9 -
Cleaning
Self-cleaning function
• Connect the steam iron with the cable base 8.
• Fill the water tank to the marking MAX.
• Insert the plug into a wall socket.
• Place the temperature regulator 7 into the
position MAX.
• Adjust the steam regulator 3 to maximum steam
power.
• Allow the steam iron to heat up until the heat
control lamp 6 extinguishes and once again
glows.
• Hold the steam iron horizontally over a catch-
ment receptacle.
• Position the steam regulator 3 at the maximal
steam power level. Press and hold down the
button Self-clean r. Thereby, steam and boiling
water flows from the steam exit holes in the iro-
ning sole e. Impurities that may be present are
washed out.
• Release the Self-clean button r as soon as all
of the water has exited.
• Thoroughly dry the ironing sole e. For this, slide
the ironing sole e back and forth over a hand
towel or an old piece of material several times.
• Allow the steam iron to cool down before pla-
cing it in storage.
Housing
Potentially fatal danger!
Disconnect the plug before cleaning. Otherwise
there is the risk of you receiving a potentially fatal
electric shock!
Risk of physical injury!
Allow the appliance to cool before cleaning it.
If you do not, there is a risk of you receiving burn
injuries!
• Clean the housing with a soft, dry cloth only.
Important!
Do not use aggressive, abrasive or chemical cleaning
agents. These could attack the surfaces and cause
irreparable damage to the appliance.
Metal parts
• Clean the metal components with a lightly water-
moistened cloth and a mild, non-abrasive cleaning
agent.
Troubleshooting
The steam iron blows out no or very little
steam:
The reserves of water in the steam iron are depleted.
Fill the water tank with mains water (See "Filling the
water tank").
The steam iron does not get hot:
• The steam iron is not plugged in or is not switched
on. Insert the plug into a wall power socket and
adjust the temperature regulator 7 to the desired
ironing temperature.
• The steam iron is defect. Arrange for the steam
iron to be repaired by qualified specialists.
IB_77153_SDBK2200A1_LB3_FI_SE_DK.qxp 12.07.2012 15:32 Uhr Seite 9

- 10 -
Disposal
Do not dispose of the appliance in your
normal domestic waste. This appliance
is subject to the provisions of European
Directive 2002/96/EC.
Dispose of the appliance through an approved dis-
posal centre or at your community waste facility.
Observe the currently applicable regulations. In
case of doubt, please contact your waste disposal
centre.
Dispose of all packaging materials in an
environmentally friendly manner.
Warranty and Service
The warranty for this appliance is for 3 years from
the date of purchase. The appliance has been ma-
nufactured with care and meticulously examined be-
fore delivery. Please retain your receipt as proof of
purchase. In the event of a warranty claim, please
make contact by telephone with our Service Depart-
ment. Only in this way can a post-free despatch for
your goods be assured.
The warranty covers only claims for material and
manufacturing defects, but not for transport dama-
ge, for wearing parts or for damage to fragile com-
ponents, e.g. buttons or batteries. This product is for
private use only and is not intended for commercial
use. The warranty is void in the case of abusive and
improper handling, use of force and internal tampe-
ring not carried out by our authorized service
branch. Your statutory rights are not restricted in any
way by this warranty.
The warranty period will not be extended by repairs
made under warranty. This applies also to replaced
and repaired parts. Any damage and defects extant
on purchase must be reported immediately after un-
packing the appliance, at the latest, two days after
the purchase date. Repairs made after the expira-
tion of the warranty period are subject to payment.
Service Great Britain
Tel.: 0871 5000 720 (£ 0.10/Min.)
E-Mail: [email protected]
Service Ireland
Tel.: 1890 930 034
(0,08 EUR/Min., (peak))
(0,06 EUR/Min., (off peak))
E-Mail: [email protected]
Importer
KOMPERNASS GMBH
BURGSTRASSE 21
44867 BOCHUM, GERMANY
www.kompernass.com
IAN 77153
IAN 77153
IB_77153_SDBK2200A1_LB3_FI_SE_DK.qxp 12.07.2012 15:32 Uhr Seite 10

- 11 -
SISÄLLYSLUETTELO SIVU
Johdanto 12
Määräystenmukainen käyttö 12
Toimituslaajuus 12
Osat 12
Tekniset tiedot 12
Turvaohjeet 13
Ennen ensimmäistä käyttöä 16
Ohjeita käyttöä varten 16
Vesisäiliön täyttö 17
Liittäminen virtalähteeseen ja silitys 17
Höyrysilitys 18
Silittäminen höyrysuihkulla 18
Höyrysilitysraudan väliaikainen pois asettaminen 18
Höyrysilitysraudan käytöstä otto 18
Pisaranestotoiminto 18
Puhdistus 19
Itsepuhdistustoiminto ......................................................................................................................19
Kotelo..............................................................................................................................................19
Metalliosat......................................................................................................................................19
Toimintahäiriöiden korjaaminen 19
Hävittäminen 20
Takuu ja huolto 20
Maahantuoja 20
Lue käyttöohje ennen ensimmäistä käyttökertaa huolellisesti läpi ja pidä sitä lähettyvillä myös myöhemmissä
käytöissä. Jos myyt laitteen, anna ohje myös seuraavalle omistajalle.
IB_77153_SDBK2200A1_LB3_FI_SE_DK.qxp 12.07.2012 15:32 Uhr Seite 11

- 12 -
HÖYRYSILITYSRAUTA
Johdanto
Sydämellinen onnittelumme uuden laitteesi johdosta.
Olet valinnut laadukkaan tuotteen. Käyttöohje on
osa tätä tuotetta. Se sisältää tärkeitä turvallisuutta,
käyttöä ja hävittämistä koskevia ohjeita. Tutustu
kaikkiin käyttö- ja turvaohjeisiin ennen tuotteen
käyttöä. Käytä tuotetta vain kuvatulla tavalla ja vain
mainittuihin käyttötarkoituksiin. Anna myös kaikki
asiakirjat edelleen luovuttaessasi tuotteen eteenpäin.
Määräystenmukainen käyttö
Höyrysilitysrauta on tarkoitettu ainoastaan vaatteiden
silittämiseen. Sitä saa käyttää ainoastaan suljetuissa
tiloissa ja yksityistalouksissa. Kaikkia muita käyttöjä
pidetään määräystenvastaisena.
Toimituslaajuus
Höyrysilitysrauta
Silitysasema
Johtojalusta
Mitta-astia
Käyttöohje
Osat
1 Vesisuutin
2 Vesisäiliön täyttöaukko
3 Höyrynsäädin
4 Vesisumuttimen painike
5 Höyrysuihkun painike
6 Lämpötilan merkkivalo
7 Lämpötilansäädin
8 Johtojalusta
9 Virtajohto
0 Vapautuskytkin
q Silitysasema
w Johtokela
e Raudan pohja
r Selfclean-painike
Tekniset tiedot
Syöttöjännite: 220 - 240 V
~
/ 50 Hz
suurin tehontarve: 2200 W
IB_77153_SDBK2200A1_LB3_FI_SE_DK.qxp 12.07.2012 15:32 Uhr Seite 12

- 13 -
Turvaohjeet
Palovamman vaara!
•Koske kuumaan höyrysilitysrautaan ainoastaan sen
kahvasta.
•Lapsia on valvottava ja on varmistettava, etteivät he leiki
laitteella.
•Älä milloinkaan pidä käsiäsi höyryssä tai kuumissa metal-
liosissa.
•Älä milloinkaan avaa vesisäiliötä käytön aikana täyttötar-
koituksessa. Anna höyrysilitysraudan ensin jäähtyä ja irrota
verkkopistoke pistorasiasta.
•Höyrysilitysraudan ja sen verkkojohdon on oltava alle
8-vuotiaiden lasten ulottumattomissa, kun se on kytketty
pistorasiaan tai asetettu jäähtymään.
Loukkaantumisvaara! Palovaara!
•Älä koskaan jätä kuumaa höyrysilitysrautaa, joka on kytket-
ty verkkovirtaan tai johon on kytketty virta, ilman valvontaa.
•Aseta höyrysilitysrauta pois vain kylmänä.
•Höyrysilitysrauta on asetettava tasaiselle alustalle ja sitä on
käytettävä tasaisella alustalla.
•Silitä ainoastaan hoito-ohjeissa annetuilla ja materiaalille
soveltuvilla lämpötiloilla. Muutoin vaatteet saattavat vahin-
goittua. Mikäli et tunne hoito-ohjeita, aloita alimmalla läm-
pötila-asetuksella.
•Älä koskaan anna lasten käyttää höyrysilitysrautaa.
IB_77153_SDBK2200A1_LB3_FI_SE_DK.qxp 12.07.2012 15:32 Uhr Seite 13

- 14 -
•Aseta silitysasema tasaiselle ja lämmönkestävälle alustalle.
Silitysaseman on seistävä tukevasti, kun höyrysilitysrauta
asetetaan sen päälle.
•Kun haluat laskea höyrysilitysraudan alas, aseta se jalustal-
le tai silitysaseman päälle.
•Silitysrautaa saa käyttää ainoastaan mukana tulevan
laskutelineen (tai johtojalustan) kanssa.
Sähköiskun vaara!
•Virtalähteen jännitteen täytyy vastata laitteen nimilaatassa
annettuja tietoja.
•Jotta vaaroilta vältyttäisiin, anna vaurioitunut laite välittö-
mästi pätevän ammattikorjaamon korjattavaksi tai käänny
huoltopalvelumme puoleen.
•Anna vaurioitunut verkkopistoke tai virtajohto heti valtuute-
tun ammattihenkilöstön tai huoltopalvelun vaihdettavaksi
vaarojen välttämiseksi.
•Vedä aina pelkästä pistokkeesta, älä koskaan johdosta.
•Älä taita tai purista virtajohtoa, ja asenna se niin, ettei se
joudu kosketukseen kuumien pintojen kanssa tai ettei ku-
kaan voi astua sen päälle tai kompastua siihen.
•Irrota verkkopistoke ennen puhdistusta, ennen vesijohtove-
den täyttämistä ja jokaisen käytön jälkeen.
•Kierrä aina virtajohto kokonaan auki ennen kytkemistä älä-
kä käytä jatkojohtoja.
•Älä milloinkaan koske johtoon tai virtapistokkeeseen kos-
teilla käsillä.
IB_77153_SDBK2200A1_LB3_FI_SE_DK.qxp 12.07.2012 15:32 Uhr Seite 14

- 15 -
•Älä käytä höyrysilitysrautaa missään tapauksessa lähellä
vettä, jota voi olla kylpyammeessa, suihkussa, pesualtaassa
tai muissa astioissa. Veden läheisyys aiheuttaa aina vaa-
ran, mikäli laite on kiinni sähköverkossa.
•Älä upota höyrysilitysrautaa missään tapauksessa nestee-
seen äläkä päästä mitään nesteitä höyrysilitysraudan kote-
loon. Laitetta ei saa altistaa kosteudelle eikä sitä saa käyt-
tää ulkona. Jos laitteen koteloon kuitenkin joutuu nestettä,
irrota verkkopistoke heti pistorasiasta ja vie laite korjatta-
vaksi pätevälle alan ammattilaiselle.
•Höyrysilitysraudan koteloa ei saa avata. Anna viallinen
höyrysilitysrauta ainoastaan pätevien ammattihenkilöiden
korjattavaksi.
•Älä missään tapauksessa käytä höyrysilitysrautaa, jos siinä
on näkyviä vaurioita, se on pudonnut tai se vuotaa. Anna
laite ensin pätevien ammattihenkilöiden korjattavaksi.
•Älä käytä laitetta, jos sen verkkojohdon taivutussuoja on
vaurioitunut.
•Yli 8-vuotiaat ja henkilöt, joiden fyysiset, aistimukselliset
tai henkiset kyvyt ovat rajalliset tai joilla ei ole riittävää
kokemusta tai tietoa laitteen käytöstä, saavat käyttää tätä
laitetta vain valvonnassa tai, kun he ovat saaneet riittävät
ohjeet laitteen käyttämistä varten ja ymmärtäneet laitteen
käytöstä aiheutuvat vaarat. Lapset eivät saa leikkiä lait-
teella. Lapset eivät saa puhdistaa tai suorittaa käyttäjän
huoltotoimenpiteitä ilman valvontaa.
IB_77153_SDBK2200A1_LB3_FI_SE_DK.qxp 12.07.2012 15:32 Uhr Seite 15

- 16 -
Huomio!
• Mikäli vaatetuksen hoito-ohje kieltää silittämisen
(symboli ), ei vaatekappaletta saa silittää.
Muutoin vaatekappale saattaa vahingoittua.
• Vesisäiliöön saa täyttää ainoastaan vesijohtovettä /
tislattua vettä. Muuten voit vahingoittaa höyrysili-
tysrautaa.
• Höyrysilitysrautaa ei saa puhdistaa liuotinaineella,
alkoholilla tai hankaavalla puhdistusaineella.
Muutoin se voi vahingoittua.
Ennen ensimmäistä käyttöä
• Poista höyrysilitysrauta pakkauksesta.
• Poista kaikki tarrat ja kalvot höyrysilitysraudasta
ja raudan pohjasta e.
Varoitus!
Muovipussit saattavat olla vaarallisia. Tukehtu-mis-
vaaran välttämiseksi tulee muovipussit säilyttää
poissa vauvojen ja pikkulasten ulottuvilta.
• Täytä vettä vesisäiliöön (katso luku “Vesisäiliön
täyttö“).
• Liitä höyrysilitysrauta johtojalustaan 8 ja ase-
maan q (katso luku "Ohjeita käyttöä varten”).
• Liitä verkkopistoke verkkopistorasiaan, joka
vastaa tyyppikilvessä ilmoitettua jännitettä.
• Käännä lämpötilansäädin 7 asentoon "MAX".
• Anna höyrysilitysraudan lämmetä muutamia
minuutteja korkeimmalla asetuksella.
• Ota silitysrauta silitysasemasta q (ks. luku
"Ohjeita käyttöä varten").
• Paina höyrysyöksyn painiketta 5 muutamia ker-
toja niin, että höyryä tulee ulos silitysliu'usta e.
• Silitä sitten vanhaa tarpeetonta kangaspalaa
puhdistaaksesi mahdolliset epäpuhtaudet rau-
dan pohjasta e.
Ohjeita käyttöä varten
Voit irrottaa höyrysilitysraudan normaalin johdollisen
käytön lisäksi myös lyhyeksi aikaa johtojalustasta 8
silittääksesi tekstiileitä, joiden lähellä ei ole virtaläh-
dettä.
Näin irrotat höyrysilitysraudan johtojalustasta 8:
• Aseta höyrysilitysrauta ja paikoilleen lukittunut
johtojalusta 8 silitysasemaan q. Vapautuskyt-
kimen 0 on sijaittava asennossa .
• Työnnä vapautuskytkin 0 asentoon .
Nyt höyrysilitysrauta voidaan nostaa ylös.
Johtojalusta 8 jää kiinni silitysasemaan q.
Ohje:
Koska höyrysilitysrauta ei enää kuumene ilman
johtojalustaa 8, sitä voidaan käyttää vain lyhyesti
ilman johtojalustaa 8. Liitä höyrysilitysrauta jälleen
johtojalustaan 8, kun höyrysuihku tai silitysteho
heikkenee.
Höyrysilitysrauta liitetään johtojalustaan 8
seuraavasti:
• Työnnä höyrysilitysrauta silitysasemaan q lukittuun
johtojalustaan 8. Työnnä vapautuskytkin 0
asentoon . Nyt voit nostaa höyrysilitys-
raudan ja johtojalustan 8 silitysasemasta q.
Jos haluat lukita höyrysilitysraudan silitysasemaan q,
esimerkiksi turvallista säilytystä varten, työnnä va-
pautuskytkin 0 asentoon höyrysilitysraudan
ollessa asemassa. Höyrysilitysrautaa ei voida nyt
enää irrottaa silitysasemasta q.
IB_77153_SDBK2200A1_LB3_FI_SE_DK.qxp 12.07.2012 15:32 Uhr Seite 16

- 17 -
Vesisäiliön täyttö
• Aseta jäähtynyt höyrysilitysrauta seisomaan
vaakasuoraan asentoon raudan pohjan e päälle.
• Työnnä vesisäiliön 2 täyttöaukon kansi auki.
• Täytä mitta-astialla vesijohtovettä korkeintaan
vesisäiliön "MAX"-merkintään asti.
• Työnnä vesisäiliön täyttöaukon kansi 2 kiinni.
Ohje:
Jos asuinpaikkakuntasi vesijohtovesi on liian kovaa,
suosittelemme tislatun veden sekoittamista vesijohto-
veteen. Muutoin höyrytoiminnon suuttimet saattavat
kalkkeutua ennen aikojaan.
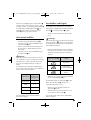
Ihanteellisen höyrytoiminnon pidentämiseksi tulee
vesijohtoveteen sekoittaa tislattua vettä taulukon
mukaisesti.
Veden kovuuden saat selville paikallisesta
vesilaitoksesta.
Veden kovuus
Tislatun veden
suhde vesijohto-
veteen
erittäin peh-
meä/pehmeä
0
keskinkertainen 1 : 1
kova 2 : 1
erittäin kova 3 : 1
Liittäminen virtalähteeseen ja
silitys
Voit kuivasilittää ilman höyryä kaikissa lämpötiloissa,
höyrysilitys on mahdollista vasta lämpötilasäätimen 7
säätöalueelta alkaen.
• Työnnä verkkopistoke pistorasiaan.
Huomio!
Mikäli vaatekappaleen hoito-ohje kieltää silittämisen
(symboli ), ei sitä saa silittää. Muutoin vaatekap-
pale saattaa vahingoittua.
• Tarkasta vaatteiden hoito-ohjeista, soveltuuko
vaatekappale silitettäväksi ja millä lämpötila-
asetuksella.
• Säädä sopiva lämpötila-asetus lämpötilansääti-
mellä 7.
Lämpötilan merkkivalo 6 palaa. Kun merkkivalo 6
sammuu, asetettu lämpötila on saavutettu.
• Odota, kunnes lämpötilan merkkivalo 6 sammuu.
• Pyykkiä voit kostuttaa painamalla vesisuihkeen
painiketta 4.
Tämä toiminto soveltuu erittäin kuiville, erittäin
ryppyisille pyykeille.
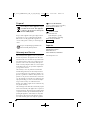
Lämpötilasäätimen
symboli 7
Kangaslaatu
akryyli, raion
silkki, villa,
polyesterisekoitteet
puuvilla, pellava,
viskoosi
IB_77153_SDBK2200A1_LB3_FI_SE_DK.qxp 12.07.2012 15:32 Uhr Seite 17

- 18 -
Höyrysilitys
• Säädä höyrysäätimellä 3 höyryn haluttu
voimakkuus.
• Lämpötilansäätimen 7 on oltava asetettuna
vähintään asetusalueelle . Muutoin ei höyryä
voida tuottaa.
Silittäminen höyrysuihkulla
Höyrysuihku soveltuu erityisesti vaatteiden
vaikeapääsyisten alueiden silittämiseen.
• Nosta höyrysilitysrautaa hieman.
• Paina höyrysuihkun painiketta 5 saadaksesi
aikaa höyrysuihkun.
Höyrysilitysraudan väliaikainen
pois asettaminen
Tulipalon vaara!
Älä koskaan jätä kuumaa, sähköverkkoon liitettyä tai
päälle kytkettyä höyrysilitysrautaa ilman valvontaa.
• Aseta lämpötilansäädin 7 asentoon "MIN".
• Aseta höyrysilitysrauta nyt johtojalustalle 8 tai
työnnä se silitysasemaan q.
Höyrysilitysraudan käytöstä otto
• Vedä verkkopistoke irti pistorasiasta.
• Tyhjennä vesisäiliö ja puhdista raudan pohja e.
• Aseta jäähtynyt höyrysilitysrauta silitysasemaan q
ja lukitse se asettamalla vapautuskytkin 0 asen-
toon .
• Virtajohto 9 voidaan kietoa ja varastoida silitys-
aseman q pohjassa olevalle johtokelalle w:
Pisaranestotoiminto
Tavallisissa höyrysilitysraudoissa saattaa raudan
pohjasta e tiputella vettä alhaisissa silityslämpöti-
loissa. Tässä silitysraudassa on kuitenkin uusi varuste-
luominaisuus, TROPF-STOP -pisaranestotoiminto.
Silitysrauta sammuttaa höyrypaineen automaattisesti
alhaisissa lämpötiloissa. Tämän tapahtuessa kuuluu
"napsahdus". Säädä silloin lämpötilansäätimellä 7
sopiva lämpötila. Heti, kun tämä on saavutettu,
höyrypaineen kehittäminen jatkuu.
IB_77153_SDBK2200A1_LB3_FI_SE_DK.qxp 12.07.2012 15:32 Uhr Seite 18
Sidan laddas ...
Sidan laddas ...
Sidan laddas ...
Sidan laddas ...
Sidan laddas ...
Sidan laddas ...
Sidan laddas ...
Sidan laddas ...
Sidan laddas ...
Sidan laddas ...
Sidan laddas ...
Sidan laddas ...
Sidan laddas ...
Sidan laddas ...
Sidan laddas ...
Sidan laddas ...
Sidan laddas ...
Sidan laddas ...
Sidan laddas ...
Sidan laddas ...
Sidan laddas ...
Sidan laddas ...
Sidan laddas ...
Sidan laddas ...
Sidan laddas ...
Sidan laddas ...
Sidan laddas ...
Sidan laddas ...
Sidan laddas ...
Sidan laddas ...
Sidan laddas ...
Sidan laddas ...
-
 1
1
-
 2
2
-
 3
3
-
 4
4
-
 5
5
-
 6
6
-
 7
7
-
 8
8
-
 9
9
-
 10
10
-
 11
11
-
 12
12
-
 13
13
-
 14
14
-
 15
15
-
 16
16
-
 17
17
-
 18
18
-
 19
19
-
 20
20
-
 21
21
-
 22
22
-
 23
23
-
 24
24
-
 25
25
-
 26
26
-
 27
27
-
 28
28
-
 29
29
-
 30
30
-
 31
31
-
 32
32
-
 33
33
-
 34
34
-
 35
35
-
 36
36
-
 37
37
-
 38
38
-
 39
39
-
 40
40
-
 41
41
-
 42
42
-
 43
43
-
 44
44
-
 45
45
-
 46
46
-
 47
47
-
 48
48
-
 49
49
-
 50
50
-
 51
51
-
 52
52


Silvercrest 77153 Operating Instructions Manual
- Kategori
- Järn
- Typ
- Operating Instructions Manual
- Denna manual är också lämplig för
på andra språk
- Deutsch: Silvercrest 77153
- English: Silvercrest 77153
- dansk: Silvercrest 77153
- suomi: Silvercrest 77153