Samsung EB40D Snabbstartsguide
- Kategori
- LCD-TV
- Typ
- Snabbstartsguide
Denna manual är också lämplig för

BN68-06718C-02
[English]
Contact the vendor where you purchased the product if any
components are missing.
The appearance of the components and items sold separately may differ
from the image shown.
Components may differ in different locations.
The ferrite core is designed solely for the EB48D model.
[Français]
S’il manque le moindre composant, contactez le revendeur auprès
duquel vous avez acheté le produit.
L’aspect des composants et éléments vendus séparément peut être
différent de l’illustration.
Les composants peuvent être différents suivant la région.
Le tore magnétique est uniquement destiné au modèle EB48D.
[Deutsch]
Wenn Komponenten fehlen, wenden Sie sich an den Anbieter, bei
dem Sie das Gerät gekauft haben.
Das Aussehen des lieferbaren Zubehörs und der lieferbaren Teile
kann vom dargestellten Bild abweichen.
Der Inhalt der Lieferkiste kann sich je nach Standort unterscheiden.
Der Ferritkern ist nur für das Modell EB48D bestimmt.
[Italiano]
Se alcuni componenti risultassero mancanti, rivolgersi al punto
vendita presso il quale è stato acquistato il prodotto.
L’aspetto dei componenti e degli accessori venduti separatamente
può variare rispetto immagine fornita.
I componenti possono variare in base alla località.
Il nucleo in ferrite è progettato esclusivamente per il modello EB48D.
[Español]
Póngase en contacto con el distribuidor donde adquirió el producto si
falta alguno de los componentes.
El aspecto real de los componentes y elementos que se venden por
separado puede ser diferente del de la ilustraciones.
Los componentes pueden variar según las localidades.
El núcleo de ferrita está diseñado para uso exclusivo en el modelo
EB48D.
[Svenska]
Kontrakta leverantören där du köpte produkten om några delar saknas.
Utseendet hos de faktiska delarna kan variera från bilden som visas.
Komponenterna kan variera på olika platser.
Ferritkärnan är endast avsedd för modellen EB48D.
[Magyar]
Ha bármelyik alkatrész hiányzik, forduljon a forgalmazóhoz.
A tényleges alkatrészek és a külön kapható tartozékok megjelenése
különbözhet a képen láthatótól.
Az alkatrészek térségenként eltérhetnek.
A ferritgyűrű kizárólag az EB48D modellhez lett kifejlesztve.
[Polski]
Jeżeli brakuje jakichkolwiek elementów, skontaktuj się ze sprzedawcą
produktu.
Wygląd elementów znajdujących się w opakowaniu oraz akcesoriów
sprzedawanych oddzielnie może się różnić od elementów pokazanych na
ilustracji.
Zawartość opakowania może się różnić w zależności od miejsca zakupu.
Rdzeń ferrytowy jest przeznaczony do użycia wyłącznie z modelem EB48D.
[Português]
Contacte o vendedor onde adquiriu o produto caso haja
componentes em falta.
O aspecto dos componentes e dos itens vendidos em separado pode ser
diferente da imagem apresentada.
Os componentes podem variar em locais diferentes.
O núcleo de ferrite foi concebido apenas para o modelo EB48D.
[Türkçe]
Herhangi bir parça eksikse, ürünü satın aldığınız satıcıyla temas kurun.
Ayrı satılan parçaların ve eşyaların görünümü gösterilen
görüntüden farklı olabilir.
Parçalar farklı bölgelerde farklılık gösterebilir.
Ferrit çekirdek yalnızca EB48D modeli için tasarlanmıştır.
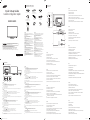
Checking the Components
Verification des composants
Control Panel
Panneau de configuration
The terms HDMI and HDMI High-Definition Multimedia Interface, and the
HDMI Logo are trademarks or registered trademarks of HDMI Licensing LLC
in the United States and other countries.
See the User’s Manual for further instructions for installation and adjustment.
The colour and the appearance may differ depending on the product,
and the specifications are subject to change without prior notice to improve the performance.
La couleur et l’aspect du produit peuvent varier en fonction du modèle,
et ses spécifications peuvent être modifiées sans préavis pour des raisons d’amélioration des performances.
Reportez-vous au manuel de l’utilisateur pour obtenir des instructions supplémentaires sur l’installation et le réglage.
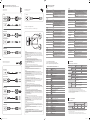
Reverse Side
Face arrière
[English]
1
Connect to a USB memory device.
2
Connect to a CI card.
3
Used for service purposes.
4
Connect to an external device using a video or Audio cable.
5
Receives sound from a PC via an audio cable.
6
Connects to a source device using a HDMI cable or HDMI-DVI cable.
7
Connect to an antenna cable.
8
Connects to a source device using a D-SUB cable.
[Français]
1
Permet de se connecter à un périphérique de mémoire USB.
2
Se connecte à une carte CI.
3
Utilisé dans le cadre de la maintenance.
4
Se connecte à un périphérique externe à l’aide d’un câble vidéo ou audio.
5
Permet de recevoir le son d'un ordinateur via un câble audio.
6
Connexion à un périphérique source à l'aide d'un câble DVI ou HDMI-DVI.
7
Connexion à un câble d'antenne.
8
Permet de se connecter à un périphérique source via un câble D-SUB.
[Deutsch]
1
Zum Anschluss eines USB-Speichergeräts.
2
Zum Anschluss einer CI-Karte.
3
Für Servicearbeiten verwendet.
4
Zum Anschluss eines externen Geräts über ein Video- oder Audiokabel.
5
Nimmt Ton von einem PC über ein Audiokabel auf.
6
Anschließen an ein externes Gerät mit Hilfe eines HDMI- oder HDMI-DVI-Kabels.
7
Zum Anschluss eines Antennenkabels.
8
Zum Anschluss eines Quellgeräts über ein D-SUB-Kabel.
[Italiano]
1
Consente il collegamento a un dispositivo di memoria USB.
2
Consente il collegamento a una scheda CI.
3
Utilizzata per scopi di servizio.
4
Consente il collegamento a un dispositivo esterno mediante un cavo video o audio.
5
Riceve l’audio da un PC attraverso il cavo audio.
6
Collega a un dispositivo sorgente mediante cavo HDMI o HDMI-DVI.
7
Consente il collegamento al cavo di un'antenna.
8
Consente il collegamento a un dispositivo sorgente mediante un cavo D-SUB.
[Español]
1
Conecta con un dispositivo de memoria USB.
2
Conecta con una tarjeta CI.
3
Usado para servicio técnico.
4
Conecta a un dispositivo externo mediante un cable de vídeo de audio.
5
Recibe el sonido de un PC a través de un cable de audio.
6
Conecta a un dispositivo de origen mediante un cable HDMI o un cable HDMI-DVI.
7
Conecte un cable de antena.
8
Conecta con un dispositivo que actúa como fuente mediante un cable D-SUB.
[Svenska]
1
För anslutning av ett USB-minne.
2
Anslut till ett CI-kort.
3
Används för serviceändamål.
4
Anslut till en extern enhet via en video- eller ljudkabel.
5
Tar emot ljud från en dator via en ljudkabel.
6
Ansluter till en källenhet med DVI-kabel eller HDMI-DVI-kabel.
7
Anslut till en antennkabel
8
För anslutning av en källenhet via en D-SUB-kabel.
[Magyar]
1
USB-memóriaeszköz csatlakoztatása.
2
Csatlakoztassa egy CI kártyához.
3
Szervizcélokra használható.
4
Csatlakozzon egy külső eszközhöz video- vagy audio kábellel.
5
Hang fogadása PC-ről, audiokábelen keresztül.
6
Csatlakoztatás forráseszközhöz HDMI-kábel vagy HDMI–DVI kábellel
7
Csatlakozzon egy antenna kábelhez.
8
Csatlakozás jelforrás készülékhez D-SUB kábellel.
[Polski]
1
Do podłączenia urządzenia pamięci USB.
2
Do podłączania karty CI.
3
Do celów serwisowych
4
Do podłączania do urządzenia zewnętrznego za pomocą przewodu wideo lub audio.
5
Do odbioru dźwięku z komputera przez przewód audio.
6
Do podłączania urządzenia źródłowego za pomocą kabla HDMI lub kabla HDMI-DVI.
7
Gniazdo do podłączania anteny.
8
Do podłączenia do urządzenia źródłowego za pomocą kabla D-SUB.
[Português]
1
Ligue a um dispositivo de memória USB.
2
Ligue a um cartão CI (cartão de interface comum).
3
Utilizada para assistência técnica.
4
Ligue a um dispositivo externo através de um cabo de vídeo ou de áudio.
5
Recebe o som de um PC através de um cabo de áudio.
6
Liga-se a um dispositivo de entrada utilizando um cabo HDMI ou HDMI-DVI.
7
Ligue a um cabo de antena.
8
Liga-se a um dispositivo de entrada através de um cabo D-SUB.
[Türkçe]
1
USB bellek cihazını takın.
2
Bir CI karta takın.
3
Servis amaçlı kullanılır.
4
Video veya Ses kablosu kullanarak harici bir cihaza bağlayın.
5
PC'den sesi bir ses kablosu ile alır.
6
Bir HDMI kablosu ya da HDMI-DVI kablosu kullanan bir kaynak cihaza bağlanır.
7
Bir anten kablosuna bağlayın.
8
D-SUB kablosuyla bir kaynak cihaza bağlanır.
COMMON
INTERFACE
USB (
5V 0.5A)
/ CLONING
ANT IN
AUDIOL R
VIDEO
AV IN
HDMI IN
(DVI)
RS232C IN
RGB / DVI
AUDIO IN
RGB IN
AUDIOL R
VIDEO
AV IN
HDMI IN
(DVI)
RS232C IN
RGB / DVI
AUDIO IN
RGB IN
USB (5V 0.5A)
/ CLONING
COMMON
INTERFACE
Quick Setup Guide
Guide de configuration rapide
Warranty card
(Not available in some locations)
Carte de garantie
(Non disponible dans certains pays)
Regulatory guide
Guide réglementaire
Batteries
(Not available in some locations)
Batteries
(Non disponible dans certains pays)
Remote Control
Télécommande
Power cord
Cordon d’alimentation
RS232C-Stereo cable
Câble stéréo RS232C
Stand base
Base du support
Stand neck
Col du support
Ferrite Core
Tore magnétique
EB40D EB48D
Quick Setup Guide
Guide de confi guration rapide
[Español]
1
Encender el producto.
Si pulsa el botón
mientras el producto está encendido, se mostrará el menú de control.
Para salir del menú OSD, mantenga pulsada la tecla del panel durante al menos un segundo.
2
Moverse al menú superior o inferior. También puede ajustar el valor de una opción.
Cambio de canal en el modo TV.
3
Moverse al menú izquierdo o derecho.
4
Pulse un botón del mando a distancia apuntando al sensor ubicado en la parte delantera del producto para utilizar la función
correspondiente a dicho botón.
[Svenska]
1
Slå på produkten.
Om du trycker på knappen
när produkten är påslagen visas kontrollmenyn.
Du stänger skärmmenyn genom att trycka och hålla in panelknappen under minst en sekund.
2
Gå till den övre eller lägre menyn. Du kan också ändra värdet för ett alternativ.
Byt kanal i läget TV.
3
Gå till vänster eller höger meny.
4
Tryck på en knapp på fjärrkontrollen och rikta den mot sensorn på produktens framsida när du vill utföra motsvarande funktion.
[Magyar]
1
Kapcsolja be a készüléket.
Ha megnyomja a
gombot a készülék bekapcsolt állapotában, akkor megjelenik a vezérlő menü.
A képernyő menüből való kilépéshez nyomja meg és tartsa lenyomva a panel gombot legalább egy másodpercig.
2
Lépjen a felső vagy az alsó menüre. Módosíthatja az egyes opciók értékét is.
Csatorna váltása TV módban.
3
Lépjen a jobb vagy a bal oldali menüre.
4
Nyomjon meg egy gombot a távirányítón, miközben a készülék előlapján levő érzékelőre mutat, a megfelelő funkció elvégzéséhez.
[Polski]
1
Włączenie urządzenia.
Naciśnięcie przycisku
, gdy urządzenie jest włączone spowoduje wyświetlenie menu sterowania.
Aby wyjść z menu ekranowego, należy nacisnąć przycisk panelu i przytrzymać go przez przynajmniej jedną sekundę.
2
Wybór wyższej lub niższej opcji menu. Te przyciski umożliwiają również zmianę wartości opcji.
Zmiana kanału w trybie TV.
3
Wybór opcji menu po lewej lub prawej stronie.
4
Aby skorzystać z wybranej funkcji, nacisnąć odpowiedni przycisk na pilocie sterowania skierowanym na czujnik umieszczony z
przodu urządzenia.
[Português]
1
Para ligar o produto.
Se premir o botão
quando o produto está ligado, o menu de controlo será apresentado.
Para sair do menu OSD, prima e mantenha premida a tecla do painel durante, pelo menos, um segundo.
2
Para deslocar para o menu superior ou inferior. Pode também ajustar o valor de uma opção.
Mude de canal no modo TV.
3
Para deslocar para o menu esquerdo ou direito.
4
Prima um botão do telecomando apontando para o sensor localizado na parte frontal do produto para executar a função correspondente.
[Türkçe]
1
Ürünü açar.
Ürün açıkken
düğmesine bastığınızda kontrol menüsü görüntülenir.
OSD menüsünden çıkmak için panel düğmesini en az bir saniye basılı tutun.
2
Bir üst veya alt menüye gider. Bir seçeneğin değerini ayarlamak için de kullanabilirsiniz.
TV modunda kanalı değiştirin.
3
Soldaki veya sağdaki menüye gider.
4
İlgili işlevi gerçekleştirmek için uzaktan kumandayı ürünün ön tarafındaki sensöre doğrultarak bir düğmeye basın.
[English]
1
Power on the product.
If you press the
button when the product is turned on, the control menu will be displayed.
To exit the OSD menu, press and hold the panel key for at least one second.
2
Move to the upper or lower menu. You can also adjust the value of an option.
Change the channel in TV mode.
3
Move to the left or right menu.
4
Press a button on the remote control pointing at the sensor on the front of the product to perform the corresponding function.
[Français]
1
Met l'appareil sous tension.
Si vous appuyez sur le bouton
alors que l'appareil est allumé, le menu de commande s'affiche.
Pour quitter le menu OSD, appuyez sur le bouton du panneau et maintenez-le enfoncé pendant au moins une seconde.
2
Passez au menu supérieur ou au menu inférieur. Vous pouvez aussi ajuster la valeur d'une option.
Changez de chaîne en mode TV.
3
Passez au menu de gauche ou au menu de droite.
4
Appuyez sur un bouton de la télécommande tout en pointant cette dernière vers le capteur situé à l'avant du produit pour exécuter
la fonction correspondante.
[Deutsch]
1
Einschalten des Geräts.
Wenn Sie die Taste
drücken, während das Gerät eingeschaltet ist, wird das Steuerungsmenü geöffnet.
Drücken Sie zum Schließen des OSD-Menüs die Steuerungstaste mindestens 1 Sekunde.
2
Geht zum oberen oder unteren Menü. Sie können damit auch den Wert einer Option ändern.
Wechseln des Senders im TV-Modus.
3
Geht zum linken oder rechten Menü.
4
Drücken Sie auf eine Taste auf der Fernbedienung, während Sie auf den Sensor an der Vorderseite des Geräts zielen, um die
entsprechende Funktion auszuführen.
[Italiano]
1
Consente di accendere il prodotto.
Se si preme il tasto
mentre il prodotto è acceso, verrà visualizzato il menu di controllo.
Per uscire dal menu OSD, tenere premuto il tasto del pannello per almeno un secondo.
2
Consente di spostarsi al menu superiore o inferiore nonché di regolare il valore di un'opzione.
Cambia canale in modalità TV.
3
Consente di spostarsi al menu di sinistra o destra.
4
Per eseguire una funzione, premere il pulsante corrispondente sul telecomando puntando quest'ultimo in direzione del sensore sulla
parte frontale del prodotto.
AUDIOL R
VIDEO
AV IN
HDMI IN
(DVI)
RS232C IN
RGB / DVI
AUDIO IN
RGB IN
USB (5V 0.5A)
/ CLONING
COMMON
INTERFACE
1
2
3
4
5
6
7
8
[EBD-EURO-QSG]BN68-06718C-02.indd 1 2014-09-23 1:56:59

Specifications
Caractéristiques techniques
Model Name
EB40D
EB48D
Panel
Size 40 CLASS (40.0 inches / 101 cm)
48 CLASS (47.6 inches / 120 cm)
Display area 886.168 mm (H) x 497.664 mm (V)
1053.186 mm (H) x 592.128 mm (V)
Dimensions (W x H x D)
/ Weight
Without Stand
914.2 x 547.9 x 90.9 mm / 7.0 kg
1083.2 x 637.8 x 90.9 mm / 9.1 kg
With Stand 914.2 x 586.4 x 196.4 mm / 8.0 kg 1083.2 x 677.0 x 203.9 mm / 10.2 kg
Synchronization
Horizontal Frequency 30 ~ 61 kHz
Vertical Frequency
60 ~ 75 Hz
Resolution
Optimum Resolution
1366 x 768 @ 60 Hz
Maximum Resolution 1366 x 768 @ 60 Hz
Power Supply
AC 100 to 240 VAC (+/- 10%), 60 / 50Hz ± 3Hz
Refer to the label at the back of the product as the standard voltage can vary
in different countries.
Environmental
considerations
Operating
Temperature : 0°C ~ 40°C (32°F ~ 104°F)
Humidity : 10 % – 80 %, non-condensing
Storage
Temperature : -20°C ~ 45°C (-4°F ~ 113°F)
Humidity : 5 % – 95 %, non-condensing
Troubleshooting Guide
Guide de depannage
[English]
Issues Solutions
The screen keeps switching on and off.
Check the cable connection between the product and PC, and ensure the connection is secure.
“No Cable Connected” is displayed
on the screen.
Check that the product is connected correctly with a cable.
Check that the device connected to the product is powered on.
“Not Optimum Mode” is displayed.
This message is displayed when a signal from the graphics card exceeds the product’s
maximum resolution and frequency.
Refer to the Standard Signal Mode Table and set the maximum resolution and frequency
according to the product specifications.
[Français]
Problèmes Solutions
L’écran s’allume et s’éteint continuellement.
Vérifiez que le câble est connecté correctement entre l’appareil et l’ordinateur.
“Aucun câble connecté” s’affiche à
l’écran.
Vérifiez que l’appareil est connecté correctement à l’aide d’un câble.
Assurez-vous que le périphérique connecté à l’appareil est sous tension.
“Mode non optimal” est affiché.
Ce message s’affiche lorsqu’un signal émis par la carte graphique est supérieur à la
fréquence et la résolution maximales de l’appareil.
Consultez le tableau des modes de signal standard et réglez la fréquence et la résolution
maximales conformément aux spécifications de l’appareil.
[Deutsch]
Problem Lösungen
Der Bildschirm wird ständig ein- und
ausgeschaltet.
Überprüfen Sie die Kabelverbindung zwischen dem Gerät und dem PC.
„Keine Kabelverbindung“
wird auf dem
Bildschirm angezeigt.
Überprüfen Sie, ob das Gerät korrekt über ein Kabel angeschlossen ist.
Überprüfen Sie, ob das angeschlossene Gerät eingeschaltet ist.
„ungeeign. Modus“ wird angezeigt.
Diese Meldung wird angezeigt, wenn ein Signal von der Grafikkarte die
maximale Aulösung und Frequenz des Geräts überschreitet.
Schlagen Sie in der Tabelle der Standardsignalmodi nach und stellen Sie die maximale
Auflösung und Frequenz gemäß den technischen Daten des Geräts ein.
[Italiano]
Problemi Soluzioni
Lo schermo si accende e si spegne.
Controllare la connessione del cavo tra il prodotto e il PC e verificare che il collegamento
sia sicuro.
Sullo schermo viene visualizzato “Nessun
cavo connesso”.
Verificare che il prodotto sia collegato correttamente mediante cavo.
Verificare che il dispositivo collegato al prodotto sia acceso.
Viene visualizzato “Mod non ottimale” .
Questo messaggio viene visualizzato quando il segnale proveniente dalla scheda grafica
supera la risoluzione e la frequenza massima del prodotto.
Vedere la Tabella delle modalità standard del segnale e impostare la frequenza e la
risoluzione massima in base alle specifiche del prodotto.
[Español]
Problemas Soluciones
La pantalla se enciende y se apaga
continuamente.
Compruebe la conexión del cable entre el producto y el PC, asegúrese de que la conexión
sea firme.
“Cable no conectado” se muestra en
la pantalla.
Compruebe que el producto esté conectado correctamente con un cable.
Compruebe que el dispositivo conectado al producto esté encendido.
”Modo no óptimo” se muestra en la
pantalla.
Este mensaje se muestra cuando una señal de la tarjeta gráfica supera la frecuencia y la
resolución máxima del producto.
Consulte la Tabla de los modos de señal estándar y configure la frecuencia y la resolución
máximas en función de las especificaciones del producto.
[Svenska]
Problem Lösningar
Skärmen håller på att slås på och av.
Kontrollera kabelanslutningen mellan produkten och datorn och se till att anslutningen är säker.
“Ingen kabel är ansluten” visas på
skärmen.
Kontrollera att produkten är korrekt ansluten med en kabel.
Kontrollera att enheten som är ansluten till produkten som är påslagen.
“Ej optimalt läge” visas.
Meddelandet visas när en signal från grafikkortet överskrider produktens maximala
upplösning och frekvens.
Se tabellen för standardsignalläge och ställ in maximal frekvens enligt
produktspecifikationerna.
[Magyar]
Problémák Megoldások
A képernyő felváltva be- és kikapcsol.
Ellenorizze a készülék és a számítógép közötti kábeles kapcsolatot, és gyozodjön meg
arról, hogy a csatlakoztatás stabil.
A képernyőn a „No Cable Connected”
üzenet látható
Gyozodjön meg arról, hogy a készülék megfeleloen van csatlakoztatva a kábellel.
Ellenorizze, hogy be van-e kapcsolva a kijelzohöz csatlakoztatott eszköz.
Megjelenik a „Nem optimális mód”
üzenet.
Ez az üzenet akkor jelenik meg, ha a videokártyától érkezo jel felbontása és frekvenciája
meghaladja a készülék maximális felbontását vagy frekvenciáját.
A Szabványos jelmód táblázat alapján állítsa be a készülék muszaki jellemzoinek
megfeleloen a maximális felbontást és frekvenciát.
[Polski]
Problem Rozwiązanie
Ekran naprzemiennie włącza się i wyłącza.
Sprawdz połaczenie miedzy urzadzeniem a komputerem i upewnij sie, ze zostało wykonane
poprawnie.
Na ekranie pojawia się komunikat
„Nie podłączono kabla”.
Upewnij sie, ze urzadzenie jest prawidłowo podłaczone kablem.
Sprawdz, czy urzadzenie podłaczone do monitora jest właczone.
Wyświetlany jest komunikat
„Niewłasciwy tryb”.
Komunikat ten pojawia sie, gdy sygnał z karty graficznej przekroczy maksymalna
rozdzielczosc i czestotliwosc urzadzenia.
Patrz Tabela trybu standardowego i ustaw maksymalna rozdzielczosc i czestotliwosc zgodnie
ze specyfikacja urzadzenia.
[Português]
Problemas Soluções
O ecrã está continuamente a ligar e a
desligar.
Verifique a ligação do cabo entre o produto e o PC, e certifique-se de que a ligação está bem
efectuada.
A mensagem “Nenhum Cabo Ligado” é
exibida no ecrã.
Verifique se o produto está ligado correctamente com um cabo.
Verifique se o dispositivo ligado ao produto está ligado.
A mensagem “Modo inadequado” é
exibida.
Esta mensagem é apresentada quando um sinal da placa gráfica ultrapassa a resolução e a
frequência máximas do produto.
Consulte a Tabela do modo de sinal padrão e defina a resolução e a frequência máximas de
acordo com as especificações do produto.
[Türkçe]
Sorunlar Çözümler
Ekran açılıp kapanmaya devam ediyor.
Ürün ve PC arasındaki kablo baglantısını kontrol edin ve baglantının saglam oldugundan
emin olun.
Ekranda “Kablo Bağlı Değil”
görüntüleniyor.
Ürünün bir kabloyla dogru sekilde baglandıgını kontrol edin.
Cihazın baglı oldugu ürünün açık oldugunu kontrol edin.
“Uygun Olmayan Mod” görüntüleniyor.
Bu mesaj, grafik kartından gelen bir sinyal ürünün maksimum çözünürlügünü ve frekansını
astıgında görüntülenir.
Standart Sinyal Modu Tablosu’na bakın ve ürünün teknik özelliklerine uygun olarak
maksimum çözünürlügü ve frekansı ayarlayın.
Connecting and Using a Source Device
Connexion et utilisation d’un peripherique source
Connecting to a PC
Connexion à un PC
Connecting to a Video Device
Connexion à un appareil vidéo
Connecting to a TV Viewing Card slot
Connexion à un emplacement pour carte d’affichage télé
RGB IN
RGB / DVI AUDIO IN
HDMI IN (DVI)
RGB / DVI AUDIO IN
HDMI IN (DVI)
HDMI IN (DVI)
Connecting the Antenna
Connexion de l’antenne
ANT IN
AV IN / VIDEO
AV IN / L-AUDIO-R
HDMI IN (DVI)
RGB / DVI AUDIO IN
[Contact SAMSUNG WORLD WIDE]
[Comment contacter Samsung dans le monde]
Web site: http:// www.samsung.com/displaysolutions
Power Consumption
Consommation
PowerSaver
Normal Operation
Power off
Rating Typical
Max
Power Consumption
EB40D 70 W 47.2 W 77 W
0.5 W
EB48D 84 W 56.3 W 93 W
Country Customer Care Centre
AUSTRIA 0800 - SAMSUNG (0800 - 7267864)
BELGIUM 02-201-24-18
BOSNIA 051 331 999
BULGARIA 800 111 31, Безплатна телефонна линия
CROATIA 072 726 786
CYPRUS
8009 4000 only from landline, toll free
CZECH
800 - SAMSUNG (800-726786)
Samsung Electronics Czech and Slovak, s.r.o. V Parku 2343/24, 148 00 - Praha 4
DENMARK 70 70 19 70
EIRE
0818 717100
ESTONIA 800-7267
FINLAND 030-6227 515
FRANCE 01 48 63 00 00
GERMANY
0180 6 SAMSUNG bzw.
0180 6 7267864*
(*0,20 €/Anruf aus dem dt. Festnetz, aus dem Mobilfunk max. 0,60 €/Anruf)
GREECE
80111-SAMSUNG (80111 726 7864) only from land line
(+30) 210 6897691 from mobile and land line
HUNGARY
0680SAMSUNG (0680-726-786)
0680PREMIUM (0680-773-648)
ITALIA 800-SAMSUNG (800.7267864)
LATVIA 8000-7267
LITHUANIA 8-800-77777
LUXEMBURG 261 03 710
MONTENEGRO 020 405 888
NETHERLANDS 0900 - SAMSUNG (0900-7267864) (€ 0,10/Min)
NORWAY 815 56480
POLAND
0 801-172-678* lub +48 22 607-93-33 *
* (koszt połączenia według taryfy operatora)
PORTUGAL 808 20 7267
ROMANIA 08008 726 78 64 (08008 SAMSUNG ) Apel GRATUIT
SERBIA 011 321 6899
SLOVAKIA 0800 - SAMSUNG(0800-726 786)
SLOVENIA 080 697 267, 090 726 786
SPAIN 0034902172678
SWEDEN 0771 726 7864 (SAMSUNG)
SWITZERLAND 0800 726 78 64 (0800-SAMSUNG)
TURKEY 444 77 11
UK 0330 SAMSUNG (7267864)
- Download the user manual from the website for further details.
- Téléchargez le manuel utilisateur du site Web pour obtenir plus de détails.
- Plug-and-Play
This monitor can be installed and used with any Plug-and-Play compatible systems.
Two-way data exchange between the monitor and PC system optimizes the monitor settings.
Monitor installation takes place automatically. However, you can customize the installation settings if desired.
- Due to the nature of the manufacturing of this product, approximately 1 pixel per million (1ppm) may appear brighter or
darker on the panel. This does not affect product performance.
- This device is a Class A digital apparatus.
- The displayed power consumption level can vary in different operating conditions or when settings are changed.
- SOG (Sync On Green) is not supported.
- To reduce the power consumption to 0, turn off the switch at the back or disconnect the power cord.
Disconnect the power cable if you will not be using the product for an extended period of time (during vacation, etc.).
[English]
Turn the TV off to connect or disconnect a CI card.
If you don’t insert the “CI or CI+ CARD”, some channels will display the message “Scrambled Signal”.
The pairing information containing a telephone number, the “CI or CI+ CARD” ID the Host ID and other
information will be displayed in about 2~3 minutes. If an error message is displayed, please contact your
service provider.
When the configuration of channel information has finished, the message “Updating Completed” is displayed,
indicating the channel list is updated.
[Français]
Mettez le téléviseur hors tension pour connecter ou déconnecter la carte CI.
Si vous ne l'insérez pas, certaines chaînes afficheront le message "Signal brouillé".
Les informations de pairage contenant un numéro de téléphone, l'ID de la carte d'interface commune (CI
ou CI+), l'ID de l'hôte et d'autres informations s'afficheront après 2 ou 3 minutes. Si un message d'erreur
s'affiche, contactez votre fournisseur d'accès.
Lorsque la configuration des informations sur les chaînes est terminée, le message "Mise à jour terminée"
s'affiche, indiquant que la liste des chaînes est mise à jour.
[Deutsch]
Schalten Sie den Fernseher aus, bevor Sie eine CI-Karte einsetzen oder entnehmen.
Wenn Sie keine „CI“- oder „CI+“-Karte einsetzen, wird bei einigen Kanälen die Meldung „Gestörtes Signal“ angezeigt.
Die Verbindungsinformationen mit Telefonnummer, Kennung der „CI“- oder „CI+“-Karte, Hostkennung und anderen
Angaben wird nach ungefähr 2 bis 3 Minuten angezeigt. Wenn eine Fehlermeldung angezeigt wird, wenden Sie sich
bitte an Ihren Dienstanbieter.
Wenn das Konfigurieren der Kanalinformationen abgeschlossen ist, wird die Meldung „Updating Completed“
(Aktualisierung abgeschlossen) angezeigt. Dies bedeutet, dass die Kanalliste aktualisiert ist.
[Italiano]
Spegnere la TV per collegare o scollegare una scheda CI.
Se non si inserisce la "SCHEDA CI o CI+" alcuni canali visualizzeranno il messaggio "Segnale criptato".
Le informazioni di accoppiamento contenenti un numero telefonico, l'ID della "SCHEDA CI o CI+", l'ID dell'host
e altre informazioni verranno visualizzati in circa 2-3 minuti. Se viene visualizzato un messaggio di errore,
contattare il proprio fornitore di servizi.
Al termine della configurazione delle informazioni sui canali, viene visualizzato il messaggio "Aggiornamento
completato" a indicare che l'elenco dei canali è aggiornato.
[Español]
Apague el televisor antes de conectar o desconectar una tarjeta CI.
Si no inserta la “TARJETA CI o CI+”, algunos canales mostrarán el mensaje “Señal codificada”.
En unos 2 o 3 minutos se mostrará la información de vinculación, que incluye un número de teléfono, el ID de la
“TARJETA CI o CI+”, el ID del host y otra información. Si se muestra un mensaje de error, póngase en contacto
con su proveedor de servicio técnico.
Cuando se complete la configuración de la información de canales, se mostrará el mensaje “Actualización
completada”, que indica que la lista de canales se ha actualizado.
[Svenska]
Stäng av TV:n när du ska ansluta eller ta bort ett CI-kort.
Om du inte sätter in CI- eller CI+-kortet, visar vissa kanaler meddelandet ”Scrambled Signal”.
Sammankopplingsinformationen som innehåller ett telefonnummer, CI- eller CI+-kortets ID, värd-ID och
annan information visas om ca 2-3 minuter. Om ett felmeddelande visas kontaktar du tjänsteleverantören.
När konfigurationen av kanalinformation har slutförts visas meddelandet ”Updating Completed” som visar att
kanallistan har uppdaterats.
[Magyar]
Kapcsolja ki a TV-készüléket a CI kártya csatlakoztatásához vagy eltávolításához.
Ha nem helyezi be a “CI vagy CI+ kártyát", egyes csatornák a "Zavaros jel" üzenetet jelenítik meg.
Az összepárosító információ, amely egy telefonszámot, a “CI vagy CI+ kártya” azonosítót és a Gazdagép
azonosítót, valamint további információkat tartalmaz, 2~3 percen belül jelenik meg. Ha hibaüzenet jelenik
meg, forduljon szakszervizhez.
Amikor a csatorna információ konfigurálása befejeződött, a "Frissítés befejezve" üzenet jelenik meg, jelezve
hogy a csatorna lista frissítésre került.
[Polski]
Podłączanie i odłączanie karty CI jest możliwe dopiero po wyłączeniu telewizora.
Jeśli karta CI lub CI+ nie zostanie włożona, dla niektórych kanałów będzie wyświetlany komunikat Scrambled Signal
(Sygnał zakodowany).
Informacje umożliwiające parowanie, w tym numer telefonu, identyfikator karty CI lub CI+, identyfikator hosta i inne
informacje, zostaną wyświetlone po około 2–3 minutach. Jeśli zostanie wyświetlony komunikat o błędzie, należy się
skontaktować z lokalnym usługodawcą.
Po zakończeniu konfiguracji parametrów kanałów wyświetlany jest komunikat Updating Completed (Aktualizacja
zakończona), informując o zaktualizowaniu listy kanałów.
[Português]
Desligue o televisor para ligar ou desligar um cartão CI.
Se não inserir o cartão “CI ou CI+”, alguns canais exibem a mensagem “Scrambled Signal” (sinal codificado).
As informações do emparelhamento, as quais incluem um número de telefone, a ID do cartão “CI ou CI+” e a ID
do anfitrião, entre outras, são exibidas cerca de 2 a 3 minutos depois. Se surgir uma mensagem de erro, contacte
o seu fornecedor de serviços.
Quando a configuração das informações do canal estiver concluída, surge a mensagem "Updating Completed"
(atualização concluída), a qual indica que a lista de canais foi atualizada.
[Türkçe]
Bir CI kart takmak veya çıkarmak için TV'yi kapatın.
“CI veya CI+ KART” takmazsanız, bazı kanallarda "Bozuk Sinyal" mesajı görüntülenir.
2-3 dakika içinde, bir telefon numarası, “CI veya CI+ KART” numarası ile ana sistem numarası ve diğer bilgileri
içeren eşleme bilgisi görüntülenir. Bir hata mesajı görüntülenirse lütfen hizmet sağlayıcınızla iletişime geçin.
Kanal bilgisi yapılandırması tamamlanınca, kanal listesinin güncellendiğini belirten "Güncelleme Tamamlandı"
mesajı görüntülenir.
[EBD-EURO-QSG]BN68-06718C-02.indd 2 2014-09-23 1:57:00
-
 1
1
-
 2
2


Samsung EB40D Snabbstartsguide
- Kategori
- LCD-TV
- Typ
- Snabbstartsguide
- Denna manual är också lämplig för
på andra språk
- italiano: Samsung EB40D Guida Rapida
- español: Samsung EB40D Guía de inicio rápido
- Deutsch: Samsung EB40D Schnellstartanleitung
- polski: Samsung EB40D Skrócona instrukcja obsługi
- português: Samsung EB40D Guia rápido
- français: Samsung EB40D Guide de démarrage rapide
- Türkçe: Samsung EB40D Hızlı başlangıç Kılavuzu
- English: Samsung EB40D Quick start guide
Relaterade papper
-
Samsung DB40E Snabbstartsguide
-
Samsung DM32D Snabbstartsguide
-
Samsung DM48D Snabbstartsguide
-
Samsung DM75D Snabbstartsguide
-
Samsung DB40D Snabbstartsguide
-
Samsung DH48D Snabbstartsguide
-
Samsung DM82D Snabbstartsguide
-
Samsung QM85D Snabbstartsguide
-
Samsung SMART Signage QM105D LED Snabbstartsguide
-
Samsung SMART Signage QM85D-BR LED Snabbstartsguide