Yamaha PSR-6000 Bruksanvisning
- Kategori
- Musikinstrument
- Typ
- Bruksanvisning


English
Owner’s Manual
Deutsch
Bedienungsanleitung
Français
Mode d’emploi

Congratulations!
You are the proud owner of an extraordinary electronic keyboard. The Yamaha
PSR-6000 PortaTone combines the most advanced AWM tone generation technol-
ogy with state-of-the-art digital electronics and features to give you stunning sound
quality with maximum musical enjoyment. The Interactive Accompaniment and
One Touch Setting features, in particular, are brilliant examples of how advanced
technology can significantly expand your musical horizons. A new large-size
graphic display and easy-to-use interface also greatly enhance the operability of
this advanced instrument.
In order to make the most of your PortaTone’s features and vast performance
potential, we urge you to read the manuals thoroughly while trying out the various
features described. Keep the manual in a safe place for later reference.
Taking Care of Your PortaTone 2
Floppy Disks & the Disk Drive.......... 3
Nomenclature 4
Connections & Music Stand 6
The Demonstration 8
The Demo Play Modes ........................9
The PSR-6000 Display &
Help Function 10
The Display & Multi-function
Controls ................................................10
■ The [MIXER] Button ........................10
■ The [LIST HOLD] Button .................11
■ The [CONTRAST] Control...............11
The Help Function.............................. 11
Playing the PSR-6000 12
Selecting & Playing Voices ............. 12
Keyboard Percussion .......................14
USER SET Voice Assignment.........15
Changing the Split Point ..................16
Transposition, Tuning, Octave
Change, & Key Velocity 17
TRANSPOSE & TUNE........................17
OCTAVE CHANGE..............................18
KEY VELOCITY ................................... 18
Using the Accompaniment Section
19
■ Accompaniment Volume .................25
■ Rhythm-only Accompaniment .........25
USER SET Style Assignment.......... 26
Interactive Accompaniment ............27
■ Auto Solo.........................................27
Using Disk Styles on Optional Data
Disks
...................................................... 28
■ Selecting a DISK Style ....................28
One Touch Setting 29
Expression & Effects 31
■ Harmony.......................................... 31
■ Sustain ............................................31
■ Reverb.............................................31
■ Effects .............................................31
■ Left Hold ..........................................32
■ Pitch Bend Wheel............................ 32
■ Modulation/Effect Wheel .................32
Using the Pads 33
The MULTI Mode................................. 33
The PHRASE Pads (pads 1 … 4)...... 33
■ Recording Phrases.......................... 34
■ Phrase Playback .............................34
The CHORD Pads (pads 5 … 8) ....... 35
■ Recording Chords ...........................35
■ Chord Playback ...............................36
■ MULTI Pad Repeat Playback..........36
The PERC Mode..................................37
■ Assigning Different Instruments
To the PERC Pads.......................... 37
■ Playing the Percussion Pads .......... 38
■ The PERC BREAK Function ...........38
The TEMPO Mode...............................39
■ The TEMPO SYNCHRO
Function ..........................................40
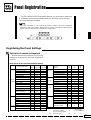
Panel Registration 41
Registering the Panel Settings ........41
Recall the Registered Panel
Settings.............................................. 42
The Freeze Function .........................42
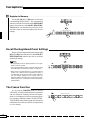
Playing DOC (Disk Orchestra
Collection)
& General MIDI
Music Software Disks 43
Disk Orchestra Collection Disk
Playback
...............................................43
■ Volume Control ............................... 45
■ Muting Specific Parts ...................... 46
■ Octave, Transpose, and Tune ........ 46
■ Other Controls That Function
In the DOC Mode ............................ 46
General MIDI Disk Playback ............ 47
■ Volume Control ............................... 47
■ Muting Specific Tracks .................... 48
■ Octave .............................................48
■ Other Controls That Function
In the General MIDI Mode............... 48
The Sequencer 49
Recording ............................................. 49
Deleting Tracks ................................... 52
Playback ............................................... 53
Sequence Editing ...............................54
■ CONDITION/VOLUME —
CONDITION ....................................54
● METRONOME ............................54
● HARMONY .................................. 54
● RECORDING TYPE .................... 55
■ CONDITION/VOLUME —
TRACK VOLUME............................55
■ EDIT — TRACK COPY/MIX............ 56
■ REMOVE EVENT............................ 57
■ DELETE MEASURE ....................... 58
■ CREATE MEASURE ....................... 58
■ QUANTIZE ......................................59
■ ERASE ............................................ 60
■ NOTE SHIFT ................................... 60
■ SONG CLEAR................................. 61
Contents

The Custom Accompaniment
Programmer 62
Basic Programming Procedure
(Normal section)
.................................62
Creating Intro, Fill-In, &
Ending Sections
.................................66
Programming a Preset Intro,
Fill-in, or Ending Section.................. 66
Editing a Previously Saved User
Intro, Fill-in, or Ending Section........ 67
Creating a New Intro, Fill-in, or
Ending Section From Scratch.......... 67
Custom Accompaniment Editing
......68
■ RECORD — NAME/SECTION........68
● NAME ..........................................68
● SECTION .................................... 68
■ RECORD — MEASURE/BEAT.......69
■ RECORD — TRACK VOLUME....... 69
■ RECORD — FADER ASSIGN ........70
■ EDIT — QUANTIZE ........................70
■ EDIT — COPY ................................71
■ EDIT — REMOVE EVENT ..............72
■ STORE ............................................72
■ I/F/E Select...................................... 73
Exiting From the Custom
Accompaniment Programmer ........ 74
Selecting & Using a Custom
Accompaniment Style
.......................74
The PSR-6000 “Functions” 75
General Function Selection &
Editing Procedure ..............................75
■ The [EXIT] Button............................ 76
F1: Custom Voice Edit 77
Standard Voice Edit Functions
(voice groups 1 through 10)
............77
■ NAME/CONTROL ...........................77
● NAME ..........................................77
● CONTROLLER............................ 78
1 TOUCH SENS.......................... 78
2 PITCH BEND............................78
■ COMMON ....................................... 78
1 OCTAVE...................................78
2 PAN .......................................... 78
● MODULATION ............................ 79
3 DEPTH .....................................79
4 SPEED .....................................79
● TONE .......................................... 79
5 BRILLIANCE ............................ 79
6 RESONANCE .......................... 79
■ ENVELOPE .....................................80
1 ATTACK ...................................80
2 DECAY ..................................... 80
3 RELEASE.................................80
4 SUSTAIN.................................. 80
Dual Voice Edit Functions
(voice group 11)
..................................81
■ NAME/VOICE.................................. 81
● NAME ..........................................81
● VOICE ......................................... 81
■ OCT/PAN/VOL./DETUNE ...............82
● OCTAVE .....................................82
● PAN ............................................. 82
● VOLUME ..................................... 82
● DETUNE .....................................82
Drum Voice Edit Functions
(Voice group 12)
................................. 83
■ NAME/PAN/PITCH/SOFTNESS .....83
● NAME ..........................................83
● PAN ............................................. 83
● PITCH .........................................83
● SOFTNESS ................................. 83
F2: Reverb/Effect 84
■ REVERB TYPE & DEPTH ..............84
● REVERB TYPE ........................... 84
● REVERB DEPTH ........................ 84
■ EFFECT TYPE & DEPTH ...............85
● EFFECT TYPE ............................ 85
● EFFECT DEPTH ......................... 85
F3: Controller 86
■ FOOT CONTROLLER..................... 86
■
MODULATION/EFFECT WHEEL
...... 86
■ SUSTAIN PEDAL &
PITCH BEND WHEEL..................... 87
● SUSTAIN PEDAL ........................ 87
● PITCH BEND WHEEL................. 87
■ FOOT SWITCH...............................88
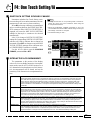
F4: One Touch Setting/IA 89
■ ONE TOUCH SETTING
SYNCHRO CHANGE...................... 89
■ INTERACTIVE
ACCOMPANIMENT ........................ 89
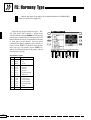
F5: Harmony Type 90
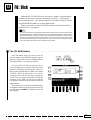
F6: Disk 91
■ The [TO DISK] Button .....................91
■ The [FROM DISK] Button................ 93
■ The F6: DISK Functions.................. 94
● 1 FROM DISK .............................94
● 2 TO DISK ................................... 95
● 3 RENAME FILE ......................... 97
● 4 DELETE FILE........................... 98
● 5 FORMAT DISK......................... 98
● 6 DISK FREE AREA ...................99
F7: Utility 100
■ MEMORY BACKUP &
REGISTRATION FREEZE ............ 100
● MEMORY BACKUP .................. 100
● REGISTRATION FREEZE ........ 101
■ RECALL PRESET DATA ..............101
F8: MIDI 102
■ THE NORMAL PLAY MODE......... 102
■ THE DOC MODE ..........................102
■ THE GENERAL MIDI (GM)
MODE ........................................... 103
● Initial General MIDI Mode
Settings .....................................103
MIDI Channel &
Multi Part Settings
............................104
■ Normal Play Mode......................... 104
● CH. SETTING............................ 104
TRANSMIT ................................ 104
RECEIVE................................... 104
SPLIT TRANSMIT ..................... 104
RHYTHM RECEIVE .................. 104
● SEQ. TRACK CH. ..................... 105
● MULTI PART .............................105
■ DOC/GM Mode ............................. 106
● KEYBOARD CHANNEL ............107
● LOCAL CONTROL ....................107
● TRANSPOSE ............................ 107
MIDI Switch, System Settings, &
Data Transmission
...........................107
■ MIDI SWITCH (Normal Play
Mode Only).................................... 107
■ MIDI SYSTEM (Normal Play
Mode Only).................................... 108
● CLOCK ...................................... 108
● LOCAL CONTROL ....................108
● TRANSPOSE ............................ 108
● SPLIT SEND ............................. 108
■ DATA TRANSMIT (Normal Play
Mode Only).................................... 109
● MIDI Bulk Dump Reception
(Memory Data Receive) ............110
● Receiving MIDI Bulk Dump
Request Messages ...................110
● Bulk Dump Error Messages ......110
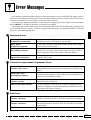
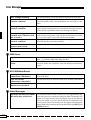
Error Messages 111
■ Sequencer Errors ..........................111
■ Custom Accompaniment
Programmer Errors ....................... 111
■ Disk Errors .................................... 111
■ MIDI Errors....................................112
■ DOC/GM Mode Errors...................112
■ Other Messages............................112
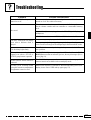
Troubleshooting 113
Index 114
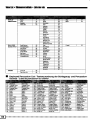
Voice List ............................................ 116
■ Keyboard Percussion List ............. 118
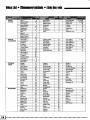
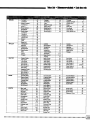
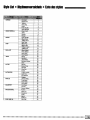
Style List .............................................119
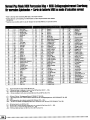
Normal Play Mode
MIDI Percussion Map ...................... 120
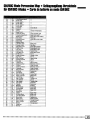
GM/DOC Mode
Percussion Map
................................121
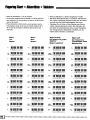
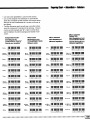
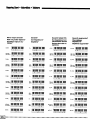
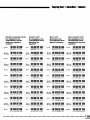
Fingering Chart ................................. 122
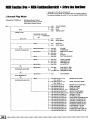
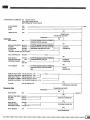
MIDI Function Tree........................... 128
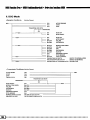
MIDI Messages ..................................133
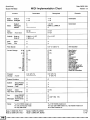
MIDI Implementation Chart............ 140
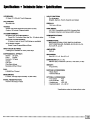
Specifications.................................... 141

2
Taking Care of Your PortaTone
Your PortaTone will give you years of playing pleasure if you follow
the simple rules given below:
■ Location
Do not expose the instrument to the following conditions
to avoid deformation, discoloration, or more serious
damage.
● Direct sunlight (e.g. near a window).
● High temperatures (e.g. near a heat source, outside,
or in a car during the daytime).
● Excessive humidity.
● Excessive dust.
● Strong vibration.
■ Power Supply
● Turn the power switch OFF when the instrument is
not in use.
● The power supply cord should be unplugged from the
AC outlet if the instrument is not to be used for an
extended period of time.
● Unplug the instrument during electric storms.
● Avoid plugging the instrument into the same AC
outlet as appliances with high power consumption,
such as electric heaters or ovens. Also avoid using
multi-plug adapters since these can result in reduced
sound quality, operation errors, and possibly damage.
■ Turn Power OFF When Making
Connections
● To avoid damage to the instrument and other devices
to which it is connected (a sound system, for exam-
ple), turn the power switches of all related devices
OFF prior to connecting or disconnecting audio and
MIDI cables.
■ Handling and Transport
● Never apply excessive force to the controls, connec-
tors or other parts of the instrument.
● Always unplug cables by gripping the plug firmly,
not by pulling on the cable.
● Disconnect all cables before moving the instrument.
● Physical shocks caused by dropping, bumping, or
placing heavy objects on the instrument can result in
scratches and more serious damage.
■ Cleaning
● Clean the cabinet and panel with a dry soft cloth.
● A slightly damp cloth may be used to remove stub-
born grime and dirt.
● Never use cleaners such as alcohol or thinner.
● Avoid placing vinyl objects on top of the instrument
(vinyl can stick to and discolor the surface).
■ Electrical Interference
● This instrument contains digital circuitry and may
cause interference if placed too close to radio or
television receivers. If this occurs, move the instru-
ment further away from the affected equipment.
■ Data Backup
● Internal data (e.g. sequencer data) is retained in
memory even if the power switch is turned OFF. If the
power is not turned ON for periods longer than about
a week, however, memory data will be lost. Save all
important data to disk before turning off for longer
periods.
● Internal memory data can be corrupted due to incor-
rect operation. Be sure to “save” important data to a
floppy disk frequently so you have a backup to revert
to if something happens to damage the data in memory.
Also note that magnetic fields can damage data on the
disk, so it is advisable to make a second back-up copy
of disks that contain very important data, and keep
backup disks in a safe place away from stray mag-
netic fields (i.e. away from speakers, appliances
containing motors, etc.).
■ Service and Modification
● The PSR-6000 contains no user serviceable parts.
Opening it or tampering with it in anyway can lead to
irreparable damage and possibly electric shock. Re-
fer all servicing to qualified YAMAHA personnel.

3
Taking Care of Your PortaTone
Floppy Disks & the Disk Drive
■ Type of Disk
Use only 3.5-inch 2DD floppy disks.
■ Disk Insertion & Removal
● To insert a floppy disk in the disk drive, hold the disk
with the label side facing up and the sliding shutter
facing the disk drive door, then insert carefully until
the disk clicks into place.
■ Floppy Disk Handling & Storage
The actual recording medium inside a floppy disk has a
fine coating of magnetic particles in which the data is
“stored”. To protect this coating as well as the disk
drive’s delicate read-write head, please observe the fol-
lowing:
● Always keep floppy disks in their plastic case when
they are not in use. Never place heavy objects on a
disk or bend the disk in any way. Also keep disks
away from liquids and dust.
● Never open the disk’s shutter and touch the exposed
surface of the disk.
● Keep floppy disks away from strong magnetic fields
such as those produced by television sets, speakers,
motors, etc.
● Never leave floppy disks in areas exposed to strong
direct sunlight, excessively high or low temperature,
or high humidity.
● Never use a floppy disk with a deformed shutter or
housing.
● Do not attach anything other than the provided labels
to a floppy disk. Also make sure that labels are
attached in the proper location.
■ Protecting Your data
● To prevent accidental erasure of important data you
have saved to floppy disk, be sure to slide the disk’s
write-protect tab to the “write protect” position (the
tab window should be open). When this is done the
disk cannot be written to.
● To remove a floppy disk from the disk drive, make
sure the disk drive “in use” light is not lit and press the
disk eject button firmly as far as it will go and then,
when the disk is full ejected, remove it by hand.
If the eject button is only partially pressed or pressed
too quickly the eject mechanism may not function
properly, leaving the disk stuck halfway. Do not
attempt to remove the disk forcefully if this happens,
since excess force can damage the disk and/or the
drive mechanism. Try either pressing the eject button
carefully again, or push the disk all the way back into
the drive and repeat the eject procedure.
● Never attempt to remove a floppy disk during a
record or playback operation!! This can corrupt the
data on the disk, and actually damage the disk drive!
● Be sure to remove the floppy disk from the disk drive
before turning off the power. A floppy disk left in the
drive for extended periods can easily pick up dust and
dirt that can cause data read/write errors.
■ Clean the Read/Write Head Regularly
This instrument employs a precision magnetic read/
write head which, after an extended period of use, will
pick up a layer of magnetic particles from the disks used
that will eventually cause read and write errors. To
maintain the disk drive in optimum working order we
recommend that you use a commercially-available Dry-
type Head Cleaning Disk to clean the head about once a
month. Ask your Yamaha dealer about the available of
head-cleaning disks.
● Make regular backup copies of important data to a
separate floppy disk, and keep your backup disks in
a separate, safe place.
● To ensure the safety of your data (and of the disk drive
itself) always use floppy disks from a well-known,
reliable manufacturer. “No-brand” disks can cause
trouble.
YAMAHA is not responsible for damage caused by improper handling or operation.
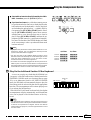
Write protected Write enabled

4
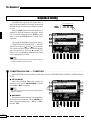
Nomenclature
MAX
MIN
MODULATION/
EFFECT
SYNCHRO
START
START/
RE-START
STOPCHORUS
2
SOLOCHORUS
1
VERSE
2
VERSE
1
MODE
SELECT
MULTI REPEAT
PERC. BREAK
TEMPO SYNCHRO
MULTI PLAYING
REC /
STOP
PHRA
S
Tap StartTempo Change
21
PHONES
ENDING/
rit.
FILL INFILL IN
INTRO 3INTRO 2INTRO 1
DOWN
UP
PITCH BEND
MIN
MAX
MASTER
VOLUME
STYLE
DANCE LATIN
ROCK’N’
ROLL
LATIN POP
ROCK WALTZ
POP
COUNTRY
PRESET
USER SET
CUSTOM A
CUSTOM B
BALLAD
TRADITIONAL
JAZZ FOR DISK IA
HELP/
LANGUAGE
EXITFUNCTIONCONTRAST
INTERACTIVE
ACCOMPANIMENT
AUTO BASS
CHORD
ONE TOUCH SETTING
VERSE
ABAB
CHORUSVERSE CHORUS
+–
TEMPO
MIXER
LIST HOLD
4
5 6 7 8
9
0 !
#
$ %
^
@
*
)
q
E R
&
17
28
39
410
511
612
THRU ––––––––– OUT –––––––
––
IN
––––
MIDIFOOT CONTROLLER SUSTAIN FOOT SWITCH
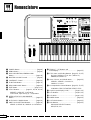
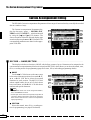
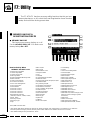
1 POWER Button ........................................ [page 8]
2 DEMO Button........................................... [page 8]
3 DISK ORCHESTRA/GENERAL MIDI
Button..................................................... [page 43]
4 MASTER VOLUME Control...................... [page 8]
5 CONTRAST Control............................... [page 11]
6 FUNCTION Button ................................. [page 75]
7 HELP/LANGUAGE Button ..................... [page 11]
8 EXIT Button........................................ [page 9, 11]
9 STYLE Buttons .............. [page 21, 26, 28, 62, 64]
PRESET, USER SET, CUSTOM A,
CUSTOM B, Style Group [1] – [12] Buttons
0 INTERACTIVE ACCOMPANIMENT
Button..................................................... [page 27]
! AUTO BASS CHORD Button ................. [page 19]
@ ONE TOUCH SETTING Buttons............ [page 29]
VERSE A, VERSE B, CHORUS A, CHORUS B
# TEMPO [–], [+] Buttons and
Beat Display ........................................... [page 22]
$ Fill-in, Intro, and Ending Buttons [page 22, 23, 25]
FILL INj (INTRO 1), FILL INn (INTRO 2),
ENDING/rit. (INTRO 3)
% Verse, Chorus, and Solo Buttons ........... [page 24]
VERSE 1, VERSE 2, CHORUS 1,
CHORUS 2, SOLO
^ Accompaniment Control Buttons [page 22, 23, 25]
SYNCHRO START, START/RE-START, STOP
& Liquid Crystal Display (LCD) .............. [page 8, 10]
* LCD Buttons....................................... [page 8, 10]
( LCD Dials........................................... [page 9, 10]
) MIXER Button ........................................ [page 10]
q LIST HOLD Button ................................. [page 11]
w PAD Buttons........................................... [page 33]
PAD MODE SELECT Buttons,
REC/STOP, 1-8

5
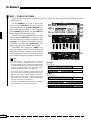
Nomenclature
>
CANCEL
PAD
S
E
CHORD
Tempo l a tempofasteraccel. slower rit.
876543
POWER
DISK ORCHESTRA/
GENERAL MIDI
DEMO
SEQUENCER / CUSTOM ACCOMPANIMENT PROGRAMMER
CHORD 1 CHORD 2 CHORD 3 CHORD 4 CHORD 5 CHORD 6 BASS RHYTHM
1 2 3 4 5 6 7 ACCOMP.
PLAY/REC PLAY/REC PLAY/REC PLAY/REC PLAY/REC PLAY/REC PLAY/REC PLAY/REC
RECORD DELETE EDIT
CUSTOM ACCOMP.
SEQUENCER
ORCHESTRA VOICE
WOODWIND
PIANO/E. PIANO GUITAR
ORGAN/
ACCORDION
BASS
STRINGS/CHOIR SYNTH
WORLD/
PERCUSSIVE
BRASS
DUAL VOICE/
SOUND
EFFECT
ORCH. 1
ORCH. 2
VOICE PART
PRESET
USER SET
CUSTOM VOICE
ORCH.
2 1
ORCH.
2+1
ORCHESTRATION
ORCH.
1
LEFT
HOLD
SUSTAINHARMONY REVERB EFFECT
DISK IN USE
FROM
DISK
TO
DISK
DISK
PANEL REGISTRATION
MEMORY
FREEZE
12345678
1
2
3
*
(
w
e
r
t y u i o p
BANK
Q
W
MALLET DRUMS
17
28
39
410
511
612
ABCD
L/L+R
––
AUX OUT
––
R L/L+R
––
AUX IN
––
R
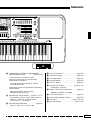
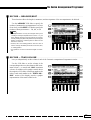
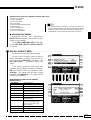
e SEQUENCER/CUSTOM ACCOMPANIMENT
PROGRAMMER Buttons ................. [page 49, 62]
SEQUENCER, CUSTOM ACCOMP.
Sequencer Track/Custom Accompaniment
Programmer Track Buttons
1 through 6/CHORD 1 through 6, 7/BASS,
ACCOMP./RHYTHM
Sequencer/Custom Accompaniment Programmer
Control Buttons
RECORD, DELETE, EDIT, p (Top),
r (Rewind), f (Forward)
r ORCHESTRA VOICE Buttons ... [page 13, 15, 77]
VOICE PART ORCH.1, VOICE PART ORCH.2,
PRESET, USER SET, CUSTOM VOICE,
Voice Group [1] – [12] Buttons
t ORCHESTRATION Buttons ................... [page 12]
ORCH. 1, ORCH. 2+1, ORCH. 2v1
y LEFT HOLD Button................................ [page 32]
u HARMONY Button ................................. [page 31]
i SUSTAIN Button .................................... [page 31]
o REVERB Button..................................... [page 31]
p EFFECT Button...................................... [page 31]
Q DISK IN USE Buttons ...................... [page 91, 93]
FROM DISK, TO DISK
W PANEL REGISTRATION Buttons........... [page 41]
MEMORY, FREEZE, 1-8, BANK
E PITCH BEND Wheel .............................. [page 32]
R MODULATION/EFFECT Wheel ............. [page 32]
T Disk Drive..................................... [page 3, 28, 43]
Y Disk Eject Button................................ [page 3, 45]
T
Y

6
Connections & Music Stand
PHONES
▼
1
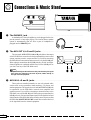
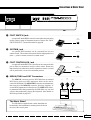
1 The PHONES Jack......................................................................................................................................................................
A standard pair of stereo headphones can be plugged in here for
private practice or late-night playing. The internal stereo speaker
system is automatically shut off when a pair of headphones is
plugged into the PHONES jack.
3 AUX IN L/L+R and R Jacks................................................................................................................................................
These jacks are intended primarily for use with external audio
sources such as tone generators, drum machines, CD players, and
similar equipment. The signal received via the AUX IN L and R jacks
is reproduced via the PSR-6000’s internal stereo amplifier and
speaker system. If you will be connecting a monaural source to the
PSR-6000, use only the L/L+R jack. When a plug is inserted into the
L/L+R jack only, the monaural input signal is fed to both the left and
right channels of the PSR-6000 stereo sound system. Please note that
the PSR-6000 MASTER VOLUME control does not affect the level
of the signal delivered to external equipment.
The rear-panel AUX OUT L/L+R and R jacks deliver the output
of the PSR-6000 for connection to a keyboard amplifier, stereo sound
system, a mixing console, or tape recorder. If you will be connecting
the PSR-6000 to a monaural sound system, use only the L/L+R jack.
When a plug is inserted into the L/L+R jack only, the left- and right-
channel signals are combined and delivered via the L/L+R jack so
you don’t lose any of the PSR-6000 sound.
CAUTION
• To prevent damage to the internal circuitry, the AUX OUT jack signal
must never be returned to the AUX IN jacks, either directly or
through external equipment.
2 The AUX OUT L/L+R and R Jacks.............................................................................................................................
AUX OUT
L/L+RR
Stereo System
AUX IN
L/L+RR
Tone Generator

7
FOOT
SWITCH
FOOT
SWITCH
SUSTAIN
FOOT
CONTROLLER
MIDI
OUT THRUIN
AUX OUT AUX IN
L/L+RL/L+RRR
2 3 7
4 5 6
The Music Stand
The PSR-6000 is supplied with a music stand that can
be attached to the instrument by inserting it into the slot at
the rear of the control panel.
4 FOOT SWITCH Jack..................................................................................................................................................................
An optional Yamaha FC5 footswitch connected to this jack can be
used to control a range of important functions. Refer to the “FOOT
SWITCH SELECT” function described on page 86.
7 MIDI IN, THRU and OUT Connectors ......................................................................................................................
The MIDI IN connector receives MIDI data from an external
MIDI device (such as a MIDI sequencer) which can be used to
control the PSR-6000. The MIDI THRU connector re-transmits any
data received at the MIDI IN connector, allowing “chaining” of
several MIDI instruments or other devices. The MIDI OUT connec-
tor transmits MIDI data generated by the PSR-6000 (e.g. note and
velocity data produced by playing the keyboard). More details on
MIDI are provided on page 102.
MIDI
OUT THRUIN
6 FOOT CONTROLLER Jack ................................................................................................................................................
An optional Yamaha FC7 Foot Controller can be connected to this
jack to allow foot expression (swell) or effect control. Please note
that when the foot controller is used for expression control, no sound
will be produced if it is set to the minimum position.
5 SUSTAIN Jack.................................................................................................................................................................................
An optional FC5 footswitch can be connected here for foot
sustain control. The footswitch functions like the damper pedal on a
piano — press for sustain, release for normal sound.
SUSTAIN
FOOT
CONTROLLER
Tone Generator
Music
Computer
Connections & Music Stand

8
The Demonstration
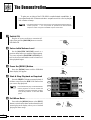
Z Switch ON............................................................................................................................................................................................
To give you an idea of the PSR-6000’s sophisticated capabilities, it
is programmed with 21 demonstration sequences which can be played
in a number of ways.
Plug the AC power cord into a convenient AC
outlet, then press the [POWER] button to turn the
PSR-6000 ON.
NOTES
• The demonstration sequences have been specially programmed for demon-
stration purposes — it is not possible to reproduce the demonstration
sequences 100% using the PSR-6000 sequencer functions.
X Set an Initial Volume Level................................................................................................................................................
Set the [MASTER VOLUME] control to a
position about half way toward the highest setting.
You can re-adjust the [MASTER VOLUME] con-
trol for the most comfortable overall volume level
after playback begins.
C Press the [DEMO] Button...................................................................................................................................................
Press the [DEMO] button and the PSR-6000
demo display will appear.
DISK ORCHESTRA/
GENERAL MIDI
DEMO
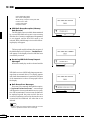
B Exit When Done ..........................................................................................................
Press either the [DEMO] button or the [EXIT]
button to exit from the demo mode and return to the
normal play-mode display when you’ve finished
playing the demo songs.
MIN
MAX
MASTER
VOLUME
DISK ORCHESTRA/
GENERAL MIDI
DEMO
EXIT
POWER
V Start & Stop Playback as Required
Press the START LCD button to start playback of
all demo songs. Press the STOP LCD button when
you want to stop playback.
NOTES
• The default demo play mode is RANDOM.
• Demo playback can also be started and
stopped by using the [START/RE-START]
and [STOP] buttons on the PSR-6000
panel.

9
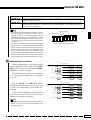
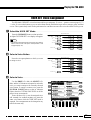
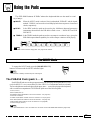
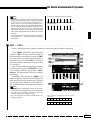
The Demo Play Modes
If you play the demo as described above, you’ll hear all 21 demo songs, one after another. Note that the demo
songs are arranged into 7 groups of three songs each. By selecting an appropriate play mode, you can also play back
all the songs in sequence, in random order, or a single specified song.
The Demonstration
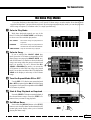
B
Exit When Done.............................................................................................................................................................................
Press either the [DEMO] button or the [EXIT]
button to exit from the demo mode and return to the
normal play-mode display when you’ve finished
playing the demo songs.
DISK ORCHESTRA/
GENERAL MIDI
DEMO
EXIT
V Start & Stop Playback as Required.........................................................................................................................
Press the START LCD button to start playback of
the selected demo song(s). Press the STOP LCD
button when you want to stop playback.
C Turn the Repeat Mode ON or OFF....
Use the REP. LCD dial to turn repeat playback
ON or OFF as required (when ON, the selected song
or sequence of songs will be repeated until the STOP
LCD button is pressed)
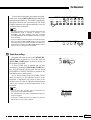
Z Select a Play Mode ....................................................................................................................................................................
With demo playback stopped, use any of the
three LCD dials under PLAY MODE on the display
to select one of the available play modes.
ALL SONGS All 21 demo songs are played back in
sequence.
RANDOM All 21 demo songs are played back in
random order. This is the default mode.
SINGLE SONG Only the selected song is played.
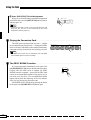
X Select a Song ..................................................................................................................................................................................
If you’ve selected the SINGLE SONG play
mode, press the LCD button corresponding to the
demo group you want to play (DANCE, ROCK, etc.)
and use the same LCD button to select the desired
song (a new song within the group is selected each
time it is pressed). If you’ve selected the ALL
SONGS or RANDOM play mode, you can use the
LCD buttons to select the first song to be played
back. You can also use either of the LCD dials under
SONG on the display to select any of the 21 demo
songs.
XC
X

10
The PSR-6000 Display & Help Function
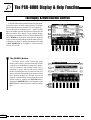
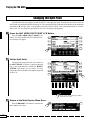
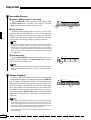
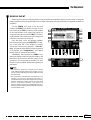
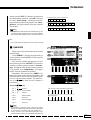
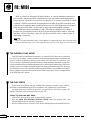
The Display & Multi-function Controls
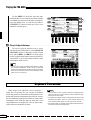
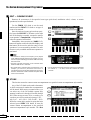
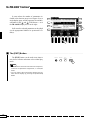
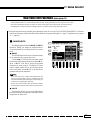
■ The [MIXER] Button..................................................................................................................................................................
The lower section of the normal play mode
display, shown above, provides individual volume
controls for the PSR-6000’s rhythm, bass, chord 1,
chord 2, orchestra 1, and orchestra 2 parts. This is
essentially a “mixer” that you will use the achieve
the best overall balance for your musical needs. The
mixer controls will disappear when functions which
have different displays are selected, but can be
instantly recalled without exiting from the current
display mode by pressing the [MIXER] button.
Pressing the [MIXER] button a second time (or the
[EXIT] button) causes the mixer controls to disap-
pear.
The PSR-6000 makes general operation and program-
ming easier than ever with a large backlit LCD display
panel and multi-function controls. The 8 LCD buttons —
four on either side of the display panel — and 8 LCD dials
below the display perform the function indicated by the
adjacent section of the display. In the example display
shown here, for example, the two LCD dials immediately
below TEMPO on the display can be used to adjust the
tempo (in this case both dials perform the same function).
In the same way, the LCD button immediately to the right
of KEY VELOCITY on the display is used to turn key
velocity ON or OFF.
MIXER
LIST HOLD

11
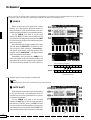
The PSR-6000 Display & Help Function
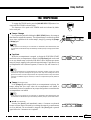
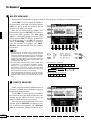
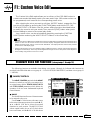
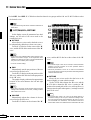
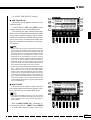
■ The [LIST HOLD] Button......................................................................................................................................................
When selecting voices (page 13) or accompani-
ment styles (page 21), the voice or style list will
appear on the display, but will automatically disap-
pear after a few seconds if no selections are made.
The voice/style list can be kept on the display for as
long as required by pressing the [LIST HOLD]
button so that its LED lights. Press [LIST HOLD]
a second time (the LED will go out) to disengage the
list hold function.
NOTES
• If the [LIST HOLD] button is engaged when the voice
or style list is not showing, the list will not appear even
when a voice or style group button is pressed.
If you’re ever in doubt about a display or button, the
PSR-6000 HELP function is available. Simply press the
[HELP/LANGUAGE] button to get information about
the current display, or press [HELP/LANGUAGE] and
then any panel button for information about that button
and its function. If more that one help display page is
available for the selected topic, use the [
] and [ ]
LCD buttons to change pages. Help is provided in five
languages — English, German, French, Spanish, and
Italian — that you can select by using any of the LCD
dials.
Exit from the HELP function by pressing either the
[HELP/LANGUAGE] or [EXIT] button.
NOTES
• The HELP function will be automatically exited if a disk is
inserted or ejected.
The Help Function
HELP/
LANGUAGE
EXITFUNCTIONCONTRAST
■ The [CONTRAST] Control..................................................................................................................................................
The PSR-6000 display panel is a liquid-crystal
type which can be easier or more difficult to read
from different angles. Use the [CONTRAST] con-
trol to set the display for optimum legibility at your
viewing angle.
CONTRAST HELP/
LANGUAGE
EXITFUNCTION
MIXER
LIST HOLD

12
■ Before You Begin
Before playing your PSR-6000 for the first time,
it might be a good idea to re-initialize it to the
original factory settings just in case these have been
changed at some point before you receive the instru-
ment. To do this, turn the [POWER] switch ON
while holding the [EXIT] and [DEMO] buttons.
When the display shown to the right appears, use
the LCD dials to select the language you want the
HELP text and messages to be displayed in, then
press the OK LCD button.
CAUTION
• When the above initialization procedure is carried
out, all sequencer and custom accompaniment
data will also be initialized and therefore lost!
Z Turn Power On and Set Initial Volume Levels...............................................................................................
Press the [POWER] button to turn the power
ON, and set the [MASTER VOLUME] control
about half way toward its highest setting. Also make
sure that the RHY, BASS, CHD2, CHD1, ORC2,
and ORC1 volume levels on the LCD are set to their
maximum “100” levels (use the corresponding LCD
dials to set these volume levels if necessary). You
can set the [MASTER VOLUME] control for the
most comfortable overall volume level after begin-
ning to play.
NOTES
• No sound will be produced if all volume levels other
than the [MASTER VOLUME] control are set to their
minimum values.
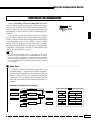
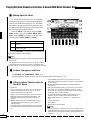
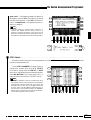
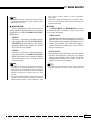
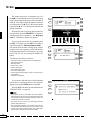
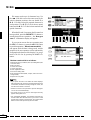
X Select the Orchestration .....................................................................................................................................................
ORCH.
2 1
ORCH.
2+1
ORCHESTRATION
ORCH.
1
LEFT
HOLD
SUSTAINHARMONY REVERB EFFECT
The PSR-6000 has three orchestration modes,
selected by the corresponding ORCHESTRATION
buttons. The corresponding ORCHESTRATION LED
will light.
Selecting & Playing Voices
Playing the PSR-6000
MIN
MAX
MASTER
VOLUME
POWER
EXIT
DEMO

13
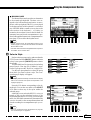
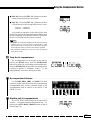
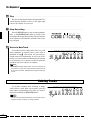
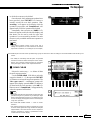
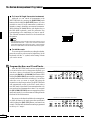
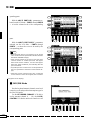
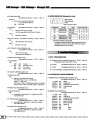
ORCH. 1 In this mode a single voice — the ORCH. 1 voice — can be played across the entire keyboard.
ORCH. 2+1 This is a “dual” mode in which two voices — ORCH. 1 and ORCH. 2 — can be played simultaneously
across the entire keyboard.
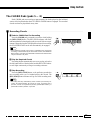
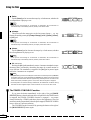
ORCH. 2v1 This is a “split” mode in which the ORCH. 2 voice is played on the left-hand section of the keyboard
(to the left of the “split point” — see “NOTES” below), while the ORCH. 1 voice is played on the right-
hand section of the keyboard.
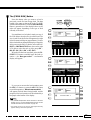
Right-hand Section
Left-hand Section
Split Point (F#2)
• The lowest key on the keyboard is C1.
NOTES
• The split point for the PSR-6000 is initially set at F
#
2.
This means that when the “ORCH. 2
v
1” mode is
selected, the ORCH. 2 voice will be played by all keys
to the left of and including F
#
2, while the ORCH. 1 voice
will be played on all keys to the right of F
#
2. You can
change the split point to any key desired as described
on page 16.
• Since two voices are played simultaneously in the dual
and split modes, the total number of notes that can be
played on the keyboard at the same time is reduced.
• When the “ORCH.2+1” mode is selected and the same
voice is selected for both ORCH. 1 and ORCH. 2, the
sound may be slightly different from the normal voice.
• When the “ORCH.2
v
1” mode is selected, the ORCH.
2 voice will automatically be transposed up one octave.
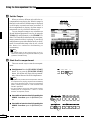
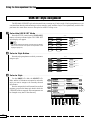
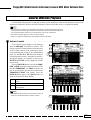
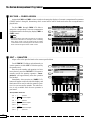
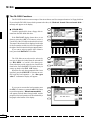
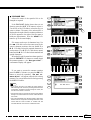
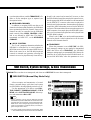
C Select a Voice or Voices........................................................................................................................................................
ORCHESTRA VOICE
WOODWIND
PIANO/E. PIANO GUITAR
ORGAN/
ACCORDION
BASS
STRINGS/CHOIR SYNTH
WORLD/
PERCUSSIVE
BRASS
DUAL VOICE/
SOUND
EFFECT
ORCH. 1
ORCH. 2
VOICE PART
PRESET
USER SET
CUSTOM VOICE
MALLET DRUMS
17
28
39
410
511
612
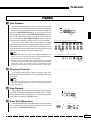
Before selecting a preset voice, make sure that
the ORCHESTRA VOICE control section [PRE-
SET] button LED is lit (if it isn’t press the [PRE-
SET] button so that it does light).
The PSR-6000 has 128 preset voices organized
in 12 voice groups (see page 116 for a complete
voice list).
Press the [ORCH. 1] or [ORCH. 2] VOICE
PART button, depending on which voice you want
to select. The corresponding VOICE PART LED
will light.
Use the voice group buttons to select the group
from which you want to select a voice. The corre-
sponding voice display will appear.
NOTES
• The display will automatically revert to the main display
after a few seconds if the [LIST HOLD] button is not
engaged (page 11).
Playing the PSR-6000
ORCHESTRA VOICE
WOODWIND
PIANO/E. PIANO GUITAR
ORGAN/
ACCORDION
BASS
STRINGS/CHOIR SYNTH
WORLD/
PERCUSSIVE
BRASS
DUAL VOICE/
SOUND
EFFECT
ORCH. 1
ORCH. 2
VOICE PART
PRESET
USER SET
CUSTOM VOICE
MALLET DRUMS
17
28
39
410
511
612
C
3
▼

14
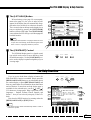
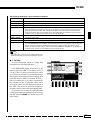
Use the PAGE LCD dials the select the page
containing the voice you want if more than one page
is available, then press the LCD button correspond-
ing to the desired voice. You can also use either of
the SELECT LCD dials to select any of the voices
within the selected group.
V Play & Adjust Volume .............................................................................................................................................................
You can now play the selected voice or voices
with the selected orchestration. Use the [MASTER
VOLUME] control to adjust the overall volume
level, and the ORC1 and ORC2 LCD dials can be
used to set the desired balance between the ORCH.
1 and ORCH. 2 voices when either the dual or split
orchestration mode is used.
NOTES
• Voices in the DUAL VOICE/SOUND EFFECT group
are actually combinations of two voices, so the total
number of simultaneous notes that can be played when
these voices are selected is less than when any of the
other voices are selected.
Keyboard Percussion
When either of the DRUMS voices is selected —
Drum Kit or Pop Drum Kit, you can play 59 different
drums and percussion instruments on the keyboard. The
drums and percussion instruments played by the various
keys are marked by symbols above the keys. Some of the
instruments in the Drum Kit and Pop Drum Kit voices
sound different even though they have the same name,
while others are essentially the same.
Playing the PSR-6000
NOTES
• The Transpose, Tune, Sustain, Harmony, Left Hold, Modu-
lation, and Octave Change functions do not affect the key-
board percussion sound.
• The pitch bend wheel can be used to bend the pitch of the
keyboard percussion voices to create unique musical ef-
fects, but it has little effect on some percussion sounds.
• See page 118 for a complete listing of the keyboard percus-
sion drum instrument assignments.

15
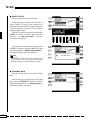
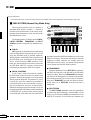
USER SET Voice Assignment
The PSR-6000 USER SET voice selection mode lets you assign any 12 voices — preset or custom (page 13, 77)
— to the 12 voice select buttons so you can select them directly without having to select a category, page, and then
a voice. This is particularly useful for the performer who want direct access to the voices he needs for a song or set.
Playing the PSR-6000
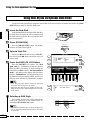
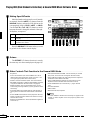
X Select a Voice Button..............................................................................................................................................................
Press the voice group button to which you want
to assign a voice.
Z Select the USER SET Mode .............................................................................................................................................
Press the [USER SET] button so that its indica-
tor lights. The USER SET voice display will appear.
NOTES
• The display will automatically revert to the main display
after a few seconds if the [LIST HOLD] button is not
engaged (page 11).
C Select a Voice ..................................................................................................................................................................................
Use the PAGE LCD dials, the SELECT LCD
dials, and the LCD buttons as required to select the
voice you want to assign to the currently selected
voice button. To assign a custom voice, press the
[CUSTOM VOICE] button so that its indicator
lights (when the CUSTOM VOICE LED is off the
preset voices are assigned).
That’s all there is to it, now the assigned voice
will instantly be recalled anytime you press the
same voice button while the USER SET mode is
engaged. Voice assignments can be changed at any
time in the same way.
ORCHESTRA VOICE
WOODWIND
PIANO/E. PIANO GUITAR
ORGAN/
ACCORDION
BASS
STRINGS/CHOIR SYNTH
WORLD/
PERCUSSIVE
BRASS
DUAL VOICE/
SOUND
EFFECT
ORCH. 1
ORCH. 2
VOICE PART
PRESET
USER SET
CUSTOM VOICE
MALLET DRUMS
17
28
39
410
511
612
ORCHESTRA VOICE
WOODWIND
PIANO/E. PIANO GUITAR
ORGAN/
ACCORDION
BASS
STRINGS/CHOIR SYNTH
WORLD/
PERCUSSIVE
BRASS
DUAL VOICE/
SOUND
EFFECT
ORCH. 1
ORCH. 2
VOICE PART
PRESET
USER SET
CUSTOM VOICE
MALLET DRUMS
17
28
39
410
511
612

16
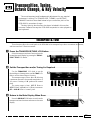
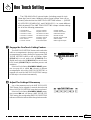
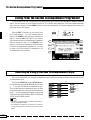
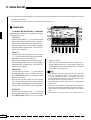
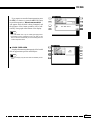
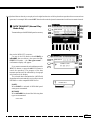
Changing the Split Point
The PSR-6000 split point applies to both the ORCH. 2v1 split play mode, described in this section, and Auto
Bass Chord accompaniment described on page 19. The current split point is indicated on the display by the triangular
split marker (t) and the “split” in the graphic keyboard when the ORCH. 2v1 orchestration mode is selected.
Here’s how you can change the split point to suit your own playing requirements.
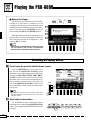
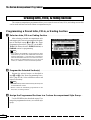
Z Press the ABC MODE/SPLIT POINT LCD Button .....................................................................................
Press the ABC MODE/SPLIT POINT LCD
button. The ABC MODE and SPLIT POINT func-
tion displays will appear.
Playing the PSR-6000
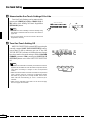
X Set the Split Point.......................................................................................................................................................................
The split point can be set in two ways: either use
the SPLIT POINT LCD dials, or press the desired
key on the keyboard while holding the DIRECT
SETTING LCD button (or vice-versa). The new
split point will be indicated on the graphic keyboard
in the LCD.
C Return to the Main Display When Done..............................................................................................................
Press the VOLUME LCD button to return to the
main display when done.
Press a key while holding the DIRECT
SETTING LCD button.

17
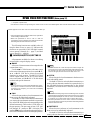
Transposition, Tuning,
Octave Change, & Key Velocity
The most important and fundamental adjustment for any musical
instrument is tuning. The TRANSPOSE, TUNING, and OCTAVE
CHANGE functions described below let you control the pitch of the
PSR-6000 in a number of ways.
The Key Velocity function has also been included in this section
because it affects the way the PSR-6000 responds to notes played on
the keyboard.
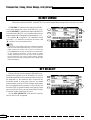
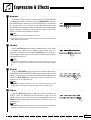
TRANSPOSE & TUNE
These functions allow the overall pitch of the PSR-6000 to be transposed up or down in semitone increments,
and fine-tuned in 0.5 Hertz increments.
Z Press the TRANSPOSE/TUNE LCD Button .....................................................................................................
Select the transpose and tune functions from the
normal play mode display by pressing the TRANS-
POSE/TUNE LCD button.
X Set the Transposition and/or Tuning As Required...................................................................................
Use the TRANSPOSE LCD dials to set the
desired degree of transposition, and the TUNE LCD
dials to set the desired degree of tuning.
The transpose range is from -6 to +6, allowing
a maximum upward or downward transposition of
1/2-octave. A setting of “0” produces the normal
pitch.
The tuning range is from 427.5 Hertz to
452.5 Hertz, adjustable in 0.5-Hertz increments.
A3 = 440.0 Hertz is “normal” pitch.
C Return to the Main Display When Done..............................................................................................................
Press the VOLUME LCD button to exit from the
transpose and tune functions and return to the main
display.
Sidan laddas ...
Sidan laddas ...
Sidan laddas ...
Sidan laddas ...
Sidan laddas ...
Sidan laddas ...
Sidan laddas ...
Sidan laddas ...
Sidan laddas ...
Sidan laddas ...
Sidan laddas ...
Sidan laddas ...
Sidan laddas ...
Sidan laddas ...
Sidan laddas ...
Sidan laddas ...
Sidan laddas ...
Sidan laddas ...
Sidan laddas ...
Sidan laddas ...
Sidan laddas ...
Sidan laddas ...
Sidan laddas ...
Sidan laddas ...
Sidan laddas ...
Sidan laddas ...
Sidan laddas ...
Sidan laddas ...
Sidan laddas ...
Sidan laddas ...
Sidan laddas ...
Sidan laddas ...
Sidan laddas ...
Sidan laddas ...
Sidan laddas ...
Sidan laddas ...
Sidan laddas ...
Sidan laddas ...
Sidan laddas ...
Sidan laddas ...
Sidan laddas ...
Sidan laddas ...
Sidan laddas ...
Sidan laddas ...
Sidan laddas ...
Sidan laddas ...
Sidan laddas ...
Sidan laddas ...
Sidan laddas ...
Sidan laddas ...
Sidan laddas ...
Sidan laddas ...
Sidan laddas ...
Sidan laddas ...
Sidan laddas ...
Sidan laddas ...
Sidan laddas ...
Sidan laddas ...
Sidan laddas ...
Sidan laddas ...
Sidan laddas ...
Sidan laddas ...
Sidan laddas ...
Sidan laddas ...
Sidan laddas ...
Sidan laddas ...
Sidan laddas ...
Sidan laddas ...
Sidan laddas ...
Sidan laddas ...
Sidan laddas ...
Sidan laddas ...
Sidan laddas ...
Sidan laddas ...
Sidan laddas ...
Sidan laddas ...
Sidan laddas ...
Sidan laddas ...
Sidan laddas ...
Sidan laddas ...
Sidan laddas ...
Sidan laddas ...
Sidan laddas ...
Sidan laddas ...
Sidan laddas ...
Sidan laddas ...
Sidan laddas ...
Sidan laddas ...
Sidan laddas ...
Sidan laddas ...
Sidan laddas ...
Sidan laddas ...
Sidan laddas ...
Sidan laddas ...
Sidan laddas ...
Sidan laddas ...
Sidan laddas ...
Sidan laddas ...
Sidan laddas ...
Sidan laddas ...
Sidan laddas ...
Sidan laddas ...
Sidan laddas ...
Sidan laddas ...
Sidan laddas ...
Sidan laddas ...
Sidan laddas ...
Sidan laddas ...
Sidan laddas ...
Sidan laddas ...
Sidan laddas ...
Sidan laddas ...
Sidan laddas ...
Sidan laddas ...
Sidan laddas ...
Sidan laddas ...
Sidan laddas ...
Sidan laddas ...
Sidan laddas ...
Sidan laddas ...
Sidan laddas ...
Sidan laddas ...
Sidan laddas ...
Sidan laddas ...
-
 1
1
-
 2
2
-
 3
3
-
 4
4
-
 5
5
-
 6
6
-
 7
7
-
 8
8
-
 9
9
-
 10
10
-
 11
11
-
 12
12
-
 13
13
-
 14
14
-
 15
15
-
 16
16
-
 17
17
-
 18
18
-
 19
19
-
 20
20
-
 21
21
-
 22
22
-
 23
23
-
 24
24
-
 25
25
-
 26
26
-
 27
27
-
 28
28
-
 29
29
-
 30
30
-
 31
31
-
 32
32
-
 33
33
-
 34
34
-
 35
35
-
 36
36
-
 37
37
-
 38
38
-
 39
39
-
 40
40
-
 41
41
-
 42
42
-
 43
43
-
 44
44
-
 45
45
-
 46
46
-
 47
47
-
 48
48
-
 49
49
-
 50
50
-
 51
51
-
 52
52
-
 53
53
-
 54
54
-
 55
55
-
 56
56
-
 57
57
-
 58
58
-
 59
59
-
 60
60
-
 61
61
-
 62
62
-
 63
63
-
 64
64
-
 65
65
-
 66
66
-
 67
67
-
 68
68
-
 69
69
-
 70
70
-
 71
71
-
 72
72
-
 73
73
-
 74
74
-
 75
75
-
 76
76
-
 77
77
-
 78
78
-
 79
79
-
 80
80
-
 81
81
-
 82
82
-
 83
83
-
 84
84
-
 85
85
-
 86
86
-
 87
87
-
 88
88
-
 89
89
-
 90
90
-
 91
91
-
 92
92
-
 93
93
-
 94
94
-
 95
95
-
 96
96
-
 97
97
-
 98
98
-
 99
99
-
 100
100
-
 101
101
-
 102
102
-
 103
103
-
 104
104
-
 105
105
-
 106
106
-
 107
107
-
 108
108
-
 109
109
-
 110
110
-
 111
111
-
 112
112
-
 113
113
-
 114
114
-
 115
115
-
 116
116
-
 117
117
-
 118
118
-
 119
119
-
 120
120
-
 121
121
-
 122
122
-
 123
123
-
 124
124
-
 125
125
-
 126
126
-
 127
127
-
 128
128
-
 129
129
-
 130
130
-
 131
131
-
 132
132
-
 133
133
-
 134
134
-
 135
135
-
 136
136
-
 137
137
-
 138
138
-
 139
139
-
 140
140
-
 141
141
-
 142
142
-
 143
143
-
 144
144


Yamaha PSR-6000 Bruksanvisning
- Kategori
- Musikinstrument
- Typ
- Bruksanvisning
på andra språk
- italiano: Yamaha PSR-6000 Manuale del proprietario
- čeština: Yamaha PSR-6000 Návod k obsluze
- español: Yamaha PSR-6000 El manual del propietario
- Deutsch: Yamaha PSR-6000 Bedienungsanleitung
- polski: Yamaha PSR-6000 Instrukcja obsługi
- português: Yamaha PSR-6000 Manual do proprietário
- français: Yamaha PSR-6000 Le manuel du propriétaire
- Türkçe: Yamaha PSR-6000 El kitabı
- English: Yamaha PSR-6000 Owner's manual
- dansk: Yamaha PSR-6000 Brugervejledning
- русский: Yamaha PSR-6000 Инструкция по применению
- suomi: Yamaha PSR-6000 Omistajan opas
- Nederlands: Yamaha PSR-6000 de handleiding
- română: Yamaha PSR-6000 Manualul proprietarului
Relaterade papper
-
Yamaha PortaTone Bruksanvisning
-
-
-
-
Yamaha Version2 Bruksanvisning
-
-
-
-
-