


3
I am known for my music. It is my passion. Behind it is a
craftsmanship - the drive to keep on improving, perfecting
every little step of the process.
This philosophy is now passed on to Kygo Life. It is built
upon Scandinavian design with sophisticated items that
have enough backbone to become classics. I hope you
will enjoy them for years to come.
Kyrre Gørvell-Dahll
Creative Director, Kygo Life


ENGLISH
5
Precautions
1. Please follow the instructions given in this manual carefully to
ensure your safety. Before using Kygo A9/600 headphones, we
would strongly encourage you to read through this user manual.
2. Pay particular attention to any edges, uneven surfaces, metal
parts, accessories and packaging to avoid any possibility of injury.
3. Do not dismantle, repair or modify this product to prevent fire,
electric shocks or other product damage, which are not covered
under warranty.
4. Do not use any solvents or volatile liquids to clean Kygo A9/600
headphones.
5. Do not use your Kygo A9/600 headphones in hazardous situations.


ENGLISH
8
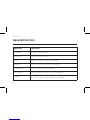
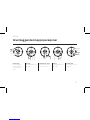
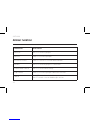
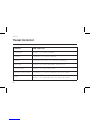
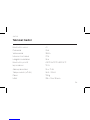
General Function
Operation LED Status
Power on Blue LED flashes 2 times
Power off Red LED flashes 2 times
Pairing Red LED & Blue LED flash alternately
Standby Blue LED flashes 3 times in 5 seconds
Incoming call Blue LED flashes continuously
Low battery Red LED flashes 2 times every 2 seconds
Charging Red LED stays lit during charging
Blue LED stays lit once charging is complete


ENGLISH
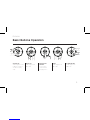
10
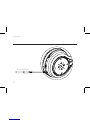
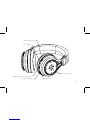
Power on: Press multi-functional button for 2 seconds. When blue
LED flashes twice, headphones are turned on.
Power off: Press multi-functional button for 3 seconds. When red LED
flashes twice then stops, headphones are turned on.
Adjust volume: Slide finger on touch panel from “-” to “+” to increase
volume. Slide it from “+” to “-” to decrease volume. When volume
reaches max or min, listen for a “tick” sound.
Play/Pause: Short press middle of touch panel to pause music. Press
again to restart.
Previous: Slide finger from “>” to “<” to go to previous track.
Next: Slide finger from “<” to “>” to go to next track.


ENGLISH
12
Battery Capacity status: When connected to iOS devices, the
headphone’s battery power status is displayed in upper right corner
of device’s screen.
Charging: A new headphone has enough power for pairing and
dialing out several times. When it has low battery, please charge via
USB cable for 2 hours. During charging, red LED flashes. Once fully
charged, blue LED remains on.
Reset Mode: Connect headphones to computer via Micro USB
cable. When red LED light flashes, reset is complete.

ENGLISH
13
3.5mm music line-in function: Connect audio line-in cable to
3.5mm audio jack for wired music. (Phone call function cannot be
used in this mode).
Before connecting your audio line, please ensure that the
headphones are powered OFF.
1. Connect the 3.5mm audio cable to the headphone and audio
player.
2. Adjust volume of the audio player or music player to reach the
desired level.
3. Pairing: Each pair of A9/600 headphones can connect with two
separate phones or devices.


ENGLISH
15
Pairing with one phone or other devices:
1. Make sure the headphones are powered OFF.
2. Press and hold the multifunction button for 5 seconds to enter into
pairing mode.
3. After red & blue LEDs flash alternately, there will be a sound to alert
you that they have entered into pairing mode.
4. Activate the Bluetooth function on your phone or device and
search for the headphones. Follow the instruction to enter “0000”
as PIN if the mobile phone reminder appears.
5. Headphones or device can now be used to play your phone
music or for phone calls.
Pairing

ENGLISH
16
Pairing with two phones or other devices at the same time
1. Pair with the “A” phone successfuly, then turn off the headphones.
2. Follow the same procedure with “B” phone.
3. Then power off the headphones again.
4. Power up headphones again. They will automatically connect to
phone “B” (the last one connected). To enable connection with
second phone, simultaneously short press multi-function button
and panel centre. Check “found devices” on phone “A” and select
Kygo A9/600 to connect.

ENGLISH
17
Pairing to a phone with NFC function
1. Turn on your phone and ensure its NFC function is activated.
2. Turn on your Kygo A9/600 headphones.
3. Put your phone’s NFC zone near the left side of your Kygo A9/600
headphones.
4. If your phone needs to confirm the connection, press YES.
5. After successfully connecting, you can enjoy music, play games
and watch movies via your Kygo A9/600. You can also can control
the player in Kygo A9/600. You can also use the headphones to
control volume and next/previous tracks.


Sidan laddas...
Sidan laddas...
Sidan laddas...
Sidan laddas...
Sidan laddas...
Sidan laddas...
Sidan laddas...
Sidan laddas...
Sidan laddas...
Sidan laddas...
Sidan laddas...
Sidan laddas...
Sidan laddas...
Sidan laddas...
Sidan laddas...
Sidan laddas...
Sidan laddas...
Sidan laddas...
Sidan laddas...
Sidan laddas...
Sidan laddas...
Sidan laddas...
Sidan laddas...
Sidan laddas...
Sidan laddas...
Sidan laddas...
Sidan laddas...
Sidan laddas...
Sidan laddas...
Sidan laddas...
Sidan laddas...
Sidan laddas...
Sidan laddas...
Sidan laddas...
Sidan laddas...
Sidan laddas...
Sidan laddas...
Sidan laddas...
Sidan laddas...
Sidan laddas...
Sidan laddas...
Sidan laddas...
Sidan laddas...
Sidan laddas...
Sidan laddas...
Sidan laddas...
Sidan laddas...
Sidan laddas...
Sidan laddas...
Sidan laddas...
Sidan laddas...
Sidan laddas...
Sidan laddas...
Sidan laddas...
Sidan laddas...
Sidan laddas...
Sidan laddas...
Sidan laddas...
Sidan laddas...
Sidan laddas...
Sidan laddas...
Sidan laddas...
Sidan laddas...
Sidan laddas...
Sidan laddas...
Sidan laddas...
Sidan laddas...
Sidan laddas...
Sidan laddas...
Sidan laddas...
Sidan laddas...
Sidan laddas...
Sidan laddas...
Sidan laddas...
Sidan laddas...
Sidan laddas...
Sidan laddas...
-
 1
1
-
 2
2
-
 3
3
-
 4
4
-
 5
5
-
 6
6
-
 7
7
-
 8
8
-
 9
9
-
 10
10
-
 11
11
-
 12
12
-
 13
13
-
 14
14
-
 15
15
-
 16
16
-
 17
17
-
 18
18
-
 19
19
-
 20
20
-
 21
21
-
 22
22
-
 23
23
-
 24
24
-
 25
25
-
 26
26
-
 27
27
-
 28
28
-
 29
29
-
 30
30
-
 31
31
-
 32
32
-
 33
33
-
 34
34
-
 35
35
-
 36
36
-
 37
37
-
 38
38
-
 39
39
-
 40
40
-
 41
41
-
 42
42
-
 43
43
-
 44
44
-
 45
45
-
 46
46
-
 47
47
-
 48
48
-
 49
49
-
 50
50
-
 51
51
-
 52
52
-
 53
53
-
 54
54
-
 55
55
-
 56
56
-
 57
57
-
 58
58
-
 59
59
-
 60
60
-
 61
61
-
 62
62
-
 63
63
-
 64
64
-
 65
65
-
 66
66
-
 67
67
-
 68
68
-
 69
69
-
 70
70
-
 71
71
-
 72
72
-
 73
73
-
 74
74
-
 75
75
-
 76
76
-
 77
77
-
 78
78
-
 79
79
-
 80
80
-
 81
81
-
 82
82
-
 83
83
-
 84
84
-
 85
85
-
 86
86
-
 87
87
-
 88
88
-
 89
89
-
 90
90
-
 91
91
-
 92
92
-
 93
93
-
 94
94
-
 95
95
-
 96
96
-
 97
97


på andra språk
- eesti: Kygo A9/600 Kasutusjuhend
- English: Kygo A9/600 User manual
- dansk: Kygo A9/600 Brugermanual
Andra dokument
-
elvita EHL100S trådlösa on-ear hörlurar Bruksanvisning
-
 amadeus PESANTE TRÅDLØSE HODETELEFONER, HVIT Bruksanvisning
-
Pioneer SE-C8TW Användarmanual
-
-
Exibel Tonalite MH-802 Användarmanual
-
Exibel BIT100 Användarmanual
-
-
-
Jabra bt 320s Användarmanual
-
Jabra Headphones BT325s Användarmanual
