Samsung PS42A456P2C Användarmanual
- Kategori
- LCD-TV
- Typ
- Användarmanual

Thank you for purchasing this Samsung product.
To receive more complete service, please register
your product at
www.samsung.com/global/register
imagine the possibilities
Plasma TV
user manual
BN68-01416C-00
Contact SAMSUNG WORLD-WIDE
If you have any questions or comments relating to Samsung products, please contact the SAMSUNG
customer care centre.
Country
Customer Care Centre
Web Site
AUSTRIA 0800-SAMSUNG(726-7864) www.samsung.com/at
BELGIUM 0032 (0)2 201 24 18 www.samsung.com/be
CZECH REPUBLIC
844 000 844 www.samsung.com/cz
Distributor pro Českou republiku:
Samsung Zrt., česka organizační složka Vyskočilova 4, 14000 Praha 4
DENMARK 70 70 19 70 www.samsung.com/dk
EIRE 0818 717 100 www.samsung.com/ie
ESTONIA 800-7267 www.samsung.ee
FINLAND 030-6227 515 www.samsung.com/fi
FRANCE
"3260 SAMSUNG (€ 0,15/Min)
08 25 08 65 65 (€ 0,15/Min)"
www.samsung.com
GERMANY 01805 - SAMSUNG(726-7864 € 0,14/Min) www.samsung.com
HUNGARY 06-80-SAMSUNG(726-7864) www.samsung.com
ITALIA 800-SAMSUNG(726-7864) www.samsung.com
KAZAKHSTAN 8-10-800-500-55-500 www.samsung.kz
KYRGYZSTAN 00-800-500-55-500 -
LATVIA 800-7267 www.samsung.com/lv
LITHUANIA 8-800-77777 www.samsung.lt
LUXEMBURG 0035 (0)2 261 03 710 www.samsung.com/be
NETHERLANDS 0900-SAMSUNG (726-7864 € 0,10/Min) www.samsung.com/nl
NORWAY 815-56 480 www.samsung.com/no
POLAND
"0 801 801 881
022-607-93-33"
www.samsung.com/pl
PORTUGAL 80820-SAMSUNG(726-7864) www.samsung.com/pt
RUSSIA 8-800-555-55-55 www.samsung.ru
SLOVAKIA 0800-SAMSUNG(726-7864) www.samsung.com/sk
SPAIN 902 10 11 30 www.samsung.com
SWEDEN 0771-400 200 www.samsung.com/se
SWITZERLAND 0800-SAMSUNG(726-7864) www.samsung.com/ch
TURKEY 444 77 11 www.samsung.com
TADJIKISTAN 8-10-800-500-55-500 -
U.K 0845 SAMSUNG (7267864) www.samsung.com
UKRAINE 8-800-502-0000 www.samsung.com
UZBEKISTAN 8-10-800-500-55-500 www.samsung.uz
Model__________Serial No.___________
BN68-01416C-Eng.indb 1 2008-04-22 오후 2:57:02
Sidan laddas...
Sidan laddas...

English - 4
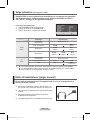
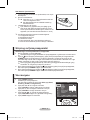
Checking Parts
Owner’s Instructions Remote Control/
AAA Batteries
Power Cord Cloth-Clean
Warranty Card/
Safety Guide Manual
(Not available in all locations)
Cover-Bottom / Screws (2ea)
(Refer to page 50)
Ferrite Core for Power Cord Ferrite Core for S-Video
Sold Separately
Antenna Cable Component Cables Audio Cables PC Cable
Scart Cable PC Audio Cable HDMI Cable HDMI/DVI Cable
➢
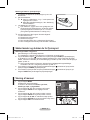
Ferrite Core (Power Cord, S-Video)
The ferrite cores are used to shield the cables from interference.
When connecting a cable, open the ferrite core and clip it around the cable near
the plug.
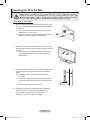
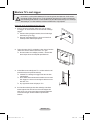
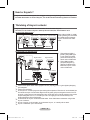
Using the Stand-Base
➢
Two or more people should carry
the PDP. Never lay the PDP on the
floor because of possible damage
to the screen. Always keep the
PDP upright.
The PDP can rotate 20 degrees in
right and left directions.
-20° ~ 20°
BN68-01416C-Eng.indb 4 2008-04-22 오후 2:57:07
Sidan laddas...
Sidan laddas...
Sidan laddas...
Sidan laddas...
Sidan laddas...
Sidan laddas...
Sidan laddas...

English - 12
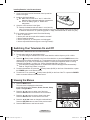
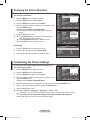
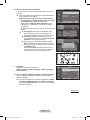
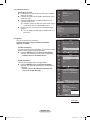
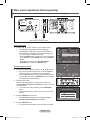
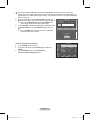
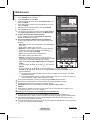
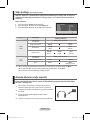
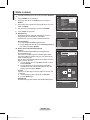
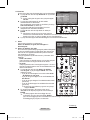
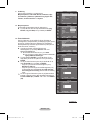
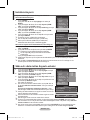
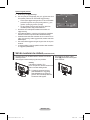
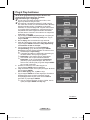
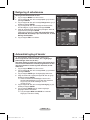
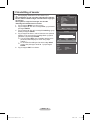
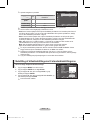
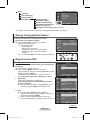
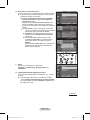
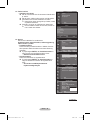
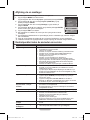
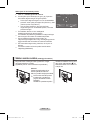
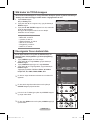
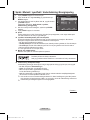
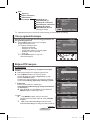
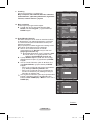
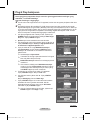
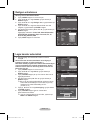
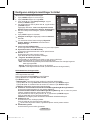
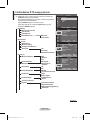
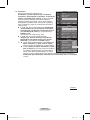
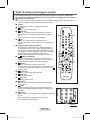
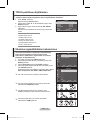
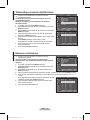
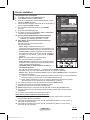
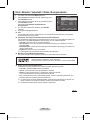
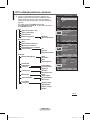
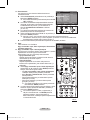
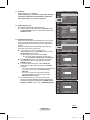
Viewing External Signal Sources
You can switch between viewing signals from connected
equipment, such as a VCR, DVD, Set-Top Box, and the TV
source (broadcast or cable).
1 Press the MENU button to display the menu.
2 Press the ▲ or ▼ button to select Input, then press the
ENTER button.
3 Press the ENTER button again to select Source List.
4 Press the ▲ or ▼ button to select the signal source, then
press the ENTER button.
Available signal sources:
TV, Ext.1, Ext.2, AV, S-Video,
Component, PC, HDMI1, HDMI2, HDMI3, DTV
➢
You can choose only those external devices that are
connected to the TV.
➢
You can select these options simply by pressing the SOURCE
button on the remote control.
➢
To watch television programme again, press the TV/DTV button
and select the channel number required.
➢
You can also watch HDMI mode simply by pressing the HDMI
button on the remote control.
Using the TOOLS Button
You can use the TOOLS button to select your frequently used functions quickly and easily. The
“Tools” menu changes depending on which external input mode you are viewing.
1 Press the TOOLS button.
The Tools menu will appear.
2 Press the ▲ or ▼ button to select a menu, then press the
ENTER button.
3 Press the ▲/▼/◄/►/ENTER buttons to display, change, or
use the selected items.
For a more detailed description of each function, refer to the
corresponding page.
• Anynet
+
(HDMI-CEC), see page 43
• Picture Mode, see page 18
• Sound Mode, see page 23
• Sleep Timer, see page 25
• SRS TS XT, see page 23
• Energy Saving, see page 27
• Dual I-II, see page 24
Move
Enter
Return
Source List :
TV ►
Edit Name ►
Anynet
+
(HDMI-CEC)
Input
T V
Move
Enter
Return
TV
Ext.1 :−−−−
Ext.2 :−−−−
AV :−−−−
S-Video :−−−−
Component :−−−−
PC :−−−−
HDMI1 :−−−−
HDMI2 :−−−−
HDMI3 :−−−−
DTV
Source List
T V
Tools
Anynet+ (HDMI-CEC)
Picture Mode : Standard
Sound Mode : Custom
Sleep Timer : Off
SRS TS XT : Off
Energy Saving : Off
Dual I-II : Mono
BN68-01416C-Eng.indb 12 2008-04-22 오후 2:57:19

English - 13
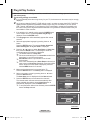
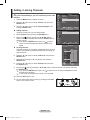
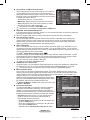
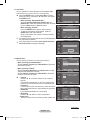
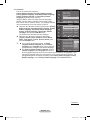
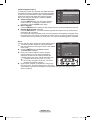
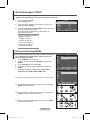
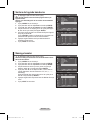
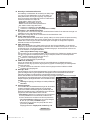
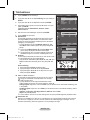
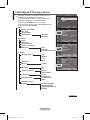
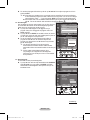
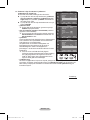
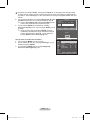
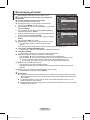
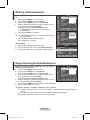
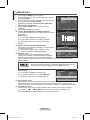
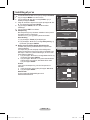
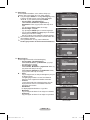
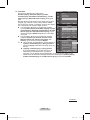
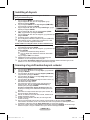
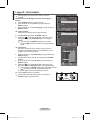
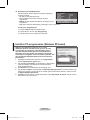
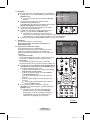
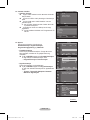
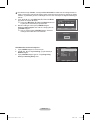
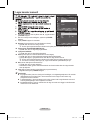
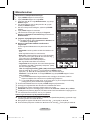
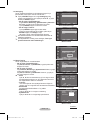
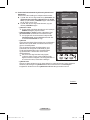
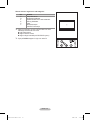
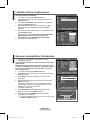
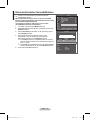
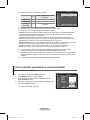
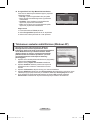
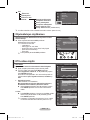
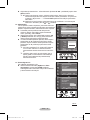
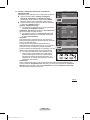
Editing Device Names
You can give a name to the external source.
1 Press the MENU button to display the menu.
2 Press the ▲ or ▼ button to select Input, then press the
ENTER button.
3 Press the ▲ or ▼ button to select Edit Name, then press the
ENTER button.
4 Press the ▲ or ▼ button to select the external source to be
edited, then press the ENTER button.
5 Select the required device by pressing ▲ or ▼, then press the
ENTER button.
Available device names:
VCR, DVD, Cable STB, Satellite
STB, PVR STB, AV Receiver, Game, Camcorder, PC, TV,
IPTV, Blu-Ray, HD DVD, DMA.
6 Press the EXIT button to exit.
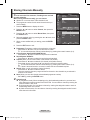
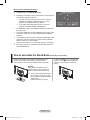
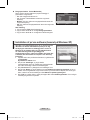
Storing Channels Automatically
➢
Not available in DTV or external input mode.
You can scan for the frequency ranges available to you
(availability depends on your country).
Automatically allocated programme numbers may not
correspond to actual or desired programme numbers.
However you can sort numbers manually and clear any
channels you do not wish to watch.
1 Press the MENU button to display the menu.
2 Press the ▲ or ▼ button to select Channel, then press the
ENTER button.
3 Press the ENTER button again. The available countries are
listed.
4 Select your country by pressing the ▲ or ▼ button, then press
the ENTER button.
➢
Even though you have changed the country setting in this
menu, the country setting for DTV is not changed. Use
the Plug & Play function to change the country setting for
DTV. (Refer to pages 10 to 11)
5 Press the ▲ or ▼ button to select Auto Store, then press the
ENTER button.
6 Press the ENTER button again to start the search.
The search will end automatically.
➢
To stop the search before it has finished, press the MENU
or the ENTER button.
Move
Enter
Return
Source List :
TV ►
Edit Name ►
Anynet
+
(HDMI-CEC)
Input
T V
Move
Enter
Return
Country :
United Kingdom
►
Auto Store ►
Manual Store ►
Channel Manager ►
Sort ►
Name ►
Fine Tune ►
Channel
T V
Auto Store
P 1 C -- 40 MHz
0 %
Enter
Return
Start
Move
Enter
Return
Ext.1 :−−−−
Ext.2 : −−−−
AV :
S-Video :
Component : −−−−
PC : −−−−
HDMI1 :
HDMI2 :
HDMI3 :
Edit Name
T V
----
VCR
DVD
Cable STB
Satellite STB
PVR STB
AV Receiver
Game
▼
Move
Enter
Return
Country :
United Kingdom
Auto Store
Manual Store
Channel Manager
Sort
Name
Fine Tune
Channel
Belgium
France
Germany
Italy
Netherlands
Spain
Switzerland
United Kingdom
▼
T V
BN68-01416C-Eng.indb 13 2008-04-22 오후 2:57:20
Sidan laddas...

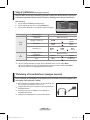
English - 15
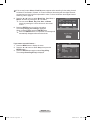
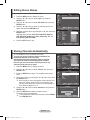
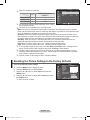
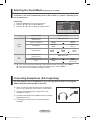
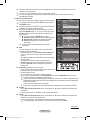
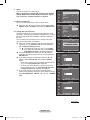
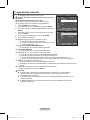
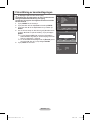
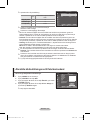
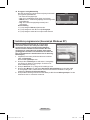
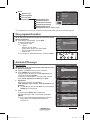
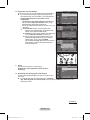
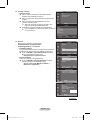
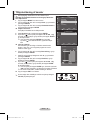
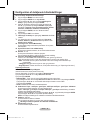
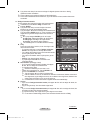
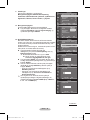
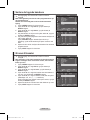
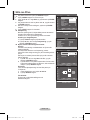
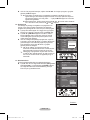
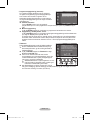
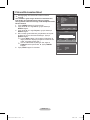
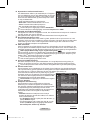
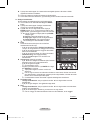
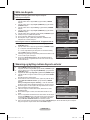
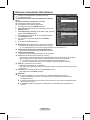
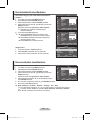
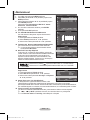
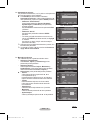
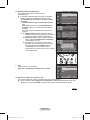
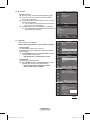
Adding / Locking Channels
➢
Not available in DTV or external input mode.
Using the Channel Manager, you can conveniently lock or add
channels.
1 Press the MENU button to display the menu.
2 Press the ▲ or ▼ button to select Channel, then press the
ENTER button.
3 Press the ▲ or ▼ button to select Channel Manager, then
press the ENTER button.
Adding channels
Using the Channel List, you can add channels.
4 Select Channel List by pressing the ENTER button.
5 Move to the ( ) field by pressing the ▲/▼/◄/► buttons,
select a channel to be added, and press the ENTER button to
add the channel.
➢
If you press the ENTER button again, the ( ) symbol
next to the channel disappears and the channel is not
added.
Locking channels
This feature allows you to prevent unauthorized users, such as
children, from watching unsuitable programmes by muting out
video and audio.
6 Press the ▲ or ▼ button to select Child Lock, then press the
ENTER button.
7 Select On by pressing the ▲ or ▼ button, then press the
ENTER button.
8 Press the ▲ or ▼ button to select Channel List, then press
the ENTER button.
9 Move to the ( ) field by pressing the ▲/▼/◄/► buttons, select a channel to be locked, and press
the ENTER button.
➢
If you press the ENTER button again, the ( ) symbol next to the channel disappears and the
channel lock is canceled.
➢
A blue screen is displayed when Child Lock is activated.
10 Press the EXIT button to exit.
➢
You can select these options simply by pressing the CH LIST
button on the remote control.
Move
Enter
Return
Country :
United Kingdom
►
Auto Store ►
Manual Store ►
Channel Manager ►
Sort ►
Name ►
Fine Tune ►
Channel
T V
Move
Enter
Return
Channel List
►
Child Lock : Off ►
Channel Manager
T V
Channel List
P 1 C 6
1 / 10
▲
▼
Prog.
0
C 1
1 C --
2 C --
3 C --
4 C --
5 C --
6 C --
7 C --
8 C --
9 C --
Add Lock
Move Enter
Page Return
BN68-01416C-Eng.indb 15 2008-04-22 오후 2:57:21

English - 16
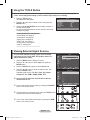
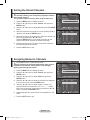
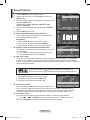
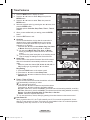
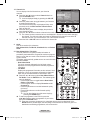
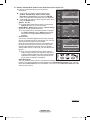
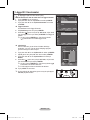
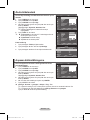
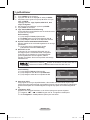
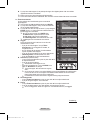
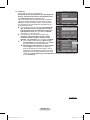
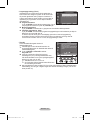
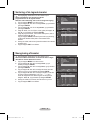
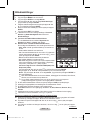
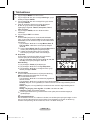
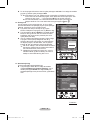
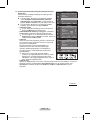
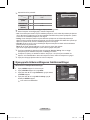
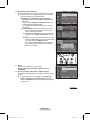
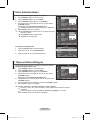
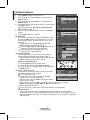
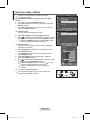
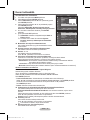
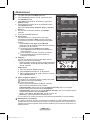
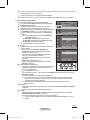
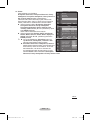
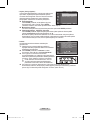
Sorting the Stored Channels
➢
Not available in DTV or external input mode.
This operation allows you to change the programme numbers
of the stored channels.
This operation may be necessary after using the auto store.
1 Press the MENU button to display the menu.
2 Press the ▲ or ▼ button to select Channel, then press the
ENTER button.
3 Press the ▲ or ▼ button to select Sort, then press the ENTER
button.
4 Select the channel that you wish to move by pressing the ▲ or
▼ button, then press the ENTER button.
5 Select the number of the programme to which the channel is to
be moved by pressing the ▲ or ▼ button.
Press the ENTER button. The channel is moved to its new
position and all other channels are shifted accordingly.
6 Repeat steps 4 to 5 until you have moved all the channels to
the required programme numbers.
7 Press the EXIT button to exit.
Assigning Names to Channels
➢
Not available in DTV or external input mode.
Channel names will be assigned automatically when channel
information is broadcast. These names can be changed,
allowing you to assign new names.
1 Press the MENU button to display the menu.
2 Press the ▲ or ▼ button to select Channel, then press the
ENTER button.
3 Press the ▲ or ▼ button to select Name, then press the
ENTER button.
4 Press the ▲ or ▼ button to select the channel to be assigned
to a new name, then press the ENTER button.
5 Press the ▲ or ▼ button to select a letter, a number, or a
symbol (Results in this sequence: A~Z, 0~9, +, -, *, /, blank).
Move on to the previous or next letter by pressing the ◄ or ►
button, then press the ENTER button.
6 Repeat steps 4 to 5 for each channel to be assigned to a new
name.
7 Press the EXIT button to exit.
Move
Enter
Return
Country :
United Kingdom
►
Auto Store ►
Manual Store ►
Channel Manager ►
Sort ►
Name ►
Fine Tune ►
Channel
T V
Move
Enter
Return
Prog. Ch. Name
▲
0 C01 −−−−− ►
1 C-- −−−−−
2 C-- −−−−−
3 C-- −−−−−
4 C-- −−−−−
5 C-- −−−−−
6 C-- −−−−−
7 C-- −−−−−
8 C-- −−−−−
9 C-- −−−−−
▼
Sort
T V
Move
Enter
Return
Prog. Ch. Name
▲
0 C01 −−−−−
1 C-- −−−−−
2 C- - −−−−−
3 C- - −−−−−
4 C- - −−−−−
5 C- - −−−−−
6 C- - −−−−−
7 C- - −−−−−
8 C- - −−−−−
9 C- - −−−−−
▼
Name
T V
Move
Enter
Return
Country :
United Kingdom
►
Auto Store ►
Manual Store ►
Channel Manager ►
Sort ►
Name ►
Fine Tune ►
Channel
T V
BN68-01416C-Eng.indb 16 2008-04-22 오후 2:57:22
Sidan laddas...
Sidan laddas...
Sidan laddas...
Sidan laddas...
Sidan laddas...
Sidan laddas...
Sidan laddas...

English - 24
Selecting the Sound Mode (depending on the model)
The DUAL I-II button displays/controls the processing and output of the audio signal. When power
is switched on, the mode is automatically preset to either “DUAL-I” or “Stereo”, depending on the
current transmission.
Easy Setting
1 Press the TOOLS button on the remote control.
2 Press the ▲ or ▼ button to select Dual I-II.
3 Press the ◄ or ► button to select the required option.
Type of broadcast On-screen indication
NICAM
Stereo
Regular broadcast
(Standard audio)
Mono (Normal use)
Regular + NICAM Mono NICAM
Mono
(Normal)
NICAM Stereo
NICAM
stereo
Mono
(Normal)
NICAM DUAL-I/II
NICAM
dual-1
NICAM
dual-2
Mono
(Normal)
A2
Stereo
Regular broadcast
(Standard audio)
Mono (Normal use)
Bilingual or DUAL-I/II Dual I Dual II
Stereo Stereo
Mono
(Forced mono)
➢
If the receiving conditions deteriorate, listening will be easier if the mode is set to Mono.
If the stereo signal is weak and automatic switching occurs, switch to Mono.
This function is only available in Analog TV mode.
Connecting Headphones (Sold separately)
You can connect a set of headphones to your set if you wish to watch a TV program
without disturbing other people in the room.
➢
When you insert the head set jack into the corresponding
port, you can operate only “Auto Volume” in Sound menu.
➢
Prolonged use of headphones at a high volume may
damage your hearing.
➢
You will not hear sound from the speakers when you connect
headphones to the TV.
➢
The headphone volume and TV volume are adjusted
separately.
TV Side Panel
Tools
Anynet+ (HDMI-CEC)
Picture Mode : Standard
Sound Mode : Custom
Sleep Timer : Off
SRS TS XT : Off
Energy Saving : Off
DualI-II ◄ Mono ►
Move
Adjust
Exit
BN68-01416C-Eng.indb 24 2008-04-22 오후 2:57:27
Sidan laddas...
Sidan laddas...
Sidan laddas...

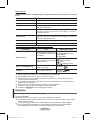
English - 28
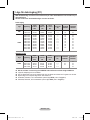
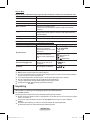
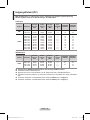
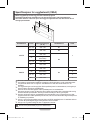
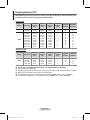
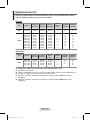
Input Mode (PC)
Both screen position and size will vary depending on the type of PC monitor and its resolution.
The table below shows all of the display modes that are supported:
D-Sub Input
Mode Resolution
Horizontal
Frequency
(kHz)
Vertical
Frequency
(Hz)
Pixel Clock
Frequency
(MHz)
Sync
Polarity
(H/V)
PS42A456/
PS42A457
PS50A456/
PS50A457
IBM
640 x 350
720 x 400
31.469
31.469
70.086
70.087
25.175
28.322
+ / -
- / +
✔
✔
✔
✔
VESA
640 x 480
640 x 480
640 x 480
800 x 600
800 x 600
800 x 600
1024 x 768
1024 x 768
1024 x 768
1360 x 768
31.469
37.861
37.500
37.879
48.077
46.875
48.363
56.476
60.023
47.712
59.940
72.809
75.000
60.317
72.188
75.000
60.004
70.069
75.029
60.015
25.175
31.500
31.500
40.000
50.000
49.500
65.000
75.000
78.750
85.500
- / -
- / -
- / -
+ / +
+ / +
+ / +
- / -
- / -
+ / +
+ / +
✔
✔
✔
✔
✔
✔
✔
✔
✔
✔
✔
✔
✔
✔
✔
✔
✔
✔
✔
HDMI/DVI Input
Mode Resolution
Horizontal
Frequency
(kHz)
Vertical
Frequency
(Hz)
Pixel Clock
Frequency
(MHz)
Sync
Polarity
(H/V)
PS42A456/
PS42A457
PS50A456/
PS50A457
VESA
640 x 480
800 x 600
1024 x 768
1360 x 768
31.469
37.879
48.363
47.712
59.940
60.317
60.004
60.015
25.175
40.000
65.000
85.500
- / -
+ / +
- / -
+ / +
✔
✔
✔
✔
✔
✔
✔
When using an HDMI/DVI cable connection, you must use the HDMI IN 2 jack.
The interlace mode is not supported.
The set might operate abnormally if a non-standard video format is selected.
Separate and Composite modes are supported. SOG is not supported.
For the PS42A456, PS42A457, PC text quality is optimum in VESA mode(1024 x 768@60Hz).
For the PS50A456, PS50A457, PC text quality is optimum in VESA mode (1360 x 768@60Hz).
BN68-01416C-Eng.indb 28 2008-04-22 오후 2:57:30
Sidan laddas...

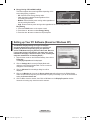
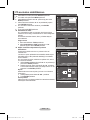
English - 30
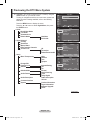
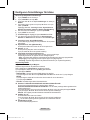
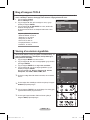
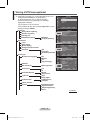
Previewing the DTV Menu System
➢
Available in DTV mode. Preset to the DTV mode by using the
TV/DTV button on your remote control.
To help you navigate around the on-screen menu system and
adjust the various settings available, refer to the following
illustration.
Press the MENU button to display the menu.
Press the ▲ or ▼ button to select
Digital Menu, then press
the ENTER button.
Guide
Now & Next Guide
Full Guide
Scheduled List
Default Guide Now/Next
Full Guide
Digital Channel
Country
Auto Store
Manual Store
Edit Favourite Channels
Channel List All
Favourites
Default/Favourites/All
Setup
Menu Transparency High
Medium
Low
Opaque
Change PIN
Parental Lock Parental Rating
Subtitle Off
On
Subtitle Mode Normal
Hard of hearing
Audio Format PCM
Dolby Digital
Audio Description Audio Description
Volume
Common Interface
System Product Information
Signal Information
Software Upgrade
Reset
Continued...
Move
Enter
Return
Guide
Digital Channel
Setup
Language
Digital Menu
T V
Move
Enter
Return
Now & Next Guide
Full Guide
Scheduled List
Default Guide : Full Guide
Guide
DTV
Country : Denmark
Auto Store
Manual Store
Edit Favourite Channels
Channel List
Channel
Move
Enter
Return
DTV
Menu Transparency : Medium
Change PIN
Parental Lock
Subtitle : On
Subtitle Mode
Setup
Move
Enter
Return
DTV
BN68-01416C-Eng.indb 30 2008-04-22 오후 2:57:32
Sidan laddas...
Sidan laddas...
Sidan laddas...
Sidan laddas...

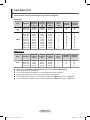
English - 35
To view programme information, press the ▲/▼/◄/► button to select a programme of your
choice, then press the INFO button.
➢
Information such as the channel number, programme title and running time, status bar,
and brief summary of the highlighted programme will be displayed in the top right corner
of the screen. If there is a lengthy summary, “…” will be displayed. Press the INFO button
for the full summary text.
Six channels are displayed. To scroll between channels, move to a channel using the ▲
or ▼ button. To display page by page, use the P or button.
2.2
Scheduled List
If you make a scheduled viewing list of programs you may
like to see, the channel will be automatically switched to the
scheduled program at the scheduled time even if you are
watching another program.
Press the red button to add a new programme. The
menu for adding a programme is displayed with Channel
selected.
Press the ▲/▼ and ENTER buttons to set the required
channel, time, date, and frequency. When you are satisfied
with your settings, save the adjusted schedule by pressing
the red button.
If you want to edit the scheduled programme, select a
programme by pressing the ▲ or ▼ button, then press
the green button. If necessary, select the programme to
be deleted by pressing the ▲ or ▼ button, then press the
blue button.
➢
When watching analog TV, the reserved DTV channel
cannot be changed. The channel is only changed
automatically to the reserved channel when you are
watching DTV.
➢
Scheduling programme only functions with the
television already turned on, and not from standby
mode. For details about switching the television on
and off automatically, refer to page 9.
2.3
Default Guide
You can preset the default guide style.
Press the ▲ or ▼ button to select the required option
(Now/Next or Full Guide), then press the ENTER button.
The selected option for default guide is displayed on the
EPG menu and the channel list appears.
Continued...
Scheduled List
Move
Return
Thursday 22 Apr 15:30 ~ 18:00 Once
2 BBC TWO
Animal Park
Thursday 22 Apr 20:00 ~ 21:00 Once
2 BBC TWO
The Hairy Biker’s
Add Programme Edit Delete
DTV
Scheduled List
Adjust
Move
Return
Save Cancel
Channel
Time
Date
Frequency
20 MOJO
19:00 - 21:00
Thu 6 Jan 2008
Once
DTV
Now & Next Guide
Full Guide
Scheduled List
Default Guide : Full Guide
Guide
Move
Enter
Return
DTV
Now & Next Guide
Full Guide
Scheduled List
Default Guide : Full Guide
Guide
Move
Enter
Return
Now/Next
Full Guide
DTV
BN68-01416C-Eng.indb 35 2008-04-22 오후 2:57:39
Sidan laddas...
Sidan laddas...
Sidan laddas...
Sidan laddas...
Sidan laddas...
Sidan laddas...
Sidan laddas...
Sidan laddas...
Sidan laddas...
Sidan laddas...
Sidan laddas...
Sidan laddas...

English - 48
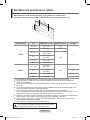
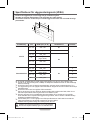
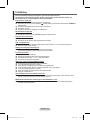
Wall Mount Kit Specifications (VESA)
Install your wall mount on a solid wall perpendicular to the floor.
When attaching to other building materials, please contact your nearest dealer.
If installed on a ceiling or slanted wall, it may fall and result in severe personal injury.
Product Family inch VESA Spec. (A * B) Standard Screw Quantity
LCD-TV
23 ~ 26 200
*
100 M4
4
32 ~ 40 200
*
200 M6
46 ~ 52
400 * 400
600 * 400
M8
57
700 * 400
(No VESA)
57 ~ 70 800 * 400
80 ~ 1400 * 800
PDP-TV
42 ~ 58
400 * 400
600 * 400
M8
4
63
676 * 407
(No VESA)
6
63 ~ 70 800 * 400 4
80 ~ 1400 * 800 4
➢
We provided the standard dimensions for wall mount kits as shown in the table above.
➢
When purchasing our wall mount kit, a detailed installation manual and all parts necessary for
assembly are provided.
➢
Do not use screws longer than the standard dimension, as they may cause damage to the inside of
the TV set.
➢
For wall mounts that do not comply with the VESA standard screw specifications, the length of the
screws may differ depending on their specifications.
➢
Do not use screws that do not comply with the VESA standard screw specifications.
Do not use fasten the screws too strongly, this may damage the product or cause the product to fall,
leading to personal injury. Samsung is not liable for these kinds of accidents.
➢
Samsung is not liable for product damage or personal injury when a non-VESA or non-specified wall
mount is used or the consumer fails to follow the product installation instructions.
➢
Our 57” and 63” models do not comply with VESA Specifications. Therefore, you should use our
dedicated wall mount kit for this model.
➢
Do not exceed 15 degrees tilt when mounting this TV.
Do not install your Wall Mount Kit while your TV is turned on.
It may result in personal injury due to electric shock.
BN68-01416C-Eng.indb 48 2008-04-22 오후 2:57:53
Sidan laddas...
Sidan laddas...
Sidan laddas...
Sidan laddas...

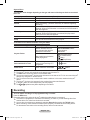
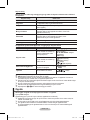
English - 53
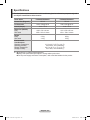
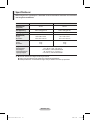
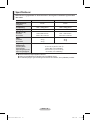
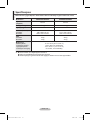
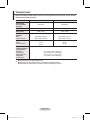
Specifications
The descriptions and characteristics in this booklet are given for information purposes only and
are subject to modification without notice.
Model Name PS42A456/PS42A457 PS50A456/PS50A457
Screen Size (Diagonal) 42 inch 50 inch
PC Resolution 1024 x 768 @ 60 Hz 1360 x 768 @ 60 Hz
Sound (Output) 10 W + 10 W 10 W + 10 W
Dimension (WxHxD)
Body
With stand
1055 x 725 x 94 mm
1055 x 725 x 316 mm
1231 x 756 x 95 mm
1231 x 756 x 316 mm
Weight
Body
With stand
27 Kg
31 Kg
35 Kg
37 Kg
Environmental
Considerations
Operating Temperature
Operating Humidity
Storage Temperature
Storage Humidity
10 °C to 40 °C (50 °F to 104 °F)
10% to 80%, non-condensing
-20 °C to 45 °C (-4 °F to 113 °F)
5% to 95%, non-condensing
➢
This device is a Class B digital apparatus.
Design and specifications are subject to change without prior notice.
For the power supply and Power Consumption, refer to the label attached to the product.
BN68-01416C-Eng.indb 53 2008-04-22 오후 2:57:58

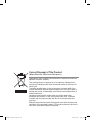
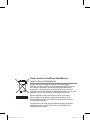
Correct Disposal of This Product
(Waste Electrical & Electronic Equipment)
(Applicable in the European Union and other European countries with
separate collection systems)
This marking shown on the product or its literature, indicates that it
should not be disposed with other household wastes at the end of its
working life.
To prevent possible harm to the environment or human health from
uncontrolled waste disposal, please separate this from other types of
wastes and recycle it responsibly to promote the sustainable reuse of
material resources.
Household users should contact either the retailer where they
purchased this product, or their local government office, for details
of where and how they can take this item for environmentally safe
recycling.
Business users should contact their supplier and check the terms and
conditions of the purchase contract. This product should not be mixed
with other commercial wastes for disposal.
BN68-01416C-Eng.indb 54 2008-04-22 오후 2:57:58

Svenska - 2
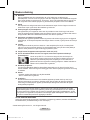
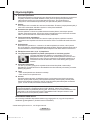
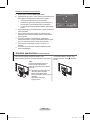
Användaranvisningar
Bilden på skärmen behålls
Visa inte en stillbild (från t.ex. ett videospel, eller när du ansluter en dator till den här
plasmabildskärmen) på plasmabildskärmen i mer än 2 timmar, eftersom detta kan medföra att bilden
på skärmen behålls. Att bilden på skärmen behålls kallas även ”bildskärmsbränning”. Du kan undvika
att bilden behålls genom att minska på ljusstyrkan och kontrasten på bildskärmen när du visar
stillbilder.
Höjd
Plasmabildskärmen fungerar i normala fall endast på höjder under 2 000 m. På höjder över 2 000 m
kan det hända att den inte fungerar som den ska. Du bör därför undvika att installera och använda
den på sådana höjder.
Värme ovanpå plasmaskärmen
Observera att produktens ovandel kan bli varm efter långvarig användning, eftersom värmen
passerar genom den övre ventilen i skärmen. Detta är helt normalt och beror inte på något fel på
produkten. Barn ska dock inte röra vid produktens ovansida.
Det hörs ett ‘sprucket’ ljud från produkten
Ett ’sprucket’ ljud kan uppstå om produkten dras ihop eller vidgas något beroende på exempelvis
temperaturväxlingar eller ändrar luftfuktighet. Det här är normalt och beror inte på något fel på
produkten.
Defekta celler
Plasmaskärmen består av en panel med 1 230 000 (SD-level) till 3 150 000(HD-level) pixlar, vilket
kräver en väl utvecklad teknik. Det kan dock finnas några få mörka eller ljusa pixlar på skärmen.
Dessa pixlar har ingen inverkan på produktens prestanda.
Undvik att använda TV:n i temperaturer som understiger 5°C(41°F)
En stillbild som visas för länge på skärmen kan orsaka permanenta skador på
plasmaskärmen.
Om du använder formatet 4:3 för länge kan det bli spår av marginalerna som till
vänster, höger och i mitten av skärmen och som orsakas av ljusstyrkan. Om du
spelar en DVD eller ett spel kan det orsaka liknande effekter på skärmen. Skador
som orsakas av det som beskrivs ovan täcks inte av garantin.
Kvarvarande bild på skärmen
Om du visar stillbilder från TV- och dataspel under för långa perioder kan det göra att det ligger kvar
rester av bilden sedan. För att förhindra detta ska du minska på ljusstyrka och kontrast vid visning av
stillbilder.
Garanti
- Garantin täcker inga skador som orsakas av att bilden behålls.
- Bildskärmsbränning täcks inte av garantin.
Installation
Kontakta ett auktoriserat servicecenter när du skall installera din skärm på en plats som är dammig,
har höga eller låga temperaturer, hög luftfuktighet, har kemisk påverkan eller där den används dygnet
runt, som exempelvis på en flygplats eller en tågstation etc.
Alla funktioner som är kopplade till Digital TV (DVB) fungerar endast i länder eller områden där DVB-T
(MPEG2) digitala signaler sänds. Kontrollera hos din lokala återförsäljare om du kan ta emot DVB-T-
signaler. Trots att den här TV-skärmen följer DVB-T-specifikataionerna, garanteras inte kompatibilitet
med framtida digitala DVB-T-signaler. Flera funktioner kanske inteär tillgängliga i vissa länder.
Kontakta SAMSUNG WORLDWIDE
Om du har några frågor eller kommentarer angående Samsungs produkter, kontakta SAMSUNG:s
kundtjänst. (Se bakre omslaget för ytterligare information).
© 2008 Samsung Electronics Co., Ltd. All rights reserved.
BN68-01416C-00Swe.indd 2 2008-4-22 11:05:59

Svenska - 3
Symboler
☛ ➢
Tryck på
Viktigt
Obs!
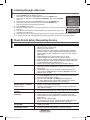
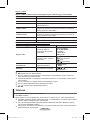
Innehåll
Allmän information
Användaranvisningar ...................................... 2
Kontrollera delar .............................................. 4
Att använda stativ ........................................... 4
Kontrollpanelen ............................................... 5
Anslutningspanel ............................................. 6
Visa fjärrkontrollen .......................................... 8
Användning
Slå på och stänga av TV:n .............................. 9
Visa menyerna ................................................ 9
Plug & Play-funktion ...................................... 10
Använda knappen TOOLS ............................ 12
Visa en extern signalkälla ............................. 12
Redigera enheternas namn .......................... 13
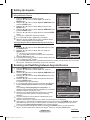
Kanalstyrning
Lagra kanaler automatiskt ............................. 13
Lagra kanaler manuellt ................................. 14
Lägga till / låsa kanaler ................................. 15
Sortera de lagrade kanalerna ....................... 16
Namnge kanaler ............................................ 16
Fininställning av kanalmottagningen ............. 17
Bildkontroll
Ändra bildstandard ........................................ 18
Anpassa bildinställningarna .......................... 18
Kongurera ninställningar för bilden ............ 19
Bildalternativ .................................................20
Återställa bildinställningarna till
fabriksstandard .............................................22
Ljudstyrning
Ljudfunktioner ...............................................23
Välja ljudläge (beroende på modell) ............. 24
Ansluta hörlurar (säljs separat) ..................... 24
Beskrivning av funktioner
Tidsfunktioner ................................................ 25
Language / Melody / Light Effect /
Entertainment / Energy Saving ..................... 26
Datorskärm
Installera programvaran
(baserad på Windows XP) ............................ 27
Läge för datoringång (PC) ............................ 28
Ställa in datorn .............................................. 29
Använda DTV-funktionen
Förhandsvisa DTV-menysystemet ................ 30
Visa programinformation ............................... 31
Använda DTV-menyn .................................... 32
Om Anynet+
Vad är Anynet+? ........................................... 42
Ansluta Anynet+-enheter............................... 42
Installera Anynet+ ......................................... 43
Söka och växla mellan Anynet+-enheter....... 43
Inspelning ...................................................... 44
Lyssna via mottagaren .................................. 45
Kontroller före kontakt med service .............. 45
Bilaga
Text-tv-funktion (beroende på modell) .......... 46
Specikationer för väggmonteringssats
(VESA) .......................................................... 48
Justering av väggfäste (säljs separat) .......... 49
Så här monterar du stativet
(modellberoende) .......................................... 50
Montera TV:n mot väggen ............................. 51
Felsökning ..................................................... 52
Specikationer ..............................................53
Svenska
BN68-01416C-00Swe.indd 3 2008-4-22 11:05:59

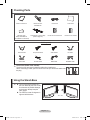
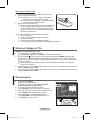
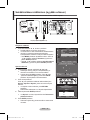
Svenska - 4
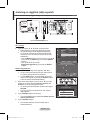
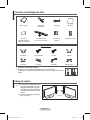
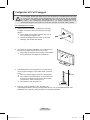
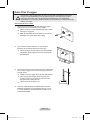
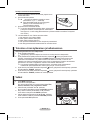
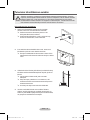
Att använda stativ
➢
Två eller fler personer bör
bära plasmabildskärmen. Lägg
aldrig plasmabildskärmen på
golvet på grund av risk för
skada på skärmen. Se till att
plasmabildskärmen alltid är i
upprätt läge.
Det går att rotera
plasmabildskärmen 20 grader i
höger och vänster riktning.
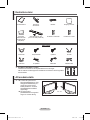
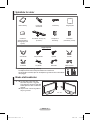
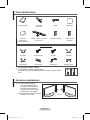
Kontrollera delar
Användarhandbok Fjärrkontroll/
AAA-batterier
Nätsladd Rengöring med trasa
Garantikort/
Säkerhetsmanual
(Ej tillgängligt på
alla platser)
Nedre kåpa/skruvar (2ea)
(Läs mer om detta på sidan 50)
Ferritkärna för strömkabel Ferritkärna för S-video
Säljs separat
Antennkabel Komponentkablar Ljudkablar PC-kabel
Scart-kabel PC-ljudkabel HDMI-kabel HDMI/DVI-kabel
➢
Ferritkärna (strömkabel, S-video)
Ferritkärnorna används för att skydda kablarna mot störningar.
När du ansluter en kabel öppnar du ferritkärnan och klämmer den kring kabeln
nära kontakten.
-20° ~ 20°
BN68-01416C-00Swe.indd 4 2008-4-22 11:06:01

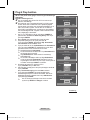
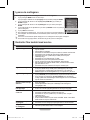
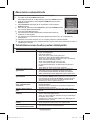
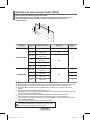
Svenska - 5
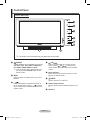
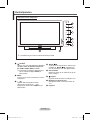
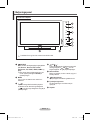
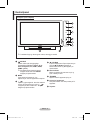
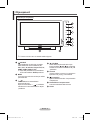
Kontrollpanelen
➢
Produktens färg och form kan variera beroende på modell.
1
SOURCE
Visar en meny över alla tillgängliga indatakällor
(TV, Ext.1, Ext.2, AV, S-Video, Component,
PC, HDMI1, HDMI2, HDMI3
och DTV).
➢
Använd den här knappen på skärmmenyn
när du använder knappen
ENTER på
fjärrkontrollen.
2
MENU
Tryck här om du vill se en skärmmeny med TV:
ns funktioner.
3
– +
Tryck för attöka ellerminska volymen.
I skärmmenyn använder du
– + -
knapparna på samma sätt som◄ och ► på
fjärrkontrollen.
4
C/P.
Tryck här när du vill byta kanal. I skärmmenyn
använder du
C/P. .-knapparna så
som du använder ▲ och ▼ på fjärrkontrollen.
5
Strömindikator
Blinkar och stängs av när strömmen är på och
tänds i viloläge
6
knappen
Tryck här när du ska slå på och stänga av TV:n.
7
Mottagare för fjärrkontrollen
Rikta fjärrkontrollen mot den här punkten på
TV:n.
8
Högtalare
Främre panelen eller sidopanelen
BN68-01416C-00Swe.indd 5 2008-4-22 11:06:02

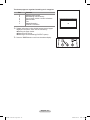
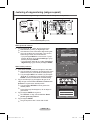
Svenska - 6
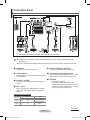
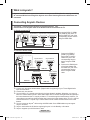
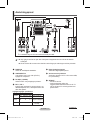
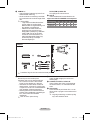
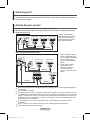
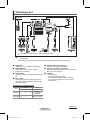
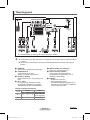
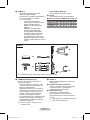
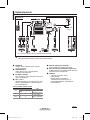
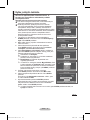
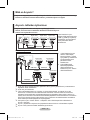
Anslutningspanel
Fortsättning...
☛
Varje gång du ansluter ett ljud- eller videosystem till apparaten ska du se till att alla delar är
avstängda.
När du ansluter till en extern enhet skall du matcha färgen på anslutningen med den på kabeln.
1
POWER IN
Anslut den medföljande nätsladden.
2
COMPONENT IN
Ljud (AUDIO (V)/(H)) och video (Y/P
B/PR)
ingångar till Component.
3
PC IN(PC) / (AUDIO)
Anslut till video- och ljudutgången på datorn.
4
EXT 1, EXT 2
Ingångar eller utgångar för externa enheter, t.ex.
videobandspelare, DVD, videospelsenheter eller
video disc-spelare.
Ingångar/utgångar specifikation
Kontakt
Ingång Utgång
Video Ljud (V/H) RGB Video + ljud (V/H)
EXT 1
✔ ✔ ✔
Enbart TV- eller DTV-
utgången är tillgänglig.
EXT 2
✔ ✔
Utgång som du
kan välja.
5
Digital ljudutgång (optisk)
Anslut till en digital ljudkomponent.
6
Ansluta externa ljudenheter
Anslut RCA-signaler från TV:n till en extern källa,
t.ex. ljudutrustning.
7
SERVICE
− Kontakt för service.
− Anslut serieuttaget mellan den
väggmonterade elektrokonsolen och din TV
när du vill justera TV:ns visningsvinkel med
fjärrkontrollen.
Baksida
➢
Produktens färg och form kan variera beroende på modell.
Kabel-TV-nät
eller
eller
1
432 6 85
9
7
BN68-01416C-00Swe.indd 6 2008-4-22 11:06:05

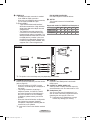
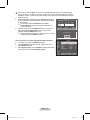
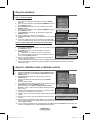
Svenska - 7
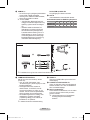
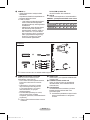
8
HDMI IN 1,2
− Ingen ytterligare ljudanslutning krävs för en
HDMI till HDMI-anslutning.
− När du använder en anslutning med HDMI/
DVI -kabel måste du använda uttaget HDMI
IN 2.
➢
Vad är HDMI?
− “High Definition Multimedia interface”
gör det möjligt att överföra digital
bildinformation av högdefinitionstyp och
flera kanaler med digitalt ljud.
− HDMI/DVI-terminalen stöder DVI-
anslutning till en extra enhet med
lämplig kabel (medföljer ej). Skillnaden
mellan HDMI och DVI är att HDMI-
enheten är mindre till storleken, har
HDCP(High Bandwidth Digital Copy
Protection)-kodning och stödjer
flerkanals digitalt ljud.
DVI IN (HDMI 2) AUDIO R/L
DVI-utgångar för externa enheter.
9
ANT IN
75Ω Koaxialkontakt för antenn/kabel-tv-nät.
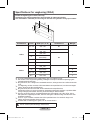
Lägen som stöds för HDMI/DVI och Component
480i 480p 576i 576p 720p 1080i
HDMI/DVI 50Hz
X X X O O O
HDMI/DVI 60Hz
X O X X O O
Component O O O O O O
➢
Produktens färg och form kan variera beroende på modell.
Sidopanel
1
Plats för COMMON INTERFACE
ISätt ett CI(Common Interface)-kort i
kortplatsen. (läs mer om detta på sidan 40)
− Om ”CI-kortet” inte sitter i visas ”kodad
signal” på vissa kanaler på tv-skärmen.
− Information som bland annat omfattar ett
telefonnummer, CI-kortets ID, värd-ID visas
i ungefär 2-3 minuter. Om ett felmeddelande
visas kontaktar du tjänsteleverantören.
− Närkonfigurationen av kanalinformationen
slutförts visas meddelandet “uppdateringen
klar”, vilket innebär att kanallistan
uppdaterats.
➢
Sätt i CI-kortet i pilens riktning.
2
HDMI IN 3
Anslut till HDMI-uttaget på en enhet med
HDMI-utgång.
3
S-VIDEO eller VIDEO / AUDIO L/R
Video (S-Video eller Video) och ljudingångar
för externa enheter, t.ex. videokameror eller
video.
4
Hörlursuttag
Du kan ansluta ett par hörlurar till tv:n om du
vill titta på ett tv-program utan att störa andra i
rummet.
➢
Långvarig användning av hörlurar på hög
volym kan skada din hörsel.
4
2
eller
3
1
BN68-01416C-00Swe.indd 7 2008-4-22 11:06:07

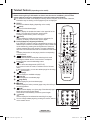
Svenska - 8
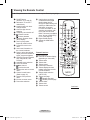
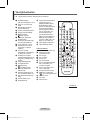
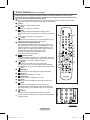
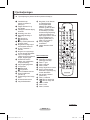
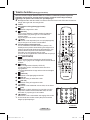
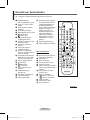
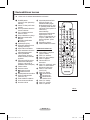
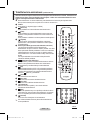
Visa fjärrkontrollen
Fjärrkontrollens funktion kan påverkas av starkt ljus.
1
POWER-knappen
(slår på och stänger av TV:n)
2
Väljer TV- och DTV-läge
direkt
3
Sifferknappar för direkt
åtkomst till kanaler
4
Välja en-/tvåsiffriga kanaler
5
Stänga av ljudet tillfälligt
6
Öka volymen
Sänka volymen
7
Visar EPG (elektronisk
programguide)
8
Använd för att snabbt välja
ofta använda funktioner.
9
Flytta markören i menyn
0
Använd denna för att se
information om aktuell
sändning
#
Tryck för att välja
tillvalsdisplay och ljudlägen
för idrott, bio och spel.
$
VIDEO-/DVD-funktion
(snabbspolning bakåt, stopp,
play/paus, snabbspolning
framåt)
%
Välja tillgängliga källor
^
Föregående kanal
&
Nästa kanal
Föregående kanal
*
Visar huvudmenyn för
skärmmenyn
(
Kanalstyrningsknapp (Läs
mer om detta på sidan 15)
)
Går tillbaka till föregående
meny
a
Avsluta skärmmenyn
b
Välja bildformat
c
Använd det här alternativet
vid anslutning av en
SAMSUNG DMA (Digital
Media Adapter)-enhet
genom ett HDMI-gränssnitt
och växla till DMA-läge.
(DMA-knappen är tillval.)
För mer information om
användningsmetoder,
se bruksanvisningen för
DMA. Den här knappen är
tillgänglig när funktionen
“Anynet+ (HDMI-CEC)” är i
läget “På” (se sidan 43).
d
Visar digitala undertexter
e
Väjer HDMI-läge direkt
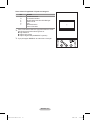
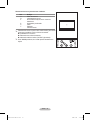
Text-tv-funktioner
(Läs mer om detta på sidan 46)
2
Avsluta text-tv-läge
(modellberoende)
7
Text-tv lagra
8
Text-tv storlek
0
Text-tv visa
!
Text-tv Ämnesval
@
Text-tv visning/blanda både
text-tv-information och
normalt tv-program
%
Text-tv val av läge (LIST/
FLOF (Lista/Flof))
^
Underordnad Text-tv-sida
&
P :Text-tv nästa sida
P
:Text-tv föregående sida
*
Index för text-tv
)
Text-tv lås
a
Avbryta text-tv
Fortsättning...
TV/DTV
GUIDE
TTX/MIX P.SIZE DMA
E.MODE SUBT.HDMI
-
/
--
MENU
P
BN68-01416C-00Swe.indd 8 2008-4-22 11:06:08
Sidan laddas...
Sidan laddas...
Sidan laddas...
Sidan laddas...
Sidan laddas...
Sidan laddas...
Sidan laddas...
Sidan laddas...
Sidan laddas...
Sidan laddas...
Sidan laddas...
Sidan laddas...
Sidan laddas...
Sidan laddas...
Sidan laddas...
Sidan laddas...
Sidan laddas...
Sidan laddas...
Sidan laddas...
Sidan laddas...
Sidan laddas...
Sidan laddas...
Sidan laddas...
Sidan laddas...
Sidan laddas...
Sidan laddas...
Sidan laddas...
Sidan laddas...
Sidan laddas...
Sidan laddas...
Sidan laddas...
Sidan laddas...
Sidan laddas...
Sidan laddas...
Sidan laddas...
Sidan laddas...
Sidan laddas...
Sidan laddas...
Sidan laddas...
Sidan laddas...
Sidan laddas...
Sidan laddas...
Sidan laddas...
Sidan laddas...
Sidan laddas...
Sidan laddas...
Sidan laddas...
Sidan laddas...
Sidan laddas...
Sidan laddas...
Sidan laddas...
Sidan laddas...
Sidan laddas...
Sidan laddas...
Sidan laddas...
Sidan laddas...
Sidan laddas...
Sidan laddas...
Sidan laddas...
Sidan laddas...
Sidan laddas...
Sidan laddas...
Sidan laddas...
Sidan laddas...
Sidan laddas...
Sidan laddas...
Sidan laddas...
Sidan laddas...
Sidan laddas...
Sidan laddas...
Sidan laddas...
Sidan laddas...
Sidan laddas...
Sidan laddas...
Sidan laddas...
Sidan laddas...
Sidan laddas...
Sidan laddas...
Sidan laddas...
Sidan laddas...
Sidan laddas...
Sidan laddas...
Sidan laddas...
Sidan laddas...
Sidan laddas...
Sidan laddas...
Sidan laddas...
Sidan laddas...
Sidan laddas...
Sidan laddas...
Sidan laddas...
Sidan laddas...
Sidan laddas...
Sidan laddas...
Sidan laddas...
Sidan laddas...
Sidan laddas...
Sidan laddas...
Sidan laddas...
Sidan laddas...
Sidan laddas...
Sidan laddas...
Sidan laddas...
Sidan laddas...
Sidan laddas...
Sidan laddas...
Sidan laddas...
Sidan laddas...
Sidan laddas...
Sidan laddas...
Sidan laddas...
Sidan laddas...
Sidan laddas...
Sidan laddas...
Sidan laddas...
Sidan laddas...
Sidan laddas...
Sidan laddas...
Sidan laddas...
Sidan laddas...
Sidan laddas...
Sidan laddas...
Sidan laddas...
Sidan laddas...
Sidan laddas...
Sidan laddas...
Sidan laddas...
Sidan laddas...
Sidan laddas...
Sidan laddas...
Sidan laddas...
Sidan laddas...
Sidan laddas...
Sidan laddas...
Sidan laddas...
Sidan laddas...
Sidan laddas...
Sidan laddas...
Sidan laddas...
Sidan laddas...
Sidan laddas...
Sidan laddas...
Sidan laddas...
Sidan laddas...
Sidan laddas...
Sidan laddas...
Sidan laddas...
Sidan laddas...
Sidan laddas...
Sidan laddas...
Sidan laddas...
Sidan laddas...
Sidan laddas...
Sidan laddas...
Sidan laddas...
Sidan laddas...
Sidan laddas...
Sidan laddas...
Sidan laddas...
Sidan laddas...
Sidan laddas...
Sidan laddas...
Sidan laddas...
Sidan laddas...
Sidan laddas...
Sidan laddas...
Sidan laddas...
Sidan laddas...
Sidan laddas...
Sidan laddas...
Sidan laddas...
Sidan laddas...
Sidan laddas...
Sidan laddas...
Sidan laddas...
Sidan laddas...
Sidan laddas...
Sidan laddas...
Sidan laddas...
Sidan laddas...
Sidan laddas...
Sidan laddas...
Sidan laddas...
Sidan laddas...
Sidan laddas...
Sidan laddas...
Sidan laddas...
Sidan laddas...
Sidan laddas...
Sidan laddas...
Sidan laddas...
Sidan laddas...
Sidan laddas...
Sidan laddas...
Sidan laddas...
Sidan laddas...
Sidan laddas...
Sidan laddas...
Sidan laddas...
Sidan laddas...
Sidan laddas...
Sidan laddas...
Sidan laddas...
Sidan laddas...
Sidan laddas...
Sidan laddas...
Sidan laddas...
Sidan laddas...
Sidan laddas...
Sidan laddas...
Sidan laddas...
Sidan laddas...
Sidan laddas...
Sidan laddas...
Sidan laddas...
Sidan laddas...
Sidan laddas...
Sidan laddas...
Sidan laddas...
Sidan laddas...
Sidan laddas...
Sidan laddas...
Sidan laddas...
Sidan laddas...
Sidan laddas...
Sidan laddas...
Sidan laddas...
Sidan laddas...
Sidan laddas...
Sidan laddas...
Sidan laddas...
Sidan laddas...
Sidan laddas...
Sidan laddas...
Sidan laddas...
Sidan laddas...
Sidan laddas...
Sidan laddas...
Sidan laddas...
Sidan laddas...
Sidan laddas...
Sidan laddas...
Sidan laddas...
Sidan laddas...
Sidan laddas...
Sidan laddas...
Sidan laddas...
Sidan laddas...
Sidan laddas...
Sidan laddas...
Sidan laddas...
Sidan laddas...
Sidan laddas...
Sidan laddas...
Sidan laddas...
Sidan laddas...
Sidan laddas...
Sidan laddas...
-
 1
1
-
 2
2
-
 3
3
-
 4
4
-
 5
5
-
 6
6
-
 7
7
-
 8
8
-
 9
9
-
 10
10
-
 11
11
-
 12
12
-
 13
13
-
 14
14
-
 15
15
-
 16
16
-
 17
17
-
 18
18
-
 19
19
-
 20
20
-
 21
21
-
 22
22
-
 23
23
-
 24
24
-
 25
25
-
 26
26
-
 27
27
-
 28
28
-
 29
29
-
 30
30
-
 31
31
-
 32
32
-
 33
33
-
 34
34
-
 35
35
-
 36
36
-
 37
37
-
 38
38
-
 39
39
-
 40
40
-
 41
41
-
 42
42
-
 43
43
-
 44
44
-
 45
45
-
 46
46
-
 47
47
-
 48
48
-
 49
49
-
 50
50
-
 51
51
-
 52
52
-
 53
53
-
 54
54
-
 55
55
-
 56
56
-
 57
57
-
 58
58
-
 59
59
-
 60
60
-
 61
61
-
 62
62
-
 63
63
-
 64
64
-
 65
65
-
 66
66
-
 67
67
-
 68
68
-
 69
69
-
 70
70
-
 71
71
-
 72
72
-
 73
73
-
 74
74
-
 75
75
-
 76
76
-
 77
77
-
 78
78
-
 79
79
-
 80
80
-
 81
81
-
 82
82
-
 83
83
-
 84
84
-
 85
85
-
 86
86
-
 87
87
-
 88
88
-
 89
89
-
 90
90
-
 91
91
-
 92
92
-
 93
93
-
 94
94
-
 95
95
-
 96
96
-
 97
97
-
 98
98
-
 99
99
-
 100
100
-
 101
101
-
 102
102
-
 103
103
-
 104
104
-
 105
105
-
 106
106
-
 107
107
-
 108
108
-
 109
109
-
 110
110
-
 111
111
-
 112
112
-
 113
113
-
 114
114
-
 115
115
-
 116
116
-
 117
117
-
 118
118
-
 119
119
-
 120
120
-
 121
121
-
 122
122
-
 123
123
-
 124
124
-
 125
125
-
 126
126
-
 127
127
-
 128
128
-
 129
129
-
 130
130
-
 131
131
-
 132
132
-
 133
133
-
 134
134
-
 135
135
-
 136
136
-
 137
137
-
 138
138
-
 139
139
-
 140
140
-
 141
141
-
 142
142
-
 143
143
-
 144
144
-
 145
145
-
 146
146
-
 147
147
-
 148
148
-
 149
149
-
 150
150
-
 151
151
-
 152
152
-
 153
153
-
 154
154
-
 155
155
-
 156
156
-
 157
157
-
 158
158
-
 159
159
-
 160
160
-
 161
161
-
 162
162
-
 163
163
-
 164
164
-
 165
165
-
 166
166
-
 167
167
-
 168
168
-
 169
169
-
 170
170
-
 171
171
-
 172
172
-
 173
173
-
 174
174
-
 175
175
-
 176
176
-
 177
177
-
 178
178
-
 179
179
-
 180
180
-
 181
181
-
 182
182
-
 183
183
-
 184
184
-
 185
185
-
 186
186
-
 187
187
-
 188
188
-
 189
189
-
 190
190
-
 191
191
-
 192
192
-
 193
193
-
 194
194
-
 195
195
-
 196
196
-
 197
197
-
 198
198
-
 199
199
-
 200
200
-
 201
201
-
 202
202
-
 203
203
-
 204
204
-
 205
205
-
 206
206
-
 207
207
-
 208
208
-
 209
209
-
 210
210
-
 211
211
-
 212
212
-
 213
213
-
 214
214
-
 215
215
-
 216
216
-
 217
217
-
 218
218
-
 219
219
-
 220
220
-
 221
221
-
 222
222
-
 223
223
-
 224
224
-
 225
225
-
 226
226
-
 227
227
-
 228
228
-
 229
229
-
 230
230
-
 231
231
-
 232
232
-
 233
233
-
 234
234
-
 235
235
-
 236
236
-
 237
237
-
 238
238
-
 239
239
-
 240
240
-
 241
241
-
 242
242
-
 243
243
-
 244
244
-
 245
245
-
 246
246
-
 247
247
-
 248
248
-
 249
249
-
 250
250
-
 251
251
-
 252
252
-
 253
253
-
 254
254
-
 255
255
-
 256
256
-
 257
257
-
 258
258
-
 259
259
-
 260
260
-
 261
261
-
 262
262
-
 263
263
-
 264
264
-
 265
265
-
 266
266
-
 267
267
-
 268
268
-
 269
269
-
 270
270
-
 271
271
-
 272
272
-
 273
273
-
 274
274
-
 275
275
-
 276
276
-
 277
277
-
 278
278
-
 279
279
-
 280
280
-
 281
281
-
 282
282
-
 283
283
-
 284
284
-
 285
285
-
 286
286
-
 287
287
-
 288
288
-
 289
289
-
 290
290
-
 291
291
-
 292
292
-
 293
293
-
 294
294
-
 295
295
-
 296
296
-
 297
297
-
 298
298
-
 299
299
-
 300
300
-
 301
301
-
 302
302
-
 303
303
-
 304
304
-
 305
305
-
 306
306
-
 307
307
-
 308
308
-
 309
309
-
 310
310
-
 311
311
-
 312
312
-
 313
313
-
 314
314
-
 315
315
-
 316
316
-
 317
317
-
 318
318
-
 319
319


Samsung PS42A456P2C Användarmanual
- Kategori
- LCD-TV
- Typ
- Användarmanual
på andra språk
- English: Samsung PS42A456P2C User manual
- dansk: Samsung PS42A456P2C Brugermanual
- suomi: Samsung PS42A456P2C Ohjekirja
Relaterade papper
-
Samsung PS50B535S2W Användarmanual
-
-
-
Samsung PS50B555T4W Användarmanual
-
-
-
-
-
-