Whirlpool SDD 534 U Användarguide
- Kategori
- Diskmaskiner
- Typ
- Användarguide

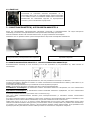
INSTRUCTION MANUAL FOR PROFESSIONAL
DISHWASHERS P.1
INSTRUKTIONSHANDBOK FÖR PROFESSIONELLA
DISKMASKINER S.15
BRUKSANVISNING FOR PROFESJONELLE OPPVASKMASKINER P.28
BRUGSANVISNING TIL PROFESSIONEL OPVASKEMASKINE P.41
KÄYTTÖOPAS AMMATTIKÄYTTÖÖN TARKOITETUILLE
ASTIANPESUKONEILLE S.55
Original instructions – Översättning av bruksanvisning i original – Oversettelse av den originale bruksanvisningen -
Originale anvisninger - Käännös alkuperäisistä ohjeista
MANUAL « A » STANDARD ECO REV01 1/1/2018
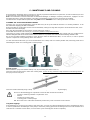
A
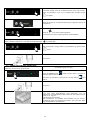
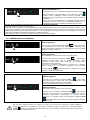
TECHNICAL LABEL / TEKNISK ETIKETT / TYPESKILT /
TYPESKILT / ARVOKILPI

2
INSTRUCTION MANUAL FOR PROFESSIONAL DISHWASHERS
We thank you for purchasing our dishwasher.
You are recommended to read all the instructions given in this manual very carefully to understand the best
and correct way to use the dishwasher.
TECHNICAL INSTRUCTIONS:
These instructions are for qualified technicians who install, commission, test and possibly
carry out maintenance on the dishwasher.
The installation technician shall make sure the user has understood the contents of the
instruction manual, has understood how the machine works properly and knows how to load
the baskets with crockery and glasses correctly.
USER INSTRUCTIONS:
They give operational advice, descriptions of the controls and how to clean and service the
dishwasher correctly.
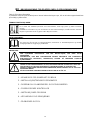
WARNINGS
THE USER IS RESPONSIBLE FOR THE LEGAL FULFILMENTS CORRELATED TO THE
INSTALLATION AND USE OF THE PRODUCT. IF THE PRODUCT IS NOT INSTALLED OR USED
CORRECTLY, OR SUITABLE MAINTENANCE IS NOT CARRIED OUT, THE MANUFACTURER
CANNOT BE HELD LIABLE FOR ANY BREAKAGES, MALFUNCTIONS, DAMAGES TO
PROPERTY OR INJURIES TO PEOPLE THAT COULD OCCUR.
ALWAYS UNPLUG THE DISHWASHER FROM THE MAINS SOCKET BEFORE STARTING ANY
MAINTENANCE WORK. IF THIS IS NOT POSSIBLE, IF THE MAINS SWITCH IS HIDDEN BEHIND
THE MACHINE OR FAR AWAY FROM WHOEVER CARRIES OUT THE WORK, YOU MUST PUT
UP A SIGN ON THE EXTERNAL MAINS SWITCH AFTER TURNING IT OFF TO WARN OTHERS
THAT MAINTENANCE WORK IS IN PROGRESS
.
1 – SAFETY AND OPERATIONAL WARNINGS
2 – INSTALLING / TECHNICAL SPECIFICATIONS
3 – RINSE AID AND DETERGENT DISPENSING
4 – PREVENTIVE CHECKS
5 – OPERATIONAL INSTRUCTIONS
6 – MAINTENANCE AND CLEANING
7 – ERRORS DISPLAYED/PROBLEMS

3
1 – SAFETY AND OPERATIONAL WARNINGS
THE
DISHWASHER IS INTENDED EXCLUSIVELY FOR PROFESSIONAL USE AND MUST BE USED BY AUTHORIZED
PERSONNEL. IT IS DESIGNED TO WASH DISHES (PLATES, CUPS, BOWLS, TRAYS, SILVERWARE) AND SIMILAR
ITEMS USED IN GASTRONOMIC SECTORS AS WELL AS IN THE PUBLIC CATERING BRANCH, AND IN
CONFORMITY TO THE INTERNATIONAL ELECTRICAL AND MECHANICAL SAFETY (CEI-EN-IEC 60335-2-58/61770)
AND ELECTROMAGNETIC COMPATIBILITY (CEI-IEC-EN 55014-1/-2, 61000-3;4, 50366) NORMS.
THE MANUFACTUIRER DECLINES ANY RESPONSIBILITY FOR DAMAGE TO PERSONS OR THINGS CAUSED BY
FAILURE TO OBSERVE THE INSTRUCTIONS PRESENT IN THE MANUAL, INCORRECT USE, TAMPERING, EVEN
WITH A SINGLE PART OF THE MACHINE, AND THE USE OF NON-ORIGINAL SPARE PARTS. IN CASE OF DAMAGE
OF THE POWER SUPPLY CABLE, IT MUST BE REPLACED ONLY BY MANUFACTURER OR BY AUTHORIZED
CUSTOMER CENTER AND BY QUALIFIED TECNICIANS.
THIS MACHINE IS MARKED IN CONFORMITY TO THE EUROPEAN DIRECTIVE 2002/96/EC, WASTE ELECTRICAL
AND ELECTRONIC EQUIPMENT (WEE).
ENSURING THAT THIS PRODUCT BE DISPOSED OF IN A PROPER MANNER CONTRIBUTES TO THE PREVENTION
OF POTENTIAL NEGATIVE HEALTH AND ENVIRONMENTAL CONSEQUENCES. WE DECLARES THAT THE
EMISSION SOUND PRESSURE LEVEL LPA IS 62 DB/A WITH AN UNCERTAINTY EQUALS TO KPA + 1 DB. SOUND
POWER LEVEL IS LWA 73.79 WITH ITS UNCERTAINTY EQUALS TO KWA + 1 DB
THE SYMBOL UPON THE PRODUCT, OR UPON ITS ACCOMPANYING DOCUMENTATION, INDICATES THAT
THIS PRODUCT MAY NOT BE TREATED AS DOMESTIC WASTE, BUT RATHER MUST BE TAKEN TO A COLLECTION
FACILITY WHICH IS SUITABLE FOR THE RECYCLING OF ELECTRIC AND ELECTRONIC EQUIPMENT.
DISCARD THIS PRODUCT IN CONFORMITY TO THE LOCAL NORMS REGARDING WASTE DISPOSAL.
FOR MORE INFORMATION REGARDING THE TREATMENT, SALVAGE AND RECYCLING OF THIS PRODUCT,
CONTACT YOUR COMPETENT LOCAL OFFICES, YOUR LOCAL WASTE COLLECTION SERVICE PROVIDER OR THE
POINT OF SALE IN WHICH THE PRODUCT WAS PURCHASED.
THIS MANUAL CONSTITUTES AND INTEGRAL PART OF THE DISHWASHER; IT MUST ALWAYS
BE PRESERVED INTACT AND KEPT TOGETHER WITH THE MACHINE.
POSITIONING, CONNECTIONS, ACTIVATION AND TROUBLESHOOTING,AND SUBSTITUTION OF
THE POWER CABLE MUST BE PERFORMED BY QUALIFIED PERSONNEL.
THE GROUNDING CONNECTION IS OBLIGATORY, IN ACCORDANCE WITH THE METHODS
PRESCRIBED BY THE ELECTRICAL SYSTEM’S SAFETY NORMS.
DO NOT INSERT SOLVENTS SUCH AS ALCOHOL OR TURPENTINE INTO THE MACHINE, WHICH
COULD CAUSE AN EXPLOSION. DO NOT INSERT DISHES WITH ASH, WAX OR VARNISH RESIDUES
INTO THE MACHINE.
NEVER USE THE DISHWASHER OR ITS PARTS AS A STEPLADDER OR SUPPORT FOR PERSONS,
THINGS OR ANIMALS.
LEANING OR SITTING UPON THE DISHWASHER’S OPEN DOOR COULD CAUSE AN OVERTURN WITH
CONSEQUENT DANGER TO PEOPLE IN THE PROXIMITY.
IN ORDER TO AVOID TRIPPING UPON IT, DO NOT LEAVE THE DISHWASHER DOOR OPEN.
DO NOT DRINK THE RESIDUAL WATER WHICH MAY BE PRESENT WITHIN THE DISHES OR THE
DISHWASHER ITSELF AFTER A WASH CYCLE.
THE MACHINE IS NOT SUITABLE TO BE USED BY MINORS, AND BY PEOPLE WITH REDUCED
PHYSICAL, SENSORIAL OR MENTAL CAPABILITIES, WHO LACK THE NECESSARY EXPERIENCE
AND KNOWLEDGE FOR ITS PROPER OPERATION.THE USE OF THE MACHINE IS PERMITTED TO
THESE PEOPLE EXCLUSIVELY UNDER THE SUPERVISION OF A PERSON IN CHARGE OF THEIR
SAFETY.
After cleaning the appliance at the end of the day, make sure no metal foreign bodies are left inside it, which
could cause internal rusting. Traces of rust could also come from non-stainless cutlery/crockery, unsuitable
detergents, from damaged wire baskets, scouring pads or metal sponges or renegeration salt spilled on the
bottom of the tank.

4
Keep the instruction handbook near the dishwasher for future consultation.
Read the handbook carefully before installing and using the dishwasher for the first time.
If the electrical and plumbing systems have to be adapted to install the dishwasher, these modifications must be
carried out by authorised professionals.
• The dishwasher is a professional machine. It must be used by adult and authorised personnel. It must be installed and
repaired exclusively by a qualified technical assistance service. The manufacturer declines all forms of responsibility for
improper use, maintenance and repairs.
• This dishwasher must not be used by children or anybody who has restricted physical, sensorial or mental capacities or by
anybody who has not been appropriately trained or who is not properly supervised.
• The door must be guided by hand when opening and closing it.
• Make sure the dishwasher does not sit on the power supply cable or on the filling and draining hoses. Adjust the support feet
of the machine to set it level.
• Do not stand on the appliance or any parts of it to reach higher places, because it is not designed to take the weight of people,
but just the weight of the basket for the crockery and cutlery to be washed.
• The dishwasher is designed only and exclusively to wash plates, glasses and various crockery soiled with residues of human
food. Do NOT use it to wash objects soiled with petrol, paint, pieces of steel or metal, fragile objects or objects made of material
that will not withstand the washing process. Do not use acid or alkaline corrosive chemical products or solvents or chlorine
based detergents.
• Do not open the doors of the dishwasher while it is working. The dishwasher is equipped with a safety device that will
immediately stop it to avoid the leakage of water if the doors should be opened accidentally. Always remember to switch the
dishwasher off and to empty the tank before accessing it to clean it or for any other reason.
• When you have finished using the dishwasher at the end of the day and when you need to carry out any form of
maintenance on it, you must disconnect the dishwasher from the mains power supply by switching the service switch
and the mains power switch on the wall off and shut off the water supply tap.
• The user must not carry out any repairs or maintenance work on the dishwasher. These jobs must be carried out by qualified
and authorised personnel.
• Any assistance required on this dishwasher must be carried out by authorised personnel.
NB: Use exclusively original spare parts, otherwise the product warranty issued and the manufacturer's responsibility
will become void.
• Do not use old water filling hoses, but exclusively new filling hoses.
• The following fundamental rules must be observed when using this appliance:
1) Never touch the appliance with wet hands or feet.
2) Never use the appliance with bare feet.
3) Do not install the appliance in workplaces where it could get sprayed/splashed with water.
• Do not put your bare hands into water containing detergent. If you do, wash them thoroughly under running water
straightaway.
• Strictly follow the manufacturer’s instruction handbook for the cleaning operations.
• This appliance is designed to work in a workplace with a maximum ambient temperature of 35°C, in a suitable area where the
temperature is never lower than 5°C.
• Do not use water to extinguish fire on electrical parts.
• After disconnecting the power supply, only qualified personnel may access the control panel.
• The machine has a protection rating against accidental water splashes of IPX1; it is not protected against pressurised water
sprays; you are therefore recommended not to use pressurised cleaning systems.
ATTENTION: YOU MUST WAIT 10 MINUTES AFTER SWITCHING THE MACHINE OFF TO CLEAN IT INTERNALLY.
ATTENTION: IT IS FORBIDDEN TO PUT YOUR HANDS INTO THE TANK AND/OR TO TOUCH THE PARTS AT THE
BOTTOM OF THE TANK DURING AND/OR AT THE END OF THE WASH CYCLE.
NB: The manufacturer declines all forms of responsibility for personal injuries or damage to property deriving from the
failed observance of the instructions given above.
1.1 GENERAL WARNINGS

5
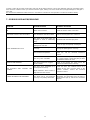
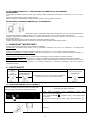
VOLT
ALWAYS UNPLUG THE DISHWASHER FROM THE MAINS SOCKET BEFORE STARTING ANY
MAINTENANCE WORK. IF THIS IS NOT POSSIBLE, IF THE MAINS SWITCH IS HIDDEN BEHIND THE
MACHINE OR FAR AWAY FROM WHOEVER CARRIES OUT THE WORK, YOU MUST PUT UP A SIGN ON
THE EXTERNAL MAINS SWITCH AFTER TURNING IT OFF TO WARN OTHERS THAT MAINTENANCE
WORK IS IN PROGRESS.
TEMPERATURE / TEMPERATUR / LÄMPÖTILAT MIN. 45°C – MAX/ MAKS 55°C
PRESSURE / TRYCK / TRYKK / TRYK / PAINE MIN. 2 – MAX/ MAKS 4 kPa/Bar
HARDNESS / HÅRDHET / HARDHETSGRAD / HÅRDHED / VEDEN KOVUUS MIN. 7° - MAX/ MAKS 12°F
/ MIN. 5° - MAX/ MAKS 7°dH
SI TRIPHASE / OM TREFAS / HVIS TREFASE / HVIS TREFASET / JOS KOLMIVAIHEINEN
DON’T REVERSE THE PHASE WITH THE NEUTRE (BLUE)
OMVÄND INTE FASEN MED NEUTRAL (BLÅ)
IKKE BYTT OM FASELEDERNE MED DEN NØYTRALE LEDEREN (BLÅ).
OMBYT IKKE FASEN MED DEN NEUTRALE (BLÅ)
ÄLÄ KÄÄNNÄ VAIHEEN JA NOLLAN (SININEN) PAIKKAA
RINSE AID / SKÖLJMEDEL / GLANSEMIDDEL / AFSPÆNDINGSMIDDEL / HUUHTELUKIRKASTE
TRANSPARENT PIPE / TUYAU TRANSPARENTE/ GJENNOMSIKTIG SLANGE / GENNEMSIGTIG SLANGE /
LÄPINÄKYVÄ LETKU
DETERGENT / DISKMEDEL / OPPVASKMIDDEL / OPVASKEMIDDEL / PESUAINE (OPTION/ ALTERNATIV/
IKKE STANDARD/ EI STANDARD) RED PIPE / RÖTT RÖR / RØD SLANGE / RØD SLANGE / PUNAINEN
LETKU
IF WASH PUMP IS THREEPHASE / OM VATTENPUMPEN ÄR TREFAS / HVIS VASKEPUMPEN ER TREFASET / MED
TREFASET PUMPE / JOS PESUPUMPPU KOLMIVAIHEINEN: VERIFY THE MOTOR ROTATION, VERIFIERA MOTORNS
ROTATION, KONTROLLER ROTASJONSRETNINGEN, KONTROLLER OMDREJNINGSRETNINGEN, TARKISTA KIERTOSUUNTA
IF WATER HARDNESS IS HIGHER THAN 12°F / 7° dH INSTALL AN EXTERNAL WATER SOFTENER
OM VATTNETS HÅRDHET ÄR HÖGRE ÄN 12 °F / 7 °dH SKA EN EXTERN VATTENAVHÄRDARE INSTALLERAS
HVIS VANNETS HARDHETSGRAD ER OVER 12 °F/7 °dH, MÅ DET INSTALLERES ET EKSTERNT AVKALKINGSFILTER
HVIS VANDETS HÅRDHED OVERSTIGER 12°F / 7° dH SKAL DER INSTALLERES ET EKSTERNT BLØDGØRINGSANLÆG
MIKÄLI VEDEN KOVUUS YLITTÄÄ 12 °F / 7° dH, ASENNA ULKOINEN VEDENPEHMENNIN
H DRAIN / DRÄNERING / AVLØPSHØYDE / AFLØB / VEDENPOISTOKORKEUS: MAX/MAKS 10 CM – HOOD/ LUCKA MAX 20 CM
DISHWASHER WITHOUT WATERSOFTENER
DISKMASKINEN UTAN VATTENAVHÄRDARE
OPPVASKMASKIN UTEN AVKALKINGSFILTER
OPVASKEMASKINE UDEN BLØDGØRINGSANLÆG
ASTIANPESUKONE ILMAN VEDENPEHMENNINTÄ
1.2 TO VERIFY – KONTROLLER – KONTROLLERE – KONTROL - TARKISTA
DISHWASHER WITH WATERSOFTENER
DISKMASKIN MED VATTENAVHÄRDARE
OPPVASKMASKIN MED AVKALKINGSFILTER
OPVASKEMASKINE MED BLØDGØRINGSANLÆG
ASTIANPESUKONE VEDENPEHMENTIMELLÄ
TEMPERATUR / LÄMPÖTILAT MAX/ MAKS 30°C
PRESSURE / TRYCK / TRYKK / TRYK / PAINE MIN. 3 – MAX/ MAKS 4 kPa/Bar
HARDNESS / HÅRDHET / HARDHETSGRAD / HÅRDHED / VEDEN KOVUUS MIN. 7° - MAX 26°F / MIN.
5° - MAX/ MAKS 15°dH
USE REGENERATING SALT AND PERIODICALLY FILL THE CONTAINER IN THE WASHTANK
ANVÄND REGENERERANDE SALT OCH FYLL BEHÅLLAREN I DISKTANKEN REGELBUNDET
BRUK OPPVASKMASKINSALT OG FYLL OPP BEHOLDEREN I VASKEKARET JEVNLIG
BRUG SALT OG FYLD BEHOLDEREN I BUNDEN JÆVNLIGT
KÄYTÄ ASTIANPESUKONESUOLAA JA TÄYTÄ ALTAAN SÄILIÖ SÄÄNNÖLLISIN VÄLIAJOIN

6
2 – INSTALLING THE DISHWASHER / TECHNICAL SPECIFICATIONS
TECHNICAL INSTRUCTIONS:
These instructions are for qualified technicians who install, commission, test and possibly carry out
maintenance on the dishwasher.
The installation technician shall make sure the user has understood the contents of the instruction
manual, has understood how the machine works properly and knows how to load the baskets with
crockery and glasses correctly.
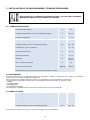
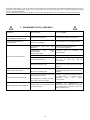
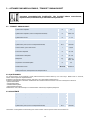
2.1 TECHNICAL SPECIFICATIONS
Water supply temperature
°C
55
Water supply temperature (model with watersoftener)
°C
Max 30
Water supply hardness
°F
7 – 12
Water supply pressure
kPa
200/400
Water supply pressure (model with watersoftener)
kPa
300/400
Rinse cycle water consumption at 200 kPa
l
2,4/2,6
Wash water temperature
°C
50 - 60
Rinse water temperature
°C
82 - 85
Net weight
kg
Min.27
Max 131
Ambient temperature max
°C
40
Power cable type
◄HAR►
H07RN-F
Refer to the rating label located on the front cover of this manual or on the right side panel of the
dishwasher for the voltage and total power.
2.2 POSITIONING
Take the dishwasher to the place of installation, unpack it, check the integrity of the appliance and its components and inform
the transporter in writing immediately if any damages should be noticed.
After unpacking, make sure the appliance has not been damaged during transport.
To dispose of the packing materials, you are recommended to dispose of the materials listed below according to standards
currently in force:
• a wooden pallet
• a nylon bag (LDPE)
• multiply card
• Polypropylene strapping (PP)
Remember that the manufacturer does not organise or manage the differentiated disposal of the appliance at the end of its
service life.
2.3 WATER CONNECTION
Temperature of the supply water
°C
55
Temperature of the supply water (for versions with softener)
°C
Max 35
Hardness of the supply water
°F
7 – 12
Pressure of the supply water
kPa
200/400
Pressure of the supply water (for versions with softener)
kPa
300/400

7
Connect the water supply to the machine using a stop valve that is capable of shutting-off the flow of water quickly and
completely.
Make sure the pressure of the mains water is between the values written on the table.
If it is lower than 200 kPa (dynamic pressure), to ensure the perfect operation of the machine, it is mandatory to install a
pressure booster pump (on request, the machine can be supplied with a built-in pressure booster pump).
If the mains pressure is higher than 400 kPa, you need to install a pressure reducer.
For water with average water hardness above 12°f, it is mandatory to use a scale inhibitor. On request, the machine can be
supplied with a built-in scale inhibitor.
If the machine is equipped with a scale inhibitor, you need to regularly regenerate the resins using special regeneration salt.
The salt compartment can take approximately 1 kg of grain salt.
The salt compartment is located on the bottom of the tank. Take the basket out, unscrew the cap and pour salt in using the
funnel supplied with the machine. Before screwing the cap back on, remove any spilled salt near the opening. Top-up with salt
when there is no water in the tank so that the washing water cannot get into the water softener. Always unplug the machine from
the mains power supply before doing this operation. Remember to plug the appliance back into the mains socket after finishing
the job.
The first time you use the appliance, after adding the salt, add some water to the salt container.
NB: For water with hardness above 12°f, if there is no scale inhibitor, the damages caused by scale will not be covered by the
warranty.
The temperature of the supply water must be between the values indicated on the table.
Each machine is supplied with a water filling hose with threaded 3/4”fitting.
The drainage hose is to be connected, after adding a siphon, directly to the drains. The water falls freely into the drains,
therefore the point where it is connected to the drain outlet must always be below the level of the wash tank. If the existent drain
point is above this level, a suitable drain pump has to be installed (optional). Do not fit the drain hose into the drains of sinks,
bathtubs etc.
For versions with built-in osmosis system, install the carbon or mesh filter supplied on the water supply cock. The water
hardness must be between 7 and 12°F and the maximum temperature 30°C.
The filters must be replaced at least twice a year.
Failed observance of these parameters will cause the internal osmotic membrane to deteriorate rapidly.
Make sure the water hardness is between 7 and 12°F, otherwise install a water softener to prevent damages caused by
scale, which are not covered by warranty.
1° FRENCH = 0.56° German = 0.7° British = 10 p.p.m.
2.4 ELECTRICAL CONNECTION
The electrical connection must be carried out according to technical standards currently in force.
Make sure the measured mains voltage matches that written on the technical data nameplate of the dishwasher.
You have to fit an appropriate omnipolar protection circuit breaker switch suitable for the input of the dishwasher.
This switch must be used exclusively for this utility and installed right next to it.
Make sure the electrical systems are suitably earthed.
The machine also has a connection, at the rear bottom part, marked with the equipotential symbol that is used to connect
various appliances together equipotentially (check standards on electrical systems).
FOR MACHINES WITH THREE-PHASE POWER SUPPLY, BE CAREFUL NOT TO INVERT THE PHASE WIRES WITH THE
NEUTRAL WIRE.
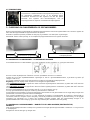
ATTENTION ! MAKE SURE THE THREE-PHASE PUMPS TURN IN THE CORRECT DIRECTION (where installed).
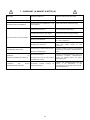
DISHWASHERS WITH SOFTENER
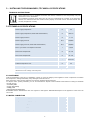
ADJUSTMENTS
A = Hardness of inlet water in °F
B = Every how many wash cycles the
automatic regeneration cycle should start.
A
14 °F
22 °F
32 °F
37 °F
42 °F
52 °F
B
100
70
50
40
30
25

8
IF THE POWER SUPPLY CABLE SHOULD GET DAMAGED, IT MUST BE REPLACED EXCLUSIVELY WITH A NEW ONE
FROM THE MANUFACTURER OR FROM AN AUTHORISED SERVICE CENTRE AND BY QUALIFIED TECHNICIANS.
2.5 TEMPERATURES
3 - RINSE AID AND DETERGENT DISPENSING
Only use detergents and rinse aids specific for industrial dishwashers. Do not use normal washing up liquid. Do not use
detergents for domestic dishwashers.
Ask a specialist in chemical products for the correct choice of products to use and their quantities.
ATTENTION! MACHINE LIVE: Remove the front panel of the dishwasher to adjust the dispensers.
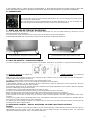
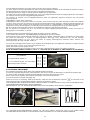
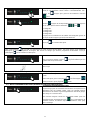
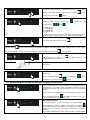
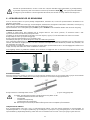
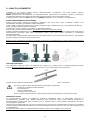
3.1 RINSE AID QUANTITY – RINSE AID DISPENSER
The rinse aid dispenser is always installed and there are two types: hydraulic (3) or peristaltic (1). They both work automatically.
The hydraulic dispenser (3) exploits the rinsing pressure to activate itself, while the peristaltic dispenser (1) is electrically
operated.
Make sure the CLEAR product suction hose is inserted into the container of the rinse aid products and that the little filter is
installed and also the weight on the hose (2).
To enable it, simply start the machine and run some complete wash cycles.
Adjustments: For each rinse cycle, the rinse aid draws a quantity of rinse aid product.
In the peristaltic dispenser (1), the minimum flow rate is obtained by turning the adjustment screw anti-clockwise, while the
maximum flow rate is obtained by turning it clockwise.
In the hydraulic dispenser (3), the minimum flow rate is obtained by turning the adjustment screw clockwise, while the maximum
flow rate is obtained by turning it anti-clockwise.
The dispenser is preset to intake approximately 5 cm of hose (0.70g.)
Too much rinse aid would leave the dishes streaky and would generate foam in the wash tank.
Dishes with drips of water and rather slow drying time mean that the quantity of rinse aid is insufficient.
Before you establish the correct quantity of the surfactant, you should test the hardness of the water in advance.
(If the hardness of the water is above 12°f, you need to install a softener upstream from the supply solenoid valve of the
machine).
Seeing as the quantity varies considerably based on the concentration of the product and on the formula, the quantities that we
have given are merely indicative and are just a rough idea.
To dispense the exact quantity of product, once intaken, take the clear hose out of the surfactant container and measure the
movement of the water column inside it.
3.2 DETERGENT QUANTITY – MANUAL DISPENSING OR USING A DISPENSER (OPTIONAL)
MANUAL
Following the instructions of the detergent supplier, put the required quantity of liquid detergent into the wash tank, which is
approximately 20g every 5 wash cycles. The quantity may vary according to the type and quantity of water. Use exclusively
specific foam-inhibitor detergents, in the concentrations indicated.
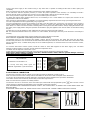
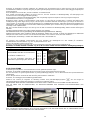
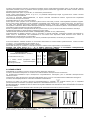
The thermostats are preset at the following temperatures: 55°C for the washing water (tank) and at
85°C for the rinse water (boiler).
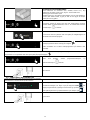
The tank thermostat cannot be adjusted whereas the boiler thermostat can; in case of settling, turn
the knob (image) on the thermostat to increase or reduce the rinse temperature.
Glass/dishwashers lower panel remove screws
Hood dishwashers lower panel remove screws

9
LIQUID DETERGENT DISPENSER (OPTIONAL)
In the detergent dispenser (1) the minimum flow rate is obtained by turning the adjustment screw anti-clockwise, while the
maximum flow rate is obtained by turning it clockwise; bear in mind that 1 g. of detergent takes up a volume of approximately 8
cm of hose.
Make sure the RED product intake hose is inserted into the detergent tank and that the little filter has been installed as well as
the weight on the hose (2).
For the type and quantity of detergent to use, ask your supplier of chemical products.
Too much detergent will not only generate foam in the wash tank, but will also leave the dishes streaky.
4 - PREVENTIVE CHECKS
Check the following before using the dishwasher:
WATER LEVEL
While the wash tank is filling, the water should stop flowing when its level is at least 1 cm. from the spill level of the overflow
device.
The filling solenoid valve should start to work again when the level of water is 2 cm. above the heating element in the tank.
WASHING AND RINSING ARMS
The washing and rinsing arms must turn freely without any interference and all the nozzles must work correctly.
TEMPERATURES
The temperatures of the rinse and washing water must be those written on the table.
DISPENSER
For each cycle, the dispenser should intake the correct amount of rinse aid and/or detergent.
WASHING RESULTS
The washing results should ensure that every possible trace of solid waste has been removed from the surface of the dishes.
At the end of the cycle, the perfectly clean dishes should dry in a couple of minutes through evaporation once the basket is
taken out of the machine.
5 – OPERATIONAL INSTRUCTIONS
Open the
mains water
cock (utility).
Check:
Switch the main
ON/OFF switch on
(utility)
the level of
detergent and rinse
aid in the
containers.
that the filters are in the correct position, the spray arms
turn and that there are no foreign bodies in the
dishwasher.
Make sure the overflow sits in the drain hole properly
5.1 – DAILY USE FOR MODELS STANDARD AND ECO
The panel shown in the manual and in the graphics may
contain functions which are not present on your machine..
What to do and what happens
Activate the wall switch, open the door, insert the overflow and close
the door:
Press the on/off button. The boiler and tank water-loading led
indicator light turns on. Once the boiler and tank have been loaded,
the boiler led indicator light turns on.
Insert the rack

10
LOADING THE DISHWASHER
The basket can hold 12 dishes or 18 plates.
Remove any solid leftovers from the plates (bones, peel, nuts etc);
leave the plates to soak in cold water if there are any stubborn
leftovers, such as dried cheese, egg etc.
Put the glasses in the basket with their stem upwards.
Use the cutlery basket for cutlery. Put the cutlery loose in the basket,
preferably with the handle at the bottom. Be careful not to injure
yourself on the fork prongs and knife blades.
Wait for 15 minutes after the boiler led indicator light to turn off.
CHOOSING A WASH PROGRAM (not available on all models)
You can select the wash program using the cycles selector.
To start the wash cycle, press the cycle button.
Once the cycle has started, the wash cycle led indicator light turns on. If the door is opened during the cycle, the program stops. Once
the door has been closed again, the program resets itself; to restart the cycle, press the cycle button
Once the program has finished, the wash cycle led indicator light turns
off and the boiler led indicator light turns on.
Remove the rack
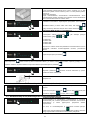
5.2 – OPERATING PHASES OF DIGIT MODELS
The control panel and the graphics shown in the manual
might show functions that are not provided on your machine.
Actions and what happens
Activate the wall-switch, open the door and insert the overflow, close
the door.
Press the on/off button , the selected cycle lights up, water is
filled into the boiler and into the tank.
When both the boiler and the tank are filled, the lights up
yellow.
Load the basket.
LOADING THE DISHWASHER
Remove any solid leftovers from the plates (bones, peel, nuts etc);
leave the plates to soak in cold water if there are any stubborn
leftovers, such as dried cheese, egg etc.
Put the glasses in the basket with their stem upwards.
Use the cutlery basket for cutlery. Put the cutlery loose in the basket,
preferably with the handle at the bottom. Be careful not to injure
yourself on the fork prongs and knife blades.

11
When the machine is started up the first time at the beginning of the
day, wait for the resistances to heat the water contained in the boiler
and in the tank, for the key to light up green and for the
machine ready icon to appear.
CHOOSING AND STARTING A WASH PROGRAM
Use the button to select the wash program: one of the LEDs of
the selected cycles will light up: or .
P1: duration 60”
P2: duration 120”
P3: duration 180”
P4: duration 480”
Program P4 can be used to finish with the rinse cycle, by pressing the
START button again (blue) during the wash phase.
In order to start up the wash cycle, press
During the cycle in course, will light up blue and the cycle LED will start blinking. If the door is opened while the wash cycle is in
progress, the program will stop. When the door is closed again, the program resets. In order to re-start the wash cycle, press the
cycle button again.
When the program is completed, from blue turns yellow and the
cycle LED stops blinking.
Unload the basket
5.3 – MANUAL COLD RINSE AT THE END OF THE CYCLE (optional)
On some models it is possible to set a cold rinse at the end of the
cycle.
Start the wash cycle by pressing , and while the cycle is in
course keep the key pressed until lights up.
5.4 – DIGIT REGENERATION CYCLE (models with built-in water softener)
AUTOMATIC REGENERATION CYCLE
The regeneration cycle is automatic. The dishwasher is equipped with
a wash meter. When the set number of cycles is reached, the
dishwasher will activate the regeneration function the first time it is
switched off and the tank is emptied.
When the machine is working normally and the set number of cycles
is reached, the blinking icon appears. This points out that the
machine will activate the regeneration function the next time it is
switched off.

12
“NO SALT” LED (VERSIONS WITH SOFTENER):
Salt for dishwashers is fundamental for the regenerative cycle of the
softener installed in the machine. The blinking icon will point out
that there is not enough salt in the container inside the tank. To top-
up, use the funnel supplied and clean any spilled salt from inside the
tank.
NB: REMOVE ANY SPILLED SALT FROM THE TANK
IMMEDIATELY, otherwise it could damage the surface of the tank
with rust or similar marks.
Attention: use exclusively specific salt for dishwashers and not kitchen salt!
The salt compartment takes approximately 1 kg of grain salt.
The salt compartment is located on the bottom of the tank. Take the basket out, unscrew the cap and pour salt in using
the funnel supplied with the machine. Before screwing the cap back on, remove any spilled salt near the opening. Top-
up with salt when there is no water in the tank so that the washing water cannot get into the water softener. Always
unplug the machine from the mains power supply before doing this operation. Remember to plug the machine back into
the mains socket after completing the operation.
When using the machine for the first time, after you fill with salt, add some water to the salt container.
5.6 – DRAIN
Models without drain pump:
Turn the machine off by pressing , open the door, remove the
overflow and wait for the tank to empty. Place the overflow back into the
tank and close the door. Deactivate the general wall switch.
Models with drain pump:
Open the door, remove the overflow pipe and close the door.
Turn the machine off by pressing the on/off in order to initiate
the emptying of the tank automatically. Drain pump will be activated until
the total drain of the tank and the wash cycle lamp will be on.
In order to reactivate the machine it is therefore necessary to place the
overflow back into the tank, close the door and press the on/off
button. Otherwise, if finished using the machine, deactivate the general
wall switch.
5.7 – DRAIN Digit versions
Total draining at the end of the day (models without drain pump)
Switch the machine off by pressing the on/off key , open the
door and remove the overflow, wait until the machine is completely
emptied. Put the overflow back into its place and close the door
again.
Switch off the main wall switch and shut off the water inlet tap.
Total draining at the end of the day (models with drain pump)
Open the door, remove the overflow and close the door again.
Switch the machine off by pressing the on/off key : the drain
pump will start until the tank is completely empty. Before starting-up
the machine again, you need to put the overflow back into the tank,
close the door and press the on/off key . In order to shut the
machine down at the end of the day, switch off the wall switch and
close the water inlet tap.
Do not turn off the dishwasher while water is still in the tank. Always drain it first. When finished using the
machine, after having performed the final drainage and eventual regeneration, turn the machine off by pressing
the on/off button, deactivate the wall switch and turn off the water interception faucet. Do not leave the
machine on, inactive and unutilized for long periods of time.

13
6 – MAINTENANCE AND CLEANING
Even though the dishwasher does not require any special programmed maintenance in particular, we still recommend you have
it checked out by a specialized technician twice a year.
N.B: The manufacturer cannot be held liable for intentional damages or damages caused by carelessness, negligence or from
the failed observance of the prescriptions, instructions and standards or from incorrect connections or plumbing.
The dishwasher complies with the protection rating IPX1 and it is forbidden to use a direct jet of water to clean it.
CLEANING THE FILTER THROUGHOUT THE DAY
For heavy use, you are recommended to clean the filter every 30-40 cycles while the machine is in working conditions. To do
this, follow the “emptying the tank” instructions.
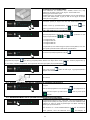
Remove the filter (1) (simply lift it out of its seat as illustrated), making sure large bits and pieces do not fall into the tank; clean
the filter and rinse it thoroughly.
Also clean the internal filter (2) and remove any bits and pieces inside it.
Put the filter back into its seat correctly (1). Do not use pointed or sharp tools to do this.
Clean away any scale to avoid possible build-up. Clean the surface carefully and frequently using a damp cloth. Use neutral and non-
abrasive detergents that do not contain chlorine-based substances or products that could corrode and damage stainless steel.
Do not use the afore-mentioned products to clean the floor under the dishwasher either, or even near it, in order to prevent
vapours or drips from causing damage to the steel surface.
To clean the tank and the walls, you are recommended to use a damp cloth or a shammy leather cloth, with soapy water and a
mild detergent. Never user scouring pads or metal sponges.
Periodic checks
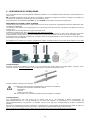
Disassemble the spray arms (bottom and top 2-3), by unscrewing the central screw (1).
Clean the holes and the nozzles under clean running water, do not use any pointed or sharp tools that could damage them. Fit
the spray arms back in place.
Clean the machine internally using a damp cloth and neutral detergent then rinse and dry thoroughly.
Long-term stoppage
If the dishwasher is not going to be used for quite some time, you have to empty the detergent and rinse aid dispensing device
to avoid crystallizations and damages to the pumps: remove the priming pipes from the detergent and rinse aid containers and
soak them in a container of clean water, run some wash cycles and empty the machine completely.
Never use the following types of products to clean the tank and the steel surfaces:
- Products containing chlorides or hydrochloric acid
- Bleach
- Products for cleaning silver
- Scouring pads or metal sponges
NB: the incorrect use of the afore-mentioned products may cause rust marks on the surfaces.

14
To finish, switch off the main on/off switch and shut off the water inlet tap; only put the detergent and rinse aid priming pipes
back into their containers when you start the machine again, making sure not to invert them (red pipe=detergent; clear pipe =
rinse aid).
Do not leave the dishwasher switched on if it is not used for some time or if the operator is not able to monitor it directly.
7 – ERRORS DISPLAYED/PROBLEMS
PROBLEM
POSSIBLE CAUSE
POSSIBLE SOLUTION
THE MAINS LIGHT FAILS TO SWITCH
ON
Mains not connected
Check the electric mains connection.
THE WASH CYCLE FAILS TO START
The dishwasher has still not filled.
Wait for the triangular Led to switch on.
POOR WASHING RESULTS
The holes of the spray arms are
clogged or scale is obstructing
them.
Dismantle and clean the spray arms.
Not enough or unsuitable
detergent or rinse aid
Check the type and quantity of detergent.
Plates/glasses not positioned
correctly.
Arrange the plates/glasses correctly.
Too low wash temperature
Check the temperature on the display; if it is
below 50°, call the technical assistance
service.
The set cycle is unsuitable
Increase the wash cycle duration, especially if
the crockery/cutlery is particularly dirty or there
are stubborn leftovers to clean.
INSUFFICIENT RINSING
The spray nozzles are clogged.
Scale in boiler.
Check if the nozzles are clean and if the
softener (if installed) works correctly.
THE GLASSES AND CUTLERY ARE
STAINED
The rinse aid is unsuitable or is
not dispensed correctly.
Water hardness above 12°dF or
high dissolved salt content.
Check the rinse aid container and if it is
suitable for the type of mains water. If the
problem consists, contact the technical
assistance service.
WATER IN TANK AFTER DRAINING
The drain pipe is not positioned
correctly or is partially obstructed.
Check if the pipe and the drain of the
dishwasher are obstructed and if the drain is
positioned too high up; refer to the connection
diagram.

15
SV - INSTRUKTIONSHANDBOK FÖR PROFESSIONELLA DISKMASKINER
Tack för att du köpt vår diskmaskin.
Vi rekommenderar att du läser alla instruktioner i denna bruksanvisning noggrant för att förstå det bästa och
korrekta sättet att använda diskmaskinen.
TEKNISKA INSTRUKTIONER:
Dessa anvisningar gäller för kvalificerade tekniker som installerar, beställer, testar och
eventuellt utför underhåll av diskmaskinen.
Installationsteknikern ska se till att användaren har förstått innehållet i bruksanvisningen,
förstått hur maskinen fungerar korrekt och vet hur man lastar korgarna med porslin och glas
på korrekt sätt.
ANVÄNDARINSTRUKTIONER:
Innehåller råd om användning, beskriver kontrollerna samt hur man rengör och utför
service av diskmaskinen på korrekt sätt.
VARNINGAR
ANVÄNDAREN ÄR ANSVARIG FÖR DE RÄTTSLIGA FULLGÖRANDEN SOM RELATERAR TILL
INSTALLATIONEN OCH ANVÄNDNINGEN AV PRODUKTEN. OM PRODUKTEN INTE
INSTALLERAS ELLER ANVÄNDS PÅ KORREKT SÄTT, ELLER OM TILLÄMPLIGT UNDERHÅLL
INTE UTFÖRS, KAN TILLVERKAREN INTE HÅLLAS ANSVARIG FÖR EVENTUELLA SKADOR,
BRISTANDE FUNKTION, SKADOR PÅ EGENDOM ELLER PERSONSKADOR SOM KAN
UPPKOMMA.
KOPPLA ALLTID BORT DISKMASKINEN FRÅN ELNÄTET INNAN UNDERHÅLLSARBETE
PÅBÖRJAS. OM DETTA INTE ÄR MÖJLIGT, OM HUVUDBRYTAREN ÄR DOLD BAKOM
MASKINEN ELLER FINNS LÅNGT IFRÅN FRÅN DEN PERSON SOM UTFÖR ARBETET, MÅSTE
DU PLACERA ETT MEDDELANDE VID DEN EXTERNA BRYTAREN EFTER ATT DU STÄNGT AV
DEN FÖR ATT VARNA ANDRA OM ATT UNDERHÅLLSARBETE PÅGÅR
.
1 – SÄKERHETS- OCH DRIFTSVARNINGAR
2 – INSTALLATION/TEKNISKA SPECIFIKATIONER
3 – DOSERING AV SKÖLJMEDEL OCH DISKMEDEL
4 – FÖREBYGGANDE KONTROLLER
5 – DRIFTSINSTRUKTIONER
6 – UNDERHÅLL OCH RENGÖRING
7 – VISADE FEL/PROBLEM

16
1 – SÄKERHETS- OCH DRIFTSVARNINGAR
DISKMASKINEN ÄR ENDAST AVSEDD FÖR PROFESSIONELL ANVÄNDNING OCH MÅSTE ANVÄNDAS AV
AUKTORISERAD PERSONAL. DEN ÄR UTFORMAD FÖR ATT RENGÖRA DISK (TALLRIKAR, KOPPAR, SKÅLAR,
BRICKOR, BESTICK) OCH LIKNANDE SOM ANVÄNDS INOM DEN GASTRONOMISKA SEKTORN SAMT INOM DEN
OFFENTLIGA CATERINGBRANSCHEN, I ENLIGHET MED STANDARDERNA I INTERNATIONAL ELECTRICAL AND
MECHANICAL SAFETY (CEI-EN-IEC 60335-2-58/61770) AND ELECTROMAGNETIC COMPATIBILITY (CEI-IEC-EN
55014-1/-2, 61000-3;4, 50366).
TILLVERKAREN AVSÄGER SIG ALLT ANSVAR FÖR PERSONSKADOR ELLER EGENDOMSSKADOR SOM
ORSAKATS GENOM UNDERLÅTENHET ATT BEAKTA INSTRUKTIONERNA I DENNA HANDBOK, FELAKTIG
ANVÄNDNING, MANIPULERING, ÄVEN AV EN ENDA DEL AV MASKINEN, SAMT ANVÄNDNING AV RESERVDELAR
SOM INTE ÄR ORIGINAL-RESERVDELAR. OM STRÖMFÖRSÖRJNINGSKABELN SKADAS FÅR DEN ENDAST
ERSÄTTAS AV TILLVERKAREN ELLER VID ETT AUKTORISERAT KUNDCENTER OCH AV KVALIFICERADE
TEKNIKER.
MASKINEN ÄR MÄRKT I ENLIGHET MED DET EUROPEISKA DIREKTIVET 2002/96/EG OM ELEKTRISKT OCH
ELEKTRONISKT AVFALL (WEE).
OM DENNA PRODUKT KASSERAS PÅ KORREKT SÄTT FÖRHINDRAS EVENTUELLA NEGATIVA HÄLSO- OCH
MILJÖPÅVERKNINGAR. VI FÖRKLARAR ATT UTSLÄPPSNIVÅN FÖR LJUDTRYCK I LPA ÄR 62 DB/A MED EN
OSÄKERHET OM KPA + 1 DB. NIVÅN FÖR LJUDSTYRKA ÄR LWA 73,79 MED EN OSÄKERHET OM KWA + 1 DB
SYMBOLEN PÅ PRODUKTEN, ELLER PÅ DESS TILLHÖRANDE DOKUMENTATION, INDIKERAR ATT DENNA
PRODUKT INTE FÅR BEHANDLAS SOM ALLMÄNT AVFALL, UTAN MÅSTE TAS TILL EN INSAMLINGSANLÄGGNING
SOM ÄR LÄMPLIG FÖR ÅTERVINNING AV ELEKTRISK OCH ELEKTRONISK UTRUSTNING.
KASSERA DENNA PRODUKT I ENLIGHET MED LOKALA FÖRESKRIFTER GÄLLANDE AVFALLSHANTERING.
FÖR MER INFORMATION AVSEENDE BEHANDLING, ÅTERANVÄNDNING OCH ÅTERVINNING AV DENNA PRODUKT
SKA DU KONTAKTA BEHÖRIGA LOKALA KONTOR, DIN LOKALA LEVERANTÖR AV
AVFALLSHANTERINGSTJÄNSTER ELLER DEN FÖRSÄLJNINGSPUNKT DÄR DU KÖPTE PRODUKTEN.
DENNA HANDBOK UTGÖR EN INTEGRERAD DEL AV DISKMASKINEN OCH DEN MÅSTE
ALLTID FÖRVARAS I KOMPLETT SKICK OCH TILLSAMMANS MED MASKINEN.
POSITIONERING, ANSLUTNING, AKTIVERING OCH FELSÖKNING SAMT ERSÄTTNING AV
STRÖMKABELN MÅSTE UTFÖRAS AV KVALIFICERAD PERSONAL.
JORDNINGSANSLUTNINGEN ÄR OBLIGATORISK I ENLIGHET MED METODERNA SOM
BESKRIVS I DET ELEKTRISKA SYSTEMETS SÄKERHETSSTANDARDER.
FÖR INTE IN LÖSNINGSMEDEL SOM T.EX. ALKOHOL ELLER TERPENTIN I MASKINEN. DET KAN
ORSAKA EN EXPLOSION. FÖR INTE IN DISK MED RESTER AV ASKA, VAX ELLER LACK I MASKINEN.
ANVÄND ALDRIG DISKMASKINEN ELLER DESS DELAR SOM STEGE ELLER PALL ELLER SOM STÖD
FÖR PERSONER, SAKER ELLER DJUR.
OM DU LUTAR DIG MOT ELLER SITTER PÅ DISKMASKINENS ÖPPNA LUCKA KAN DISKMASKINEN
VÄLTA OCH ORSAKA SKADOR PÅ PERSONER I DESS NÄRHET.
UNDVIK ATT SNUBBLA PÅ DISKMASKINENS LUCKA GENOM ATT ALLTID HÅLLA LUCKAN STÄNGD.
DRICK INTE DET VATTEN SOM KAN FINNAS KVAR I DISKEN ELLER I SJÄLVA DISKMASKINEN
EFTER EN DISKCYKEL.
MASKINEN ÄR INTE LÄMPLIG FÖR ANVÄNDNING AV MINDERÅRIGA ELLER PERSONER MED
NEDSATTA FYSISKA, SENSORISKA ELLER MENTALA FÖRMÅGOR SOM SAKNAR DEN
NÖDVÄNDIGA ERFARENHETEN OCH KUNSKAPEN FÖR KORREKT ANVÄNDNING AV MASKINEN.
DESSA PERSONER FÅR ENDAST ANVÄNDA MASKINEN OM DE STÅR UNDER DIREKT
ÖVERVAKNING AV EN ANNAN PERSON SOM ANSVARAR FÖR DERAS SÄKERHET.
Efter rengöring av apparaten vid slutet av dagen ska du se till att inga främmande metallföremål lämnas inuti
den, då dessa kan orsaka intern rostning. Spår av rost kan även komma från icke-rostfria bestick/porslin,
olämpliga diskmedel, från skadade trådkorgar, skurkuddar eller metallsvampar eller regenerationssalt som
spillts på botten av tanken.

17
Förvara instruktionshandboken nära diskmaskinen för framtida hänvisning.
Läs handboken noga innan du installerar och använder diskmaskinen för första gången.
Om el- och VVS-systemen måste anpassas för att installera diskmaskinen så måste dessa ändringar utföras av
auktoriserade experter.
• Diskmaskinen är en professionell maskin. Den måste användas av vuxen och auktoriserad personal. Den måste installeras
och repareras uteslutande av en kvalificerad teknisk hjälptjänst. Tillverkaren avsäger sig alla former av ansvar för felaktig
användning, underhåll och reparation.
• Denna diskmaskin får inte användas av barn eller någon person med nedsatt fysisk, sensorisk eller mental förmåga eller av
någon som inte har fått tillräcklig utbildning eller som inte får tillräcklig handledning.
• Luckan måste guidas för hand när du öppnar och stänger den.
• Säkerställ att diskmaskinen inte är placerad på strömkabeln eller på fyllnings- och dräneringsslangarna. Justera maskinens
stödfötter för att se till att den står jämnt.
• Stå inte på apparaten eller någon del av den för att nå högre belägna platser, eftersom den inte är avsedd att bära människor
utan endast vikten för korgen för det porslin och de bestick som ska tvättas.
• Diskmaskinen är utformad enbart och uteslutande för diskning av tallrikar, glas och olika typer av porslin som är nedsmutsade
med rester av livsmedel. Använd den INTE för att tvätta föremål som är nedsmutsade med bensin, färg, bitar av stål eller metall,
bräckliga föremål eller föremål av material som inte tål diskprocessen. Använd inte sura eller alkaliska frätande kemiska
produkter eller lösningsmedel eller klorbaserade diskmedel.
• Öppna inte diskmaskinens luckor då den är i drift. Diskmaskinen är utrustad med en säkerhetsanordning som omedelbart
stoppar maskinen för att undvika läckage av vatten om luckorna öppnas oavsiktligt. Kom alltid ihåg att stänga av diskmaskinen
och tömma tanken innan du öppnar den för att rengöra den eller av någon annan anledning.
• När du har slutat använda diskmaskinen vid slutet av dagen och när du behöver utföra någon form av underhåll på
den, måste du koppla ur diskmaskinen från elnätet genom att stänga av servicebrytaren och strömbrytaren på väggen
och stänga av kranen för vattenförsörjningen.
• Användaren får inte utföra reparationer eller underhållsarbete av diskmaskinen. Dessa arbeten får endast utföras av
kvalificerad och auktoriserad personal.
• Eventuell assistans som krävs avseende denna diskmaskin måste utföras av behörig personal.
NB: Använd endast originalreservdelar. I annat fall kommer produktgarantin och tillverkarens ansvarsförhållande att
bli ogiltiga.
• Använd inte gamla vattenfyllningsslangar utan uteslutande nya fyllningsslangar.
• Följande grundläggande regler måste följas vid användning av denna apparat:
1) Rör aldrig vid apparaten med våta händer eller fötter.
2) Använd aldrig apparaten med oskyddade fötter.
3) Installera inte apparaten på arbetsplatser där den kan utsättas för vattenstrålar/vattenstänk.
• Placera inte oskyddade händer i vatten som innehåller diskmedel. Om du gör detta ska du omedelbart tvätta dem ordentligt
under rinnande vatten.
• Följ tillverkarens instruktionshandbok för rengöring noga.
• Denna apparat är utformad för drift vid en arbetsplats med en maximal omgivningstemperatur om 35 °C, i ett lämpligt område
där temperaturen aldrig är lägre än 5 °C.
• Använd inte vatten för att släcka brand i elektriska delar.
• När du har kopplat från strömförsörjningen får endast kvalificerad personal använda kontrollpanelen.
• Maskinen har en IPX1-skyddsmärkning mot oavsiktliga vattenstänk, så den är inte skyddad mot trycksatta vattenstrålar. Det
rekommenderas därför att du inte använder trycksatta rengöringssystem (t.ex. högtryckstvätt).
OBSERVERA: DU MÅSTE VÄNTA 10 MINUTER EFTER ATT DU STÄNGT AV MASKINEN INNAN DU RENGÖR DESS
INSIDA.
OBSERVERA: DET ÄR FÖRBJUDET ATT FÖRA IN HÄNDER I TANKEN OCH/ELLER RÖRA VID DELARNA PÅ BOTTEN
AV TANKEN UNDER OCH/ELLER VID SLUTET AV DISKCYKELN.
NB: Tillverkaren avsäger sig alla former av ansvar för personskador eller skador på egendom som härrör från
underlåtenhet att följa instruktionerna ovan.
1.1 ALLMÄNNA VARNINGAR

18
VOLT
KOPPLA ALLTID BORT DISKMASKINEN FRÅN ELNÄTET INNAN UNDERHÅLLSARBETE PÅBÖRJAS.
OM DETTA INTE ÄR MÖJLIGT, OM HUVUDBRYTAREN ÄR DOLD BAKOM MASKINEN ELLER FINNS
LÅNGT IFRÅN FRÅN DEN PERSON SOM UTFÖR ARBETET, MÅSTE DU PLACERA ETT MEDDELANDE
VID DEN EXTERNA BRYTAREN EFTER ATT DU STÄNGT AV DEN FÖR ATT VARNA ANDRA OM ATT
UNDERHÅLLSARBETE PÅGÅR.
TEMPERATURE / TEMPERATUR / LÄMPÖTILAT MIN. 45°C – MAX/ MAKS 55°C
PRESSURE / TRYCK / TRYKK / TRYK / PAINE MIN. 2 – MAX/ MAKS 4 kPa/Bar
HARDNESS / HÅRDHET / HARDHETSGRAD / HÅRDHED / VEDEN KOVUUS MIN. 7° - MAX/ MAKS 12°F
/ MIN. 5° - MAX/ MAKS 7°dH
SI TRIPHASE / OM TREFAS / HVIS TREFASE / HVIS TREFASET / JOS KOLMIVAIHEINEN
DON’T REVERSE THE PHASE WITH THE NEUTRE (BLUE)
OMVÄND INTE FASEN MED NEUTRAL (BLÅ)
IKKE BYTT OM FASELEDERNE MED DEN NØYTRALE LEDEREN (BLÅ).
OMBYT IKKE FASEN MED DEN NEUTRALE (BLÅ)
ÄLÄ KÄÄNNÄ VAIHEEN JA NOLLAN (SININEN) PAIKKAA
RINSE AID / SKÖLJMEDEL / GLANSEMIDDEL / AFSPÆNDINGSMIDDEL / HUUHTELUKIRKASTE
TRANSPARENT PIPE / TUYAU TRANSPARENTE/ GJENNOMSIKTIG SLANGE / GENNEMSIGTIG SLANGE /
LÄPINÄKYVÄ LETKU
DETERGENT / DISKMEDEL / OPPVASKMIDDEL / OPVASKEMIDDEL / PESUAINE (OPTION/ ALTERNATIV/
IKKE STANDARD/ EI STANDARD) RED PIPE / RÖTT RÖR / RØD SLANGE / RØD SLANGE / PUNAINEN
LETKU
IF WASH PUMP IS THREEPHASE / OM VATTENPUMPEN ÄR TREFAS / HVIS VASKEPUMPEN ER TREFASET / MED
TREFASET PUMPE / JOS PESUPUMPPU KOLMIVAIHEINEN: VERIFY THE MOTOR ROTATION, VERIFIERA MOTORNS
ROTATION, KONTROLLER ROTASJONSRETNINGEN, KONTROLLER OMDREJNINGSRETNINGEN, TARKISTA KIERTOSUUNTA
IF WATER HARDNESS IS HIGHER THAN 12°F / 7° dH INSTALL AN EXTERNAL WATER SOFTENER
OM VATTNETS HÅRDHET ÄR HÖGRE ÄN 12 °F / 7 °dH SKA EN EXTERN VATTENAVHÄRDARE INSTALLERAS
HVIS VANNETS HARDHETSGRAD ER OVER 12 °F/7 °dH, MÅ DET INSTALLERES ET EKSTERNT AVKALKINGSFILTER
HVIS VANDETS HÅRDHED OVERSTIGER 12°F / 7° dH SKAL DER INSTALLERES ET EKSTERNT BLØDGØRINGSANLÆG
MIKÄLI VEDEN KOVUUS YLITTÄÄ 12 °F / 7° dH, ASENNA ULKOINEN VEDENPEHMENNIN
H DRAIN / DRÄNERING / AVLØPSHØYDE / AFLØB / VEDENPOISTOKORKEUS: MAX/MAKS 10 CM – HOOD/ LUCKA MAX 20 CM
DISHWASHER WITHOUT WATERSOFTENER
DISKMASKINEN UTAN VATTENAVHÄRDARE
OPPVASKMASKIN UTEN AVKALKINGSFILTER
OPVASKEMASKINE UDEN BLØDGØRINGSANLÆG
ASTIANPESUKONE ILMAN VEDENPEHMENNINTÄ
1.2 TO VERIFY – KONTROLLER – KONTROLLERE – KONTROL - TARKISTA
DISHWASHER WITH WATERSOFTENER
DISKMASKIN MED VATTENAVHÄRDARE
OPPVASKMASKIN MED AVKALKINGSFILTER
OPVASKEMASKINE MED BLØDGØRINGSANLÆG
ASTIANPESUKONE VEDENPEHMENTIMELLÄ
TEMPERATUR / LÄMPÖTILAT MAX/ MAKS 30°C
PRESSURE / TRYCK / TRYKK / TRYK / PAINE MIN. 3 – MAX/ MAKS 4 kPa/Bar
HARDNESS / HÅRDHET / HARDHETSGRAD / HÅRDHED / VEDEN KOVUUS MIN. 7° - MAX 26°F / MIN.
5° - MAX/ MAKS 15°dH
USE REGENERATING SALT AND PERIODICALLY FILL THE CONTAINER IN THE WASHTANK
ANVÄND REGENERERANDE SALT OCH FYLL BEHÅLLAREN I DISKTANKEN REGELBUNDET
BRUK OPPVASKMASKINSALT OG FYLL OPP BEHOLDEREN I VASKEKARET JEVNLIG
BRUG SALT OG FYLD BEHOLDEREN I BUNDEN JÆVNLIGT
KÄYTÄ ASTIANPESUKONESUOLAA JA TÄYTÄ ALTAAN SÄILIÖ SÄÄNNÖLLISIN VÄLIAJOIN

19
2 – INSTALLERA DISKMASKINEN/TEKNISKA SPECIFIKATIONER
TEKNISKA INSTRUKTIONER:
Dessa anvisningar gäller för kvalificerade tekniker som installerar, beställer, testar och eventuellt utför
underhåll av diskmaskinen.
Installationsteknikern ska se till att användaren har förstått innehållet i bruksanvisningen, förstått hur
maskinen fungerar korrekt och vet hur man lastar korgarna med porslin och glas på korrekt sätt.
2.1 TEKNISKA SPECIFIKATIONER
Vattenförsörjningens temperatur
°C
55
Vattenförsörjningens temperatur (modell med vattenavhärdare)
°C
Max 30
Vattenförsörjningens hårdhet
°F
7 – 12
Vattenförsörjningens tryck
kPa
200/400
Vattenförsörjningens tryck (modell med vattenavhärdare)
kPa
300/400
Vattenförbrukning under sköljcykel vid 200 kPa
l
2,4/2,6
Diskvattnets temperatur
°C
50 - 60
Sköljvattnets temperatur
°C
82 - 85
Nettovikt
kg
Min 27
Max 131
Max omgivande temperatur
°C
40
Strömkabelstyp
◄HAR►
H07RN-F
Se märkningsskylten på framsidan av den här handboken eller på diskmaskinens högra sida för
spänning och total effekt.
2.2 POSITIONERING
Ta diskmaskinen till installationsplatsen, packa upp den, kontrollera apparatens och komponenternas integritet och informera
transportören omedelbart om eventuella skador upptäcks.
Efter uppackning ska du säkerställa att apparaten inte har skadats under transporten.
Det rekommenderas att förpackningsmaterialet nedan kasseras enligt gällande standarder:
• en träpall
• en nylonpåse (LDPE)
• multipliceringskort
• Polypropylenband (PP)
Kom ihåg att tillverkaren inte organiserar eller hanterar det separata bortskaffandet av apparaten vid slutet av dess livslängd.
2.3 VATTENANSLUTNING
Vattenförsörjningens temperatur
°C
55
Vattenförsörjningens temperatur (för modeller med avhärdare)
°C
Max 35
Vattenförsörjningens hårdhet
°F
7 – 12
Vattenförsörjningens tryck
kPa
200/400
Vattenförsörjningens tryck (för modeller med avhärdare)
kPa
300/400
Anslut vattenförsörjningen till maskinen med hjälp av en stoppventil som möjliggör att vattenflödet kan stängas av snabbt och
fullständigt.

20
Se till att vattenförsörjningens tryck ligger mellan de värden som är angivna i tabellen.
Om det är lägre än 200 kPa (dynamiskt tryck) måste en tryckboosterpump installeras för att säkerställa att maskinen fungerar
perfekt (på begäran kan maskinen levereras med en inbyggd tryckboosterpump).
Om försörjningstrycket är högre än 400 kPa måste du installera en tryckreducerare.
För vatten med en genomsnittlig vattenhårdhet över 12 °F är det obligatoriskt att använda en beläggningshämmare. På begäran
kan maskinen levereras med en inbyggd beläggningshämmare.
Om maskinen är utrustad med en beläggningshämmare måste du regelbundet regenerera hartserna med ett speciellt
regenereringssalt.
Saltbehållaren rymmer cirka 1 kg kornsalt.
Saltbehållaren är placerad på tankens botten. Ta ut korgen, skruva av locket och häll i saltet med hjälp av tratten som medföljer
maskinen. Innan du skruvar på locket igen ska du ta bort eventuellt spillt salt nära öppningen. Tillsätt salt ända till öppningen när
det inte finns något vatten i tanken så att diskvattnet inte kan komma in i vattenavhärdaren. Koppla alltid från maskinen från
elnätet innan du utför den här åtgärden. Kom ihåg att ansluta apparaten till vägguttaget efter att du har slutfört åtgärden.
När du använder maskinen för första gången ska du tillsätta lite vatten till saltet efter att du fyllt på det.
NB: Om vattnet har en hårdhet över 12 °F och det inte finns någon beläggningshämmare kommer skador som orsakas av
beläggningar inte att omfattas av garantin.
Vattenförsörjningens temperatur måste ligga mellan de värden som anges i tabellen.
Varje maskin är försedd med en vattenfyllningsslang med gängad 3/4” (1,9 cm) montering.
Dräneringsslangen ska anslutas direkt till dräneringen, efter att en sil tillsatts. Vattnet faller fritt in i dräneringen och därför måste
den punkt där dräneringen är ansluten till dräneringsutloppet alltid ligga under disktankens nivå. Om den befintliga
dräneringspunkten befinner sig över denna nivå måste en lämplig dräneringspump installeras (tillval). Montera inte
dräneringsslangen till avlopp i handfat, badkar etc.
För versioner med inbyggt osmossystem ska du installera det medföljande kol- eller nätfiltret på vattenkranen. Vattnets hårdhet
måste vara mellan 7 och 12 °F och maximal temperatur är 30 °C.
Filtren måste bytas minst två gånger om året.
Underlåtenhet att iaktta dessa parametrar kommer att orsaka snabb försämring av det inre osmotiska membranet.
Se till att vattnets hårdhet är mellan 7 och 12 °F. I annat fall ska du installera en vattenavhärdare för att förhindra
skador som orsakas av beläggning, eftersom dessa inte omfattas av garantin.
1 ° FRANSKA = 0,56 ° Tyska = 0,7 ° Brittiska = 10 p.p.m.
2.4 ELEKTRISK ANSLUTNING
Den elektriska anslutningen måste utföras enligt gällande tekniska standarder.
Se till att den uppmätta nätspänningen överensstämmer med den som angivits på diskmaskinens märkning för tekniska data.
Du måste montera en lämplig omnipolär skyddskretsbrytare som passar diskmaskinens inström.
Denna brytare måste användas uteslutande för utrustningen och installeras bredvid den.
Se till att elsystemen är jordade på lämpligt sätt.
Maskinen har även en anslutning, baktill på undersidan, märkt med den ekvipotentiella symbolen som används för att
ansluta olika apparater ekvipotentiellt (kontrollera standarder för elektriska system).
FÖR MASKINER MED STRÖMFÖRSÖRJNING I TREFAS MÅSTE DU VARA FÖRSIKTIG SÅ ATT DU INTE BLANDAR IHOP
FASLEDNINGARNA MED DEN NEUTRALA LEDNINGEN.
OBSERVERA! SE TILL ATT TREFASPUMPARNA VRIDS I RÄTT RIKTNING (i de fall sådana är installerade).
OM STRÖMMFÖRSÖRJNINGSKABELN SKADAS SÅ FÅR DEN ENDAST ERSÄTTAS MED EN NY KABEL FRÅN
TILLVERKAREN ELLER FRÅN ETT AUKTORISERAT SERVICECENTER OCH AV KVALIFICERADE TEKNIKER.
DISKMASKIN MED AVHÄRDARE
JUSTERINGAR
A = Inloppsvattnets hårdhet i °F
B = Hur många diskcykler den automatiska
regenereringscykeln ska starta.
A
14 °F
22 °F
32 °F
37 °F
42 °F
52 °F
B
100
70
50
40
30
25
Sidan laddas ...
Sidan laddas ...
Sidan laddas ...
Sidan laddas ...
Sidan laddas ...
Sidan laddas ...
Sidan laddas ...
Sidan laddas ...
Sidan laddas ...
Sidan laddas ...
Sidan laddas ...
Sidan laddas ...
Sidan laddas ...
Sidan laddas ...
Sidan laddas ...
Sidan laddas ...
Sidan laddas ...
Sidan laddas ...
Sidan laddas ...
Sidan laddas ...
Sidan laddas ...
Sidan laddas ...
Sidan laddas ...
Sidan laddas ...
Sidan laddas ...
Sidan laddas ...
Sidan laddas ...
Sidan laddas ...
Sidan laddas ...
Sidan laddas ...
Sidan laddas ...
Sidan laddas ...
Sidan laddas ...
Sidan laddas ...
Sidan laddas ...
Sidan laddas ...
Sidan laddas ...
Sidan laddas ...
Sidan laddas ...
Sidan laddas ...
Sidan laddas ...
Sidan laddas ...
Sidan laddas ...
Sidan laddas ...
Sidan laddas ...
Sidan laddas ...
-
 1
1
-
 2
2
-
 3
3
-
 4
4
-
 5
5
-
 6
6
-
 7
7
-
 8
8
-
 9
9
-
 10
10
-
 11
11
-
 12
12
-
 13
13
-
 14
14
-
 15
15
-
 16
16
-
 17
17
-
 18
18
-
 19
19
-
 20
20
-
 21
21
-
 22
22
-
 23
23
-
 24
24
-
 25
25
-
 26
26
-
 27
27
-
 28
28
-
 29
29
-
 30
30
-
 31
31
-
 32
32
-
 33
33
-
 34
34
-
 35
35
-
 36
36
-
 37
37
-
 38
38
-
 39
39
-
 40
40
-
 41
41
-
 42
42
-
 43
43
-
 44
44
-
 45
45
-
 46
46
-
 47
47
-
 48
48
-
 49
49
-
 50
50
-
 51
51
-
 52
52
-
 53
53
-
 54
54
-
 55
55
-
 56
56
-
 57
57
-
 58
58
-
 59
59
-
 60
60
-
 61
61
-
 62
62
-
 63
63
-
 64
64
-
 65
65
-
 66
66


Whirlpool SDD 534 U Användarguide
- Kategori
- Diskmaskiner
- Typ
- Användarguide
på andra språk
- eesti: Whirlpool SDD 534 U Kasutusjuhend
- English: Whirlpool SDD 534 U User guide
- dansk: Whirlpool SDD 534 U Brugervejledning