Elektro Elco AB, Tallvägen 5, SE-564 35 Bankeryd, Sweden | www.ecolite.se | UM034 | 201804
VENA Smartbox RGB
Art. nr: 595169
VARNING:
För ditt skydd och din säkerhet ska du noggrant läsa igenom och förstå informationen i den här handboken innan du försöker
montera, installera eller använda produkten.
1. Se till att drivdonets spänning endast är 12V DC
2. Ta aldrig isär eller reparera boxen under några omständigheter
3. Om ljuskällan inte används under en längre tid, koppla från strömförsörjningen
4. Överbelasta inte boxen, annars kan det orsaka elektriska stötar eller brand
WARNING:
For your protection and safety, carefully read and understand the information provided in this manual completely before
attempting to assemble, install or operate this product.
1. Make sure the power supply is DC 12V only
2. Don’t ever disassemble or repair under any circumstances
3. When the light source is not used for a long time, please disconnect the power supply
4. Do not overload the circuit, otherwise, it may cause electric shock or fire
ADVARS E L:
Av hensyn til din egen sikkerhet bør du lese og gjøre deg innforstått med hele denne bruksanvisningen før du begynner å
sette sammen, montere eller bruke dette produktet.
1. Kontroller at strømforsyningen bare er DC 12V
2. kke demonter eller reparer under noen omstendigheter
3. Når lyskilden ikke brukes på lenge, må du koble fra strømforsyningen
4. Ikke overbelast dimmerboksen, ellers kan det forårsake elektrisk støt eller brann
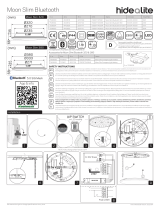
SAFE INSTALLATION
OFF
R G B W
FLASH
FADE
STROBE
SMOOTH
ON
ON
25% 50%
75%
100%
OFF 60S
FADE
15min 30min 60min
STROBE
OFF
R G B W
FLASH
FADE
STROBE
SMOOTH
ON
ON
25% 50%
75%
100%
OFF 60S
FADE
15min 30min 60min
STROBE
x1
x1
IP20 12-24
V DC
x1
11 x CR2025

Elektro Elco AB, Tallvägen 5, SE-564 35 Bankeryd, Sweden | www.ecolite.se | UM034 | 201804
ADVARS E L:
Af hensyn til din beskyttelse og sikkerhed skal du læse manualen omhyggeligt og forstå informationerne inden du forsøger
at samle, installere eller betjene dette produkt.
1. Sørg for, at strømforsyningen kun er DC 12V
2. Skil aldrig under nogen omstændigheder adskille eller reparere
3. Hvis lyskilden ikke bruges i længere tid, skal du afbryde strømforsyningen
4. Overbelast ikke dæmperboksen, da det kan forårsage elektrisk stød eller brand
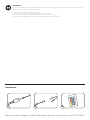
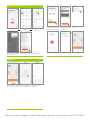
Installation:
OFF
R G B W
FLASH
FADE
STROBE
SMOOTH
ON
1
OFF
R G B W
FLASH
FADE
STROBE
SMOOTH
ON
2
OFF
R G B W
FLASH
FADE
STROBE
SMOOTH
ON
3

Elektro Elco AB, Tallvägen 5, SE-564 35 Bankeryd, Sweden | www.ecolite.se | UM034 | 201804
1. Make sure the power supply is DC 12V only;
2. Don't ever disassemble or repair under any circumstances;
3. When the lamp is not used for a long time, please disconnect the power supply;
4. Do not overload the circuit, otherwise it may cause electric shock or fire.
Warning
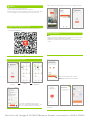
1
a. You can download the App by searching Tuya Smart in mobile app stores or
scanning the following QR code.
1. Download app and Register account
3
Click “+” at the
home page “Lighting” “Lighting Source
(BLE+Wi-Fi)”
EZ Mode(Easy-Connect Mode)
If you could see the rapid blinks from the connected
fixtures, click “Confirm the light is blinking rapidly” →“Next”;
If not, reset by turning O/On by 3 times till it appears.
2
Note:
a. Make sure the fixtures are blinking after power on, either fast or slow, if not, power
ON/OFF the Smart box by 3 times till you see the blink.
b. If EZ mode is not working, change to AP mode(some routers don't support EZ
mode).
2.Fixture Connection
b. Open the APP, click “Sign Up” and create your account according to the prompt.
Select Region
Mobile number/Email
4
Enter your WI-FI and password, click “Next”.
Note:
Only 2.4 GHz network are supported.
Click “Done” after the connecting process is completed, now the fixtures are added
successfully.

Elektro Elco AB, Tallvägen 5, SE-564 35 Bankeryd, Sweden | www.ecolite.se | UM034 | 201804
5
AP Mode (Access Point Mode)
If you see the rapid blinking instead of slow ones,reset to AP mode by turning
OFF/ON 3 times.
Click “AP Mode”→“Confirm the light is blinking slowly”→“Next” .
Click “+” at the
home page “Lighting” “Lighting Source
(BLE+Wi-Fi)”
3.Edit Timer
Click on the Clock icon after the fixtures are added successfully, then you can
add your schedule to decide when to turn ON/OFF of your fixtures.
7
6
Enter your WI-FI name and password, click “Next”, you'll see the hotspot named
“Smartlife-XXX” generated from the Smart box, click “Go to Connect” .
Note: Only 2.4 GHz network are supported.
Go back to TUYA app, click “Done” after the connection process is completed.
-
 1
1
-
 2
2
-
 3
3
-
 4
4