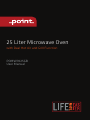
POINT 7-SERIES POMW7025GB MIKROBØLGEOVN Användarmanual
- Kategori
- Mikrovågor
- Typ
- Användarmanual

POMW7025GB
User Manual
25 Liter Microwave Oven
with Real Hot Air and Grill Function

2
GB
NO
FI
DK
SE
Thank you for purchasing your new
Point Microwave Oven.
These operating instructions will help you use it properly and safely. We recommend
that you spend some time reading this instruction manual in order that you fully
understand all the operational features it oers. Read all the safety instructions
carefully before use and keep this instruction manual for future reference.
Takk for at du kjøpte ditt nye Point Mikrobølgeovn.
Denne bruksanvisningen vil hjelpe deg med å bruke den på en trygg og riktig måte. Vi
anbefaler at du tar deg tid til å lese gjennom hele bruksanvisningen for å bli fortrolig
med alle funksjonene som tilbys. Les alle sikkerhetsanvisningene nøye før bruk, og
oppbevar bruksanvisningen for fremtidig referanse.
Kiitos, kun valitsit uuden Point-mikroaaltouunin.
Nämä käyttöohjeet opastavat sinua käyttämään laitetta oikein ja turvallisesti.
Suosittelemme, että käytät hetken tämän käyttöoppaan lukemiseen, jotta ymmärrät
täysin, mitä toimintoja laitteessa on. Lue kaikki turvallisuusohjeet huolellisesti ennen
laitteen käyttöä ja säilytä käyttöopas myöhempää käyttöä varten.
Tak for købet af dit nye Mikrobølgeovn fra Point.
Disse brugervejledninger hjælper dig med at bruge dette apparat rigtigt og sikkert. Vi
anbefaler, at du læser denne brugervejledning, så du får en fuld forståelse af hvordan
alle funktionerne virker. Læs sikkerhedsforskrifterne grundigt inden brug, og gem
denne brugervejledning til senere brug.
Tack för att du har köpt ditt nya Point Mikrovågsugn.
Denna bruksanvisning hjälper dig att använda den på ett säkert och korrekt sätt.
Vi rekommenderar att du tar dig tid att läsa igenom denna bruksanvisning för att till
fullo förstå alla driftfunktioner som den erbjuder. Läs noga igenom alla
säkerhetsinstruktioner före användning och spara bruksanvisningen för framtida bruk.

3
NO
DK
SE FI GB
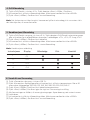
Instruction Manual – English ..........................page 4 - 23
Bruksanvisning – Norsk ...................................side 24 - 43
Käyttöopas - Suomi .........................................sivu 44 - 63
Brugervejledning – Dansk ................................side 64 - 83
Bruksanvisning – Svenska ...............................sida 84 - 103

Do not attempt to operate this microwave oven with the
door open since this can result in harmful exposure to
microwave radiation. It is important not to break or
tamper with the safety interlocks.
Do not place any object between the front face and the
door of the microwave oven, or allow any oil or food
residue to accumulate on sealing surfaces.
WARNING: If the door or door sealing is damaged, do not
operate the microwave oven until it has been repaired by
a competent person.
If the appliance is not maintained well in clean state, its
surface could be degraded and this will aect its life span
and even lead to a dangerous situation.
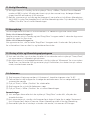
PRECAUTIONS TO AVOID POSSIBLE EXPOSURE TO
EXCESSIVE MICROWAVE RADIATION
a)
b)
c)
d)
4

5
IMPORTANT SAFETY INSTRUCTIONS WARNING
To reduce the risk of fire, electric shock, injury or the
exposure to excessive microwave oven radiation, follow basic
precautions when using your appliance:
Read and follow the specific "PRECAUTIONS TO AVOID
POSSIBLE EXPOSURE TO EXCESSIVE MICROWAVE
RADIATION".
This appliance can be used by children aged from 8 years
and above and persons with reduced physical, sensory or
mental capabilities or lack of experience and knowledge if
they have been given supervision or instruction
concerning use of the appliance in a safe way and
understand the hazards involved. Children shall not play
with the appliance.
Cleaning and user maintenance shall not be made by
children unless they are older than 8 and are supervised.
Children younger than 8 years of age shall be kept away
unless they are continuously supervised.
Keep the appliance and its supply cord out of reach of
children younger than 8 years old.
If the supply cord is damaged, it must be replaced by the
manufacturer, its service agent or similarly qualified
persons in order to avoid a hazard (For appliance with
type Y attachment).
WARNING: To avoid the possibility of electric shock,
ensure that the appliance is switched o before replacing
the lamp.
WARNING: The cover gives protection against exposure
to microwave radiation, so it is hazardous for anyone
other than a competent person to carry out any service or
repair operation that involves the removal of it.
1.
2.
3.
4.
5.
6.
GB

6
WARNING: Liquids and other foods must not be heated
in sealed containers since they are liable to explode.
When heating food in plastic or paper containers, keep an
eye on the microwave oven due to the possibility of
ignition.
Only use utensils that are suitable for microwave ovens
when operating.
If the microwave oven gives o smoke, switch o or
unplug the appliance and keep the door closed in order to
stifle any flames.
Microwave heating of beverages can result in subsequent
eruptive boiling, therefore care must be taken when
handling the container.
The contents of feeding bottles and baby food jars shall
be stirred or shaken, and the temperature shall be
checked before consumption, in order to avoid burns to
baby.
Eggs in their shell and whole hard-boiled eggs should not
be heated in microwave ovens, since they may explode,
even after microwave heating has ended.
The appliance should be cleaned regularly and any food
deposits should be removed.
Failure to maintain the appliance in a clean condition
could lead to deterioration of the surface, and this could
aect the life of the appliance and possibly result in a
hazardous situation.
The appliance must not be installed behind a decorative
door in order to avoid overheating. (This is not applicable
for appliances with decorative door.)
Only use the temperature probe recommended for this
appliance (for microwave provided with a facility to use a
temperature-sensing probe).
7.
8.
9.
10.
11.
12.
13.
14.
15.
16.
17.

7
The microwave oven shall not be placed in a cabinet
unless it has been tested safe to use in a cabinet.
This appliance is intended to be used in a household and
similar applications such as:
-sta kitchen areas in shops, oces and other working
environments;
-by clients in hotels, motels and other residential
environments;
-farm houses;
-simple environment in bed and breakfast kind.
The appliance is intended for heating food and
beverages. Drying of food or clothing, and heating of
warming pads, slippers, sponges, damp cloths and
similar may lead to risk of injury, ignition or fire.
Metallic containers for food and beverages are not
allowed during microwave cooking.
The appliance shall not be cleaned with a steam cleaner.
The appliance is intended to be used freestanding.
The rear surface of appliances shall be placed against a
wall.
The appliances are not intended to be operated by means
of an external timer or separate remote-control system.
The temperature of accessible surfaces may be high
when the appliance is operating.
WARNING: When the appliance is operated in the
combination mode, children should only use the
appliance under adult supervision.
18.
19.
20.
21.
22.
23.
24.
25.
26.
27.
READ CAREFULLY AND KEEP FOR FUTURE REFERENCE.
GB

8
TO REDUCE THE RISK OF INJURY TO PERSONS,
INSTALL GROUNDING.
DANGER
Electric Shock Hazard
Touching some of the internal components can cause
serious personal injury or death. Do not disassemble this
appliance.
WARNING
Electric Shock Hazard
Improper use of the grounding can result in electric shock.
Do not plug it into an outlet until the appliance is properly
installed and grounded.
This appliance must be grounded. In the event of an
electrical short circuit, grounding reduces the risk of electric
shock by providing an escape wire for the electric current.
This appliance is equipped with a power cord having a
grounding wire and grounding plug. The appliance must be
plugged into an outlet that is properly installed and
grounded.
Consult a qualified electrician or service man if the
grounding instructions are not completely understood or if
any doubt as to whether the appliance is properly grounded.
If has to use an extension cord, only use a 3-wire extension
cord.

9
A short power-The supply cord is provided to reduce the
risks resulting from becoming entangled in or tripping
over by a longer cord.
If a long cord set or extension cord is used:
1.
2.
The marked electrical rating of the cord set or
extension cord should be at least as powerful as the
electrical rating of the appliance.
The extension cord must be a grounding-type 3-wire
cord.
The long cord should be arranged so that it will not
drape over the counter top or table top where children
may trip over by the cord.
1)
2)
3)
CLEANING
Be sure to unplug the appliance from the power supply
before cleaning.
Clean the cavity of the appliance after use with a slightly
damp cloth.
Clean the accessories in soapy water.
The door frame and seal and neighbouring parts must be
cleaned carefully with a damp cloth when they are dirty.
Do not use harsh abrasive cleaners or sharp metal scrapers
to clean the appliance glass door since they can scratch
the surface, which may result in shattering of the glass.
Cleaning tips---For easier cleaning of the cavity walls that
are stained by the food during cooking: Place half a lemon
in a bowl, add 300ml (1/2 pint) water and heat on 100%
microwave power for 10 minutes. Wipe the oven clean
using a soft, dry cloth.
1.
2.
3.
4.
5.
GB

10
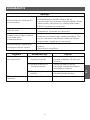
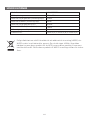
UTENSILS
CAUTION
Personal Injury Hazard
The cover gives protection against exposure to microwave
radiation, so it is hazardous for anyone other than a
competent person to carry out any service or repair operation
that involves the removal of it.
See the instructions on "Materials you can use or to be
avoided in microwave oven ." Some non-metallic utensils are
not safe to use for microwaving. If any doubt, you are
suggested to test following steps below.
UTENSIL TEST:
Fill a microwave-safe container with a cup of cold water
(250ml), and put the utensil in it.
Cook on maximum power for 1 minute.
Carefully feel the utensil. If the empty utensil is warm, do
not use it for microwave cooking.
Do not exceed 1 minute when testing.
1.
2.
3.
4.

11
GB
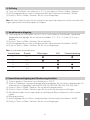
Materials you can use in a microwave oven
Utensils Remarks
Browning dish Follow the manufacturer's instructions. The bottom of the browning dish must
be at least 3/16 inch (5mm) above the turntable.
Incorrect usage may cause the turntable to break.
Dinnerware Microwave-safe only. Follow manufacturer's instructions. Do not use cracked or
chipped dishes.
Glass jars Always remove lid. Use only to heat food until just warm. Most glass jars are
not heat resistant and may break.
Glassware Heat-resistant microwave oven glassware only. Make sure there is no meatallic
trim. Do not use cracked or chipped dishes.
Microwave oven
cooking bags Follow manufacturer's instructions. Do not close with metal tie. Make slits to
allow steam to escape.
Paper plates and cups Use for short-term cooking/warming only. Do not leave the microwave oven
unattended while cooking.
Paper towels Use to cover food for reheating and absorbing fat. Use with supervision for
short-term cooking only.
Parchment paper Use as a cover to prevent splattering or a wrap for steaming.
Plastic Microwave-safe only. Follow the manufacturer’s instructions. Should
be labeled "Microwave Safe". Some plastic containers soften when they get
hot. "Boiling bags" and tightly closed plastic bags should be slit, pierced or
vented as directed b.y package.
Plastic wrap Microwave-safe only. Use to cover food during cooking to retain
moisture. Do not allow plastic wrap to touch food.
Thermometers Microwave-safe only (meat and candy thermometers).
Materials to be avoided in a microwave oven
Utensils Remarks
Aluminum tray May cause deforming. Transfer food into a microwave-safe dish.
Food carton with metal
handle May cause deforming. Transfer food into a microwave-safe dish.
Metal or metaltrimmed
utensils Metal shields the food from microwave radiation. Metal trim may cause
deforming.
Metal twist ties May cause deforming and a re in the cabinet.
Paper bags May cause a fire in the microwave oven.
Plastic foam Plastic foam may melt or contaminate the liquid inside when
exposed to high temperature.
Wood Wood will dry out when used in the microwave oven and may split or crack.
Wax paper Use as a cover to prevent splattering and retain moisture.

12
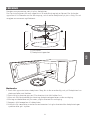
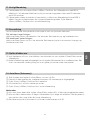
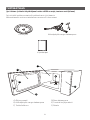
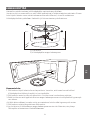
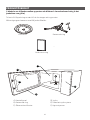
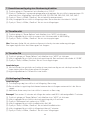
PRODUCT OVERVIEW
(In case of any dierences between the appliance and the pictures in this manual, the
product will prevail.)
Remove all package materials from the carton and the appliance.
Your microwave oven comes with following accessories:
Instruction Manual
Glass Tray Turntable Ring Assembly
A
C
F
B
D
E
A) Control panel
B) Turntable Ring Assembly
C) Observation window
D) Door assembly
E) Safety interlock system
F) The cavity

13
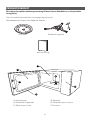
BEFORE USE
2
1
1) Glass Tray
2) Turntable Ring Assembly
Cleaning the cooking compartment and putting the turntable in place.
For new installations, make sure all packaging and shipping tape has been removed. Before
using the appliance to prepare food for the first time, you will need to put the turntable in
place correctly. You must clean the cooking compartment and accessories.
Never use the appliance without the turntable. Make sure that it is properly engaged. The
turntable can turn clockwise or anti-clockwise.
Never place the glass tray upside down. The glass tray should never be restricted.
Both glass tray and turntable ring assembly must always be used during cooking.
All food and containers of food have to be placed on the glass tray for cooking.
Never restrict the movement of the turntable.
If glass tray or turntable ring assembly cracks or breaks, contact your nearest authorized
service center.
Notes
1.
2.
3.
4.
5.
6.
GB

14
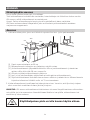
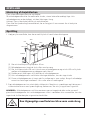
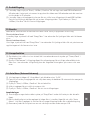
INSTALLATION
Turntable Installation
Remove all packing material and accessories.
Examine the microwave oven for any damage such as dents or a broken door. Do not install if
the microwave oven is damaged.
Cabinet: Remove any protective film found on the microwave oven cabinet surface.
Do not remove the light brown Mica cover that is attached to the microwave oven cavity to
protect the magnetron.
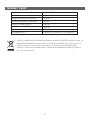
Select a level surface that provides enough open space for the intake and / or outlet vents.
1.
20cm
30cm
20cm
min85cm
0cm
The minimum installation height is 85cm.
The rear surface of the microwave oven shuld be placed against a wall.
Leave a minimum clearance of 30cm above the microwave oven, and a minimum
clearance of 20cm between the microwave oven and any adjacent walls.
Do not remove the legs from the bottom of the microwave oven.
Blocking the intake and/ or outlet openings can damage the microwave oven.
Place the microwave oven as far away from radios and TVs as possible. Operation of a
microwave oven may cause interference to your radio or TV reception.
(1)
(2)
(3)
(4)
(5)
(6)
Plug your microwave oven into a standard household outlet. Be sure the voltage and the
frequency are the same as the voltage and the frequency on the rating label.
2.
WARNING: Do not install the microwave oven over a cooktop or other heat- producing
microwave oven. If installed near or over a heat source, the microwave oven could be damaged
and the warranty will be void.
The accessible surface may be hot during
operation.
Installation

15
GB
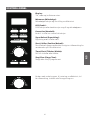
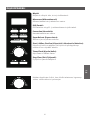
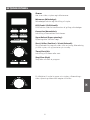
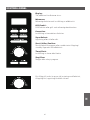
CONTROL PANEL
Display:
Time, power and indicators are displayed.
Microwave:
Microwave function and power level setting.
Grill/Combi.:
Grill function or grill and microwave combination.
Convection:
Convection function setting.
Super Defrost:
Defrost by time or weight.
Start/+30Sec./Confirm:
Start/confirm program, or quick start cooking in standby
mode at full power level.
Timer/Clock:
Timer or clock setting.
Stop/Clear:
Stop or cancel program.
An addition to other keys when adjusting power level,
cooking time, defrosting time or weight, etc.

16
OPERATION
1. Setting the Clock
(1) Press “Timer/Clock” twice and then “00:00” will display.
(2) Turn the knob to set the hour, it should be within 0-23.
(3) Press “Timer/Clock” to confirm.
(4) Turn the knob to set the minute, it should be within 0-59.
(5) Press “Timer/Clock” to confirm. The clock is set.
Notes:
(1) The clock is a 24-hour diaplay. If the clock is not set, it would not work when powered.
(2) To reset the clock, please repeat step 1 to step 5.
(3) After step 4, if the “Timer/Clock” is not pressed and there is no operation within 5 minutes,
the setting is invalid.
2. Setting the Kitchen Timer
(1) Press “Timer/Clock” once and then “00:00” will display.
(2) Turn the knob to set the desired time. The maximum time value is “95:00”.
(3) Press “Start/+30Sec./Confirm” to confirm. The timer starts counting down.
Note: No programs can be set during kitchen timer.
3. Microwave Cooking
Power levels
Power Level
Display
100%
P100
80%
P80
50%
P50
30%
P30
10%
P10
(1) Press “Microwave” and then “P100” will display.
(2) Press “Microwave” repeatedly or turn the knob to set the power level. The 5 power levels
are available.
(3) Press “Start/+30Sec./Confirm” to confirm the power level.
(4) Turn the knob to adjust the cooking time. The maximum time value is “95:00”.
(5) Press “Start/+30Sec./Confirm” to start cooking.
Note: Opening the oven door or pressing “Stop/Clear” during operation will interrupt the
current mode.

17
GB
4. Grill Cooking
5. Combination Cooking
(1) Press “Grill/Combi.” and then “G-1” will display, then press "Start/+30Sec./Confirm".
(2) Turn the knob to set the cooking time. The maximum time value is “95:00”.
(3) Press “Start/+30Sec./Confirm” to start cooking.
Note: When half of the time has passed, the buzzer will sound to remind you to turn the food
over. If no operation, the oven will continue working.
(1) Press “Grill/Combi.” once and then “G-1” will display. And then press “Grill/Combi.”
repeatedly or turn the knob to choose the power you want, “C-1”, “C-2”, “C-3” and “C-4” will
display in order.
(2) Press “Start/+30Sec./Confirm” to confirm.
(3) Turn the knob to set cooking time. The maximum time value is “95:00”.
(4) Press “Start/+30Sec./Confirm” to start cooking.
Instructions
1
2
3
4
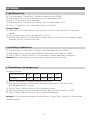
Display Microwave Grill Convection
C-1
C-2
C-3
C-4
6. Convection Cooking with Preheat Function
(1) Press “Convection” once and then “150” will display.
(2) Press “Convection” repeatedly or turn the knob to set temperature. 10 options are available,
including 150, 160, 170, 180, 190, 200, 210, 220, 230, 240.
(3) Press “Start/+30Sec./Confirm” to confirm the temperature.
(4) Press “Start/+30Sec./Confirm” again to enter preheating setting.
(5) When preheating is completed, the oven will beep twice. Open the door and place food in
the oven.
(6) Close the oven door.
(7) Turn the knob to set the cooking time. The maximum time value is “95:00”.
(8) Press “Start/+30Sec./Confirm” to start cooking.

18
7. Convection Cooking without Preheat Function
8. Defrost by Weight
(1) Press “Super Defrost” once and then the screen will display “dEF1”.
(2) Turn the knob to set the weight of food. The range of the weight is 100-2000g.
(3) Press “Start/+30Sec./Confirm” to start defrosting.
Note: The buzzer will sound to remind you to turn the food over during defrosting.
If no operation, the oven will continue working.
9. Defrost by Time
(1) Press “Super Defrost” twice and then the screen will display “dEF2”.
(2) Turn the knob to set the desired defrost time. The maximum time value is “95:00”.
(3) Press “Start/+30Sec./Confirm” to start defrosting.
Notes:
(1) When half of the time has passed, the buzzer will sound to remind you to turn the food over.
If no operation, the oven will continue working.
(2) The defrost power is P30 and it cannot be changed.
(1) Press “Convection” once and then “150” will display.
(2) Press “Convection” repeatedly or turn the knob to set temperature. 10 options are available,
including 150, 160, 170, 180, 190, 200, 210, 220, 230, 240.
(3) Press “Start/+30Sec./Confirm” to confirm the temperature.
(4) Turn the knob to set the cooking time. The maximum time value is “95:00”.
(5) Press “Start/+30Sec./Confirm” to start cooking.
10. Multi-Stage Cooking
Notes:
(1) Two cooking stages can be set in multi-stage cooking.
(2) If you set defrost function, it will work automatically in the first stage.
(3) Kitchen Timer, Auto menu cannot be set as one of the multi-stage.
Example: Defrost food for 5 minutes and then cook with 80% microwave power for 7 minutes.
(1) Press “Super Defrost” twice and then the screen will display “dEF2”.
(2) Turn the knob to set the desired defrost time of 5 minutes.
(3) Press “Microwave” and then “P100” will display.
(4) Turn the knob to set the power level of P80.
(5) Press “Start/+30Sec./Confirm” to confirm the power level.
(6) Turn the knob to set the cooking time of 7 minutes.
(7) Press “Start/+30Sec./Confirm” to start cooking.

19
GB
11. Speedy Cooking
In standby mode, press “Start/+30Sec./Confirm” to cook food with 100% power level for 30
seconds. Each press on the same key can increase 30 seconds and the maximum time value
is 95 minutes.
In standby mode, turn the knob left to set a cooking time with 100% power.
Continue to turn the knob to adjust the cooking time. Then press “Start/+30Sec./Confirm”
to start cooking.
(1)
(2)
You can use this function to prevent children from accidentally turning the appliance on.
To activate the lock:
In standby mode, press and hold “Stop/Clear” for three seconds. A beep sounds and the locked
icon will display.
To deactivate the lock:
In locked state, press and hold “Stop/Clear” for three secondsa beep will sound to remind
dis-lock and the lock icon will not display.
(1) Turn the knob right to “Auto Menu” and then “A-01” will display.
(2) Continue to turn the knob to choose the menu you need. 10 auto menus are available.
(3) Press “Start/+30Sec./Confirm” to confirm.
(4) Turn the knob to set the weight of food.
(5) Press “Start/+30Sec./Confirm” to start cooking.
Notes:
(1) Opening the oven door or pressing “Stop/Clear” during operation will interrupt the current
mode.
(2) It is necessary to turn the knob right first in the standby mode for selecting “Auto Menu”.
Turning the knob left first will enter the cooking time of speed cooking.
(3) The buzzer will sound to remind of turning over the food during the menu of A-10.
12. Lock Function for Children
13. Inquiring Function
If the clock has been set, the current time will display for three seconds by pressing
“Timer/Clock” in the cooking state.
In the microwave cooking state, press “Microwave” to inquire the power level.
It will display for three seconds. In the griling state, the inquiring way can be done by the
same way as above.
(1)
(2)
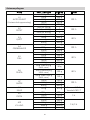
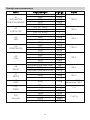
14. Auto menu

20
Auto menu chart
Menu Weight / Quantity
Display Power
A1
AUTO REHEAT 100%
250g 250g
350g 350g
450g 450g
600g 600g
A2
POTATO
1
100%
2
3
A3
MEAT
300g 300g
600g
600g
A4
VEGETABLE 100%
500g
500g
A5
FISH 80%
A6
PASTA
50g(with 450g cold water ) 50g
80%
1
0
0g
(
with
800g cold )
100g
150g(with 1200g
cold water )
150g
A7
SOUP
200 200g
100%
400 400g
A8
CAKE
475g 475g
preheat 160
Convection 160
A9
PIZZA
C -4
A10
CHICKEN
C -4/C-4
water
g
g
1pc(about 230g)
2pcs(about 450g)
3pcs(about 650g)
80%
100g
200g
300g
100g
200g
300g
1200g
1000g
750g
500g
750g
1000g
1200g
500g
600g600g
650g 650g
450g 450g
350g 350g
250g 250g
150g 150g
150g 150g
350g 350g
450g 450g
150g 150g
150g 150g
Sidan laddas...
Sidan laddas...
Sidan laddas...
Sidan laddas...
Sidan laddas...
Sidan laddas...
Sidan laddas...
Sidan laddas...
Sidan laddas...
Sidan laddas...
Sidan laddas...
Sidan laddas...
Sidan laddas...
Sidan laddas...
Sidan laddas...
Sidan laddas...
Sidan laddas...
Sidan laddas...
Sidan laddas...
Sidan laddas...
Sidan laddas...
Sidan laddas...
Sidan laddas...
Sidan laddas...
Sidan laddas...
Sidan laddas...
Sidan laddas...
Sidan laddas...
Sidan laddas...
Sidan laddas...
Sidan laddas...
Sidan laddas...
Sidan laddas...
Sidan laddas...
Sidan laddas...
Sidan laddas...
Sidan laddas...
Sidan laddas...
Sidan laddas...
Sidan laddas...
Sidan laddas...
Sidan laddas...
Sidan laddas...
Sidan laddas...
Sidan laddas...
Sidan laddas...
Sidan laddas...
Sidan laddas...
Sidan laddas...
Sidan laddas...
Sidan laddas...
Sidan laddas...
Sidan laddas...
Sidan laddas...
Sidan laddas...
Sidan laddas...
Sidan laddas...
Sidan laddas...
Sidan laddas...
Sidan laddas...
Sidan laddas...
Sidan laddas...
Sidan laddas...
Sidan laddas...
Sidan laddas...
Sidan laddas...
Sidan laddas...
Sidan laddas...
Sidan laddas...
Sidan laddas...
Sidan laddas...
Sidan laddas...
Sidan laddas...
Sidan laddas...
Sidan laddas...
Sidan laddas...
Sidan laddas...
Sidan laddas...
Sidan laddas...
Sidan laddas...
Sidan laddas...
Sidan laddas...
Sidan laddas...
Sidan laddas...
-
 1
1
-
 2
2
-
 3
3
-
 4
4
-
 5
5
-
 6
6
-
 7
7
-
 8
8
-
 9
9
-
 10
10
-
 11
11
-
 12
12
-
 13
13
-
 14
14
-
 15
15
-
 16
16
-
 17
17
-
 18
18
-
 19
19
-
 20
20
-
 21
21
-
 22
22
-
 23
23
-
 24
24
-
 25
25
-
 26
26
-
 27
27
-
 28
28
-
 29
29
-
 30
30
-
 31
31
-
 32
32
-
 33
33
-
 34
34
-
 35
35
-
 36
36
-
 37
37
-
 38
38
-
 39
39
-
 40
40
-
 41
41
-
 42
42
-
 43
43
-
 44
44
-
 45
45
-
 46
46
-
 47
47
-
 48
48
-
 49
49
-
 50
50
-
 51
51
-
 52
52
-
 53
53
-
 54
54
-
 55
55
-
 56
56
-
 57
57
-
 58
58
-
 59
59
-
 60
60
-
 61
61
-
 62
62
-
 63
63
-
 64
64
-
 65
65
-
 66
66
-
 67
67
-
 68
68
-
 69
69
-
 70
70
-
 71
71
-
 72
72
-
 73
73
-
 74
74
-
 75
75
-
 76
76
-
 77
77
-
 78
78
-
 79
79
-
 80
80
-
 81
81
-
 82
82
-
 83
83
-
 84
84
-
 85
85
-
 86
86
-
 87
87
-
 88
88
-
 89
89
-
 90
90
-
 91
91
-
 92
92
-
 93
93
-
 94
94
-
 95
95
-
 96
96
-
 97
97
-
 98
98
-
 99
99
-
 100
100
-
 101
101
-
 102
102
-
 103
103
-
 104
104


POINT 7-SERIES POMW7025GB MIKROBØLGEOVN Användarmanual
- Kategori
- Mikrovågor
- Typ
- Användarmanual
på andra språk
Relaterade papper


Andra dokument
-
 SENZ SMM820BIB17 MIKROBØLGEOVN Bruksanvisning
-
 Kulz KMW6020GB MIKROBØLGEOVN Bruksanvisning
-
Sandstrom S25CSS11E Användarmanual
-
 SENZ SEMW2020W MIKROBØLGEOVN Bruksanvisning
-
 Chef Matteo COOKANDFRY MIKROBØLGEOVN Användarmanual
-
Grundig GMI 11311 X MIKROBØLGEOVN Bruksanvisning
-
-
Logik L17MSB13E Användarmanual
-
-
Sharp R92STW Bruksanvisning


